In this blog post, I will show you how to setup Citrix user profiles using FSLogix. You can also setup Citrix user profiles by using Citrix User profile manager (UPM). Refer to the Step-by-step guide Setup Citrix User Profiles using Citrix UPM for more details.
To minimize network load and enhance the user logon performance, consider redirecting user profile folders, such as Documents, Downloads, Desktop, Pictures to a network share or to OneDrive. For guidance on configuring folder redirection for Citrix user profiles, refer to the post: Set Up Folder Redirection in Citrix.
Contents
1. Create FSLogix Profile Container
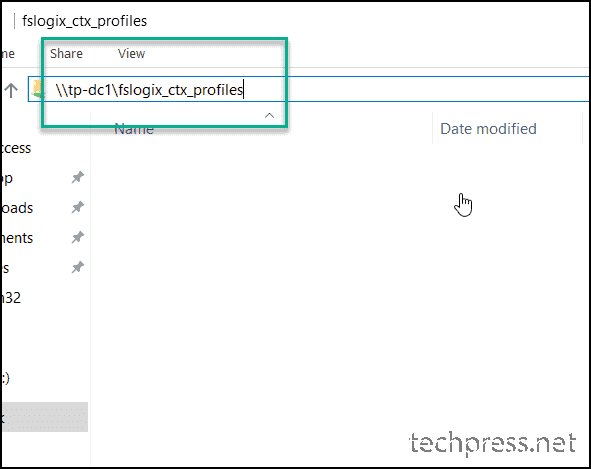
Start by creating an FSLogix Profile Container or a shared folder (e.g., fslogix_ctx_profiles) on a file server where FSLogix user profiles will be stored. FSLogix user profiles are stored in a file with a .vhd or .vhdx file extension.
I have provided step-by-step instructions on configuring Share and NTFS permissions while configuring folder redirection in Citrix. The permissions need to be setup exactly the same way. Refer to the guide Set Up Folder Redirection in Citrix#Step1 for setting up folder permissions and at the end Copy the UNC path which will be required while configuring the Group policy.
2. Download and Install FSLogix Agent on Citrix VDA
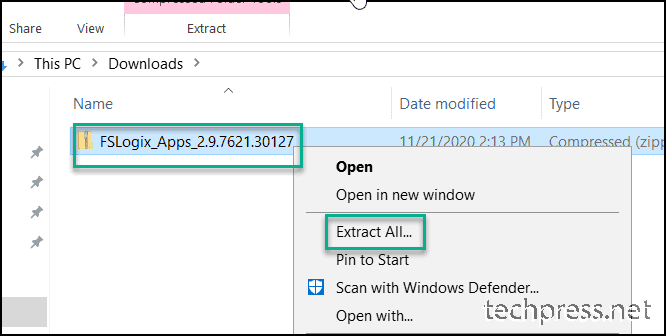
- Download the FSLogix Agent from https://aka.ms/fslogix_download link and install this agent on each Citrix VDA server. After downloading the agent, extract its contents to a folder.
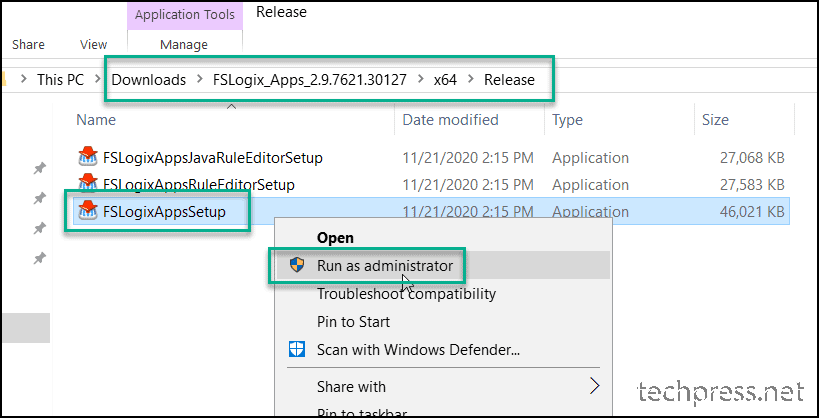
- Right-click on FSLogixAppsSetup and select Run as administrator. The installation of FSLogix is straightforward; follow the wizard to install the agent on the Citrix VDA/Session Host server.
3. Configure FSLogix User Profile Settings
The best way is to use a Group policy to configure FSLogix User Profile settings and assign the GPO to Citrix VDA servers. Alternatively, you can use registry editor and create the registry keys to configure FSLogix User profile settings on Citrix VDA servers.
You will need to import FSLogix ADMX template files on the domain controller first. Locate .admx and .adml files in the downloaded FSLogix agent setup folder and import it on a domain controller and use it to configure user profile settings via a GPO.
In the next part of the blog post, I have used registry editor on one of the Citrix VDA server to configure FSLogix user profile settings. I will explain about the relevant settings, and then you can use a GPO to configure those settings.
Create below Registry entries under the registry path: HKLM\SOFTWARE\FSLogix\Profiles (create the Profiles registry key if it does not exist).
Required Registry Keys to Enable FSLogix
- VHDLocations and Enabled Registry Entries are the minimum required settings for FSLogix to work.
- VHDLocations: Provide the shared folder path where FSLogix user profiles will be stored (MULTI_SZ is used if you have more than one path to for High Availability).
- Enabled: Setting this to 1 will enable FSLogix Profile Containers.
| Registry Entry | Type | Value |
|---|---|---|
| VHDLocations | MULTI_SZ or REG_SZ | \\tp-dc1\fslogix_ctx_profiles |
| Enabled | DWORD | 1 |
Additional Registry entries to Optimize FSLogix:
- Create a registry entry VolumeType (REG_SZ) and set its value to vhdx. This ensures that the profile containers are created with .vhdx file extension. VHDX disks are more optimized than VHD. For more information on VHDX files, you can refer to the link: VHDX Overview.
- Create a registry entry named DeleteLocalProfileWhenVHDShouldApply with a REG_DWORD type and set its value to 1. This configuration will permanently delete the local profile on the Citrix VDA server, if it exists for the user, allowing the use of the FSLogix profile.
- Create a registry entry named SizeInMBs with a REG_DWORD type and set its value to a number accepted as MBs. The default value is, 30000 (30 GB), representing the maximum allowed size of the user profile.
- You can modify this value to increase the storage capacity of the user profile. For example, to update the user profile maximum size limit to 50 GB, set this value to 50000 (50 GB). It’s important to note that exceeding this limit may result in issues or errors during user logon.
- Create a registry entry named IsDynamic with a REG_DWORD type and set its value to 1. This configuration ensures that the VHDX file is not allocated with space set in SizeinMBs all at once. If IsDynamic is set to 1, the FSLogix user profile will use the minimum space required on the disk and can grow up to the value set in SizeinMBs.
- Create a registry entry named FlipFlopProfileDirectoryName with a REG_DWORD type and set its value to 1. When set to 1, the SID folder is created as %username%%sid% instead of the default %sid%%username%. This setting has the same effect as setting SIDDirNamePattern = “%username%%sid%” and SIDDirNameMatch = “%username%%sid%”.
| Registry Entry | Type | Value |
|---|---|---|
| VolumeType | REG_SZ | vhdx |
| DeleteLocalProfileWhenVHDShouldApply | REG_DWORD | 1 |
| SizeInMBs | REG_DWORD | 30000 (30GB) |
| IsDynamic | REG_DWORD | 1 |
| FlipFlopProfileDirectoryName | REG_DWORD | 1 |
To expedite the creation of the registry keys, you can copy the following registry entries, paste them into a notepad, and save the file with a .reg extension. After saving the file, double-click on it to import these registry entries.
| FSLogix_Reg_Keys_File.reg |
|---|
| Windows Registry Editor Version 5.00 [HKEY_LOCAL_MACHINE\SOFTWARE\FSLogix\Profiles] “VHDLocations”=”\\\\tp-dc1\\fslogix_ctx_profiles” “VolumeType”=”vhdx” “Enabled”=dword:00000001 “DeleteLocalProfileWhenVHDShouldApply”=dword:00000001 “SizeInMBs”=dword:00030000 “IsDynamic”=dword:00000001 “FlipFlopProfileDirectoryName”=dword:00000001 |

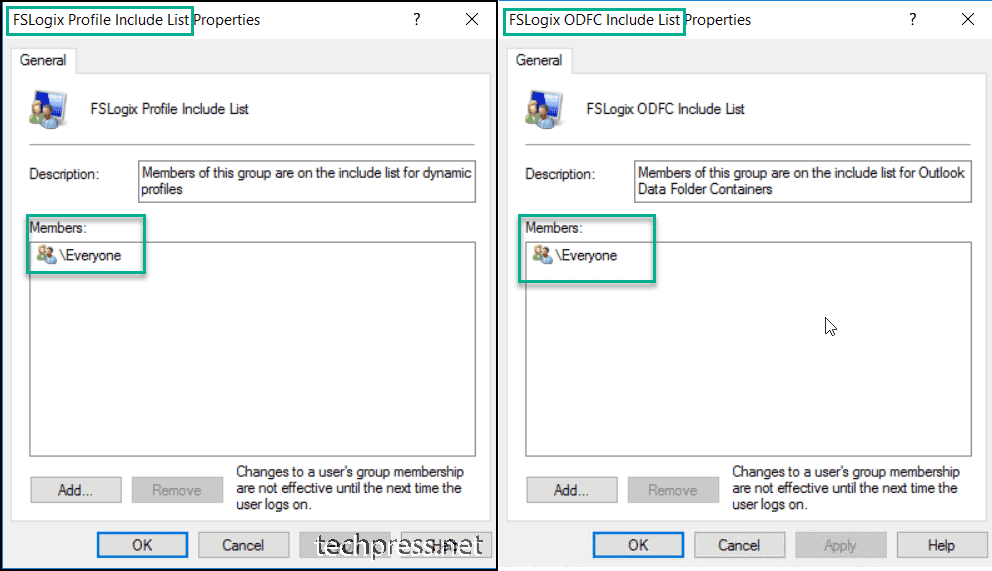
Exclude Users from FSLogix Profile
By default, when you install FSLogix Agent on the Citrix VDA server, 4 local groups are automatically created. To locate these groups, follow these steps:
- Click on Start > Run > Type
compmgmt.msc> System Tools > Local Users and Computers > Groups.
By default, Everyone is added to the FSLogix Profile Include List and FSLogix ODFC Include List. You can add users or AD Security groups to the FSLogix Profile Exclude List and FSLogix ODFC Exclude List to exclude users from FSLogix and prevent FSLogix settings from being applied.
If you want to manage the Office container separately, then add the users to the FSLogix ODFC Exclude group only, as Office containers store Microsoft Office-specific settings.
The following screenshot displays the FSLogix groups created on the Citrix VDA server.

Verify If FSLogix is Working
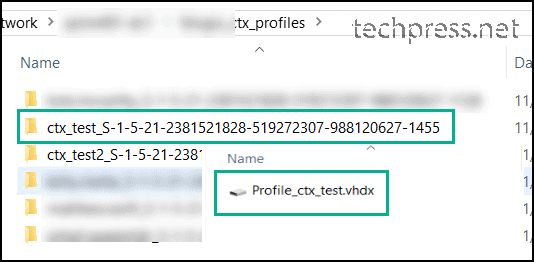
Now, the configuration of FSLogix user profiles is complete. Once the user logs on to Citrix, their profile folder will be created under the fslogix_ctx_profiles folder. You can open the folder and find the user’s profile with a .vhdx extension file, which represents the FSLogix user profile.
if we setup this do we still need to setup ODFC container? my Outlook keep ask to login MFA each time server get rebooted.