In this post, I will demonstrate the steps to setup Citrix user profiles using Citrix UPM. If you are using FSLogix, you can configure user profiles by referring to the post: Set Up Citrix User Profiles using FSLogix.
To minimize network load and enhance the user logon performance, consider redirecting user profile folders, such as Documents, Downloads, Desktop, Pictures to a network share or to OneDrive. For guidance on configuring folder redirection for Citrix user profiles, refer to the post: Set Up Folder Redirection in Citrix.
Contents
1. Import Citrix ADMX Templates
First step is to Import Citrix ADMX template files on the domain controller. ADMX template files contain the settings for enabling Citrix UPM.
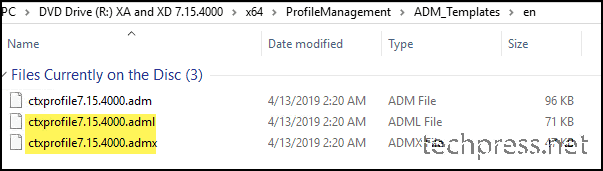
- Open the Citrix Installation ISO and navigate to the following location: \x64\ProfileManagement\ADM_Templates\en.
- Depending on the Citrix version, you will find a different name of the admx and adml files. As I am using Citrix 7.15.4, the template files are named ctxprofile7.15.4000.admx and ctxprofile7.15.4000.adml.
- Copy and Paste the ADMX file into C:\Windows\PolicyDefinitions\ and the ADML file into C:\Windows\PolicyDefinitions\en-US.
If you are using a Central Store for Group Policies, paste these files into the appropriate store location. For details on the location of the Central Store, please refer to the link: Central GPO Store PolicyDefinitions folder.
Note
2. Ensure Citrix Profile Management Service is Running
Ensure that Citrix Profile management service is in running state on all Citrix VDA/Session host servers.

3. Create a Network Share on File Server (User Store)
Create a network share on the file server which will hold user profiles (e.g., ctx_upm_profiles) and configure Share and NTFS permissions.
I have provided step-by-step instructions on configuring Share and NTFS permissions while configuring folder redirection in Citrix. The permissions need to be setup exactly the same way. Refer to the guide Set Up Folder Redirection in Citrix#Step1 for setting up folder permissions and at the end copy the UNC path which will be required while configuring the Group policy.
4. Enable and Configure Citrix UPM Using Group Policy
- Log in to the Domain Controller and open Group Policy Management Console (gpmc.msc).
- Create a new Group Policy or use an existing one. I have created a group policy for folder redirection in Citrix, I will be using the same group policy (Citrix – Folder Redirection) to configure Citrix user profiles.
- Go to Computer Configuration > Policies > Administrative Templates > Profile Management.
- Some settings are required to enable Citrix Profile Management, such as Enable Profile Management and Path to User Store. Other settings can be configured as a best practice. Below table shows all the relevant settings which I have configured.
| Profile Setting | Path of the Setting | Value |
|---|---|---|
| Enable Profile Management | …\Profile Management\ | Enabled |
| Path to User Store | …\Profile Management\ | \\<server>\ctx_upm_profiles\#SAMAccountName# |
| Customer Experience Improvement Program | …\Profile Management\ | Disabled |
| Process logons of local administrators | …\Profile Management\ | Disabled (It helps when troubleshooting because, if Profile Management is misconfigured and prevents user logons, you are still able to log on as an administrator.) |
| Enable Logging | …Profile Management\Log Settings | Enabled |
| Maximum size of Log File | …Profile Management\Log Settings | Enabled Maximum Size in bytes: 10485760 (10 MB) |
| Path to Log File | …Profile Management\Log Settings | C:\ctx_upm_logs |
| Local Profile Conflict Handling | …Profile Management\Profile Handling | Enabled if both a local Windows user profile and a Citrix user profile in the user store both exist: Delete Local Profile or Rename Local profile according to your preference. |
| Migration of Existing Profiles | …Profile Management\Profile Handling | Enabled Types of user profiles to be migrated if the user store is empty: Roaming and Local |
| Delete locally cached profiles on logoff | …Profile Management\Profile Handling | Enabled |
| Profile streaming | …Profile Management\Streamed User Profiles | Enabled |
| Profile Streaming Exclusion list | …Profile Management\Streamed User Profiles | Enabled List of directories to exclude from profile Streaming: List1 |
| Exclusion list- Files | …Profile Management\File system | Enabled List of files to Exclude: !ctx_localappdata!\Microsoft\Windows\UsrClass.dat* |
| Directories to synchronize | …Profile Management\File system\Synchronization | Enabled List of directories to synchronize: AppData\Local\Microsoft\Credentials Appdata\Roaming\Microsoft\Credentials Appdata\Roaming\Microsoft\Crypto Appdata\Roaming\Microsoft\Protect Appdata\Roaming\Microsoft\SystemCertificates |
| Files to Synchronize | …Profile Management\File system\Synchronization | Enabled List 2 (Files to Synchronize) |
| List1 (List of directories to exclude from profile Streaming) |
|---|
| Exclusion list-directories [These are part of Default Exclusions from UPM 5.3 onwards] !ctx_internetcache! AppData\Local\Google\Chrome\User Data\Default\Cache AppData\Local\Google\Chrome\User Data\Default\Cached Theme Images AppData\Local\Google\Chrome\User Data\Default\JumpListIcons AppData\Local\Google\Chrome\User Data\Default\JumpListIconsOld AppData\Local\GroupPolicy AppData\Local\Microsoft\AppV AppData\Local\Microsoft\Messenger AppData\Local\Microsoft\Office\15.0\Lync\Tracing AppData\Local\Microsoft\OneNote AppData\Local\Microsoft\Terminal Server Client AppData\Local\Microsoft\UEV AppData\Local\Microsoft\Windows Live AppData\Local\Microsoft\Windows Live Contacts AppData\Local\Microsoft\Windows\Application Shortcuts AppData\Local\Microsoft\Windows\Burn AppData\Local\Microsoft\Windows\CD Burning AppData\Local\Microsoft\Windows\Notifications AppData\Local\Packages AppData\Local\Sun AppData\Local\Windows Live !ctx_localsettings!\Temp AppData\Roaming\Microsoft\AppV\Client\Catalog AppData\Roaming\Sun\Java\Deployment\cache AppData\Roaming\Sun\Java\Deployment\log AppData\Roaming\Sun\Java\Deployment\tmp $Recycle.Bin AppData\LocalLow Tracing new path for Temporary Internet Files in Windows 8 and later AppData\Local\Microsoft\Windows\INetCache If running Office 365 with Shared Computer Activation, then exclude !ctx_localappdata!\Microsoft\Office\15.0\Licensing !ctx_localappdata!\Microsoft\Office\16.0\Licensing |
| List 2 (Files to Synchronize) |
|---|
| AppData\LocalLow\Sun\Java\Deployment\security\exception.sites AppData\LocalLow\Sun\Java\Deployment\security\trusted.certs AppData\LocalLow\Sun\Java\Deployment\deployment.properties AppData\Local\Google\Chrome\User Data\First Run AppData\Local\Google\Chrome\User Data\Local State AppData\Local\Google\Chrome\User Data\Default\Bookmarks AppData\Local\Google\Chrome\User Data\Default\Favicons AppData\Local\Google\Chrome\User Data\Default\History AppData\Local\Google\Chrome\User Data\Default\Preferences |
Applying the GPO on Citrix VDA servers will create corresponding registry entries in the following registry path on each Citrix VDA Server.
HKEY_LOCAL_MACHINE\SOFTWARE\Policies\Citrix\UserProfileManager\
Registry Location
Ensure that the registry entries and values match the configurations set in the GPO. If the registry entries are not visible, it may be an indication that the GPO is not being applied or is not configured correctly.
5. Verify Citrix User Profile Folder
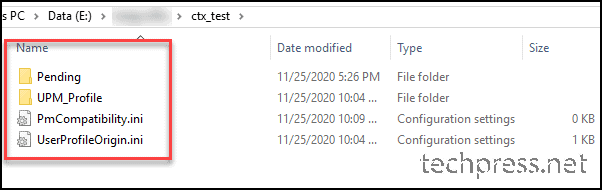
When a user logs on to Citrix, a Citrix UPM profile folder is created using the user’s SAMAccountName at the user store location specified in the Group Policy (GPO). The screenshot below shows an example of a Citrix user profile for a specific user.
References
- User Profile Best Practices for XenApp: https://support.citrix.com/article/CTX120285