Setting up a Kubernetes home lab is one of the best ways to learn container orchestration, cluster administration, and modern cloud-native infrastructure in a hands-on environment. In this step-by-step guide, I will show you how to build a Kubernetes home lab on Ubuntu Server using Ubuntu 24.04 LTS (Noble Numbat) installed from scratch on VMware Workstation.
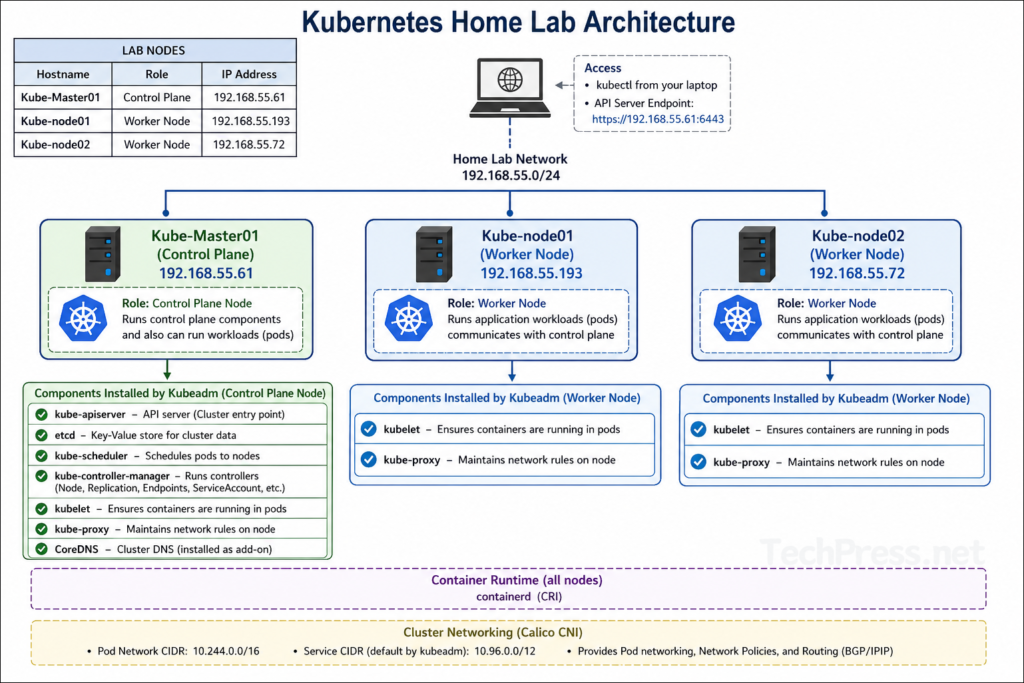
The lab will include one control-plane node and multiple worker nodes, created using kubeadm for cluster bootstrapping, containerd as the container runtime, and Calico as the Container Network Interface (CNI) to provide pod networking and network policy support. The diagram below shows the Kubernetes home lab architecture that I will be provisioning.
If you prefer to use different add-on components for your Kubernetes cluster, you can install those instead. For example, if you want to use Flannel or Canal as your CNI plugin, skip the steps to install Calico CNI in this post. Follow the installation guidance on the Kubernetes.io website for the CNI plugin you will be installing.
Let’s get started!!
Contents
Step 1: Download Ubuntu 24.04 (Noble Numbat)
The first step is to download Ubuntu 24.04 LTS (Noble Numbat) from here: Ubuntu 24.04.4 (Noble Numbat). I will be downloading the server installation image rather than the desktop image, as I do not require a GUI. This also reduces the need for additional RAM and CPU resources compared to a GUI-based Ubuntu Server installation.
You can also choose Ubuntu 26.04 LTS, which is currently the latest version. However, I did not have much success with this version in my lab and encountered the errors below while initializing the cluster using kubeadm. In contrast, I was able to successfully initialize the cluster using kubeadm on Ubuntu 24.04.
The following packages have unmet dependencies:
kubeadm : Depends: cri-tools (>= 1.30.0) but it is not installable
kubelet : Depends: kubernetes-cni (>= 1.2.0) but it is not going to be installed
E: Unable to satisfy dependencies. Reached two conflicting assignments:
1. kubeadm:amd64=1.36.0-1.1 is selected for install
2. kubeadm:amd64 Depends cri-tools (>= 1.30.0) but none of the choices are installable: [no choices]
Step 2: Install Ubuntu 24.04 (Noble Numbat)
As per my home lab architecture, I will create one control plane node and two worker nodes. Therefore, I will create three virtual machines as per the below specifications.
Role
Hostname
vCPU
RAM
Disk
IP
Control plane
Kube-Master01
2
2 GB
20 GB
192.168.55.61
Worker 1
Kube-node01
2
2 GB
20 GB
192.168.55.193
Worker 2
Kube-node02
2
2 GB
20 GB
192.168.55.72
The installation of Ubuntu Server is straightforward, and I used the default selections throughout the process. I will demonstrate the installation on one VM, and the same steps apply to the other two servers running Ubuntu 24.04. Let’s take a look.
Steps to Install Ubuntu 24.04 Server
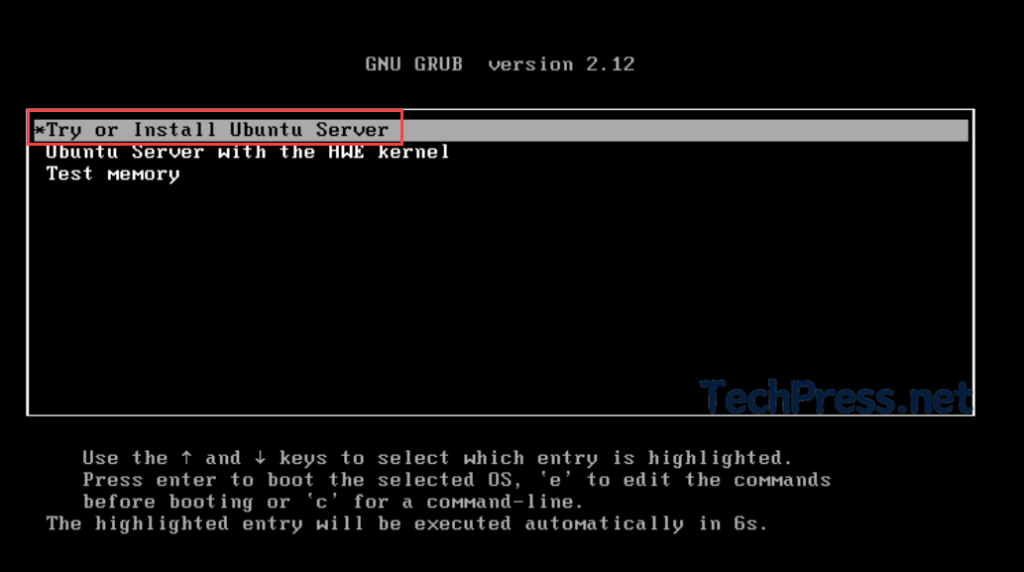
The steps below cover the installation of Ubuntu 24.04 Server. Create a virtual machine using VMware Workstation or Oracle VirtualBox and start the VM. The OS will boot and present the installation screens. On the first screen shown below, select Try or Install Ubuntu Server and press Enter to continue.
Select the OS language. By default, English will be selected. Press Enter to proceed to the next step.
Select Update to the new installer and press Enter. This is optional; you can also go with the continue without updating option as well.
Review the keyboard configuration and select Done.
Choose the type of installation. I will go with Ubuntu Server; select Done.
Ubuntu archive mirror configuration: Select Done and press Enter to proceed to the next step.
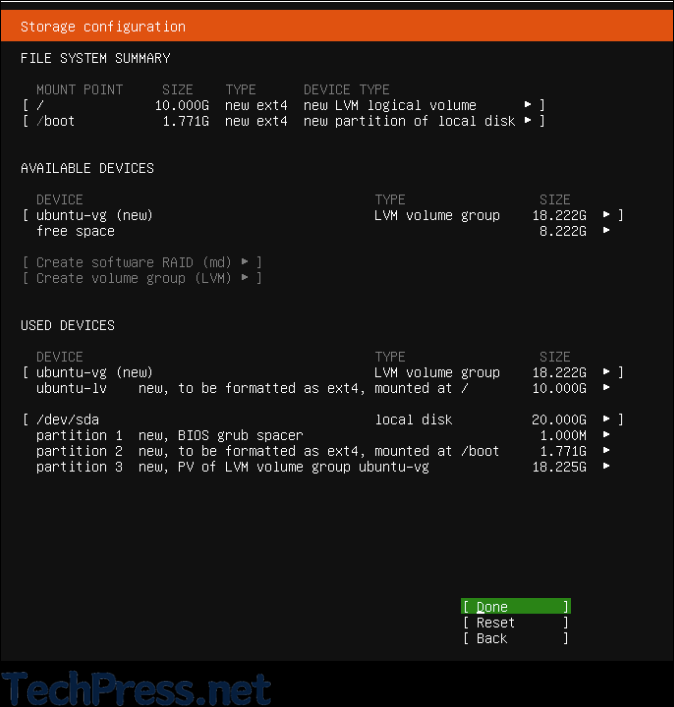
Guided storage configuration: Select Done and press Enter to proceed to the next step.
Storage configuration: Select Done and press Enter to proceed to the next step.
Storage configuration: Select Continue.
Profile configuration: Provide the information in the form that you will use to connect to the server.
Your name: Provide your name
Your servers name: Provide the name of the server. For example, kube-master01 or kube-node01.
Pick a username: Provide a username.
Choose a password: Provide the password.
Confirm your password: Confirm the password.
Select Done and press Enter to create the user profile.
Upgrade to Ubuntu Pro: For this home lab, Ubuntu Pro is not required. Keep the default option Skip for now selected, and then choose Continue.
SSH configuration: Do not select Install OpenSSH server for now. We will install it later. Select Done and press Enter to proceed to the next step.
Features server snaps: Do not select any applications. Select Done and press Enter to proceed to the next step.
The installation will start and may take a few minutes to complete. Once finished, the header will change to Installation complete, and you will see a Reboot Now option. Select it to reboot the server.
After you reboot the server, you may see an error:
[FAILED] Failed unmounting cdrom.mount - /cdrom. Please remove the installation medium then press ENTER:
To fix the error, open the VM Settings > Hardware tab > CD/DVD (SATA) > Device status > Uncheck Connect at power on option > Press OK button. Restart the VM.
After the reboot, the server will start and display the login prompt. Sign in using the user account you created during the installation process.
Check the server IP address using the IP add command.
Use the below commands to upgrade installed packages on the server.
sudo apt update
sudo apt upgrade -y
Repeat the steps to create three Ubuntu servers and note down their IP address information.
Role
Hostname
IP
Control plane
Kube-Master01
192.168.55.61
Worker 1
Kube-node01
192.168.55.193
Worker 2
Kube-node02
192.168.55.72
Creating a Kubernetes cluster requires running many commands, so it is much quicker if you can copy and paste them directly into the VM. However, VMware Workstation may not allow this. Therefore, we will first install OpenSSH on all the servers and connect to it remotely from the host machine.
Step 3: Install OpenSSH on all 3 Servers
In this step, we will install the OpenSSH server on all the servers, including the control plane server. Connect to each VM and run the commands given below:
To make it easier to work with all the servers, add them to the VS Code terminal and test the SSH connections.
Troubleshooting
The below error may occur when the SSH host key for the server has changed compared to the entry stored in your known_hosts file, which SSH flags as a potential security risk (possible man-in-the-middle attack or a rebuilt/reinstalled server). To fix it, remove the existing SSH host key entry for the server from your known_hosts file so a new key can be accepted.
PS C:\Users\jatin> ssh [email protected] @@@@@@@@@@@@@@@@@@@@@@@@@@@@@@@@@@@@@@@@@@@@@@@@@@@@@@@@@@@ @ WARNING: REMOTE HOST IDENTIFICATION HAS CHANGED! @ @@@@@@@@@@@@@@@@@@@@@@@@@@@@@@@@@@@@@@@@@@@@@@@@@@@@@@@@@@@ IT IS POSSIBLE THAT SOMEONE IS DOING SOMETHING NASTY! Someone could be eavesdropping on you right now (man-in-the-middle attack)! It is also possible that a host key has just been changed. The fingerprint for the ED25519 key sent by the remote host is SHA256:67SDkPKHqomFFMRTaB6TrhVgKqBTsqgbYFD2dwy8pOw. Please contact your system administrator. Add correct host key in C:\Users\jatin/.ssh/known_hosts to get rid of this message. Offending ECDSA key in C:\Users\jatin/.ssh/known_hosts:3 Host key for 192.168.55.61 has changed and you have requested strict checking. Host key verification failed.