In this blog post, we will see how to send an email with attachment using Graph API and PowerShell. I have created a PowerShell script (refer to the end section of the post) which sends an email to a specific email address with an attachment and also includes a table of contents in the body of the email. I would be using an App registration in Entra ID to send an email using the Graph API.
Contents
Prerequisites
- An Entra app with mail.send permissions.
- Client ID and Client secret values of the application.
- Tenant ID of the organization
Create App registration in Entra ID
- Sign in to the Entra admin center > Identity > Applications > App registrations.
- Click on New registration.
- Provide the display name of the application and select Accounts in this organizational directory only (<tenant> only -Single tenant). Click Register.
- Open the Entra app registration > API Permissions > Add a permission.
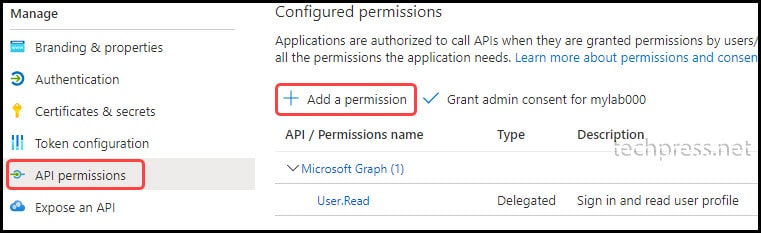
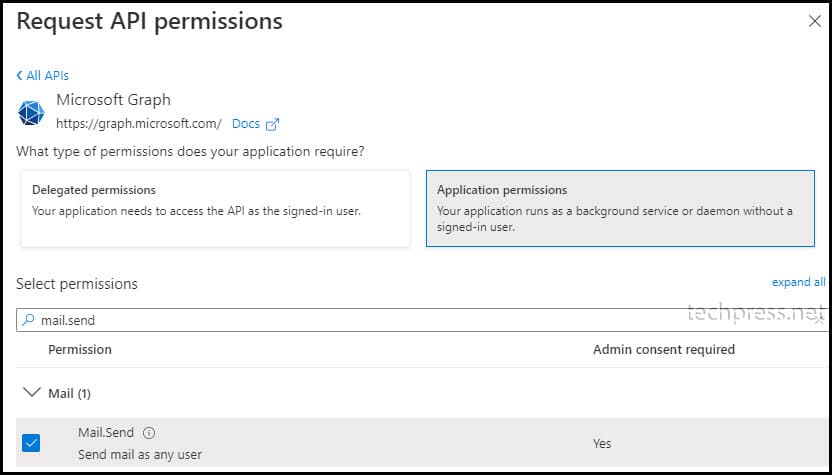
- Click on Microsoft Graph > Application Permissions > search for mail.send. Select Mail.send and click on Add permission.
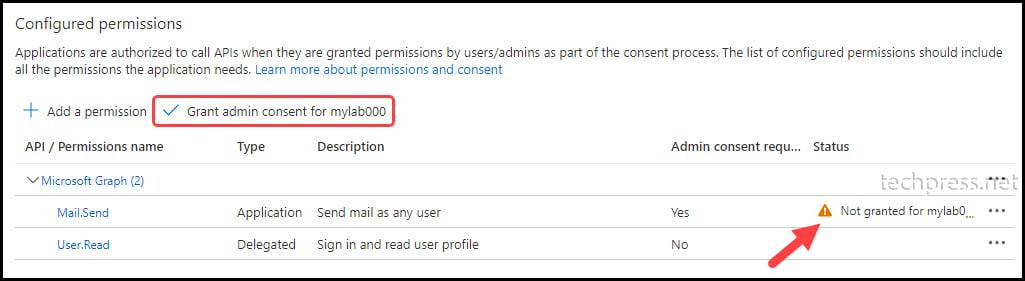
- Click on Grant admin consent for <your org name> to grant admin consent for this application permission.
Copy Client ID, Client Secret, and Tenant ID
- Sign in to the Entra admin center > Identity > Applications > App registrations.
- Find and click the application created in the previous step.
- Click on Certificates & secrets and then click on + New client secret.
- Create a client secret and copy its value.

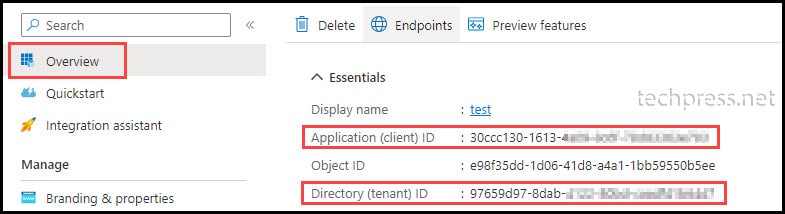
- Go to the Overview page of the Entra App registration and copy Client ID and tenant ID.
PowerShell Code to Send Email Using Graph API
- Store the client ID, client secret, and tenant ID in
$clientid,$clientsecretand$tenantidvariables.
Client ID, Client secret, and Tenant ID
$clientid = "30ccc130-1613-4a09-8c6f-78hhsjbjekk1"
$clientsecret = "TWr8Q~yMNFKsobLjPNZ2mKo-egt8U49Hhbjdsk"
$tenantid = "97659d97-8dab-4122-80bd-caddddddd7"- Connect to Graph API
Connect to Graph API
#Connection to MS GRAPH API
$tokenBody = @{
    Grant_Type    = "client_credentials"
    Scope         = "https://graph.microsoft.com/.default"
    Client_Id     = $clientId
    Client_Secret = $clientSecret
}
$tokenResponse = Invoke-RestMethod -Uri "https://login.microsoftonline.com/$tenantID/oauth2/v2.0/token" -Method POST -Body $tokenBody
$headers = @{
    "Authorization" = "Bearer $($tokenResponse.access_token)"
    "Content-type"  = "application/json"
}- Email Attachment Variable
Next, create a variable called $attachment and provide the path of the attachment you want to send with the email. For example: $attachment = “c:\temp\listofusers.csv”. You can modify the location according to where your email attachment is stored.
Email Attachment variable
$Attachment="C:\temp\ListofUsers.csv"- Get File name and contents and Store them in variables $FileName and $base64string.
Get File name and contents
#Get File Name and Base64 string
$FileName=(Get-Item -Path $Attachment).name
$base64string = [Convert]::ToBase64String([IO.File]::ReadAllBytes($Attachment))
Retrieve the message parameters and convert them to JSON. $htmlobject is a PowerShell object. You can create a PowerShell object and pipe it to the ConvertTo-Html cmdlet, then use that object in the content.
The content of $htmlobject will create the email body. Also, ensure you have a sender email address stored in the $FromAddress PowerShell variable. For example: $FromAddress = “[email protected]”.
Get the message parameters and covert it to JSON
$MessageParams = @{
    "URI"         = "https://graph.microsoft.com/v1.0/users/$FromAddress/sendMail"
    "Headers"     = $headers
    "Method"      = "POST"
    "ContentType" = 'application/json'
    "Body" = (@{
          "message" = @{
          "subject" = "Userlist Report"
          "body"    = @{
               "contentType" = 'HTML'
               "content"     = $htmloutput}
          "toRecipients" = @(
          @{
          "emailAddress" = @{"address" = "[email protected]" }
        } )
        "attachments" = @(
              @{
                "@odata.type" = "#microsoft.graph.fileAttachment"
                "name" = $FileName
                "contentType" = "text/plain"
                "contentBytes" = "$base64string"
                }
        )
}
}) | ConvertTo-JSON -Depth 6
}- Send the message
The final command is to send an email using the Invoke-RestMethod command.
Invoke-RestMethod
Invoke-RestMethod @Messageparams- Complete PowerShell script to Send an email with attachment using Graph API
Send_Email_Attachment_Graph.ps1
#Connection to MS GRAPH API
$tokenBody = @{
    Grant_Type    = "client_credentials"
    Scope         = "https://graph.microsoft.com/.default"
    Client_Id     = $clientId
    Client_Secret = $clientSecret
}
$tokenResponse = Invoke-RestMethod -Uri "https://login.microsoftonline.com/$tenantID/oauth2/v2.0/token" -Method POST -Body $tokenBody
$headers = @{
    "Authorization" = "Bearer $($tokenResponse.access_token)"
    "Content-type"  = "application/json"
}
$Attachment=".\SPONotCompliantFileList.csv"
#Get File Name and Base64 string
$FileName=(Get-Item -Path $Attachment).name
$base64string = [Convert]::ToBase64String([IO.File]::ReadAllBytes($Attachment))
$MessageParams = @{
    "URI"         = "https://graph.microsoft.com/v1.0/users/$FromAddress/sendMail"
    "Headers"     = $headers
    "Method"      = "POST"
    "ContentType" = 'application/json'
    "Body" = (@{
          "message" = @{
          "subject" = "Userlist Report"
          "body"    = @{
               "contentType" = 'HTML'
               "content"     = $htmloutput}
          "toRecipients" = @(
          @{
          "emailAddress" = @{"address" = "[email protected]" }
        } )
        "attachments" = @(
              @{
                "@odata.type" = "#microsoft.graph.fileAttachment"
                "name" = $FileName
                "contentType" = "text/plain"
                "contentBytes" = "$base64string"
                }
        )
}
}) | ConvertTo-JSON -Depth 6
}
# Send the message
Invoke-RestMethod @Messageparams