In this post, I will show you how to fix Windows 11 upgrade error 0x800f0830-0x20003. I recently tried to upgrade my Windows 10 device to Windows 11 and during the installation/upgrade process, I encountered 0x800f0830 – 0x20003 error message. On Windows 11 Setup screen, you may get below error message:
| Error Message |
|---|
| We couldn’t install Windows 11. We’ve set your PC back to the way it was right before you started installing Windows 11. 0x800F0830 – 0x2003 The Installation failed in the SAFE_OS phase with an error during INSTALL_UPDATES operation. |

I want to provide a bit of background on how I got this error message before we check different solutions to fix this issue. For upgrading my Windows 10 device, I downloaded the ISO from Microsoft website and extracted the ISO and run setup.exe to start the upgrade process.
Installation initiated successfully by checking for updates and displays Installing Windows 11 with a cancel button. When the system got rebooted, it tried to check for Windows updates and failed at around 10 to 11 percent stage.
The system got rebooted again, and a message appeared on the screen Undoing changes made to your computer. This process basically reverted the Win 11 Installation and restoring it to previous state.

After another reboot, I have got below error message. I will share the solution which worked for me and if that solution does not work for you, you can try alternative solutions provided in this post which could help you to fix this issue.
| Error Message |
|---|
| We couldn’t install Windows 11 We’ve set your PC back to the way it was right before you started installing Windows 11. 0x800F0830 – 0x2003 The Installation failed in the SAFE_OS phase with an error during INSTALL_UPDATES operation. |
Contents
1. Disconnect your Computer from Internet
During the upgrade of Windows 10 to Windows 11, Setup process will check for latest updates from Microsoft which may include latest drivers, feature update and quality updates. The error could occur during this phase of the upgrade.
If you got the error 0x800F0830 - 0x2003 during this stage, try to disconnect your computer from the Internet before you start the upgrade process and maintain the disconnected state throughout the upgrade process.
You can disable Wi-Fi adaptor or disconnect physical LAN cable from your computer. If you are on a Virtual machine, then disable the virtual switch. Additionally, disconnect any USB device, External HDDs, printers before starting the process.
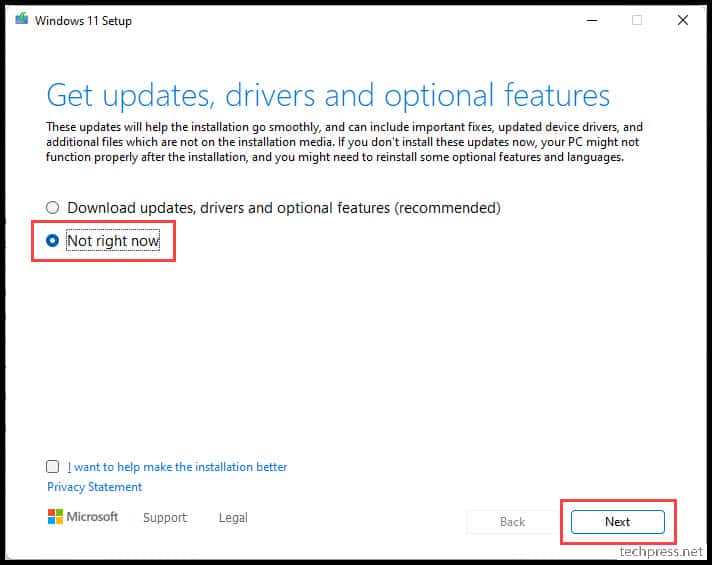
- When you launch setup.exe next time. Click on Change how Setup downloads updates.
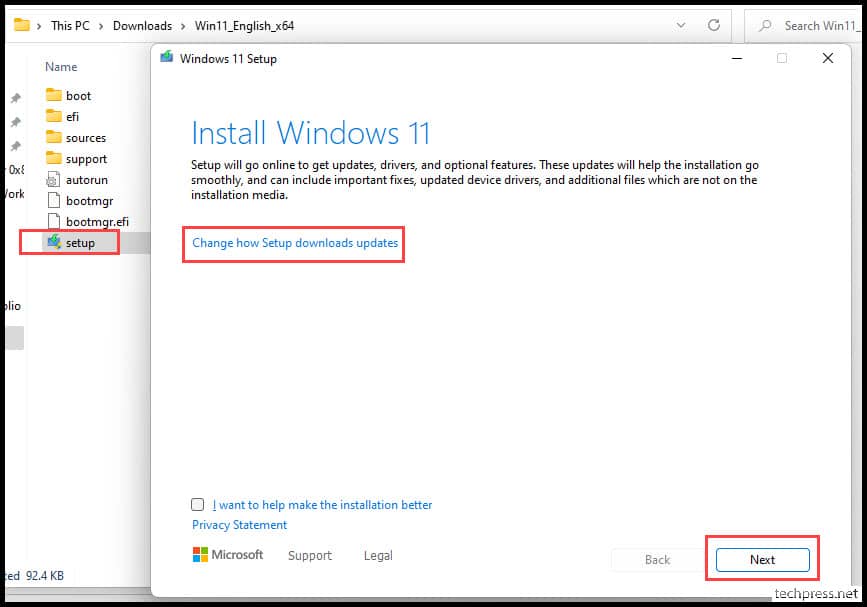
- Select Not right now and click Next.
2. Ensure Windows Version is Compatible
This error code could also occur if you are upgrading Windows to an incompatible Edition, which is not a supported upgrade path. Check Supported Windows upgrade path before starting the upgrade process.
As an example, If you are trying to upgrade from a Windows 10 Home Edition to Windows 11 Enterprise Edition. It will not work, and you may get an error as this upgrade path is not supported.
3. Check For Free Space in System Drive
Ensure that there is enough space to upgrade the OS. For the upgrade to complete successfully, you will require at least 64 GB of free space in the system or OS drive.
4. Run System File checker (SFC)
You may get the error code 0x800f0830-0x20003 as a result of corrupted or missing system files. To identify and automatically replace corrupted system files, you can use the System File Checker (SFC) tool. Before running the sfc.exe, it’s recommended to run DISM /Restorehealth. SFC tool will scan all protected system files and replace any corrupted files with a cached copy from the %WinDir%\System32\dllcache folder.
Check any component store corruption
DISM.exe /Online /Cleanup-image /checkhealthScan to check Corrupted files
DISM.exe /Online /Cleanup-image /scanhealth
Repair Corrupted files
DISM.exe /Online /Cleanup-image /Restorehealth
Scan Corrupted files and replace them with a cached copy
sfc /scannow5. Use Windows Update Troubleshooter
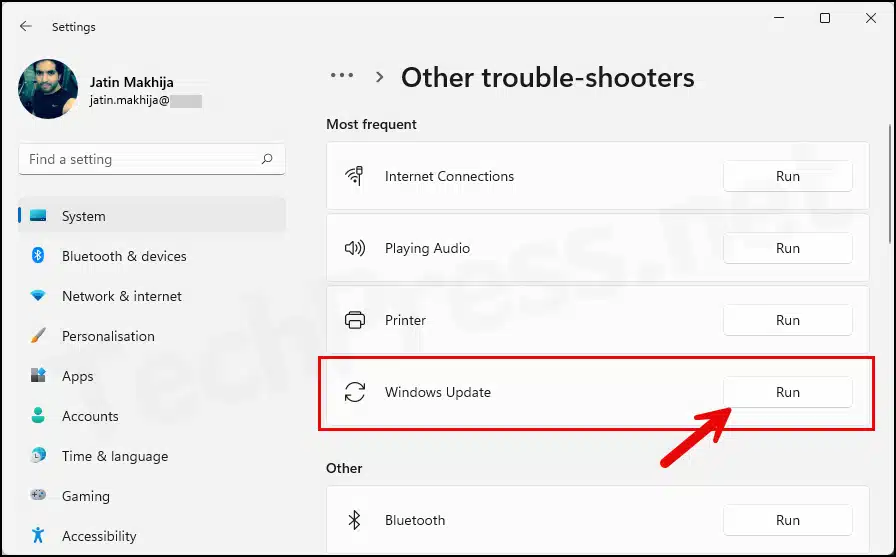
You can also try to run the built-in troubleshooter for Windows updates, which could automatically detect issues and provide the fix.
- On Windows 11 device
- Press Windows key + I to open the Settings App.
- Go to System > Troubleshoot > Other Troubleshooters.
- Next to Windows Update, click on Run to launch the troubleshooter.
- On Windows 10 device
- Press Windows key + I to open the Settings app.
- Navigate to Update & Security > Troubleshoot > Additional Troubleshooters.
- Click Windows Update > Run the troubleshooter.
- Restart your device and try to upgrade to Windows 11 once again.
6. Restart Windows Update Service
If the installation process is getting stuck during the installation of Windows update, you could try to restart the service once, which can sometimes help fix this issue.
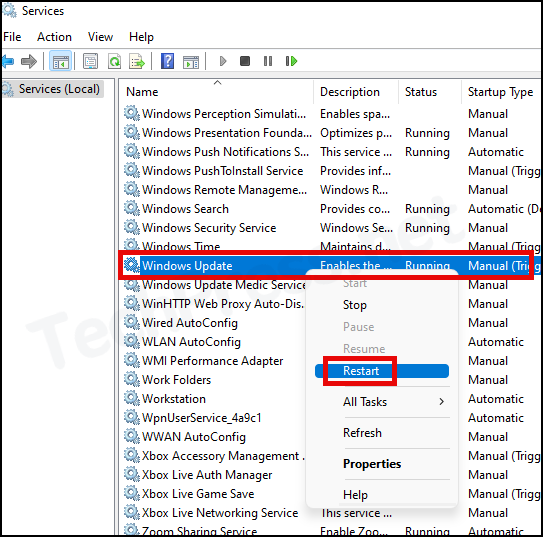
- Press Windows + R to open the Run dialog box.
- Type
services.mscand press Enter to open Services Management Console. - Find the Windows Update service and right-click on it, Select Restart.
7. Disable Third-Party Antivirus Software
If you have installed any third-party AV solution on your computer, it could interrupt the upgrade process, therefore try to disable it once and restart Windows 10 to Windows 11 upgrade.
8. Reset Windows Update Components
You can also reset Windows update components and then try the upgrade process again. To reset windows components on your computer, follow the below steps:
- Open the command prompt in Admin mode.
- Stop BITS service, Windows update service and Cryptographic service by running below commands.
net stop bits
net stop wuauserv
net stop cryptsvc- Delete qmgr*.dat files.
Del "%ALLUSERSPROFILE%\Application Data\Microsoft\Network\Downloader\qmgr*.dat"- Copy and paste below command to run and press Enter.
cd /d %windir%\system32- Now re-register BITS and Windows Update. Copy and paste below commands on command prompt and press Enter.
regsvr32.exe atl.dll
regsvr32.exe urlmon.dll
regsvr32.exe mshtml.dll
regsvr32.exe shdocvw.dll
regsvr32.exe browseui.dll
regsvr32.exe jscript.dll
regsvr32.exe vbscript.dll
regsvr32.exe scrrun.dll
regsvr32.exe msxml.dll
regsvr32.exe msxml3.dll
regsvr32.exe msxml6.dll
regsvr32.exe actxprxy.dll
regsvr32.exe softpub.dll
regsvr32.exe wintrust.dll
regsvr32.exe dssenh.dll
regsvr32.exe rsaenh.dll
regsvr32.exe gpkcsp.dll
regsvr32.exe sccbase.dll
regsvr32.exe slbcsp.dll
regsvr32.exe cryptdlg.dll
regsvr32.exe oleaut32.dll
regsvr32.exe ole32.dll
regsvr32.exe shell32.dll
regsvr32.exe initpki.dll
regsvr32.exe wuapi.dll
regsvr32.exe wuaueng.dll
regsvr32.exe wuaueng1.dll
regsvr32.exe wucltui.dll
regsvr32.exe wups.dll
regsvr32.exe wups2.dll
regsvr32.exe wuweb.dll
regsvr32.exe qmgr.dll
regsvr32.exe qmgrprxy.dll
regsvr32.exe wucltux.dll
regsvr32.exe muweb.dll
regsvr32.exe wuwebv.dll- Reset Winsock
netsh winsock reset- Restart BITS Service, Windows Update service and Cryptographic service.
net start bits
net start wuauserv
net start cryptsvc
Perform below steps if there are still issues with Windows Update components. Only try below steps if all above steps have not fixed the issue.
- Run below commands on Command prompt to rename below files:
- %Systemroot%\SoftwareDistribution\DataStore
- %Systemroot%\SoftwareDistribution\Download
- %Systemroot%\System32\catroot2
Ren %Systemroot%\SoftwareDistribution\DataStore DataStore.bak
Ren %Systemroot%\SoftwareDistribution\Download Download.bak
Ren %Systemroot%\System32\catroot2 catroot2.bak- Reset BITS service and Windows update service
sc.exe sdset bits D:(A;CI;CCDCLCSWRPWPDTLOCRSDRCWDWO;;;SY)(A;;CCDCLCSWRPWPDTLOCRSDRCWDWO;;;BA)(A;;CCLCSWLOCRRC;;;IU)(A;;CCLCSWLOCRRC;;;SU)
sc.exe sdset wuauserv D:(A;;CCLCSWRPLORC;;;AU)(A;;CCDCLCSWRPWPDTLOCRSDRCWDWO;;;BA)(A;;CCDCLCSWRPWPDTLOCRSDRCWDWO;;;SY)
Tried all of these previously apart from the disconect from the internet etc bit at the end, then disconected from the internet etc and RESULT! Thanks you whoever you are at techpress. Unable to identify you, but many thanks.????
I am glad that the issue has been resolved for you. Thanks for the feedback.
Wonderful, unplugging the network did the trick. I had the same problem with one of the Windows 10 updates and it took be for ever to get it installed. As soon as I saw this error I thought oh no how did I solve this last time. Googled it and you were first on the list. Thank you very much.
No Problem Adrian. Thanks for the feedback.
Bump up – enabled TPM & secure boot in BIOS, bypassed 6th generation Intel problem, install via ISO — but had the “How to fix Error 0x800f0830 – 0x20003” error. Found this page, didn’t disconnect any USB or anything, only disconnected network: worked!! Great thanks.
Thank you so much! Your solution (disconnect from internet) was the only that works on my problem. In my case I was installing Windows 10 over Windows 11.
After numerous failed upgrade attempts, disconnecting it from the network was the only way I could get it to succeed. Thank you very much for the advice!
Just wanted to say thanks for posting this. Was upgrading a ‘mission-critical’ (aren’t they all) server from Server 2012 Essentials to Server 2022 Standard (via Server 2016) and had failed at the above error twice. And it takes a couple of hours each time just to get to the failure point. Google brought me here and disabling the virtual switch for the VM finally got Server 2022 installed on the server. Respect to you Sir.