In this guide, I’ll show you how to create desktop shortcuts using Intune. When you install an application on a Windows device, a shortcut is often added to the desktop for quick access. But not all applications do this automatically, which means you may need to create the shortcut yourself.
You can use the steps for not just creating application shortcuts. You can also create shortcuts for web resources that your organization uses frequently. This could be a SharePoint intranet site, a custom business web app, or any other website your users need easy access to.
You can deploy desktop shortcuts for an app or create a web link shortcut at below locations.
- Public desktop location (C:\users\public\desktop).
- Users profile desktop location (C:\users\<username>\desktop) or C:\Users\<username>\OneDrive – <org>\Desktop, if Windows known folders are redirected to OneDrive.
If you want to delete desktop shortcuts using Intune, refer to the link: Delete desktop shortcuts using Intune.
Related
Contents
Prepare PowerShell Scripts
I have created two PowerShell scripts for creating desktop shortcuts via Intune. One creates desktop shortcut in C:\users\public desktop location (Create_Desktop_Shortcuts_Public_Desktop_v1.ps1) and the other one creates shortcuts in User’s profile desktop folder (Create_Desktop_Shortcuts_UsersProfile_Desktop_v1.ps1) which may or may not be redirected to OneDrive. You can download the scripts from my GitHub repo link: Create Desktop Shortcuts.
Important Points About the Script
- Script can create a single or multiple desktop shortcuts depending upon the input value in the variable
$Shortcuts.
- If you create desktop shortcuts at C:\users\public\desktop location, it will be visible on the desktop of all users who use the device.
- If you have re-directed Windows known folders (KFM) to OneDrive, shortcuts will be created in the desktop folder which exists under OneDrive, else it will create desktop shortcuts under C:\users\<username>\desktop location.
- Script will not create a desktop shortcut for an application which does not exist on the device (except for the web links shortcuts).
- You only need to update
$Shortcutsvariable in the script to provide shortcutNameandTargetPathof each shortcut you want to create. Below is the code snippet which you need to update in the script file.
$Shortcuts = @(
    @{ Name = "Zoom"; TargetPath = "C:\Program Files\Zoom\bin\Zoom.exe" },
    @{ Name = "Notepad"; TargetPath = "C:\Windows\System32\notepad.exe" },
    @{ Name = "Calculator"; TargetPath = "C:\Windows\System32\calc.exe" },
    @{ Name = "Google"; TargetPath = "https://www.google.com" },
    @{ Name = "TechPress"; TargetPath = "https://techpress.net" }
)
Once you have modified the script as per your requirement, you can use the following steps to deploy it using Intune.
Deploying Desktop Shortcuts using Intune
- Sign in to the Intune admin center > Devices > Scripts and remediations > Platform Scripts.
- Click on + Add and then Select Windows 10 and later.
- Basics: Provide a Name and Description of the deployment.
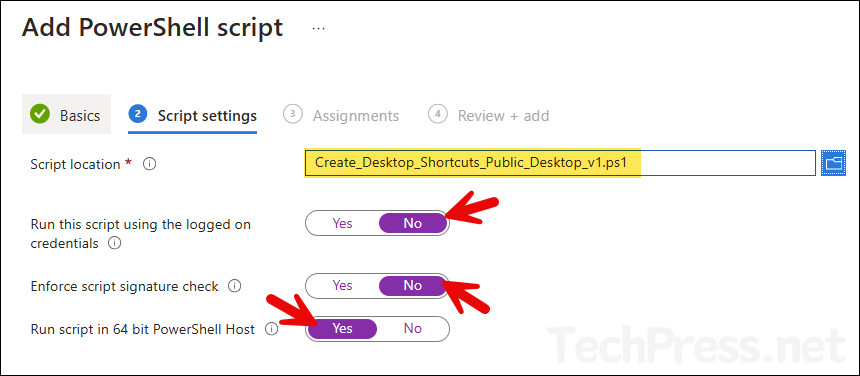
- Script settings: Browse to the script location. For deploying shortcuts to Public desktop location, select Create_Desktop_Shortcuts_Public_Desktop_v1.ps1 script file and configure script settings as shown in below screenshot.
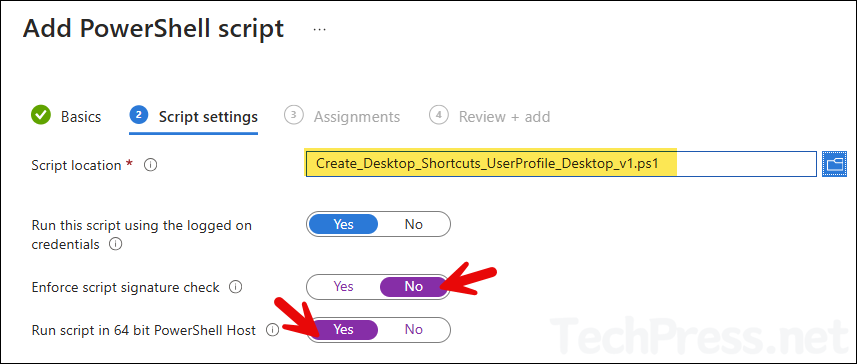
- If you want to create desktop shortcuts at Uses profile location, then select Create_Desktop_Shortcuts_UsersProfile_Desktop_v1.ps1 script and configure script settings as shown in below screenshot. Ensure that Run this script using the logged-on credentials is set to Yes when deploying desktop shortcut in user’s profile folder location.
- Assignments – Click on Add Groups and add an Entra security group containing Windows devices.
- Review + add – Review the information and click Add to start the deployment process.
Sync Intune Policies
The device check-in process might not begin immediately. If you’re testing this policy on a test device, you can manually kickstart the Intune sync from the device itself or remotely through the Intune admin center.
Alternatively, you can use PowerShell to force the Intune sync on Windows devices. Restarting the device is another way to trigger the Intune device check-in process.
End User Experience
On the target device, a PowerShell script deployed via Intune will be downloaded to the device at the following location: C:\Program Files (x86)\Microsoft Intune Management Extension\Policies\Scripts. It gets deleted as soon as the execution is done.
- If you have used Create_Desktop_Shortcuts_Public_Desktop_v1.ps1 script to deploy desktop shortcuts and web links, It will create the shortcuts at C:\users\public\desktop location. Below screenshot shows the result of deploying this script on a Windows 11 device.

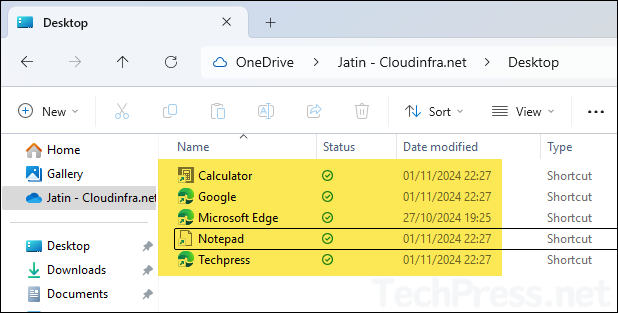
- If you have used Create_Desktop_Shortcuts_UsersProfile_Desktop_v1.ps1 script to deploy desktop shortcuts and web links, It will create the shortcuts at C:\users\<username>\desktop location. If Windows known folders like desktop is redirected to OneDrive, shortcuts will be created at C:\Users\<username>\OneDrive – <org>\Desktop location.
This works but it is saving the shortcut to the root of C:\ and not the desktop path. What is weird is running this from powershell from a device puts it perfectly on the desktop. But there is something about this running through Intune where it seems to not resolve the desktop path?
Hi Martin,
When you are creating desktop shortcuts on User’s OneDrive desktop, Are you executing the script using logged on user’s credentials / User Context ?
Try Setting Run this Script using logged on credentials in Script Settings to Yes.
Hello,
I’ve tried to import a similar script (that works manually when you execute it yourself through powershell) in intune so word and chrome can have shortcut on the desktop, but the script always fails. i have tried to make the script wait 30 min and then execute the code, i tried to execute it instantly when autopilot read the script, and another that check if a installation is still going (if yes, it wait 10s and re check if there is an installation) but this one is not working i guess.
So, i don’t understand why it works manually but not with autopilot. Do you have an idea ?
Thanks Jatin, that’s super well written and easy to implement – very useful !
Hi, Jatin!
I have created a script per your instructions, trying to deploy a weblink to the desktop. In Intune it shows as deployed successfully, but the link is not showing up in the public desktop folder. Do you have any idea what could be the reason?
The script settings look like this:
PowerShell script
help shortcut.ps1
Run this script using the logged on credentials
Yes
Enforce script signature check
No
Run script in 64 bit PowerShell Host
Yes
Thanks!