Contents
Scenario
Organization has moved all their mailboxes to the Exchange Online from On-Premise Exchange 2010 server. MX Record is cutover to Microsoft 365 (inbound and outbound mail flow is moved to Microsoft 365). Entra connect is being used to sync Active directory users to Entra ID.
Requirement
Decommission Exchange 2010 server from the environment while keeping the Active directory synchronization through Entra connect running.
Procedure
You may have used Hybrid Configuration Wizard (HCW) or third party tools like bittitan to migrate mailboxes to the cloud. Most of the steps from this post will still be applicable.
This blog post will be based on one Exchange 2010 server with all exchange roles on it without DAG and without HCW configuration. You can use this article as a guidance and create a plan for decommissioning exchange server as per your organization requirements.
| Important Note: |
|---|
| Please note Microsoft recommends not to fully decommission the last Exchange Server specially when Azure AD Connect is in use to sync the users to the cloud. If you still go ahead with Exchange server decommissioning, then most of the mail attributes needs to be managed via on-premise using Active Directory Schema Editor Snap-in or Third Party Tools or Powershell which is something not supported by Microsoft. (“MS recommendation: Remove all Exchange servers with the exception of the servers you will retain for user management and creation. Two servers should be sufficient for user management, although you could possibly get by with one server. In addition, there is no need to have a Database Availability Group or any other high availability options.”) |

1. Take Backup of mail Attributes from AD
Taking backup of important email attributes is not mandatory but its always a best practice to take the backup before the start of this activity. This backup can also be used later for verifying the email attributes to make sure that mail attributes are populated correctly as per requirement.
Backup mail, mailNickName and proxyaddresses
Get-ADUser -Filter * -Properties proxyaddresses, mailNickName, Mail | Where { ($_.Enabled -eq $True) -and ($_.proxyaddresses -ne $null) } | Select-Object Name, Mail, mailNickName, @{ L = "ProxyAddresses"; E = {($_.ProxyAddresses | Where-Object {$_ -like "*smtp:*" }) -join ';'} } | Export-Csv -Path "c:\temp\UsersMailAttributes.csv" –NoTypeInformationBackup X400 Addresses
Get-ADUser -Filter * -Properties proxyaddresses | Where { ($_.Enabled -eq $True) -and ($_.proxyaddresses -ne $null) } | Select-Object Name, @{ L = "ProxyAddresses"; E = {($_.ProxyAddresses | Where-Object {$_ -like "X400*" }) -join ';'} } | Export-Csv -Path "c:\temp\X400.csv" –NoTypeInformationBackup X500 Addresses
Get-ADUser -Filter * -Properties proxyaddresses | Where { ($_.Enabled -eq $True) -and ($_.proxyaddresses -ne $null) } | Select-Object Name, @{ L = "ProxyAddresses"; E = {($_.ProxyAddresses | Where-Object {$_ -like "X500*" }) -join ';'} } | Export-Csv -Path "c:\temp\X500.csv" –NoTypeInformationOther Commands for Reference (optional)
- csvde -f c:\DLs.txt -r “(&(objectCategory=group)(proxyAddresses=*))”
- csvde -f c:\Users.txt -r “(&(objectCategory=user)(proxyAddresses=*))”
2. Disable Entra Connect Synchronization
Login to the server where Entra Connect is installed and disable the entra sync using below command.
Disable Entra Sync
Set-ADSyncScheduler -SyncCycleEnabled $false3. Remove Service Connection Point (SCP)
Next, Remove the Service Connection Point (SCP) value on your Exchange Servers. SCP value is used for automatically configure outlook client. When you remove the Service connection point, the client will use the DNS method for autodiscover.
For Exchange 2010 Server:
Get-ClientAccessServer | fl AutoDiscoverServiceInternalUri

Get-ClientAccessServer | Set-ClientAccessServer -AutoDiscoverServiceInternalUri $Null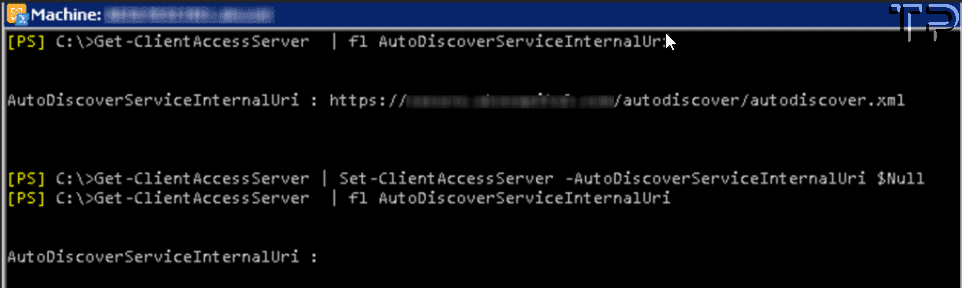
Exchange 2016 Server or later:
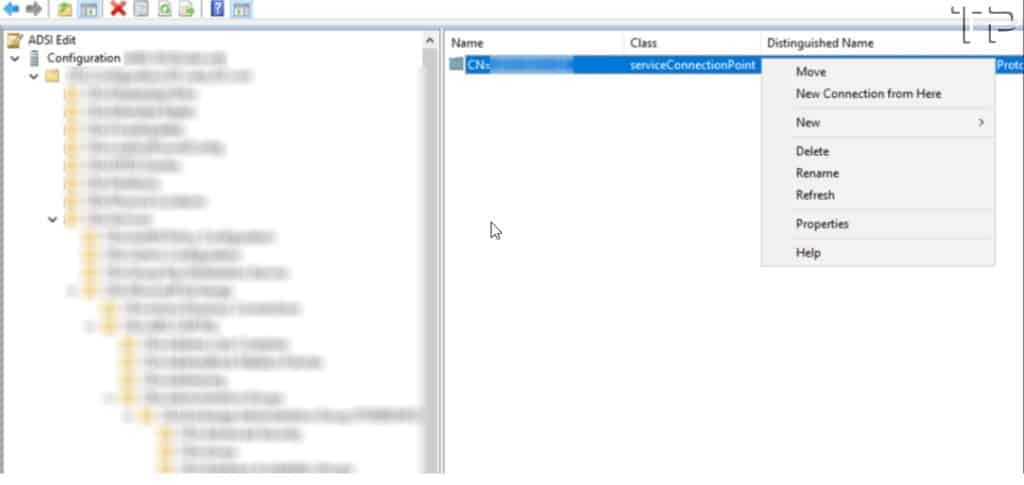
Get-ClientAccessService | Set-ClientAccessService -AutoDiscoverServiceInternalUri $NullIf you are unable to remove the Service Connection Point using Powershell. You can open ADSIEdit and delete the Service connection Point manually.
Open ADSIEdit > Configuration Partition > Services > Microsoft Exchange > CN = <Exchange Organization> > Administrative Groups > Servers > <Exchange Server Name> > Protocols > Autodiscover > Under this folder you will see serviceConnectionPoint. Delete this manually. However, I will prefer the Powershell command option as its easier and less complex than using ADSIEdit.
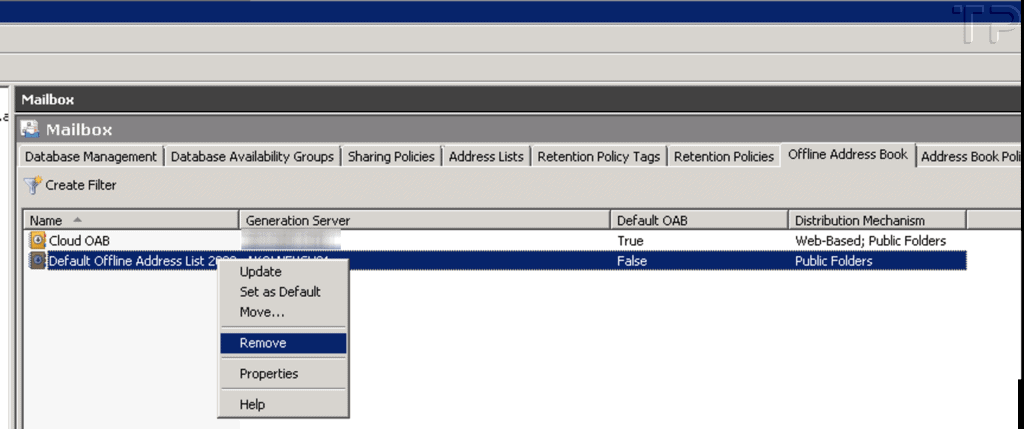
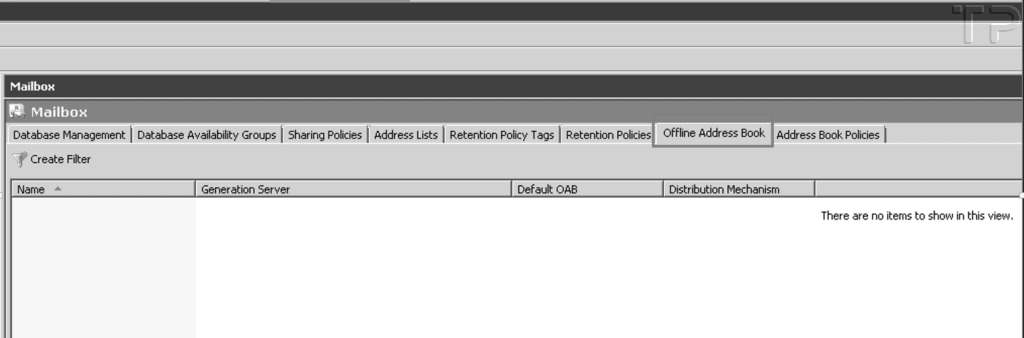
4. Delete offline Address Books (OAB’s)
Remove offline Address Books (OAB’s) using Powershell or manually using the Exchange management console (EMC). Please find both the methods below and use the one preferable to you.
Using Powershell
Get-OfflineAddressBook
Get-OfflineAddressBook | Remove-OfflineAddressBook
Get-OfflineAddressBook
Using GUI Method
Open Exchange Management Console > Organization Configuration > Mailbox > offline Address Book > Select all Offline Address Books > right click > Remove.
5. Migration of Public Folders
- Launch Powershell as administrator.
- Execute Get-OrganizationConfig |fl PublicFoldersEnabled and ensure that it is not set to remote.
If it is set to remote and you want to continue to access the public folders, you would need to migrate them to Exchange online. If you have already migrated Public folders to Exchange Online, Please proceed to the next section to delete public folders.
Delete Public Folders
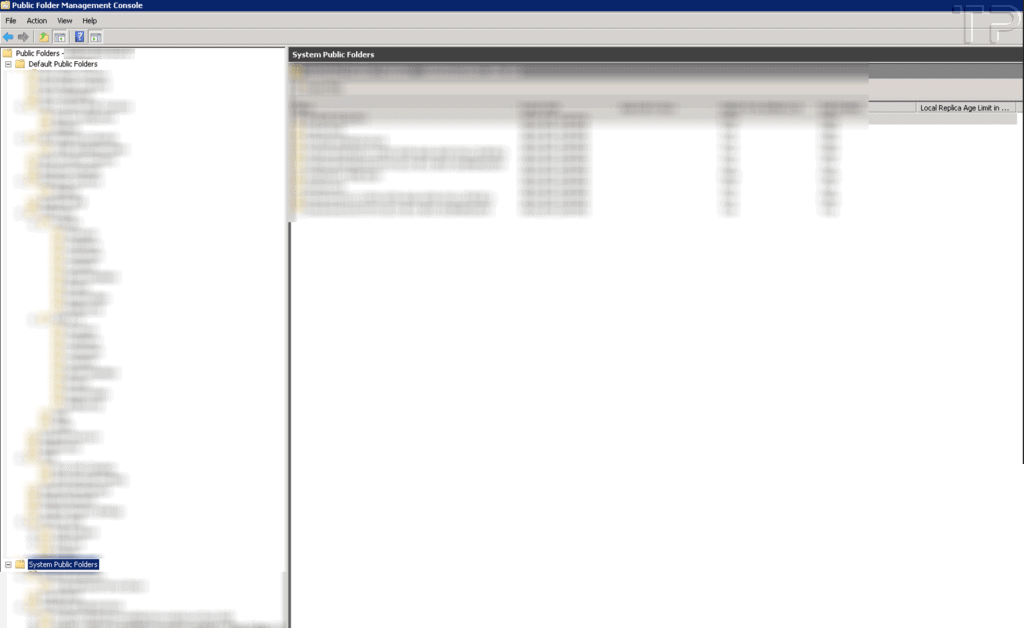
Before deleting Public folders, Open Exchange Management Console > Toolbox > Open Public Folder Management Console and check the existence of Public Folders.
Use below command to delete all public folders.
Get-PublicFolder -Server ExchangeServerHostName “\” -Recurse -ResultSize:Unlimited | Remove-PublicFolder -Server ExchangeServerHostName -Recurse -ErrorAction:SilentlyContinueOnce all Public folders are deleted. Open the Public folder management console again to verify the deletion (as shown in below screenshot).
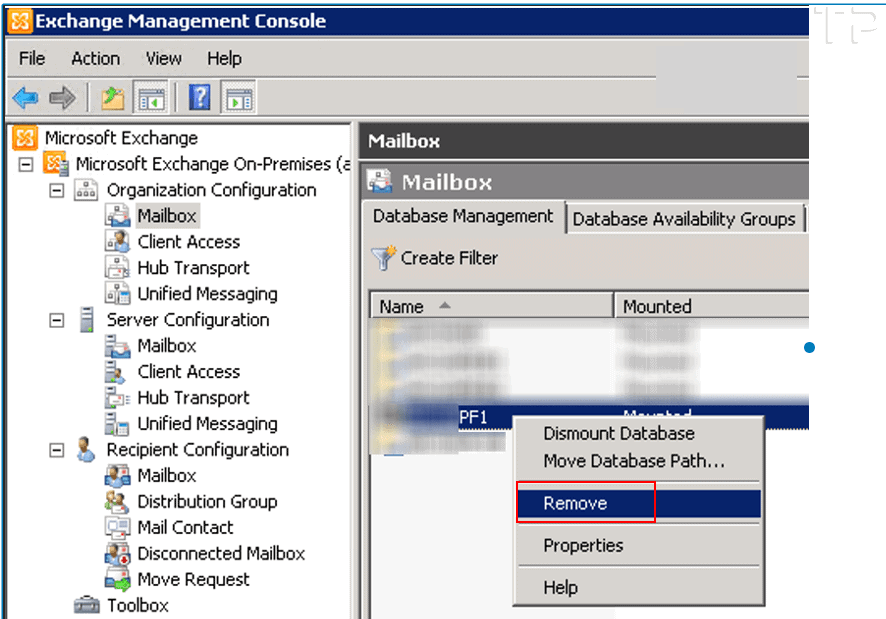
Delete Public Folder Database
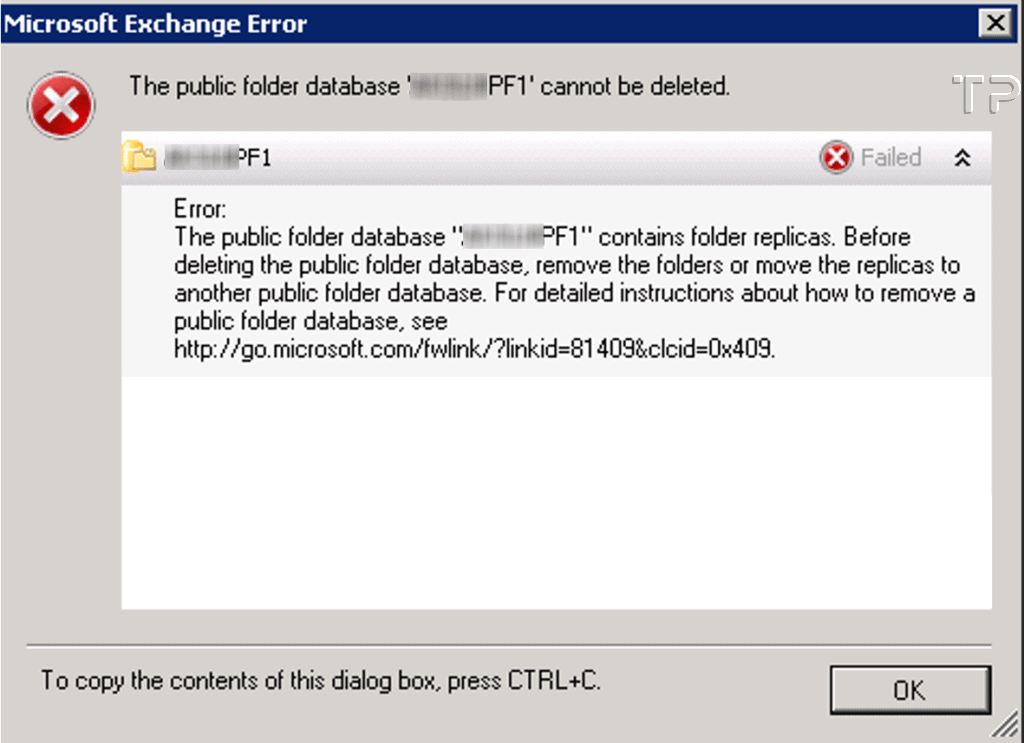
Now, you can Delete the Public Folder Database from the Exchange Management console (However, if you receive an error message as shown below, please follow the given steps to fix the error).
| Error: |
|---|
| The public folder database Public Folder Database contains folder replicas. Before deleting the public folder database, remove the folders or move the replicas to another public folder database. For detailed instructions about how to remove a public folder database, see http://go.microsoft.com/fwlink/?linkid=81409&clcid=0x409. |
You can check the replicas using below command:
Get-PublicFolder -Recurse | ft name,parentpath,replicas
You will find folder replicas are still there for the Public folder database. To get around this issue, follow below steps:
- Dismount the Public folder database.
- Move Public folder database folder contents to a New directory (which includes database and log files, if your log file’s location is different than the database location, go to the log file folder and move its contents as well).
- Mount the Public folder database again and delete it.
I’ll guide you on how I resolved this error and offer some alternative methods to fix it. If you want to skip ahead to an alternative method (that I haven’t personally tested), please check the Alternate Fix for Replica Error section.
a) Dismount the Public Folder Database(s)
Dismount-Database -Identity PublicFolderDatabaseName
b) Note Public Folder database and log file paths Information
You can also check this information by right clicking the Public folder database and click properties > General Tab.
Get-PublicFolderDatabase | fl name, *Path*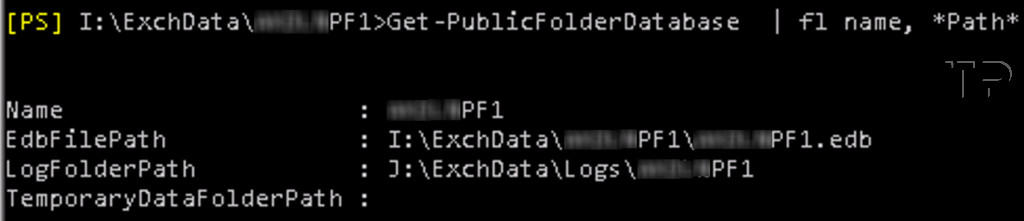
c) Move the Contents of EdbFilepath and LogFolderPath folder to another new Folder.
I created a new folder movePFcontents in I:\ drive. You can create the folder in any drive provided you have enough free space to move the Public folder database and Log folder contents. You can also manually move the data using GUI tools, I have used move command to move the contents.

d) Mount the Public Folder Database
Mount-Database -identity publicfolderdatabasename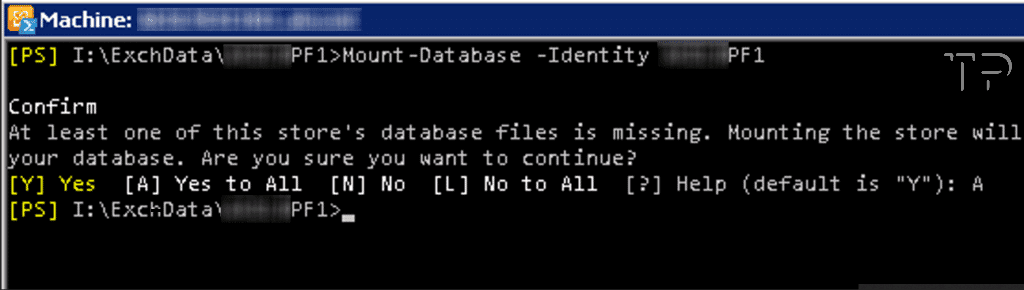
e) Delete Public Folder database
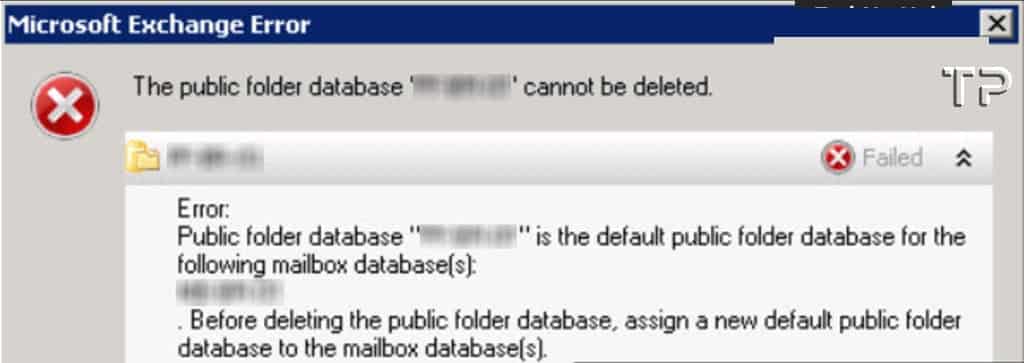
You can now try to delete the Public folder database at this stage. However, If you receive below error message then please follow further guidance to fix the issue.
The public folder database ‘PublicFolderDatabaseName’ cannot be deleted.
Error:
Public folder database “PublicFolderDatabaseName” is the default public folder database for the following mailbox database(s):Mailboxdatabasename
. Before deleting the public folder database, assign a new default public folder database to the mailbox database(s).
Error Message when trying to delete the public folder database
Solution
First we need to check the default public folder associated for each mailbox database. Run the command Get-MailboxDatabase | ft name, publicfolderdatabase. You can see that mailbox database(s) are having association with public folder database. We need to remove this association to fix this issue so that that mailbox database will not be able to use the public folder DB.
Get-MailboxDatabase | ft name, publicfolderdatabaseDeleting this association by using Set-Mailboxdatabase command didn’t work in my case, so I have used the ADSI Edit to delete the associations manually.
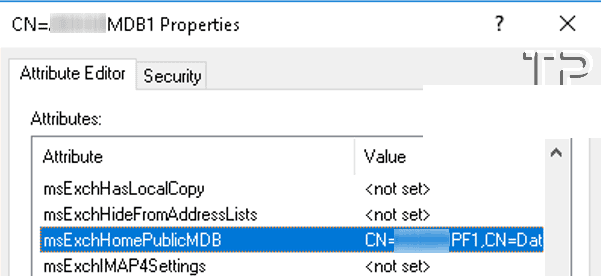
Open ADSI Editor > Configuration Partition > CN=Services > CN=Microsoft Exchange > CN=(<your organization name>) > CN=Administrative Groups > CN=Exchange Administrative Group (<group name>) > CN=Databases.
Right click on each mailbox database for which you noted the association with public folder databases and Click Properties > Attributes Editor. Search for msExchHomePublicMDB attribute and clear the value.
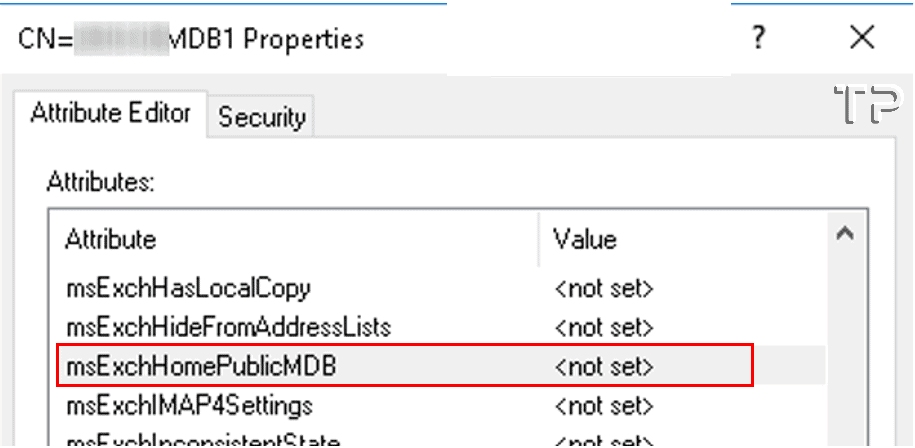
Repeat for all other Mailbox databases and then check the association of mailbox database with public folder again to make sure that you have removed all association(s). Use the same command which was used earlier.
Get-MailboxDatabase | ft name, publicfolderdatabase
Now, try to delete the Public folder databases. As you can see from below screenshot, Public folder database is now removed.
Get-PublicFolderDatabase | Remove-PublicFolderDatabase
Alternate Fix for Replica Error [Not Tested]
If you’ve got a pop-up displaying below error message, you can use the provided commands to resolve it. I haven’t personally tested these methods, so I can’t guarantee their effectiveness.
Error: The public folder database “Public Folder Database” contains folder replicas. Before deleting the public folder database, remove the folders or move the replicas to another public folder database. For detailed instructions about how to remove a public folder database, see http://go.microsoft.com/fwlink/?linkid=81409&clcid=0x409
Set-OrganizationConfig -PublicFolderMigrationComplete $TrueRemove-PublicFolderDatabase "Public Folder Database" -RemoveLastAllowed6. Disable and Delete Mailboxes
The next step is to disable all mailboxes. When you disable a user mailbox using either the Exchange Management Console or Exchange Management Shell, mail-related attributes are removed from the On-Premises Active Directory for that user.
To handle this, we need to convert the disabled user mailbox to a Mail User, as demonstrated in the next section. It’s important to ensure that Entra connect sync is stopped by running the Set-ADSyncScheduler -SyncCycleEnabled $false command.
If Entra sync is not paused and you disable a mailbox, it will remove the mail-related attributes from the On-Premises Active Directory user. Once the AD Sync runs, it will convert the users email addresses to onmicrosoft.com addresses in Microsoft 365.
Note
Below mail attributes are removed from user when you disable a user mailbox.
- EmailAddress
- legacyExchangeDN
- mailNickname
- msExchHomeServerName
- textEncodedORAddress
- showInAddressBook
- proxyAddresses
- msExchUserAccountControl
- msExchVersion
- msExchMailboxSecurityDescriptor
- msExchRBACPolicyLink
- msExchPoliciesIncluded
- homeMDB
- homeMTA
- mDBUseDefaults
6.1 Disable Mailbox and Convert User Mailbox to Mail User
For One User
- Launch Powershell on the Entra connect server.
- Import-Module ADSync.
- Set-ADSyncScheduler -SyncCycleEnabled $false.
Before disabling a user mailbox, please ensure you take a backup of the user’s email aliases. Converting a user to a mail user will not automatically restore the aliases; only the primary SMTP address is restored after the conversion.
To restore or add user aliases, follow these steps:
- Go to Active Directory > User account properties.
- Navigate to Attribute Editor.
- Locate proxyAddresses.
- Type the aliases in the format smtp:<user email alias> (e.g., smtp:[email protected]).
- Use Uppercase SMTP: for the primary SMTP email address and lowercase smtp: for all user email aliases.
- Open Exchange Management Console > Recipient configuration > Mailbox > Select User Mailbox > right click on it and select disable.
- Alternatively, you can use Powershell (Exchange management shell), command. Disable-Mailbox -Identity <user’s unique Identifier e.g. Name, Alias etc>.
If you’ve disabled a user mailbox and don’t see it immediately appear in the Disconnected Mailbox folder in Exchange Management Console, you can force it to appear. Use the command Get-Mailboxdatabase | Clean-mailboxdatabase, then return to the EMC and refresh the Disconnected Mailbox Folder.
6.1.1 Convert User Mailbox to Mail User
Before converting a User mailbox to a mail user, it’s important to determine the externalEmailAddress value. You can provide this value explicitly or you can use userprincipalname or samAccountName as a reference to populate the value.
In below command, I’ve used userprincipalname because the primary SMTP address of Exchange users matches the userprincipalname in Active directory in our case.
Once you have identified the externalEmailAddress value, you can run below command against one user to convert disabled User to Mail User.
| Important Note: |
|---|
| Please note that I am assuming users Entra ID UPN matches the Primary SMTP Address. If not, you can use a script to match UPN to the primary SMTP address (pSMTP). If you prefer not to match UPN to pSMTP, you can use the samAccountname parameter instead of userprincipalname or copy the externalmailaddress for each user in a CSV file and modify the command below according to your specific requirements. |
$userlist = get-user -Identity "Username"
$userlist | foreach {Enable-MailUser $_ -externalEmailAddress “$($_.userprincipalname)” }
If you want to use samAccountName instead of userprincipalname, use below commands:
$userlist = get-user -Identity "Username"
$userlist | foreach { Enable-MailUser $_ -externalEmailAddress “$($_.samaccountname)@DOMAIN.COM” }
Now the user has been converted to mail user, you can check in the on-premise active directory, Users email attributes will be restored. Below email attributes are restored to the on-premise user:
1. EmailAddress
2. InternetEncoding
3. legacyExchangeDN
4. mail
5. mailNickname
6. msExchPoliciesIncluded
7. msExchRecipientDisplayType
8. msExchRecipientTypeDetails
9. msExchVersion
10. proxyAddresses
11. showInAddressBook
12. targetAddress
13. textEncodedORAddress
6.1.2 Resume Entra Connect Sync
Set-ADSyncScheduler -SyncCycleEnabled $true- Test email Flow for this mail user.
- Purge the disabled/disconnected user mailbox
- Check the mailboxes which are in disconnected state or in disabled state. Note Down the
mailbox guidof the user which you want to purge from database.
Get-ExchangeServer | Where-Object {$_.IsMailboxServer –eq $true} | ForEach-Object { Get-MailboxStatistics –Server $_.Name | Where-Object {$_.DisconnectDate –notlike ‘’}} | select displayname, mailboxguid, databaseIf you want to purge a specific disconnected or disabled mailbox, use the mailboxguid noted above and replace it in the command below. This command will capture the disconnected user matching the mailbox guid in the $mailboxes variable.
$mailboxes = Get-ExchangeServer | Where-Object {$_.IsMailboxServer –eq $true} | ForEach-Object { Get-MailboxStatistics –Server $_.Name | Where-Object {($_.DisconnectDate –notlike ‘’) -and ($_.Mailboxguid -eq '87b867e5-b0ol-4jj2-b0d9-13a3n78933e49')}} | select displayname, mailboxguid, databasePurge the mailbox which is captured/stored in $mailboxes variable.
$mailboxes | ForEach { Remove-Mailbox -Database $_.Database -StoreMailboxIdentity $_.MailboxGuid -confirm:$false }Verify that the disconnected or disabled mailbox have been purged.
Get-ExchangeServer | Where-Object {$_.IsMailboxServer –eq $true} | ForEach-Object { Get-MailboxStatistics –Server $_.Name | Where-Object {$_.DisconnectDate –notlike ‘’}} | select displayname, mailboxguid, databaseFor All Users
When you want to disable all users at once and convert it to mail users, you can follow below steps. Most of the process will be same as applied for one user. The only difference is that the commands will run against all mailboxes.
- Pause Entra Connect Sync
- Launch Powershell on the Entra connect server.
- Import-Module ADSync.
- Set-ADSyncScheduler -SyncCycleEnabled $false.
Before disabling a user mailbox, make sure to back up the user’s email aliases. Converting a user to a mail user will not automatically restore the aliases; only the primary SMTP address is restored after the conversion.
To restore or add user aliases, follow these steps:
- Go to Active Directory > User account properties.
- Navigate to Attribute Editor.
- Locate proxyAddresses.
- Type the aliases in the format smtp:<user email alias> (e.g., smtp:[email protected]).
- Use Uppercase SMTP: for the primary SMTP email address and lowercase smtp: for all user email aliases.
- Disable All mailboxes
Get-Mailbox -Resultsize Unlimited | Disable-Mailbox
- Once the Mailboxes are disabled, convert each disabled user to mail User using below commands.
$userlist = Get-user -Filter { RecipientType -eq “user” }
$userlist | foreach {Enable-MailUser $_ -externalEmailAddress “$($_.userprincipalname)” }
If you want to use samAccountName instead of userprincipalname. Use below commands:
$userlist = Get-user -Filter { RecipientType -eq “user” }
$userlist | foreach { Enable-MailUser $_ -externalEmailAddress “$($_.samaccountname)@DOMAIN.COM” }
- Resume Entra Connect sync.
Set-ADSyncScheduler -SyncCycleEnabled $true- Test email Flow for few random users to confirm the mail flow.
- Now, Check all the disconnected/disabled mailboxes.
Get-ExchangeServer | Where-Object {$_.IsMailboxServer –eq $true} | ForEach-Object { Get-MailboxStatistics –Server $_.Name | Where-Object {$_.DisconnectDate –notlike ‘’}} | select displayname, mailboxguid, database
- Run below command to store all the disconnected mailboxes in a variable:
$mailboxes = Get-ExchangeServer | Where-Object {$_.IsMailboxServer –eq $true} | ForEach-Object { Get-MailboxStatistics –Server $_.Name | Where-Object {$_.DisconnectDate –notlike ‘’}} | select displayname, mailboxguid, database- Purge all mailboxes.
$mailboxes | ForEach { Remove-Mailbox -Database $_.Database -StoreMailboxIdentity $_.MailboxGuid -confirm:$false }- Verify if all the mailboxes are now purged
Get-ExchangeServer | Where-Object {$_.IsMailboxServer –eq $true} | ForEach-Object { Get-MailboxStatistics –Server $_.Name | Where-Object {$_.DisconnectDate –notlike ‘’}} | select displayname, mailboxguid, database7. Disable Arbitration mailboxes
- Get a list of Arbitration/system mailboxes.
Get-Mailbox -Arbitration
- Disable the Arbitration Mailboxes using below command:
Get-mailbox -Arbitration | Disable-Mailbox -Arbitration -DisableLastArbitrationMailboxAllowed
- Once arbitration mailboxes are disabled. Make sure you do not see any Arbitration Mailboxes when you run
Get-Mailbox -Arbitrationcommand:
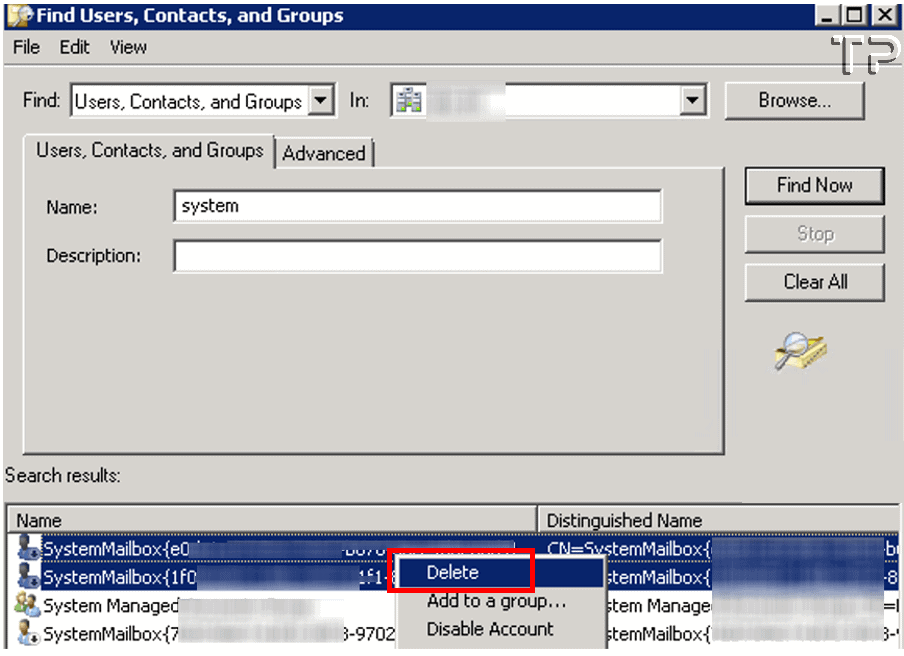
Get-Mailbox -Arbitration8. Delete SystemMailbox objects from Active Directory
Open Active Directory Users and Computers > Search for System Mailbox accounts and right click on them > Select Delete.
9. Remove Send and Receive Connectors
You can use Exchange Management Console (EMC) or Powershell to remove the send connectors. I have used Powershell command as shown below.
- Remove Send Connector.
Get-SendConnector | Remove-SendConnector
- Remove Receive Connector.
Get-ReceiveConnector | Remove-ReceiveConnector
10. Delete Mailbox Import Requests
Run below command to check if there are mailbox import requests in the queue.
Get-MailboxImportRequest
- Remove MailboxImport Requests.
Get-MailboxImportRequest | Remove-MailboxImportRequest
- Make sure all Mailbox Import Requests are deleted.
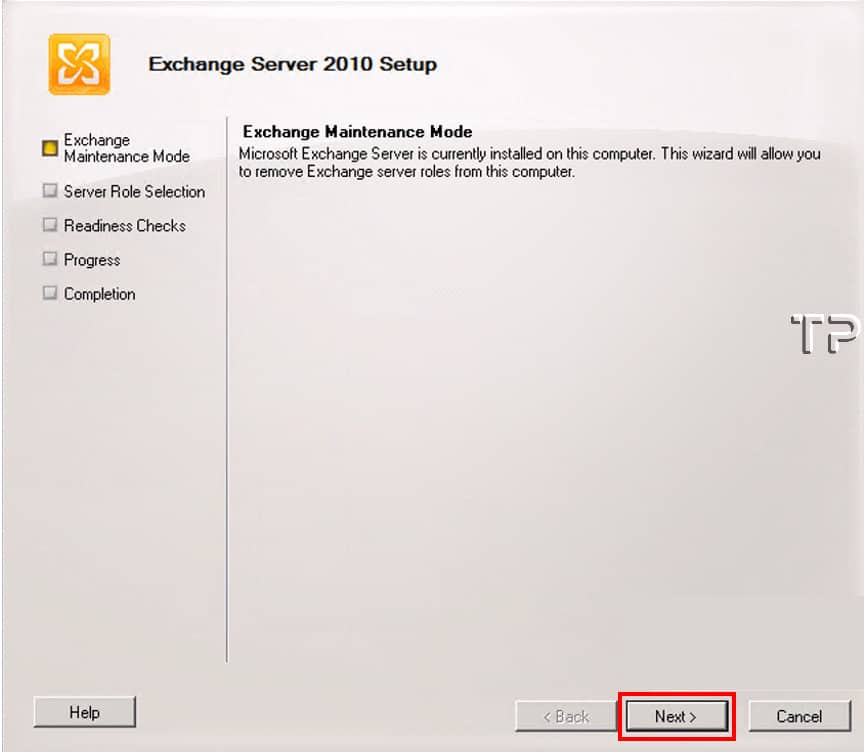
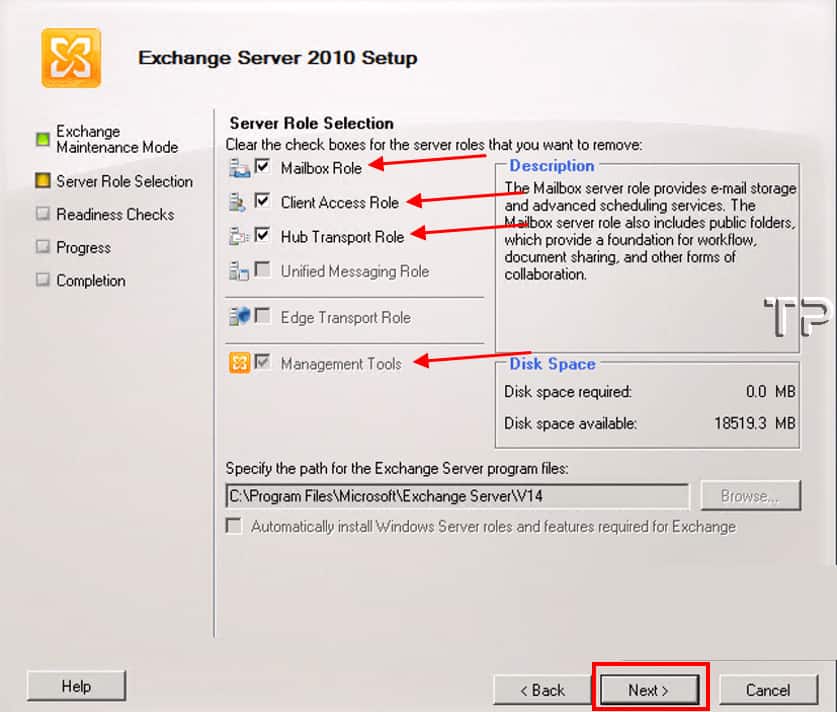
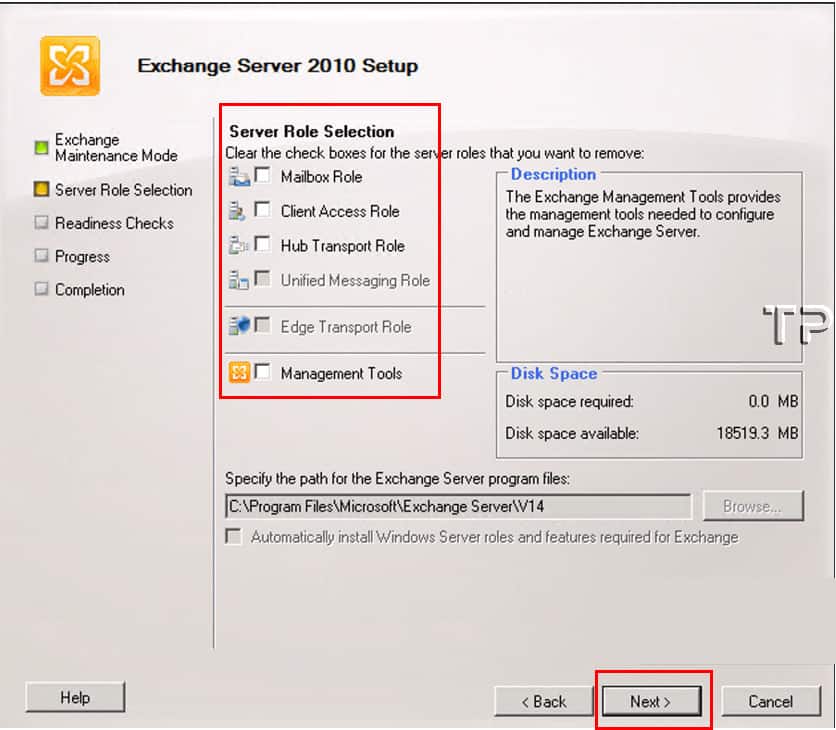
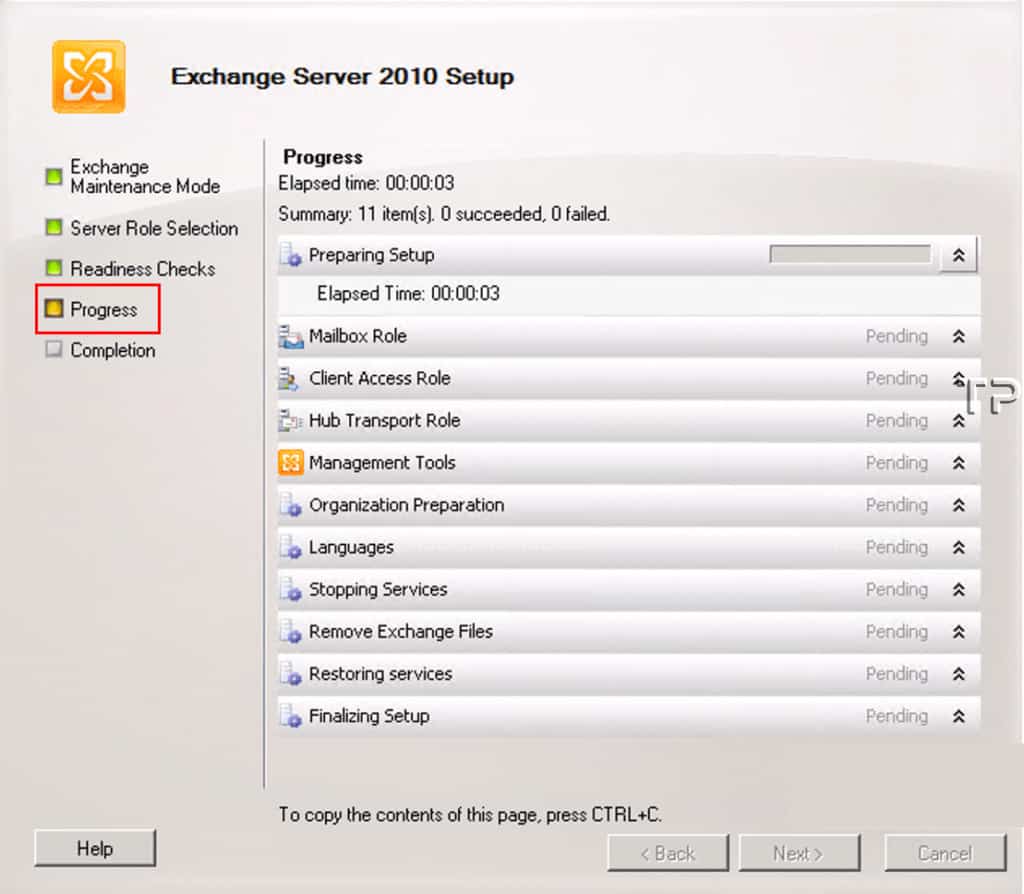
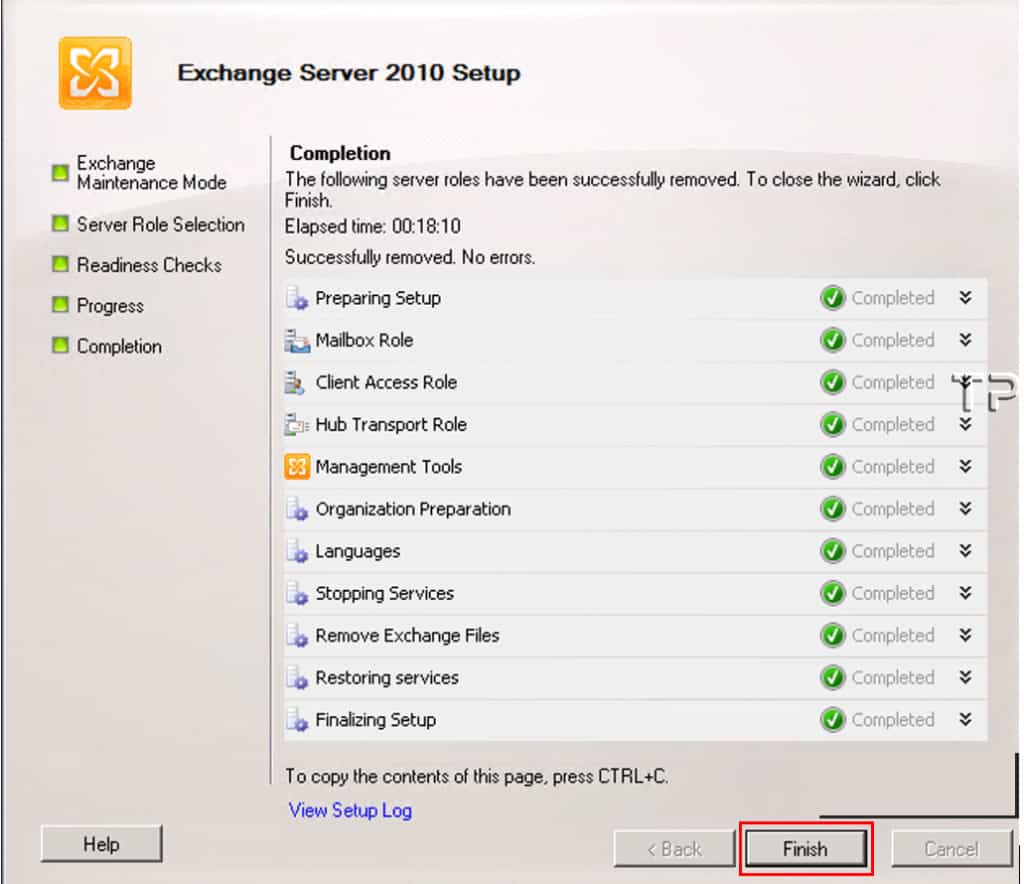
Get-MailboxImportRequest11. Uninstall Microsoft Exchange 2010 from the server
Before starting this process, Please make sure Exchange Management Shell (EMS) window is closed, Else you will receive an error about Powershell has open files.
- Go to Start > Run > type appwiz.cpl and press Enter.
- Select Microsoft Exchange Server 2010 > Right click > Uninstall

12. Test Email Flow
- Check Inbound / outbound email flow.
- Check Entra sync health status.
- Login to M365 admin center to check the users accounts and make sure there are no issues/errors.
13. Uninstall Other Softwares from Exchange server
Uninstall other software(s) from exchange server like Anti-Virus, Backup Software, Veritas backup exec agent, or any other third party tools to cleanup the meta-data and release the licenses (if any).
14. Disjoin Exchange Sever from domain
Now, you can remove the server from domain. Please make sure to create local admin account on the server so that you can login on the server if required. Delete the meta-data of the Exchange Server(s) like computer account in AD etc.
15. Power down Exchange Server
You can Power down the exchange server and remove it from monitoring systems if it was added to monitoring systems.
16. Monitoring and Deletion of Exchange Server from the disk
You can monitor the server after power down and then if its a virtual server, delete it from disk if there are no issues reported.
17. Update Documentation
Update the documentation related to Exchange Server where applicable.
Thank you for this. It is exactly what i needed. I ran a cutover migration, and enabled DirSync too soon before decomming the Exchange server. Ended up in the Oh no now you can remove Exchange forever issue
No Worries Mack. I am glad i could help.
I’ve ready to many different ways to handle this and I’m just going to give in and ask…
Currently:
All mailboxes are migrated to 365 and working for ~4 months.
to make sure I fix all apps and relays.. I logged for a month, then unplugged the nic for a week, then disabled all connectors. (I’m using a different non-Exchange server for mail relay)
Because I have 2 users that are allowed to manage addresses, mailing groups, and lists, I’d like to install Exchange 2016 to continue using exchange management tools..
I’m unsure what to do..
I’ve been told:
op1: install 2016 first, uninstall 2010, then run HCW
op2: install 2016 first, run HCW, then uninstall 2010
op3: run HCW (disabling), uninstall 2010, install 2016, then run HCW
op4: uninstall 2010, install 2016, then run HCW
I’ve been told a mixture of both and not to run HCW
Of course been told to ditch exchange and teach the users how to use PS, ADUC attrib, ADSIEdit (lol)
op2 is what I had planned from the start but I’ve spent to much time looking for the best way to handle it…
Thanks,
Mark
@Mark You need to install 2016 first, practically I followed these steps
Prepare Active Directory for Exchange 2016
Build Exchange 2016
Run HCW
Move Resources to Exchange 2016 (if any)
Decommission Exchange 2010
Hope this helps.
Thanks,
Hari
@Mark
On Below query:
Of course been told to ditch exchange and teach the users how to use PS, ADUC attrib, ADSIEdit (lol) >>>>> We have completely removed the Exchange 2010 Server for several customers and just using Active Directory Attributes Editor when creating new users or modifying existing users. Only three attributes needs to be updated in the Active Directory attributes editor 1) mail 2) mailnickname 3) ProxyAddress. In that case, IT Admin team should be able to update it or a PS script can be created for the same.
To make the management of users easier, you can leave an exchange server running as per your Plan and as Hari mentioned.
That’s how I’ve added new users recently..
Hopefully, one day…. the 365 team allows us to manage everything from 365.. its been their goal for what 5 years now? lol — I’m guessing they just haven’t figured out how to make money off it.. :p
Anyways thank you for the help.
Sounds good to me. Thank you!
Can I decommission Exchange Server with MailUsers in it and without disabling mailusers? If yes, what would happen to attributes of those mail users after decommissioning Exchange Server?
Confirmed that we do not need to disable MailUsers and Mail Contacts to decommission the Exchange on-premises server. The mail attributes for Mail users and mail contacts stay “as-is” after clean decommissioning of Exchange server.
Hi RNDMaster, Thanks for providing the insight on this. Can you please advise how did you perform a clean decommissioning of Exchange Server ? Was it your last Exchange server ? Did you simply uninstalled the Exchange Server without first disabling the mailboxes and deleting the databases ?
After uninstalling exchange 2010, what happens to Distribution and Security groups created within EMC and their attributes (such as manager, members, email address, message approval, etc…)
If you are moving completely into Cloud (Azure AD) then you will have to export the Distribution groups & import them in Cloud (re-creating them) but if you are running in a Hybrid mode then no changes are required as the authoritative identity manager is still On-Premises Active Directory
The current solution is O365 with Azure AD Connect for AD object sync. There is an on-prem exchange 2010 that we want to get rid of. We only want to keep Azure AD Connect for SSO and completely remove that. If security and DLs created through on-prem exchange will stay intact after uninstalling of exchange then is fine! thanks
Hi Haris, There should not be any impact on the DL’s and Security groups. However, I will advise you to take the backup of DL’s Proxy Addresses just in case required. I have performed the decommissioning of Exchange Server exactly as shown in this blog post. We are no longer using Exchange Server 2010 and have Azure AD Connect Synced users to Azure AD. hope this helps.
Thanks for the help comments guys
@Haris G – No Problem. I hope you were able to decommission your exchange server successfully. Please share your experience.
Thanks for the handy guide. In trying to decommission an Exchange 2010 in preparing for an SBS2011 – 2019 move, I got stuck on the Public Folder Replicas error. No amount of moving, remounting and deleting would work it. Thankfully the Alternate Fix did the trick!
Thanks for your feedback Gaby. I am glad that Alternate fix helped.
$userlist = Get-user –Filter { RecipientType -eq “user” }
This command won’t work for me ????I can only do per user not for all of them in 1 command..
any help?
Hi Bobby, Please check if the variable $userlist contains the data. If its working for one user, it should work for all the users when you use foreach loop. Can you post the error message / screenshot.
I have the same issue. Here is a screenshot of the error I get.
Not sure if my previous reply made it through so I apologize if this is a double post.
I am having the same issue with that command. Here is a screensot
Hi Tom,
Have you disabled the mailboxes as per the section “Disable All Mailboxes” ? Link: b) Disable All mailboxes before running this command ? To be on safe side, you can fist try to disable one test user mailbox and then run this command to see if it captures that user. You can follow the “For One user” Section in this article. Link:
I have divided this section in two parts. If you are testing with One user
> Try to run get-user -Filter {recipienttype -eq “user”} to see if you get any results. I have run this command on my exchange 2010 test environment and its working fine. [Please see the attached screenshot]. It could be that you have not disabled the mailboxes or could be powershell version issue as i have explained below.
> Please also check the version of Powershell. I am using below PS version.
You can try to change the version of powershell using a command and then try again. [Please see the attached screenshot].
[PS] C:Windowssystem32>$psversiontable
Name Value
—- —–
CLRVersion 2.0.50727.8813
BuildVersion 6.1.7600.16385
PSVersion 2.0
WSManStackVersion 2.0
PSCompatibleVersions {1.0, 2.0}
SerializationVersion 1.1.0.1
PSRemotingProtocolVersion 2.1
Note: There is only one screenshot covering attached to this comment.
Hi Jatin,
Yes, I have disabled the mailboxes already. I am running version 2 of Powershell. I have test with the For One User and that works fine.
Through some more testing, I found that I need to use single quotes instead of double quotes to get the command to work. So the command for me is: Get-user -Filter { RecipientType -eq ‘user’ }.
That brings me to another question though. The command returns a long list of users not all of which are Exchange users and some are system users like the IWAM user, etc. Will executing the second command that converts the users to MailUsers have a negative effect on those non-Exchange and system user accounts?
Thanks Tom, its good to see single quotes turned out to be the solution for this.
Regarding your second question, I can suggest you to capture the output of all the users in a txt file and filter out the non-exchange accounts which you do not want to convert to mail user. Use get-content to read the file into a variable and then convert the users which are in txt file to mail users.
Let me know how it goes.
Hi Jatin,
Thanks for the suggestions. I am still having problems though. I did as you suggested and created a txt file with the output and edited down the appropriate users to convert. I used get-content to add the list to the $userlist variable. When I execute the command to convert the users though I get these errors. Using the “for one user” commands still work fine as I tested them on another user again.
@Tom, I am not sure if this is fixed for you yet. I will check it again to see why there are issues when the command is used with all users. Let me know the current status.
Thank you for sharing such detailed instructions for this task. Our organization went through a “Cutover” migration to Microsoft 365 from Exchange 2010 on-prem but AD Sync was established before we did the migration. As I understand it, after reading countless articles on the web, this means our transition was more like a Hybrid migration rather than a Cutover migration so, bummer.
I have been trying to determine how our organization is going to get out of the state we are in. Of course we are not unique here but we seem to be stuck in an even more interesting state compared to all articles on the web that provide guidance/insight/help that I have been able to find. We have the unfortunate luck to have our Exchange 2010 installation be on a Windows Server 2008 NON-R2 virtual machine. What this means is the highest build number supported for this Exchange 2010 installation, is Update Rollup 8 for Exchange Server 2010 SP1 released in December of 2012. We are unable to introduce Exchange 2016 with the intent to perform user management with it (so we stay in a Microsoft recommended supported state) so we can decom the 2010 because Exchange 2016 will not install until the 2010 version is on a much newer build.
I don’t feel confident moving forward with any option. I wonder if we just limp along until perhaps Microsoft releases new guidance for ripping out Exchange 2010 or even a wizard based application that decommissions it but who knows if that would ever come.
No Problem Bren. Yes, you can keep it running for now or plan to decommission it completely and use ADSIEdit to manage mail attributes of users. I have worked with a lot of clients and decommissioned their Exchange 2010 On-Prem servers after migration to Office365. I understand its easier to manage the mail attributes when exchange server is in place. But its actually not too difficult to manage mail attributes using Attributes Editor in Active Directory.
I make sure mail, mailNickname and proxyAddresses is populated as per request when creating any new user and sync it to Azure AD using Azure AD Connect.
Thank you for your help, tips, and information. Your response certainly makes me feel a lot better about moving forward. I do have two follow up questions – if I may ask.
Thanks again.
No Problem Bren, Happy to help.You can try creating a test mailbox -> check mail attributes in AD -> disable that mailbox -> check mail attributes in AD again. It will be removed. Therefore, convert it to mail user first and then disable the mailbox to retain the mail attributes.
Feel free to let me know if there are more queries.
#1 When you convert a user to mail user and then disable the mailbox, it will retain the mail related attributes in Active Directory. I have just disabled a mailbox and got below pop-up message. (as shown in screenshot attached) After it was disabled, all mail related attributes from Active Directory were removed that’s why we need to convert a user to a mail user.
#2 Stop the sync temporarily should not have any impact on the accounts already synced to office365. General Advice on it is Stop the Sync Cycle temporarily, make changes and then start the sync again. I generally plan the decommissioning work out of office hours or over a weekend.
It appears that this works, however, after I disable the user mailbox and then convert it to a mail user, it appears that any additional proxyAddresses that were set are lost. Is this expected?
I guess I will need to backup the aliases and then restore them.
Hi Matt, Yes that’s right. Only Primary SMTP is restored back when a user mailbox is disabled and then converted to a mail user. As the command for enabling a user to mail user is using user principal name, Its restoring only Primary SMTP email address of the user which matches the user principal name value in Active Directory. User email aliases will need to be backed up and restored after a user is converted to a mail user. I have updated the guide to include this.
Thank you for updating the guide and the guide in general, I found it very helpful !
Can you confirm few more things for me?
1) Will distribution groups be retained once I uninstall Exchange 2010? Is there anything I need to do to preserve them?
2) Once we convert the users to a mail user, they appear in Exchange 2010 EMC under “Mail Contacts”. I assume that’s expected and I will be able to remove Exchange without removing the contacts from there as that would delete the user, is this correct?
Hi Matt,
#1 Answered here: If you are moving completely into Cloud (Azure AD) then you will have to export the Distribution groups & import them in Cloud (re-creating them) but if you are running in a Hybrid mode
To be on safe side, you can take backup of all Distribution Groups, Security Groups memberships and mail attributes.
#2 Contacts: Not need to delete the contacts, leave them as is.
What about the exchange 2010 groups where it says groups are managed only on premised. Do i have to migrate this before to the cloud then i could start the process. MY environment already has exchange mx to the cloud. I just realized the groups are not manage. How do i proceed?
I really need some help , been struggling with this.
If you are using Azure AD Connect to sync the Distribution to the cloud and will continue to do so after removing exchange then there is no change required. This was answered in one of the previous comments: If you are moving completely into Cloud (Azure AD) then you will have to export the Distribution groups & import them in Cloud (re-creating them) but if you are running in a Hybrid mode.
Hope this helps, please let me know if any more queries. To be on safe side, you can take backup of all Distribution Groups, Security Groups memberships and mail attributes.
I did a remote move migration, so there are no mailboxes left. So I guess that the conversion to mail users is not necessary, right?
Hi, I am also in this situation as Phillip.
Exchange 2010 was setup in hybrid and we performed remote move requests to lift the mailboxes from on-prem to Exchange Online.
All users are now in Exchange Online.
AD Sync is in place for password synchronisation.
We have several mailbox databases but they are now empty except for the Arbitration Mailboxes
The users that have been moved from on-premise to Exchange Online are referenced in EMC here – Recipient Configuration > Mail Contact. They are listed as recipient type Remote User Mailbox.
If we uninstall Exchange will it strip the Exchange attributes from a Remote User Mailbox?
My understanding is that Mail Contacts are not effected by uninstalling Exchange and I am wondering if Remote User Mailboxes are treated in the same way.
Thanks
Danny
For completeness and to answer the question – If we uninstall Exchange will it strip the Exchange attributes from a Remote User Mailbox? The answer in our scenario was no, all attributes and their values remained after completely uninstalling Exchange 2010. It seems that remote user mailboxes are treated like contacts and uninstalling Exchange doesn’t change any of their values.
We followed the above article and it was a great help, except we didn’t need to convert the users to Mail Users.
We tested the uninstallation of Exchange in a test Hyper V environment with a copy of the Exchange server that we P2Vd and a DC with all the FSMO roles before proceeding in the real world
Dear All,
Thanks for this step by step document. Actually we had same scenario like exchange 2010 with DAG and more than 500 users. We have migrated all users to O365 and changed the connector also. Its working fine from more than 3 months.
There is no any mailbox available in Exchange 2010. We have shutdown the servers from last 3 months.
Its working fine but when we create a new user in AD, we have to add proxy address manually which is sync through AD connect to O365.
So my question is , it is till required to removed the Exchange 2010? after shutdown its also working fine.
Please help me to understand.