In blog post is an extension of my other post Connect to Sharepoint Online using PowerShell and Entra App, which provides the steps to connect with SharePoint online using Connect-PnPOnline cmdlet. We created and used a self-signed certificate to establish a connection with SharePoint online using this cmdlet.
When we established the connection, we used a self-signed certificate which was stored on the local device, which was less secure. In this blog post, I will show you the steps to store the certificate in Azure KeyVault and use it to connect with Sharepoint online.
Contents
1. Create a Self-Signed certificate
There are two ways to create a Self-signed certificate. You can either use the steps given in the post: #step-1-create-a-self-signed-certificate or #step-2-create-a-self-signed-certificate. You can use any of these links to create a self-signed certificate.
2. Create an App registration in Entra ID
Create an App registration which will be used to establish the connection. For steps on creating Entra ID App registration, refer to the link: #step-2-create-an-app-registration-in-entra-id.
3. Upload Self-Signed Certificate
Upload the Self-signed certificate to the App registration. Refer to the link to check the Steps for uploading the cert: #step-4-upload-certificate-to-the-application.
4. Create an Azure KeyVault
Once you have completed Steps 1, 2, and 3, you can now create an Azure KeyVault using the following PowerShell command. Alternatively, you can manually create an Azure KeyVault by logging on to the Azure Portal.
Create Azure KeyVault
New-AzKeyVault -Name "Mytestkeyvault001" -ResourceGroupName "uk-south01" -Location "UK South"4.1 Import Self-Signed Certificate in Azure KeyVault
The generated Self-signed certificate PFX file, along with its password, needs to be imported into Azure KeyVault. To import the certificate into Azure KeyVault, please follow the steps below:
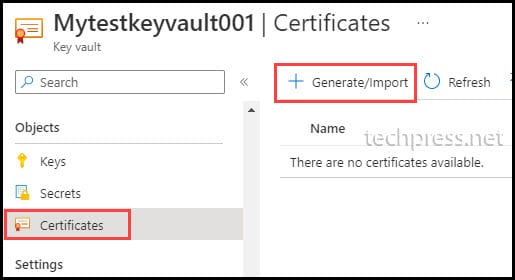
- Open Azure KeyVault Mytestkeyvault001.
- Click on Certificates.
- Click on + Generate/Import.
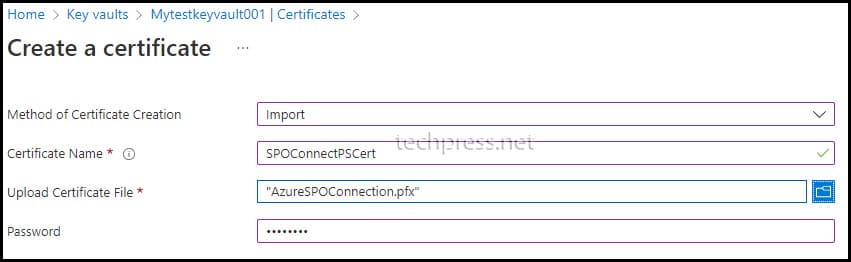
- Select the method of Certificate Creation as Import.
- Certificate Name: Provide any user-friendly name for the certificate.
- Upload Certificate File: Browse to the certificate PFX file.
- Password: Provide the password for the certificate PFX file.
- Click on Create to initiate the import process.
4.2 Assign Get/List Permission to the Entra App in Azure KeyVault
Once the certificate is imported, we need to provide Get and List permissions to the Entra App in Azure KeyVault. Please follow the steps below to grant these permissions:
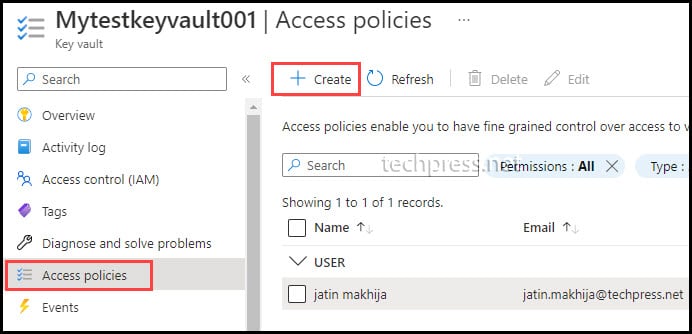
- Open Azure KeyVault Mytestkeyvault001.
- Click on Access policies.
- Click on + Create.
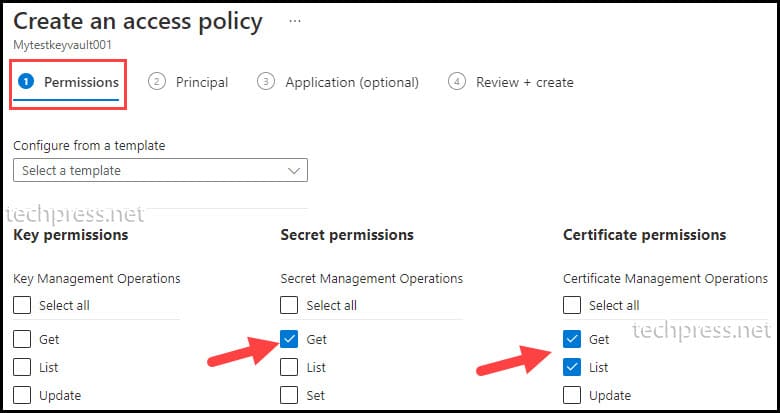
- On the Permissions tab:
- Select Get under Secret permissions.
- Select Get and List under Certificate permissions.
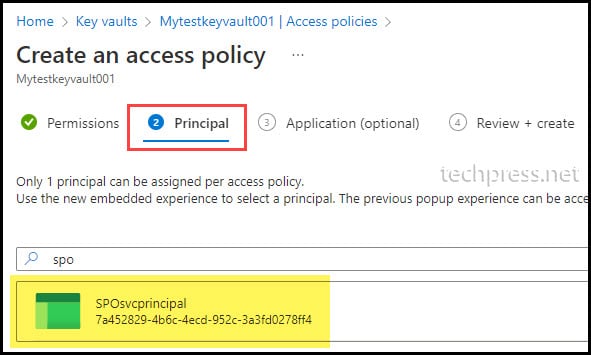
- On the Principal tab, search for the Entra App registration and select it. Click Next to proceed. Move to the Application and Review + create tabs, then click Create.
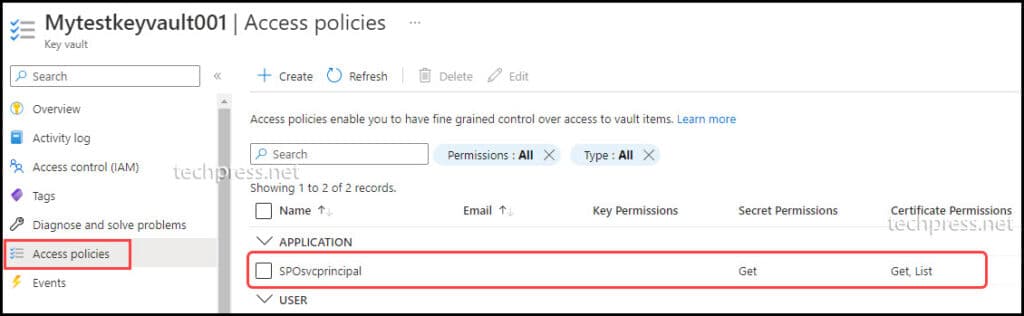
- After adding permissions for the app, it will be listed under Access policies. You can also review the permissions assigned to the Entra app under Secret Permissions and Certificate Permissions column.
5. Retrieve Self-Signed Certificate from Azure KeyVault using PowerShell
To retrieve the Self-signed certificate from Azure KeyVault, you will first need to connect to Azure using the Connect-AzAccount cmdlet, which is part of the Az PowerShell module.
If you do not have the Az PowerShell module installed on your device, you may encounter an error stating that the Connect-AzAccount command is not recognized.
- To install the Az PowerShell module, use the following command:
Install the Az PowerShell module
Install-Module -Name Az -Scope CurrentUser -Repository PSGallery -Force- Connect to Azure using
Connect-AzAccount- $ApplicationId: Provide the Client ID of the Entra App. The same app where you uploaded the self-signed certificate and added permissions in Azure KeyVault.
- $TenantId: Provide the Tenant ID of your organization. You can find the Tenant ID of your organization on the Overview tab of the Entra admin center.
- $ClientSecret: Provide the Client Secret of the service principal. You can find the Client Secret by navigating to the Entra admin center > Applications > App registrations > Click on the Application > Certificate & secrets > Client secrets.
If you have not created a Client Secret, you can click on the + New client secret button. Provide a description and expiry date for this client secret. Click on Add to create a client secret. Make sure to copy the Client Secret Value, not the Secret ID, for the commands/script.
Note
Connect to Azure using Connect-AzAccount
$ApplicationId ="ee15adf9-eabd-4bcf-bbf3-cc0f7d2616ba"
$TenantId= "97659d97-8dab-4122-80bd-caadf41b64d7"
[string][ValidateNotNullOrEmpty()] $ClientSecret = "hLT8Q~8mCkXdGVsMnsdE61IhFskED6m8I5ExJbcI"
$AzPassword = ConvertTo-SecureString -String $ClientSecret -AsPlainText -Force
$Credential = New-Object -TypeName System.Management.Automation.PSCredential -ArgumentList $ApplicationId, $AzPassword
Connect-AzAccount -ServicePrincipal -TenantId $TenantId -Credential $Credential- Use the Get-AzKeyVaultSecret cmdlet to retrieve the certificate in a PowerShell variable.
- $VaultName: Provide the Azure KeyVault name.
- $certName: Provide the certificate name as shown in Azure KeyVault.
- $secretValueText: This variable will store the certificate value.
Retrieve the Certificate in a PowerShell variable
# Specify Azure Key Vault Name and Cert Name
$VaultName = "Mytestkeyvault001"
$certName = "SPOConnectPSCert"

# Get the cert stored in KeyVault
$secret = Get-AzKeyVaultSecret -VaultName $vaultName -Name $certName
$secretValue = $secret.SecretValue
$bstr = [System.Runtime.InteropServices.Marshal]::SecureStringToBSTR($secretValue);
$secretValueText = [System.Runtime.InteropServices.Marshal]::PtrToStringAuto($bstr);
6. Use Connect-PnPOnline to Connect to Sharepoint online
The last step is to use the variables $secretValueText, $clientID, $tenant, and $siteurl to connect to SharePoint Online using the Connect-PnPOnline command.
- $tenant: Provide your organization’s tenant name.
- $siteurl: Provide the SharePoint Online site URL to connect.
- $clientID: Provide the Client ID of the Entra App.
- $secretValueText: This variable contains the certificate value.
Connect to Sharepoint online (Example)
$tenant = "mylab000.onmicrosoft.com" # or tenantId
$siteUrl = "https://mylab000.sharepoint.com/sites/Finance"
$clientID = "ee15adf9-eabd-4bcf-bbf3-cc0f7d2616ba" # Azure Registered App / Service Principal with the same certificate and Keyvault permissions configured

$props = @{
    Url                     = $siteUrl
    ClientId                = $clientID
    Tenant                  = $tenant
    CertificateBase64Encoded = $secretValueText  # Assuming $secretValueText contains the Base64-encoded certificate
}

Connect-PnPOnline @props
Great post thank you. One adjustment. Step 5, there was no Secret ID within my app. Two steps I had to do for this to work were:
1. Manually add a Secret (I set expiry for 2 years)
2. The secret ID was the wrong value and I received an error….its the “Secret Value” that must be provided.
Other than that you saved me a lot of headaches with this post. Appreciate it.
Thank you for the feedback. I am glad that this post helped you. I have updated the post as per your comments.
Great post Jatin! It helped me a lot in creating YAML pipeline deployments with PS scripts.