This blog post will guide you on how to Add a user/group to local admin using Intune. We will learn multiple ways to add an existing Entra ID user account or Entra security group into the Local administrator’s group on Windows devices using the Intune admin center.
Contents
Method 1: Using a PowerShell Script
You can create and deploy a PowerShell script using Intune to add an Entra ID user to the local administrator group on Windows devices. Let’s check the steps:
Step 1: Create a PowerShell Script
Open a Notepad file and paste the following line of code. Replace the user account name with the one you want to add to the local administrators group on target devices. Save the file as Add_Local_Admin.ps1.
For example, the following command will add the user [email protected] into the local administrator group.
Add_Local_Admin.ps1
Net localgroup administrators "AzureAD\[email protected]" /add
Step 2: Deploy the PowerShell Script
The next step is to deploy the PowerShell script file Add_Local_Admin.ps1, which will add [email protected] to the local administrator group.
You can refer to this step-by-step guide for deploying PowerShell scripts using the Intune admin center: How to deploy a PowerShell script using Intune.
Step 3: End User Experience
Once the script deployment has been completed successfully. Now, let’s check if the user account, [email protected], has been added to the local administrator’s group on the target devices.
To check and confirm, follow below steps:
- Press the Windows key + R to open the Run dialog box.
- Type
compmgmt.mscand press Enter to open the Computer Management console. - Navigate to Local Users and Groups > Groups.
- Double-click on the Administrators group, and you will find that the Entra ID user account given in the PowerShell script is added to this group.

Method 2: Using an Autopilot Deployment Profile
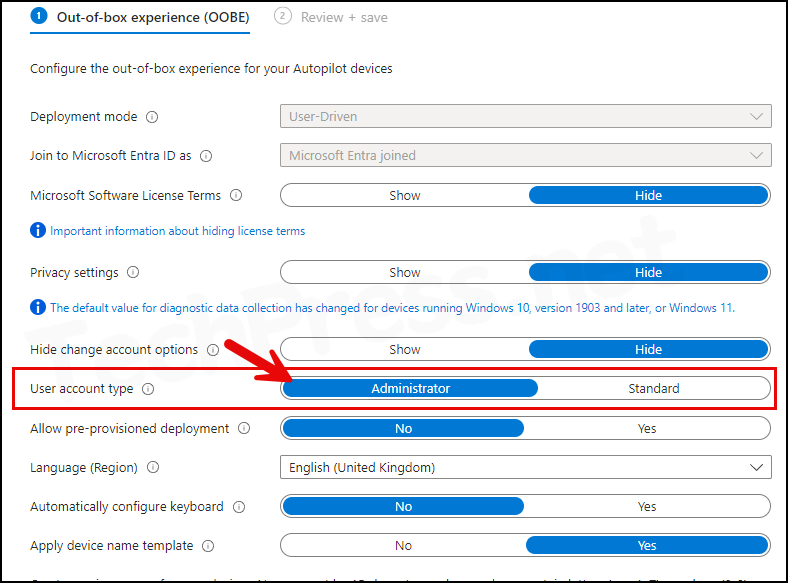
If you are using an Autopilot deployment profile, you can elevate a user to a Local Administrator using this method. The user will automatically become an administrator when you provision a device using the Autopilot profile configured with the user account type set as Administrator.
To check the Autopilot Deployment profile, Navigate to Intune admin center > Devices > Windows > Enrollment > Deployment profiles.
Method 3: Using Local User Group Membership
You can add an Entra ID user account or an Entra security group to the Local administrator group using Local User Group Membership configuration on Intune admin center.
- Sign in to the Intune admin center > Endpoint Security > Account protection.
- Click on Create Policy.
- Platform: Windows 10 and later
- Profile: Local user group membership and click on Create.
For complete information and step-by-step instructions on adding a user or group to the local admin group using Local User Group Membership method, refer to the guide: Add a User to Local Admin Group Using Intune.