Continuing the Kubernetes home lab series, this is Part 3, where we proceed further with initializing the Kubernetes cluster. In Part 1, we downloaded and installed Ubuntu 24.04 Server and created three VMs for the lab based on the specifications below and established remote connectivity using SSH.
| Role | Hostname | vCPU | RAM | Disk | IP |
|---|---|---|---|---|---|
| Control plane | Kube-Master01 | 2 | 2 GB | 20 GB | 192.168.55.61 |
| Worker 1 | Kube-node01 | 2 | 2 GB | 20 GB | 192.168.55.193 |
| Worker 2 | Kube-node02 | 2 | 2 GB | 20 GB | 192.168.55.72 |
In part 2 of the series, we prepared the base OS image for setting up the cluster, including installing kubeadm, kubelet, and kubectl. We also installed containerd for container runtime. Container runtime is the software responsible for running the containers.
Contents
Step 7: Initialize Cluster with Kubeadm (Run this Only on Master/Control Plane Node)
We will now be initializing our Kubernetes cluster using Kubeadm. The command that we are going to use is kubeadm init <args>. This command executes multiple phases, like running preflight checks, generating and uploading the required certificates for different components, marking the node as a control plane, etc. For learning more, refer to the link: kubeadm-init.
Before you start initializing the cluster, you will need the below details.
For more information about initializing a Kubernetes cluster, refer to the link #initializing-your-control-plane-node.
- kubeadm init: Initializes the Kubernetes control plane on the node and sets up essential components such as the API server, scheduler, controller manager, and etcd.
- –apiserver-advertise-address=192.168.55.61: Specifies the IP address that the Kubernetes API server will advertise to other nodes in the cluster. Worker nodes use this address to communicate with the control plane.
- –pod-network-cidr=10.244.0.0/16: Defines the IP address range used for pod networking. This range must align with the requirements of the CNI plugin you plan to use, as the default pod network CIDR can vary between plugins. For example, Flannel uses 10.244.0.0/16, while Calico uses 192.168.0.0/16 by default. If you use the plugin’s default CIDR range, no changes are required in its YAML configuration file. However, if you choose a different CIDR range, you must update the plugin’s YAML file with the new CIDR before installing the CNI plugin.
- –cri-socket unix:///run/containerd/containerd.sock: Specifies the Container Runtime Interface (CRI) socket used by the container runtime. In this case, it tells Kubernetes to use containerd as the runtime via its Unix socket.
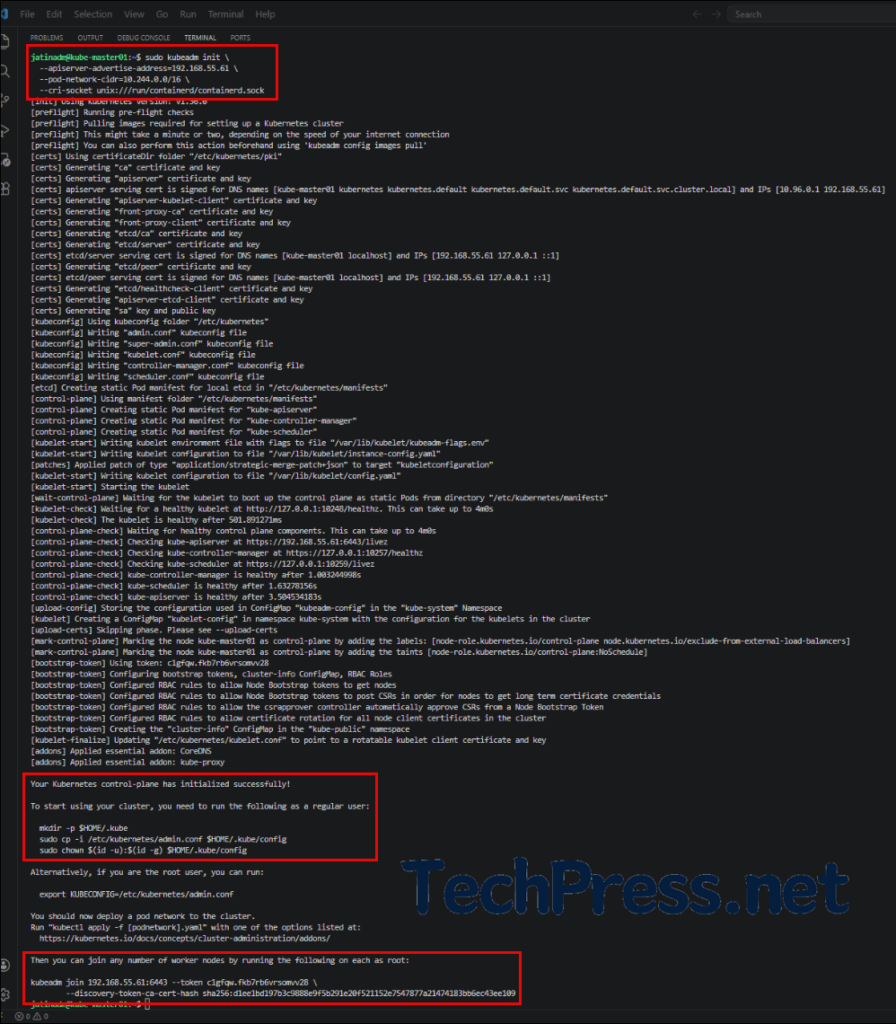
sudo kubeadm init \
  --apiserver-advertise-address=192.168.55.61 \
  --pod-network-cidr=10.244.0.0/16 \
  --cri-socket unix:///run/containerd/containerd.sock
The output of the kubeadm init command provides the next steps, as highlighted in the screenshot below. Look for the message “Your Kubernetes control-plane has initialized successfully!”. After this, it lists the commands required to configure kubectl access for the current user (which we will run next).
At the end of the output, you will find the kubeadm join command used to add worker nodes to the control plane. You will need this command to join the worker nodes to the master node. If you did not copy it earlier, you can generate it again using: kubeadm token create –print-join-command.
Configure kubectl Access for Current User
These steps configure access to your Kubernetes cluster for the current user by placing the cluster’s admin configuration in the user’s home directory and ensuring the correct permissions are set. This allows you to run kubectl commands without requiring elevated privileges.
mkdir -p $HOME/.kube
sudo cp -i /etc/kubernetes/admin.conf $HOME/.kube/config
sudo chown $(id -u):$(id -g) $HOME/.kube/config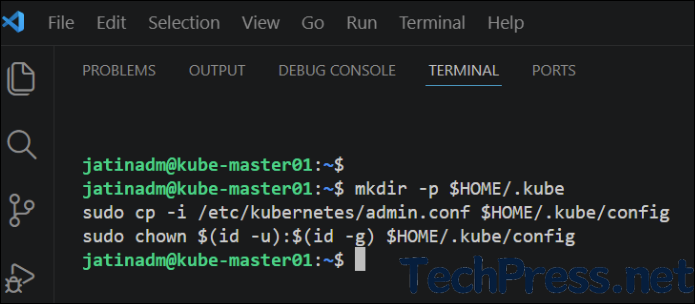
Test Master/Control Plane Node
Now, after successfully initializing the Kubernetes cluster, run basic kubectl commands to check and confirm the status of the cluster.
kubectl get nodesWhen you run kubectl get nodes, only the kube-master01 node appears, and its status shows as NotReady because the Container Network Interface (CNI) plugin has not yet been installed. Once you install a CNI plugin, the node status will change to Ready.
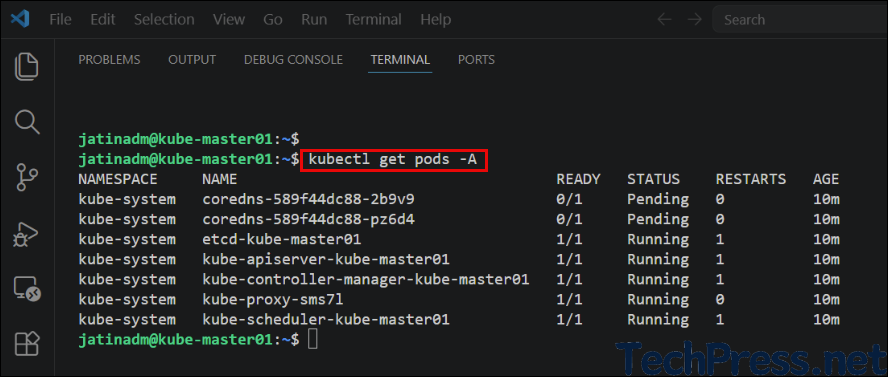
You can also run kubectl get pods -A commands to check different pods running on the master node.
Step 8: Install Calico CNI plugin on Control Plane
A CNI (Container Network Interface) plugin is required in Kubernetes to provide networking for Pods, including assigning IP addresses and enabling communication between Pods across nodes. Without it, pods cannot communicate with each other.
Calico is a popular CNI plugin that not only provides reliable and high-performance networking using Layer 3 routing but also adds advanced security through network policies, allowing you to control traffic between pods within the cluster. You can select any other CNI add-on and install it instead, for example, Flannel or Canal, etc. For more information about these CNI add-ons, refer to the link, Installing Addons | Kubernetes.
Run below command to download the Calico Kubernetes manifest file from the official GitHub repository and save it to your current directory.
curl https://raw.githubusercontent.com/projectcalico/calico/v3.31.4/manifests/calico.yaml -O
Since we used --pod-network-cidr=10.244.0.0/16, which differs from Calico’s default pod network CIDR, we need to update it in the calico.yaml file. Open the file, uncomment the CALICO_IPV4POOL_CIDR line, and set its value to the same pod network CIDR range that was configured during the kubeadm init step. In out case, it’s 10.244.0.0/16.
vi calico.yaml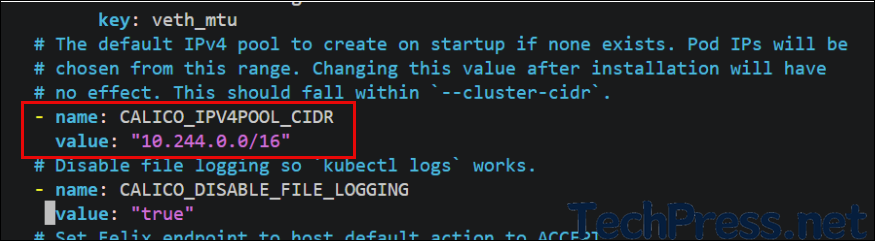
Run the command below to install Calico as the CNI plugin. This will create all the required components, including Pods, DaemonSets, ConfigMaps, and RBAC resources, in the cluster.
kubectl apply -f calico.yaml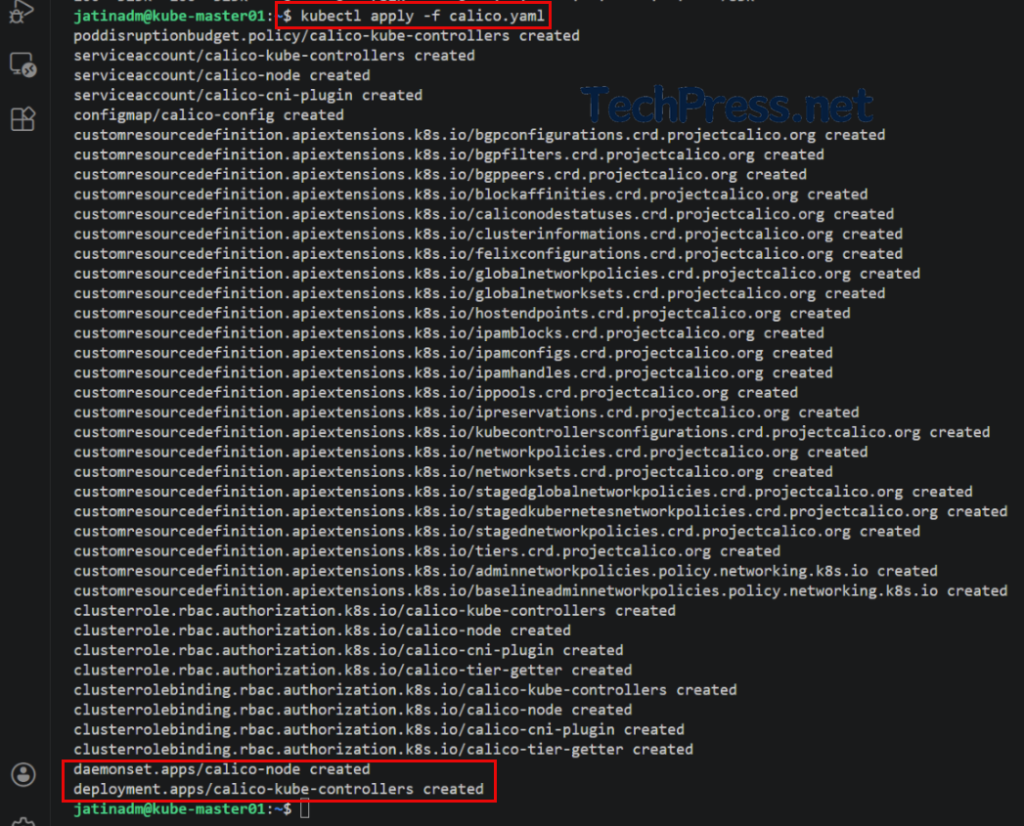
Run the commands below to verify that the control plane node is in the Ready state. Moreover, check the pod’s IP addresses to confirm they are being allocated from the configured range 10.244.0.0/16.
kubectl get nodes

kubectl get pods -A -o wide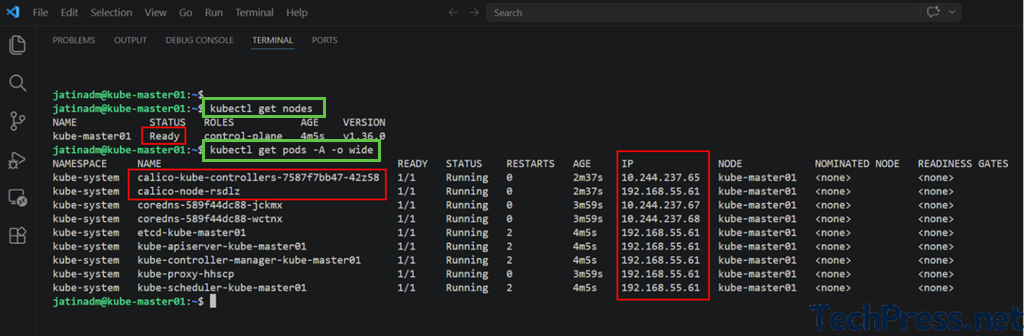
Step 9: Join Worker Nodes to Master Node
Once you have completed the Kubernetes cluster initialization and installed the required components, you can join the worker nodes to the control plane node. After running the kubeadm init command, the output includes a kubeadm join command that you can use to add worker nodes to the cluster.
If you did not copy the output of the kubeadm init command, you can run the command below on the control plane node to display the join command again in the console.
kubeadm token create --print-join-command
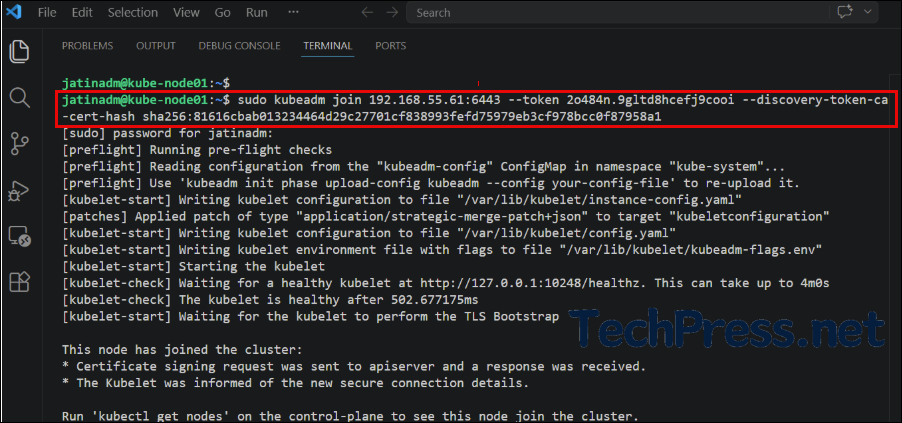
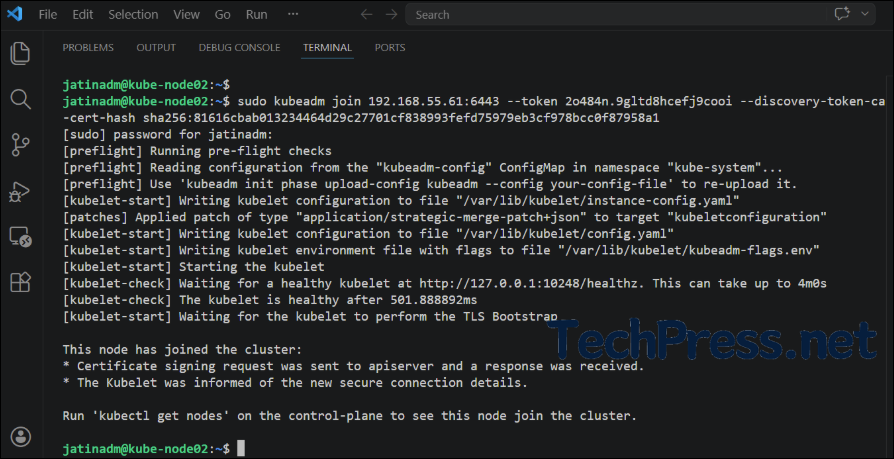
Run the kubeadm join command exactly as printed on the console on all worker nodes to join them to the control plane (master) node.
sudo kubeadm join 192.168.55.61:6443 --token 2o484n.9gltd8hcefj9cooi --discovery-token-ca-cert-hash sha256:81616cbab013234464d29c27701cf838993fefd75979eb3cf978bcc0f87958a1Node01 (Worker node)
Node02 (Worker node)
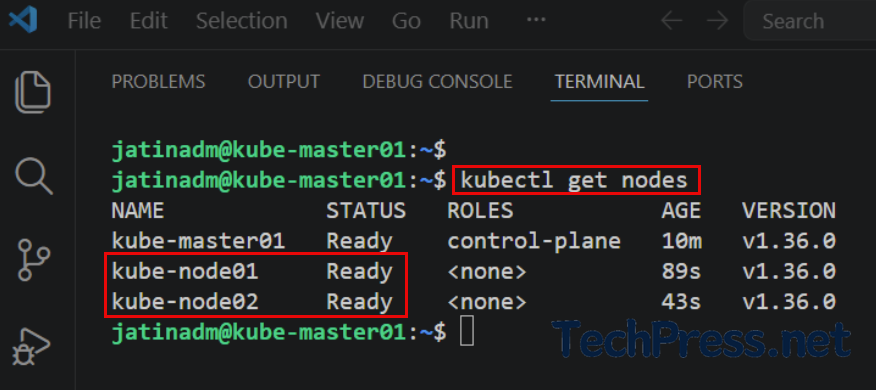
Run kubectl get nodes on the control plane node to verify that the worker nodes have successfully joined the cluster. The status for each node should display as Ready.
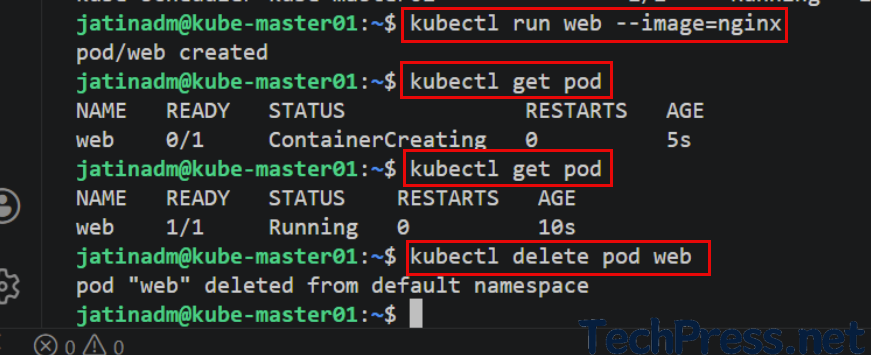
Verify that you can create a pod on the cluster. For example, create a test NGINX pod by running the following commands and check it using kubectl get pod.
kubectl run web --image=nginx
kubectl get pod
kubectl delete pod web