In this post, I will show you how to copy emails from one mailbox to another in Office 365. You may need to switch from one mailbox to another by copying all emails from the old mailbox to the new one. If only certain emails are relevant or important to you, you can selectively choose the emails you want to copy to the new mailbox.
Another scenario could involve consolidating multiple mailboxes into one, and after that deleting the old mailboxes. Whatever the reason may be, copying emails from one mailbox to another in Office 365 is a common task that can be accomplished in a few simple steps.
The source mailbox can be either a user mailbox or a shared mailbox, and the destination mailbox can also be either a user mailbox or a shared mailbox. While we will primarily use PowerShell, I will also demonstrate a method which utilizes Outlook for copying emails.
Contents
Option 1: Copy emails using New-ComplianceSearchAction
You can use the New-ComplianceSearchAction cmdlet, part of the Exchange Online PowerShell module, to copy emails from one mailbox to another. This cmdlet will help with exporting emails into PST file which can be imported into the target mailbox.
First, we need to perform content search using New-ComplianceSearch cmdlet. Once the search is complete, the results can be exported to a PST file using the New-ComplianceSearchAction cmdlet.
Ensure that you are part of eDiscovery manager role to complete this process. To provide eDiscovery Manager role, follow below steps:
- Sign in to the Microsoft 365 Defender portal.
- Expand System > Permissions > Email & collaboration roles > Roles.

- Find eDiscovery Manager role and click on Edit.

- Click on Choose users and add the administrator account who will be performing this task. Click on Next. Skip the step for adding users to eDiscovery Administrator role.

- After we have provided eDiscovery Manager role to the administrator, we can proceed with the rest of the steps. Before we proceed, ensure that Exchange Online PowerShell module (EXO V3 module) is installed on your computer.
Connect to the Security & Compliance Center
Connect-IPPSSession -UserPrincipalName <administrator UPN>

Example:
Connect-IPPSSession -UserPrincipalName [email protected]
Create a New Content search
New-ComplianceSearch -Name <Search Name> -ExchangeLocation <Source Mailbox> -ContentMatchQuery <Search Query>

Example:
New-ComplianceSearch -Name JatinMMails -ExchangeLocation [email protected]
Start the Content search
Start-ComplianceSearch -Identity <Search Name>

Example:
Start-ComplianceSearch -Identity JatinMMails
Check the Status of Content search
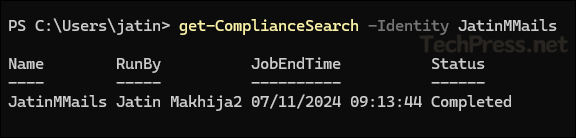
Get-ComplianceSearch -Identity <Search Name>

Example:
Get-ComplianceSearch -Identity JatinMMails
- Below step which uses
New-ComplianceSearchActioncmdlet to export the emails into PST file requires eDiscovery manager role. If you do not have this role, you will get the following error on PowerShell console.
New-ComplianceSearchAction: A parameter cannot be found that matches parameter name ‘Export’.
Export the Search results using New-ComplianceSearchAction
New-ComplianceSearchAction -SearchName JatinMMails -Export -ExchangeArchiveFormat PerUserPST
- Check and confirm if the Export process is completed by running
Get-ComplianceSearchActioncmdlet.
Get-ComplianceSearchAction
Download the Results from Microsoft Purview portal
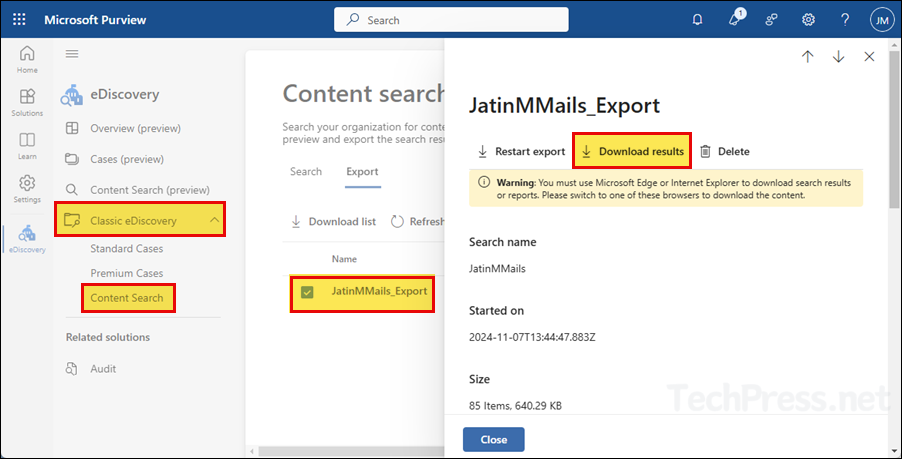
- Sign in to the Microsoft Purview portal using an administrator account with eDiscovery manager role. If you do not have this role assigned, you may get below Permission error.

- Expand Classic eDiscovery > Content Search.
- Select the Exported Content search result and click on Download results.
- It will download Microsoft.Office.Client.Discovery.UnifiedExportTool which can be used to download the PST file.
Please note you must use Microsoft Edge browser to open this tool and download the search results. Best option is to open the purview portal in Edge browser and then proceed with the steps to Download the PST.
Note
- After you download the PST file which contains all emails, you can use Outlook to Import the PST file in target users mailbox. You can refer to this link Import emails using PST for more Information.
Option 2: Copy Emails Using Outlook
You can also use Outlook app to copy emails from one mailbox to another. For example, if you want to copy emails from Grady A’s mailbox to Nestor W’s mailbox, you need to grant Nestor W Read and Manage (full access) to Grady A’s mailbox. You can provide full access to a user on another user mailbox either by using Exchange admin center or by using PowerShell.
Using Exchange Admin Center
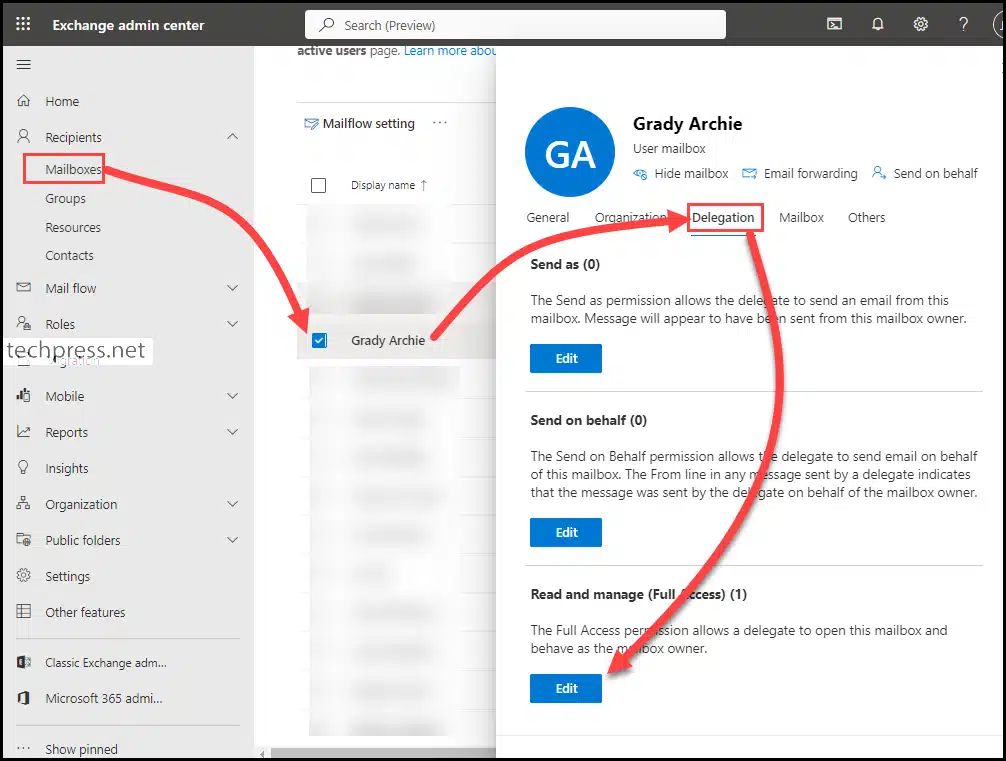
- Sign in to the Exchange Admin Center > Recipients > Mailboxes.
- Locate the user Grady Archie and click on it.
- Go to the Delegation tab.
- Click on Edit next to Read and manage (Full Access).
- Click on + Add members to add Nestor W and provide him with Full Mailbox access to Grady A’s mailbox.
Using PowerShell
Install Exchange Online PowerShell Module
Install-module -Name ExchangeOnlineManagementConnect to Exchange Online
Connect-ExchangeOnline -UserPrincipalName <Admin UPN>

Example:
Connect-ExchangeOnline -UserPrincipalName [email protected]
Provide Full mailbox access to NestorW on GradyA’s mailbox
Add-MailboxPermission -Identity [email protected] -User [email protected] -AccessRights FullAccess -InheritanceType All -AutoMapping $true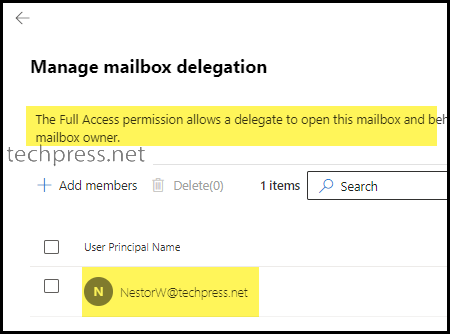
Finally, Use the Below Steps to Copy Emails Using Outlook
As we used -AutoMapping $true when granting full mailbox permission to NestorW on GradyA’s mailbox, upon restarting Outlook, Grady Archie’s mailbox will automatically appear in Nestor W’s Outlook.
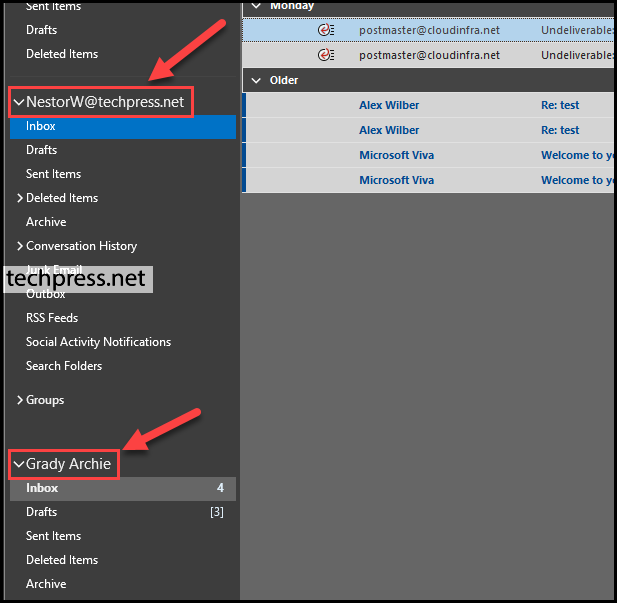
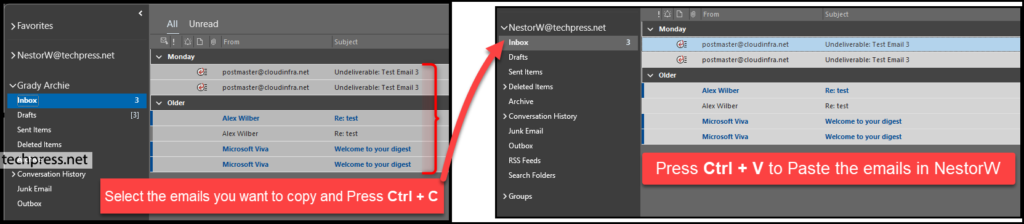
- Open source mailbox (Grady Archie in this example) and select all the emails you want to copy to target mailbox (NestorW mailbox in this example) and press
Ctrl + Cto copy. - Go to Nestor W’s mailbox and select the folder where you want to paste the emails.
- Press
Ctrl + Von the keyboard to paste the emails.
| You can also drag emails from Grady Archie’s mailbox to NestorW’s mailbox. While dragging to the destination folder, keep holding the Ctrl key on the keyboard to copy the emails; otherwise, the emails will be moved instead of getting copied. |
Option 3: Copy Emails Using Bittitan MigrationWiz
Another option for copying emails from a source mailbox to a target mailbox is Bittitan MigrationWiz. As a third-party solution, it comes with associated costs. You’ll need to purchase a license for each user mailbox migration.
When you use this tool to copy the emails, the folder structure will be preserved. Also, it provides monitoring and statistics of the emails being copied.
Option 4: Copy Emails using Search-Mailbox
Search-Mailbox cmdlet in Exchange Online PowerShell has been retired and can no longer be used to copy or purge mailbox contents. Instead, Microsoft recommends using the New-ComplianceSearch and New-ComplianceSearchAction cmdlets as an alternative (Option 1).
However, Search-Mailbox cmdlet is still available and functional in on-premises Exchange environments. If you are using on-premises Exchange, you can follow below steps to copy emails from one mailbox to another using this cmdlet.
Note
Search-Mailbox cmdlet is a powerful tool in On-premise Exchange environments, enabling you to search for and manage mailbox content. This cmdlet can be used to find and delete specific emails, as well as to copy or move emails between mailboxes.
It is especially valuable for compliance and legal purposes, empowering administrators to search for and preserve emails relevant to legal or regulatory investigations. However, it is crucial to exercise caution when using Search-Mailbox, as improper usage may result in the unintentional deletion of important emails.
Permissions Required to use Search-mailbox cmdlet
To run the Search-Mailbox cmdlet, you must have either the Mailbox Search or Mailbox Import-Export role. Without these permissions, you may encounter the following error message.
| Error |
|---|
| Search-mailbox: The term ‘Search-mailbox’ is not recognized as the name of a cmdlet, function, script file, or operable program. Check the spelling of the name, or if a path was included, verify that the path is correct and try again. At line:1 char:1 Search-mailbox ~~~~~~ CategoryInfo : ObjectNotFound: (Search-mailbox:String) [], CommandNotFoundException FullyQualifiedErrorId: CommandNotFoundException |

1. Add admin user to Discovery Management Role Group
You can add the administrator account to the Discovery Management role group using either the Exchange admin center or PowerShell. Let’s explore both methods.
Using Exchange admin center
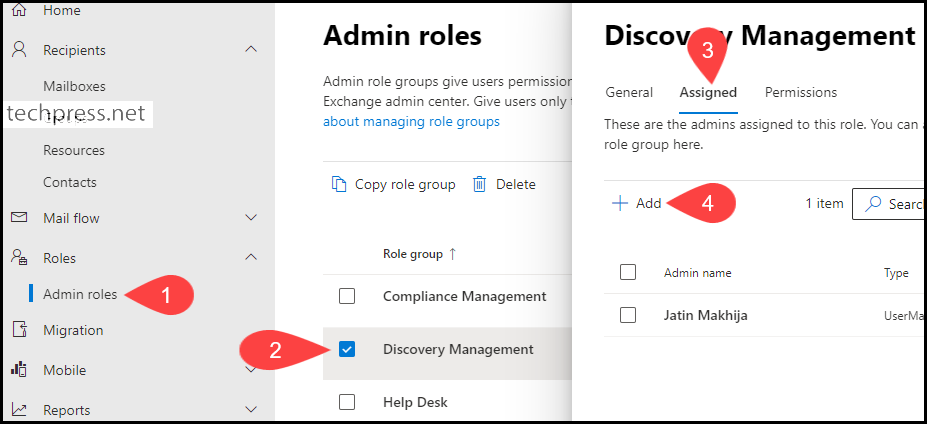
- Sign in to the Exchange Admin Center > Roles > Admin roles.
- Locate the Discovery Management Role group and click on it.
- Go to the Assigned tab > Click on the + Add button.
- Add the administrator account here.
Using PowerShell
To add an administrator account to the Discovery Management role group using PowerShell, you first need to install the Exchange Online Management PowerShell module and then connect to Exchange Online. Let’s go through the steps.
Install Exchange Online PowerShell Module
Install-module -Name ExchangeOnlineManagementConnect to Exchange Online
Connect-ExchangeOnline -UserPrincipalName <Admin UPN>

Example:
Connect-ExchangeOnline -UserPrincipalName [email protected]
For Example: To add [email protected] to the Discovery Management Role group, you can use the following PowerShell command:
Example:
Add-RoleGroupMember -Identity "Discovery Management" -Member [email protected]2. Add an Admin user to the Mailbox Import-Export role group
To add an admin user to the Mailbox Import-Export role group, you can use the following PowerShell cmdlets. First, create a new role group called Mailbox Import-Export Mgmt, and then add the admin user to this role group.
Create a new role group for Mailbox Import Export Permission
New-RoleGroup "Mailbox Import-Export Mgmt" -Roles "Mailbox Import Export"Example: Add admin user [email protected] into the Mailbox Import-Export Mgmt role group
Add-RoleGroupMember "Mailbox Import-Export Mgmt" -Member [email protected]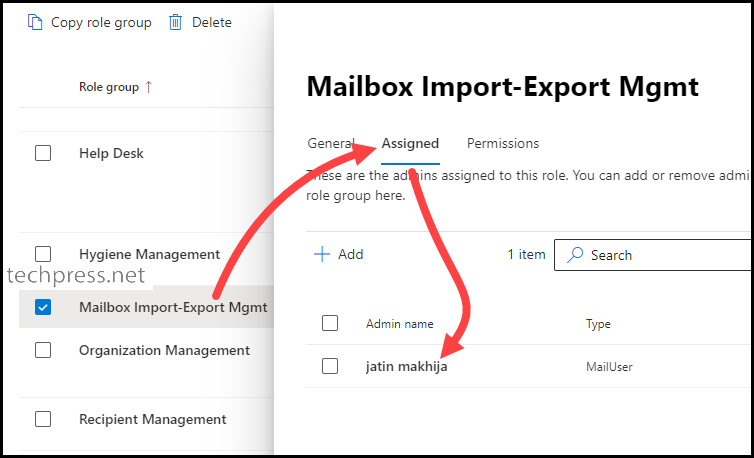
Finally, Use the Search-Mailbox cmdlet to Copy emails
Now, with administrator permissions assigned, we can use the Search-Mailbox cmdlet to copy emails from one mailbox to another user’s mailbox.
- Source Mailbox: GradyA@techpress
- Destination Mailbox: NestorW@techpress
- Emails to copy: All
Ensure that you are still connected to Exchange Online PowerShell and execute below command to copy all emails from one mailbox to another.
Copy All emails of GradyA to the NestorW mailbox in a new folder, GradyA-Emails
Search-Mailbox -Identity "[email protected]" -TargetMailbox "[email protected]" -TargetFolder "GradyA-Emails"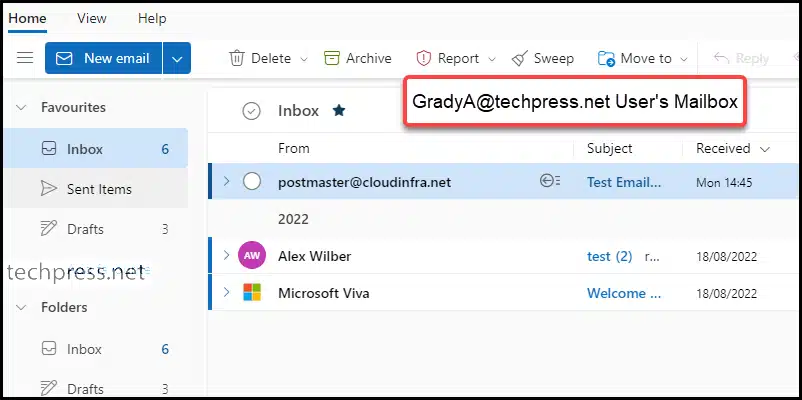
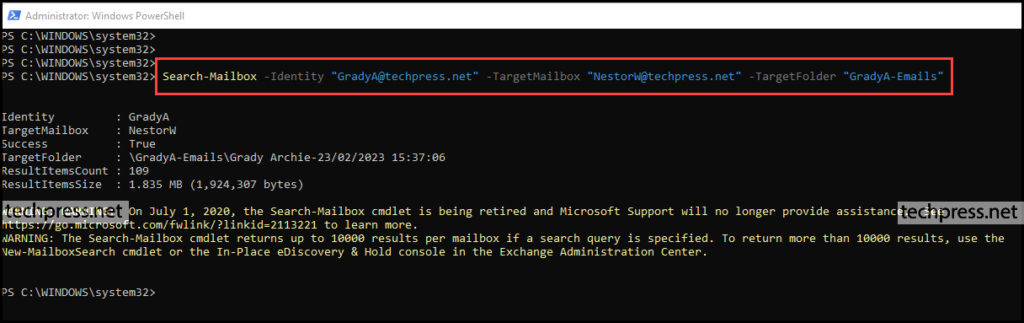
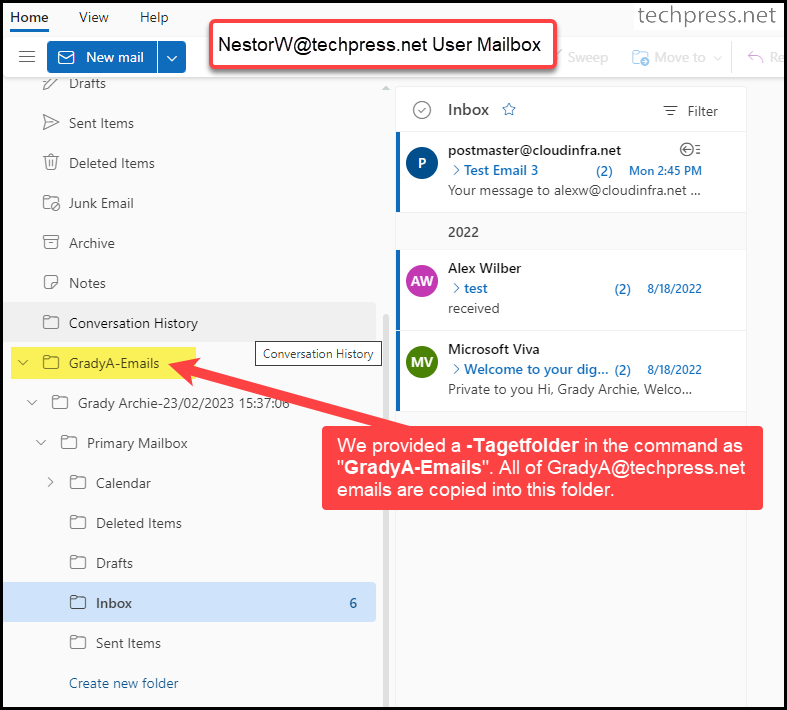
As we can see, all emails from Grady A’s user mailbox have been copied to Nestor W’s mailbox in a separate folder called GradyA-Emails. The folder structure is as follows: TargetFolder\User Name-Date and time\Primary Mailbox\Inbox.
Search-mailbox was an easy way however it is no longer supported by Exo Microsoft removed this cmdlet