DiskPart is still a useful tool in SCCM OSD, especially when the built-in Format and Partition Disk step is not flexible enough for your partitioning design. The native task sequence step can format and partition a specified disk, supports both MBR and GPT, and runs only in Windows PE. For more information, refer to the link: Task sequence steps – Configuration Manager | Microsoft Learn.
For most deployments, the built-in Format and Partition Disk step should be your first choice. It is easier to support, easier to read, and integrates cleanly with the Apply Operating System Image step. DiskPart becomes valuable when you need a custom layout, want to script partition logic yourself, or need repeatable control over special partitions such as EFI, MSR, Windows, Recovery, or utility partitions.
For task sequence failures, review the smsts.log file first, because it is the primary log for SCCM OSD and records the progress of each task sequence step, command execution, partitioning action, image application, reboots, and error details. This helps identify exactly where the deployment failed. Configuration Manager log file reference: Log file reference – Configuration Manager | Microsoft Learn.
What is DiskPart?
DiskPart is a text-based disk management tool that can create, delete, clean, convert, and format disks and partitions. It is the command interpreter for managing disks, partitions, volumes, and VHDs. It’s the supported way to automate those tasks.
In SCCM OSD world, that means you can package a .txt script, call it from a task sequence, and produce a consistent partition layout before the OS image is applied.
DiskPart Usage in SCCM OSD
Use DiskPart in OSD when you require more control than the standard task sequence partitioning step provides. Common examples include creating a custom recovery partition layout, building a different partition scheme for specific hardware, handling utility partitions, or using your own detection logic to pick the correct target disk before partitioning.
Configuration Manager supports this approach because the Run Command Line step can run in Windows PE, and DiskPart supports scripted execution through diskpart /s.
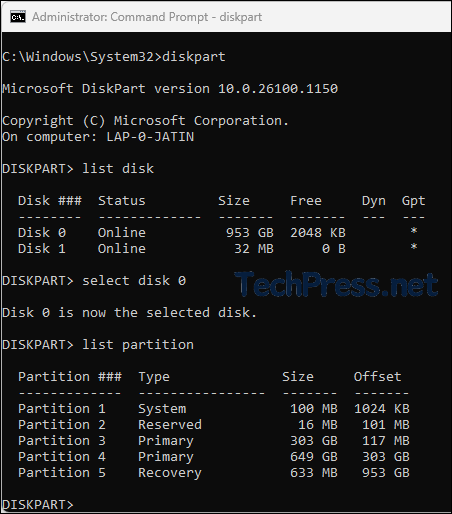
The screenshot below shows the basic diskpart commands.
- Start by opening a command prompt window as an administrator and type diskpart and press Enter to enter into the DISKPART mode.
- Then list the disks using
list diskcommand. - Select the disk using
Select diskcommand. - Then list the partitions using
list partitioncommand.
In the following sections of this post, I have listed more advanced Diskpart commands and the sequence of commands you can use to wipe the disk and create the standard UEFI/GPT partition layout.
Prerequisites
Before using DiskPart in SCCM OSD, make sure the task sequence is running in Windows PE, confirm which physical disk should be partitioned, and verify whether the device is booted in UEFI or Legacy BIOS mode. Partition type must match firmware type: UEFI systems use GPT, while legacy BIOS systems use MBR.
You should also test your partition script on both single-disk and multi-disk hardware. If the wrong disk is targeted, clean removes all partition and volume formatting from that disk.
Using DiskPart Commands During OSD
If you want to use DiskPart during SCCM OSD, the cleanest method is to run it from a Run Command Line step while the task sequence is still in Windows PE.
Partitioning and imaging steps such as Format and Partition Disk and Apply Operating System Image run in Windows PE. Use diskpart /s to automate disk configuration from a script file.
Basic workflow
- Boot into Windows PE.
- Add a Run Command Line step to run your DiskPart script.
- Apply the Windows image to the partition you created.
- Continue with Setup Windows and ConfigMgr and the remaining OSD steps.
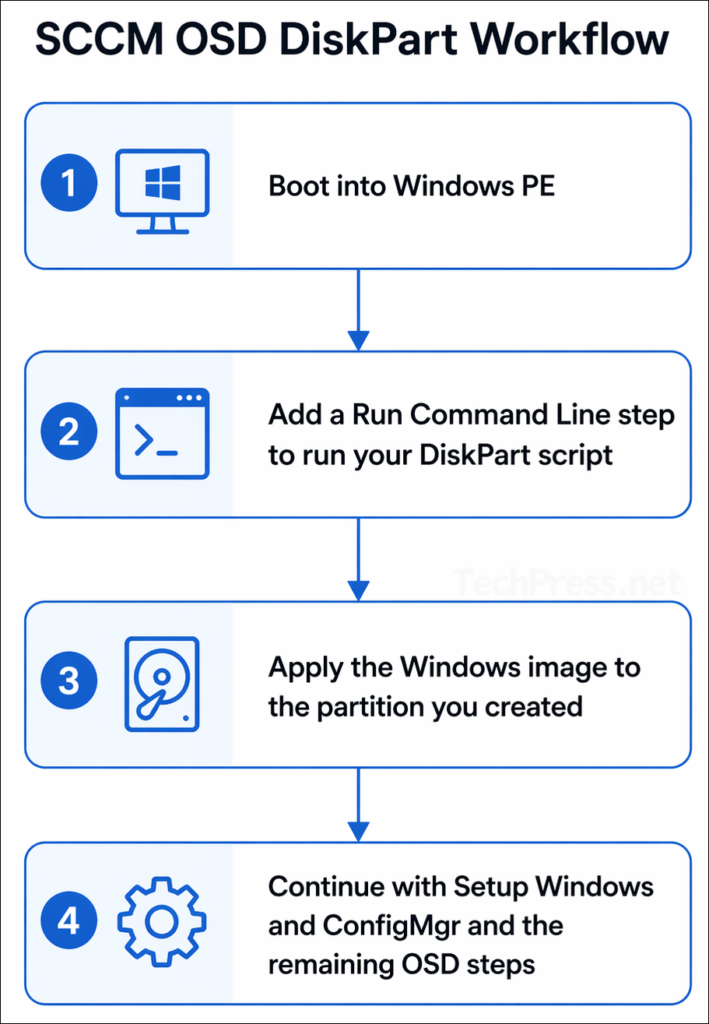
This sequence matters because the disk must already be partitioned before the OS image is applied. Run Command Line is a supported task-sequence step, and Apply Operating System Image is the step that installs Windows onto the target partition.
Step 1: Create a DiskPart script file
Create a text file such as CreatePartitions-UEFI.txt or CreatePartitions-BIOS.txt and save your DiskPart commands inside it. Use diskpart /s <scriptname> to run scripted disk actions such as cleaning a disk, converting partition style, and creating volumes.
Example UEFI script file:
select disk 0
clean
convert gpt
create partition efi size=200
format quick fs=fat32 label="System"
assign letter="S"
create partition msr size=16
create partition primary
shrink minimum=500
format quick fs=ntfs label="Windows"
assign letter="W"
create partition primary
format quick fs=ntfs label="Recovery"
assign letter="R"
set id="de94bba4-06d1-4d40-a16a-bfd50179d6ac"
gpt attributes=0x8000000000000001
exit
Step 2: Add the script to a package
Place the .txt script file in a normal SCCM package so the task sequence can access it during deployment. In the Run Command Line step, specify that package in the Package field. The package option on this step is used when the command needs files that are not already present on the destination computer.
Step 3: Run DiskPart from a Run Command Line step
In the task sequence, add a Run Command Line step before Apply Operating System Image and use a command like this:
cmd.exe /c diskpart /s CreatePartitions-UEFI.txtStep 4: Apply the OS image to the correct partition
After DiskPart finishes, configure Apply Operating System Image so that Windows is applied to the OS partition you created. If your script assigns the Windows partition a temporary WinPE drive letter such as W:, make sure the image step targets the correct disk and partition. The image step installs the OS onto a selected destination partition and then continues the deployment from there.
Step 5: Continue the task sequence normally
Once the image is applied, let the task sequence continue with Setup Windows and ConfigMgr, drivers, applications, and the rest of your OSD steps. Setup Windows and ConfigMgr is the required step that transitions the deployment from Windows PE into the newly applied operating system.
DiskPart Commands for Hard Disk (UEFI)
The UEFI commands in below table are in the sequential order to wipe the disk and create the standard UEFI/GPT partition layout.
| Step | DiskPart command | Purpose |
|---|---|---|
| 1 | select disk 0 | Select the target disk. |
| 2 | clean | Remove all existing partitions and formatting from the disk. |
| 3 | convert gpt | Prepare the disk as GPT for UEFI deployments. |
| 4 | create partition efi size=200 | Create the EFI System Partition. Microsoft’s sample uses 200 MB and notes 300 MB for some 4Kn drives. |
| 5 | format quick fs=fat32 label=”System” | Format the EFI partition as FAT32. |
| 6 | assign letter=”S” | Temporarily assign drive letter S to the EFI/System partition in WinPE. |
| 7 | create partition msr size=16 | Create the Microsoft Reserved (MSR) partition. |
| 8 | create partition primary | Create the main Windows partition. |
| 9 | shrink minimum=500 | Reserve space for the Recovery partition. |
| 10 | format quick fs=ntfs label=”Windows” | Format the Windows partition as NTFS. |
| 11 | assign letter=”W” | Temporarily assign drive letter W to the Windows partition in WinPE. |
| 12 | create partition primary | Create the Recovery partition. |
| 13 | format quick fs=ntfs label=”Recovery” | Format the Recovery partition as NTFS. |
| 14 | assign letter=”R” | Temporarily assign drive letter R to the Recovery partition in WinPE. |
| 15 | set id=”de94bba4-06d1-4d40-a16a-bfd50179d6ac” | Set the Recovery partition type GUID. |
| 16 | gpt attributes=0x8000000000000001 | Mark the Recovery partition with the required GPT attributes. |
| 17 | list volume | Display the created volumes for validation. |
| 18 | exit | Exit DiskPart. |
DiskPart Commands for SCCM OSD (Legacy BIOS)
For legacy BIOS, use the below commands in order.
| Step | DiskPart command | Purpose |
|---|---|---|
| 1 | select disk 0 | Select the target disk. |
| 2 | clean | Remove all existing partitions and formatting from the disk. |
| 3 | create partition primary size=100 | Create the System partition. |
| 4 | format quick fs=ntfs label=”System” | Format the System partition as NTFS. |
| 5 | assign letter=”S” | Temporarily assign drive letter S to the System partition in WinPE. |
| 6 | active | Mark the System partition as active for BIOS boot. |
| 7 | create partition primary | Create the main Windows partition. |
| 8 | shrink minimum=500 | Reserve space for the Recovery partition. |
| 9 | format quick fs=ntfs label=”Windows” | Format the Windows partition as NTFS. |
| 10 | assign letter=”W” | Temporarily assign drive letter W to the Windows partition in WinPE. |
| 11 | create partition primary | Create the Recovery partition. |
| 12 | format quick fs=ntfs label=”Recovery image” | Format the Recovery partition as NTFS. |
| 13 | assign letter=”R” | Temporarily assign drive letter R to the Recovery partition in WinPE. |
| 14 | set id=27 | Set the partition type for the BIOS recovery partition. |
| 15 | list volume | Display the created volumes for validation. |
| 16 | exit | Exit DiskPart. |
Important tips
- Run DiskPart only in Windows PE during OSD.
- Be careful with
clean, because it removes all existing partition and volume information from the selected disk. Confirm the correct disk before reformatting it. - Match firmware mode to partition style: UEFI = GPT, Legacy BIOS = MBR.
In SCCM OSD, DiskPart is typically used through a Run Command Line step in WinPE, where a packaged script file is executed with
diskpart /sbefore the Apply Operating System Image step.
Handling Target Disk Correctly
One of the biggest risks with DiskPart in OSD is assuming the OS disk is always Disk 0. That works on many devices, but not all. Configuration Manager supports using task sequence variables for the disk number in the native Format and Partition Disk step. Use a script to discover the correct disk and then store it in a variable. The same idea applies when you use DiskPart.
If you want to stay native, you can let ConfigMgr handle the disk number dynamically with OSDDiskIndex or a custom variable. If you choose DiskPart, add your own detection step first and then generate or select the correct script accordingly.
How the OS step knows where to install Windows
After partitioning, your Apply Operating System Image step must target the correct partition. Configuration Manager supports several destination options, including Specific disk and partition, Specific logical drive letter, or Logical drive letter stored in a variable. The logical-drive-letter variable is typically set from the partition properties of the Format and Partition Disk step.
When you are using DiskPart instead of the native partitioning step, the simplest approach is to keep the Windows partition assignment consistent during WinPE, such as assigning it W: in the script, and then target that partition explicitly in the OSD step. After the image is applied, ConfigMgr sets OSDTargetSystemDrive to the deployed OS partition.
Most Often Used DiskPart Commands in OSD
These are the commands you will use most often in SCCM OSD scripts:
select disk 0selects the target disk.cleanremoves all partition and volume information from the selected disk.convert gptorconvert mbrsets the partition style.create partition efi,create partition msr, orcreate partition primarycreates the required partitions.format quick fs=fat32orformat quick fs=ntfsformats the partition.assign letter=assigns a temporary drive letter in WinPE.activemarks the BIOS system partition as active.list volumeis useful for validation and troubleshooting.exitcloses DiskPart.
Best practices for using DiskPart in SCCM OSD
Keep your DiskPart scripts in a dedicated ConfigMgr package and version them carefully. Partitioning mistakes are destructive, so treat the scripts like production code. clean command removes all existing partition information on the selected disk, so validating the disk target is critical.
Prefer UEFI/GPT for new Windows 11 deployments. Use BIOS/MBR only where the hardware or firmware mode requires it. If you need standard Windows layouts only, use Format and Partition Disk instead of DiskPart. The task sequence step already supports GPT and MBR layouts, dynamic disk selection, and direct integration with the rest of OSD. Use DiskPart when you genuinely require script-level control.
Troubleshooting tips
If the task sequence fails after partitioning, first confirm the device booted in the correct firmware mode. A GPT layout on a BIOS-booted device, or an MBR layout on a UEFI-booted device, leads to deployment problems. GPT is tied to UEFI, and MBR to legacy BIOS.
If the OS image does not apply to the expected partition, review the Apply Operating System Image destination settings. ConfigMgr supports multiple targeting methods, and a mismatch between your DiskPart letters and the destination configuration is a common cause.
Conclusion
DiskPart is not the only way to partition disks in SCCM OSD, but it is still one of the most useful tools when you need precise control. The safest model is to use the native Format and Partition Disk step for standard deployments and reserve DiskPart for custom layouts, firmware-based branching, and advanced imaging workflows. If you do use DiskPart, keep the scripts simple, validate the target disk carefully, and make sure the partition layout matches the firmware mode before the OS image is applied.