Through this guide, I will demonstrate the step-by-step implementation of Entra Application Proxy. Entra Application Proxy service provides secure remote access to on-premise web applications. Access to the Internally hosted web applications is provided through a lightweight connector agent called Entra private network connector.
Entra private network connector agent needs to be installed in the private on-premise network on a Windows server that has access to backend application resources. Microsoft recommends installing this agent on multiple servers for high availability and load balancing.
About Private Network Connector Agent
- Connector will only send Outbound requests to Entra Private Access and Application proxy services, No requirement to open any inbound ports on the firewall.
- You can create Connector groups and assign applications to specific connector groups.
- On an average, One connector agent server can handle 2000 requests per second. (will also depend upon the server compute resources).
- Private network connector Updater service, installed with the connector agent, takes care of automatically updating the agent.
- Connector agent requires TLS 1.2.
- At least two connector agents are recommended in one connector group.
- Ensure access to the outbound ports 80 and 443 and URLs are allowed in the firewall.
Contents
Important Note

1. Download and Install Private Network Connector Agent
First step is to Download and Install the Private Network Connector agent on on-premises Windows servers that have access to the backend application resources. To download and install the agent, follow below steps:
- Minimum supported OS: Windows Server 2012 or later.
- If you are installing Private Network Connector Agent on Windows Server 2019, make sure to disable HTTP2 protocol support in the WinHttp component using below reg key.
[HKEY_LOCAL_MACHINE\SOFTWARE\Microsoft\Windows\CurrentVersion\Internet Settings\WinHttp] “EnableDefaultHttp2″=dword:00000000
- TLS 1.2 must be enabled on the server. If its not enabled, add/update below registry keys and restart the server to enable TLS 1.2. For more information, refer to the link: Disable TLS 1.0 and TLS 1.1, which also contains reg keys for enabling TLS 1.2.
Windows Registry Editor Version 5.00 [HKEY_LOCAL_MACHINE\SYSTEM\CurrentControlSet\Control\SecurityProviders\SCHANNEL\Protocols\TLS 1.2] [HKEY_LOCAL_MACHINE\SYSTEM\CurrentControlSet\Control\SecurityProviders\SCHANNEL\Protocols\TLS 1.2\Client] “DisabledByDefault”=dword:00000000 “Enabled”=dword:00000001 [HKEY_LOCAL_MACHINE\SYSTEM\CurrentControlSet\Control\SecurityProviders\SCHANNEL\Protocols\TLS 1.2\Server] “DisabledByDefault”=dword:00000000 “Enabled”=dword:00000001 [HKEY_LOCAL_MACHINE\SOFTWARE\Microsoft\.NETFramework\v4.0.30319] “SchUseStrongCrypto”=dword:00000001
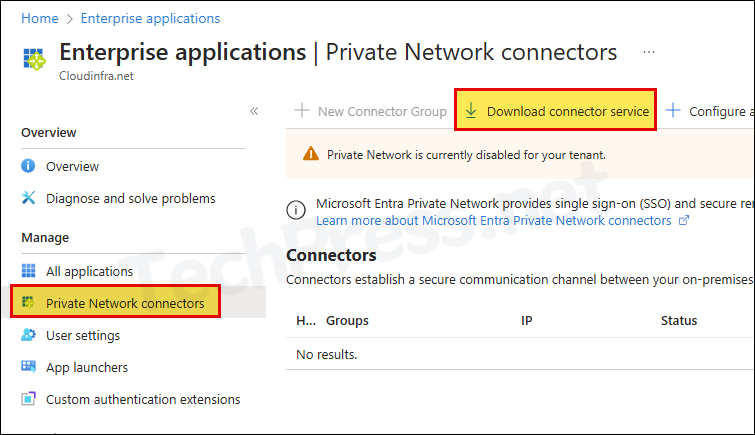
- Sign in to the Entra admin center > Identity > Applications > Enterprise applications > Private Network connectors.
- Click on Download connector service.
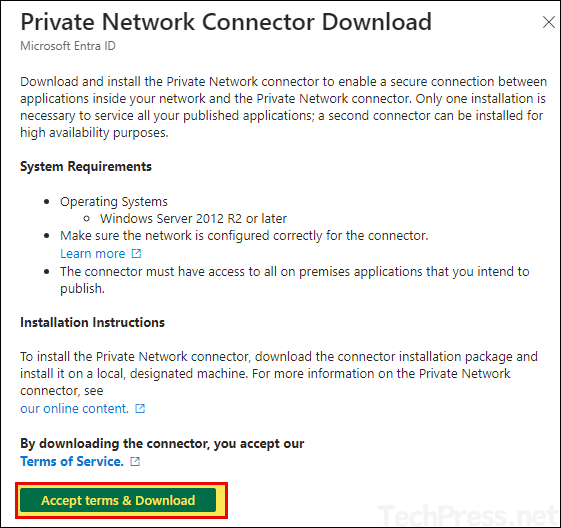
- Click on Accept terms & Download button to initiate the download.
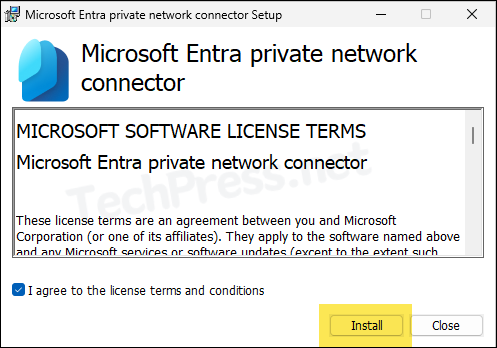
- Launch Microsoft Entra private network connector setup to begin the installation process. Click on Install.
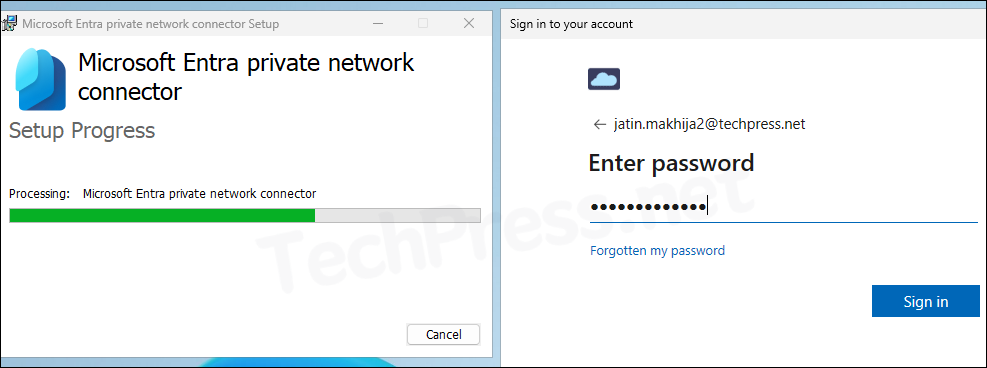
- During the Installation process, you will be requested to provide administrator credentials for registration of the connector agent server on Entra admin center.
- Once the agent is registered successfully, Private network connector will be enabled, and you will get a Setup Successful message.
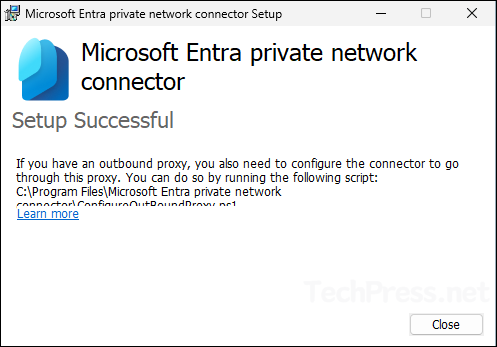
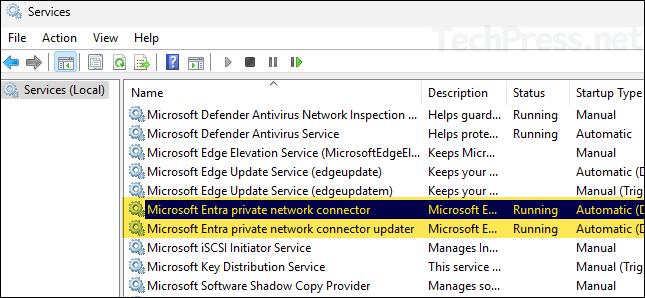
- The agent also installs two services on the server. Ensure that both the services are in Running state.
- Microsoft Entra private network connector: This is the main service which enabled the connectivity between the agent and Application proxy.
- Microsoft Entra private network connector updater: This service is an automated update service to check new version of the connector and update it if needed.
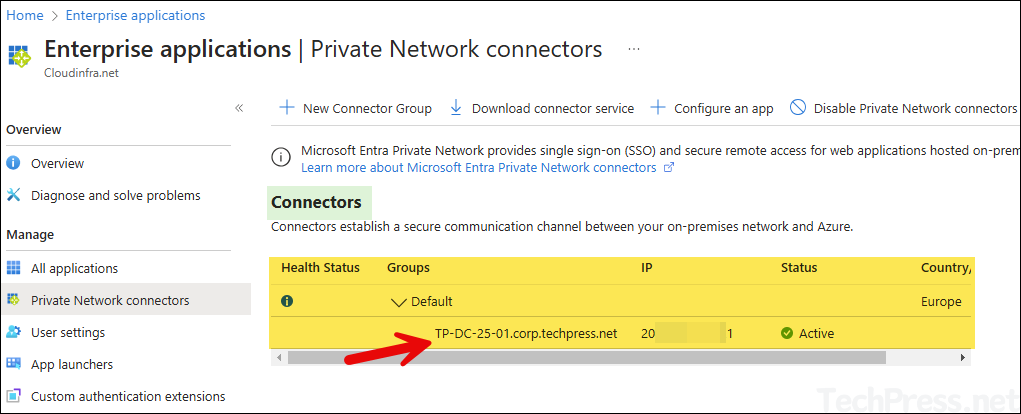
- Verify Connector agent registration from Entra admin center. When you register an agent first time, it will add the agent server in the Default Connector group.
- You can also create the connector groups by clicking on New Connector group. Connector groups are useful when you are configuring multiple on-premise applications, and you want to assign different applications to specific connector groups.
- After the agent is registered, you will find below information on Entra admin center:
- Agent health status.
- Connector group name.
- Server name.
- Public IP address of the server.
- Its current status for service connection requests.
- Country.
- Repeat the process for Installing connector agent on another Windows server which has access to the backend application resources. Microsoft recommends at least two connector agent servers in the connector group for high availability and load balancing application.
2. Configure On-Premise App on Entra admin center
Once the connector agent is installed, we can proceed with configuring On-premise application. Let’s check the steps:
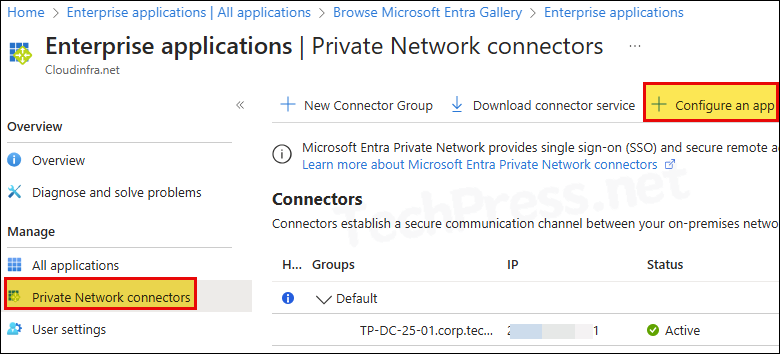
- Sign in to the Entra admin center > Applications > Enterprise applications > Private Network connectors.
- Click on Configure an app option.
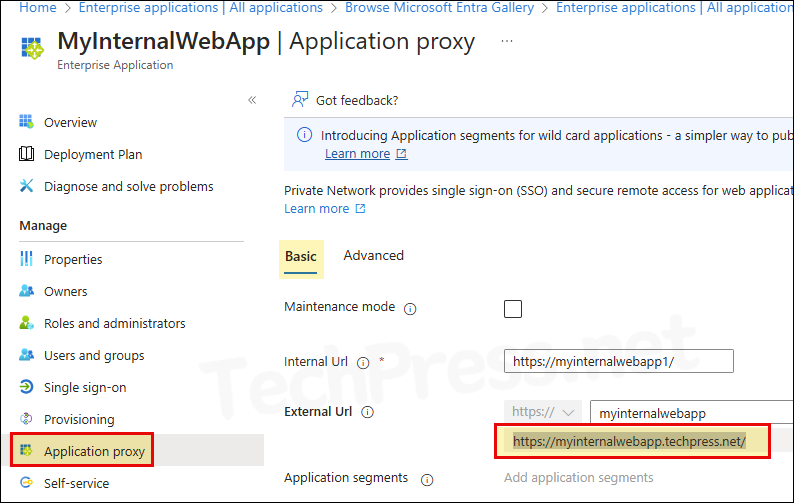
- Name: Provide a Name of the application.
- Internal URL: Provide Internal URL of the application which must be accessible from Connector agent servers.
- External URL: Automatically generated with default FQDN. You can change the FQDN to point it to your custom domain. This requires creating a CNAME record in DNS.
- As an example, you will need to create MyInternalWebApp.techpress.net CNAME record to point to MyInternalWebApp-<your tenantname>.msappproxy.net. You can find this CNAME suggestion on the bottom of the page as well to get the exact record details you need to create in the DNS.
- Pre-Authentication: Select Microsoft Entra ID
- Connector Group: Select the connector group from the drop-down which has access to the application.
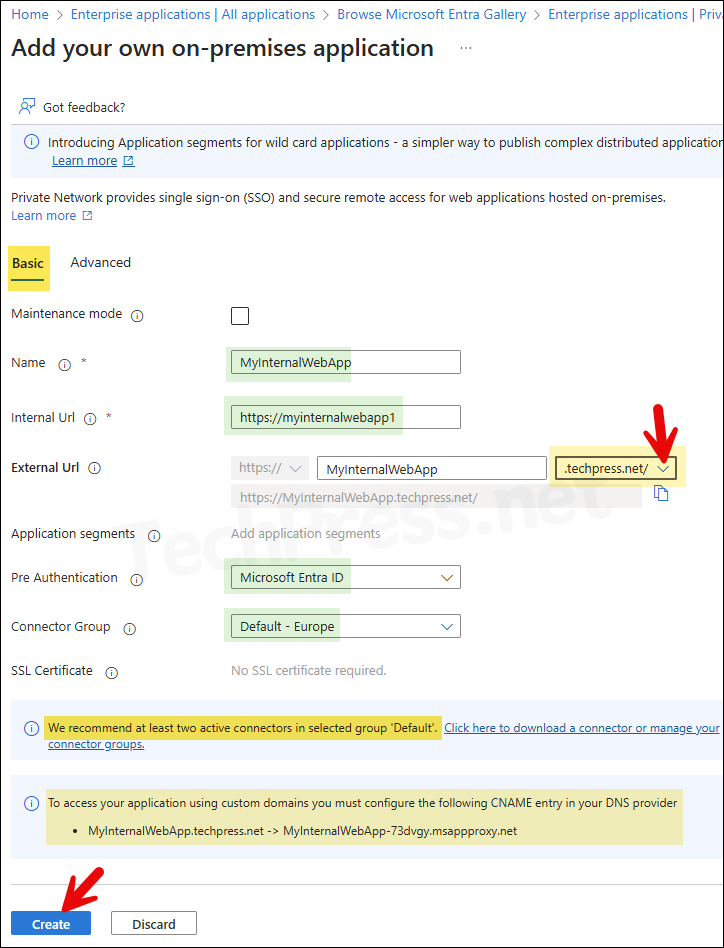
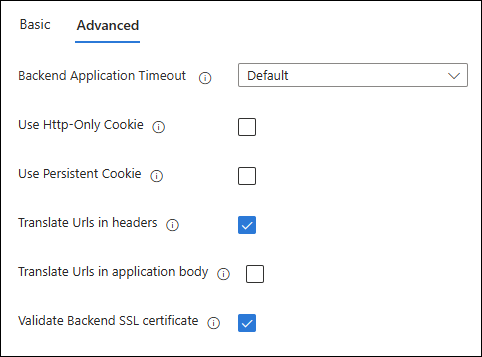
- You can click on the Advanced tab to configure advanced settings for the application, or leave it at default to test and confirm if the application is launching fine before making any changes here.
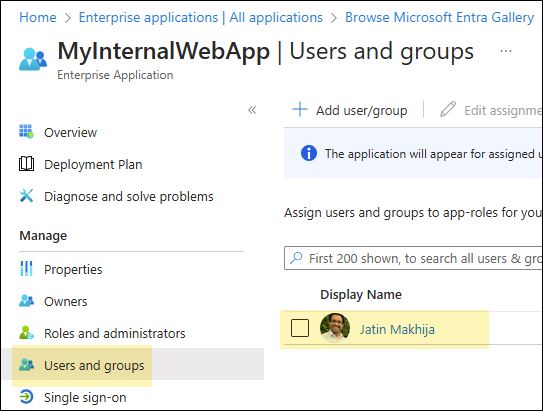
3. Assign Application to Users
To access the application via Entra application proxy, users needs to be assigned access to the application. Let’s check the steps:
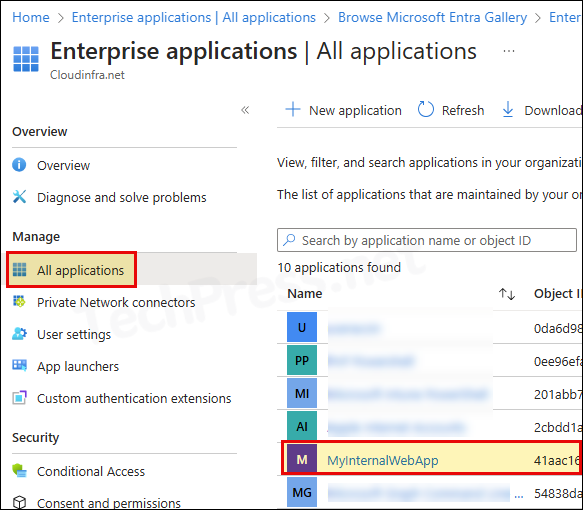
- Sign in to the Entra admin center > Applications > Enterprise applications > All applications.
- Search for the On-premise application (e.g., MyInternalWebapp).
- Click on Users and groups > Add user/group.
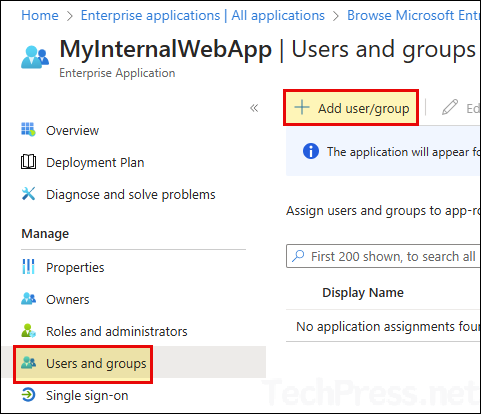
- Add Entra ID users or Entra security group to provide access to the application.
4. Test the Application
To test the application, you can use the External URL of the app and launch it from any web browser.
- Copy External URL of the app by opening the application on Entra admin center > Application Proxy and on the right-hand side Copy External URL.
- Open a web browser and launch the application to check and confirm if its working fine.
5. Secure Application Access
For enhancing security of the application, Microsoft recommends using application proxy with Conditional access. As an example, you can assign the application to an Entra security group. Then create a conditional access policies to allow access to the application only If a user is a member of the security group. Also, enforce MFA when accessing the application etc.
Troubleshooting
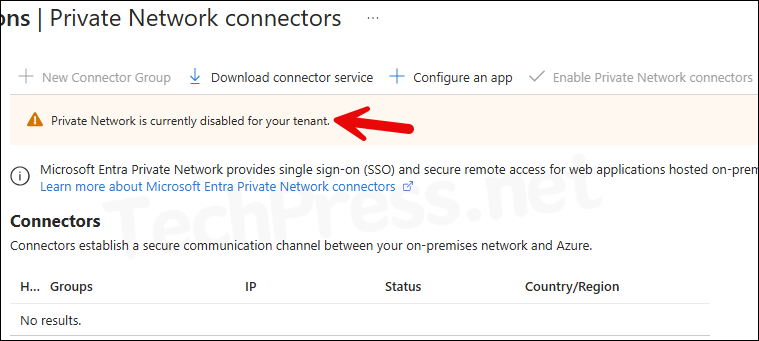
Private Network is currently disabled for your tenant
If you are configuring Entra application proxy first time, you may see a warning message on top of the page, Private Network is currently disabled for your tenant. For enabling this, download the Connector agent and install it on one of the one premise server. Once the agent communicates with Application proxy, Private network will be enabled automatically.
Enable Private Network connectors is greyed out
You may notice that the option Enable Private Network connectors is greyed out, and you are not able to enable this option even though you are the administrators of the tenant.
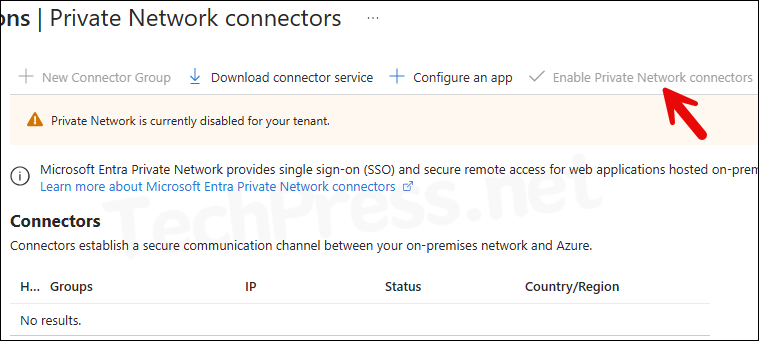
To enable Private Network connectors option, you will need to download and install Connector service agent on your On-premise Windows server. Once the agent communicates with Application proxy service, you will notice that Private Network connectors is enabled automatically.
Please note, Entra application proxy service requires Entra ID P1 or Entra ID P2 license. If you are not using any of these licenses, you may not be able to Enable Private connector.
Note
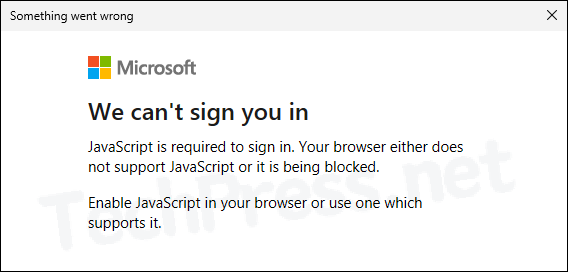
JavaScript is required to sign in. Your browser either does not support JavaScript or it is being blocked.
During the Installation of Entra Private network connector agent, you are required to authenticate with Entra ID using admin credentials for registration of the agent. During the authentication process, you may see below error message:
- After this, Microsoft Entra private network connector Setup will fail.
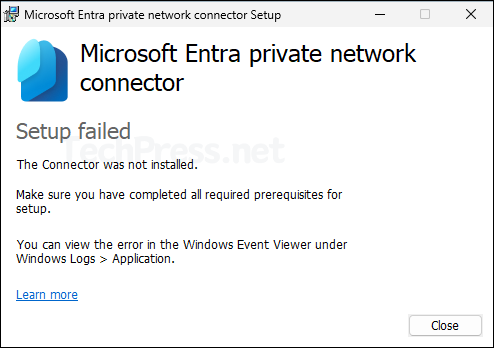
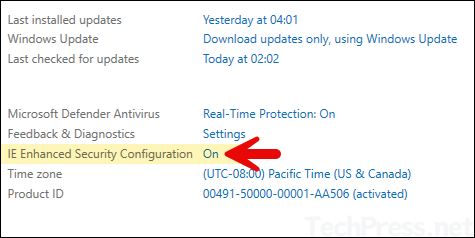
To fix this issue, you will need to disable IE Enhanced Security Configuration first and start the installation process again. To disabled IE Enhanced Security Configuration.
- Open Server Manager on the Windows server.
- Click on Local Server and find IE Enhanced Security Configuration.
- Select Off for Administrators and Users and click on OK to save.
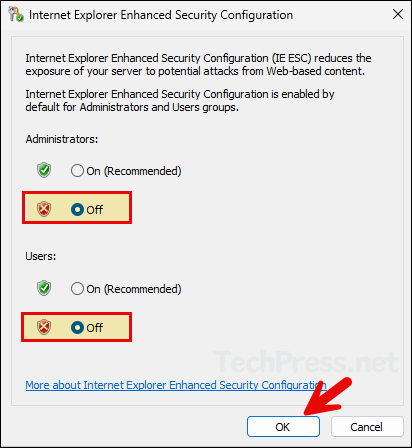
- Launch Entra Private network connector agent setup again, this time it should proceed further without this error.