When you send an email using a shared mailbox, it’s not getting saved in the shared mailbox sent items folder, instead it’s being saved in senders mailbox sent items folder. This is the default behavior in Microsoft 365/Outlook.
In this blog post, we will look into different solutions to fix this issue. We will also ensure that any email sent using a shared mailbox is saved in the sent items of shared mailbox as well as your own mailbox as well. In Microsoft 365 and Exchange server CU9 or later, new PowerShell cmdlets and flags are introduced for managing this setting. Let’s take a look:
Contents
Option 1: Configure it Using Microsoft 365 admin center
You can use Microsoft 365 admin center to configure a setting in the shared mailbox to save the emails in shared mailbox sent items folder.
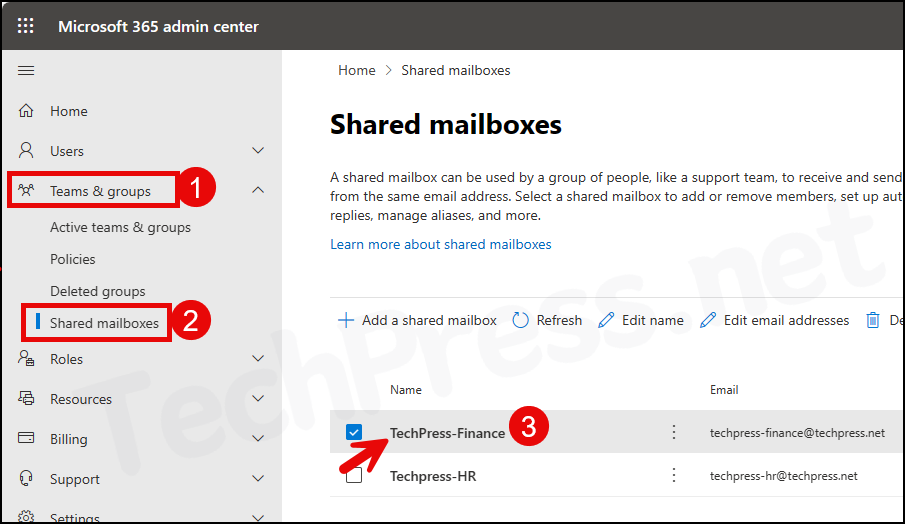
- Sign in to the Microsoft 365 admin center.
- Expand Teams & groups > Shared mailboxes.
- Click on the Shared Mailbox.
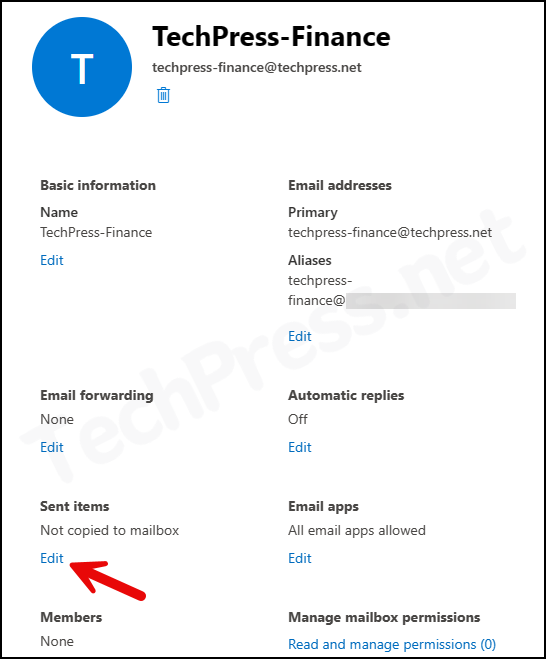
- Click on Edit under Sent Items.
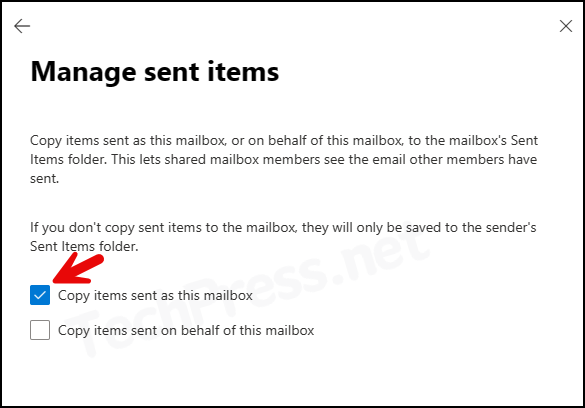
- Select Copy items sent as this mailbox for emails Sent As shared mailbox.
- Select Copy items sent on behalf of this mailbox for emails Sent on behalf of the shared mailbox.
Option 2: Configure it Using PowerShell
You can use PowerShell to configure a setting for the shared mailbox to save emails in the sent items folder. We will use Set-Mailbox cmdlet to fix this issue.
Steps for Microsoft 365/Exchange Server 2013 CU9 or later
- Launch PowerShell console as an administrator and execute the following commands.
Please note that the MessageCopyForSentAsEnabled and MessageCopyForSendOnBehalfEnabled flags only work for shared mailboxes. If you have Send As permission on a user’s mailbox and want to configure this behavior, use the DelegateSentItemsStyle registry entry instead.
Note
Install ExchangeOnlinemanagement PowerShell Module
Install-module ExchangeOnlinemanagementConnect to Exchange Online
Connect-ExchangeOnlineFor emails Sent As the Shared Mailbox
set-mailbox <mailbox-name> -MessageCopyForSentAsEnabled $TrueFor emails Sent As the Shared Mailbox [Apply to All Shared Mailboxes]
Get-Mailbox -ResultSize unlimited -Filter {(RecipientTypeDetails -eq 'SharedMailbox')} | set-mailbox -MessageCopyForSentAsEnabled $True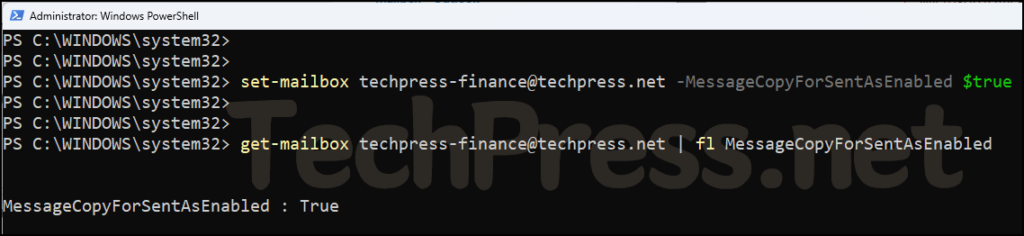
If you have sent an email on behalf of a shared mailbox, you need to set the -MessageCopyForSendOnBehalfEnabled flag to $true.
For emails Sent On Behalf of the Shared Mailbox
set-mailbox <mailbox-name> -MessageCopyForSendOnBehalfEnabled $TrueFor emails Sent On Behalf of the Shared Mailbox [All Shared Mailboxes]
Get-Mailbox -ResultSize unlimited -Filter {(RecipientTypeDetails -eq 'SharedMailbox')} | set-mailbox -MessageCopyForSendOnBehalfEnabled $TrueSteps for Exchange Server 2010
With the introduction of Update Roll-up pack 4 for Exchange Server 2010 Service Pack 2, an Exchange PowerShell cmdlet called Set-MailboxSentItemsConfiguration was introduced to configure the sent Items folder.
This configuration using Set-MailboxSentItemsConfiguration is a server-side feature, allowing Outlook to be configured in either Online mode or Cached mode. However, please be aware that in order to use this feature, the DelegateSentItemsStyle registry value must be disabled for Outlook.
To save Sent As emails in the Sent Items folder of both the sender and the shared mailbox, use the following command:
Emails sent from a Shared Mailbox with Send As permission
Set-MailboxSentItemsConfiguration -Identity "<shared Mailbox>" -SendAsItemsCopiedTo SenderAndFromTo save Send As and Sent on Behalf emails in the Sent Items folder of both the sender and the shared mailbox, use the following command:
Emails sent from a Shared Mailbox with Sent on behalf and Send As permission
Set-MailboxSentItemsConfiguration -Identity "<shared Mailbox>" -SendAsItemsCopiedTo SenderAndFrom -SendOnBehalfOfItemsCopiedTo SenderAndFromOption 3: Configure it Using DelegateSentItemsStyle Registry key
For Outlook 2013 and later versions, you can follow below steps configure DelegateSentItemsStyle registry key.
Outlook must be configured in cached mode for DelegateSentItemsStyle registry value to work correctly.
Note
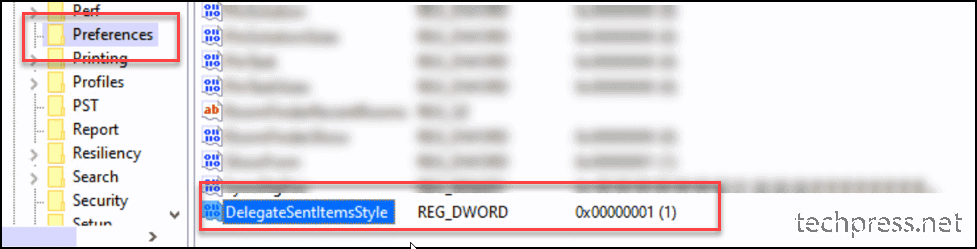
- Press Win + R keys to open the Run dialog box.
- Type regedit and press Enter to open Registry Editor.
- Navigate to HKEY_CURRENT_USER\Software\Microsoft\Office\x.0\Outlook\Preferences registry key (The x.0 placeholder represents version of Office (16.0 = Office 2016, 15.0 = Office 2013, 14.0 = Office 2010).
- Create a new DWORD registry entry name DelegateSentItemsStyle and set its value to 1.
- Click on OK and Exit Registry Editor.
| DelegateSentItemsStyle | MessageCopyForSentAsEnabled | Copy of the email will be saved in |
|---|---|---|
| 0 | True | Sender’s Mailbox = Yes Shared Mailbox = Yes |
| 1 | True | Sender’s Mailbox = No Shared Mailbox = Yes [2 copies of the email will be saved in Shared Mailbox] Sender’s Mailbox |
| 0 | False | Sender’s Mailbox = Yes Shared Mailbox = No |
| 1 | False | Sender’s Mailbox = No Shared Mailbox = Yes |