In this post, I will demonstrate the steps on how to use Connect-MgGraph PowerShell cmdlet. Once you’ve installed Microsoft Graph PowerShell module on your computer, the next step is to connect using Connect-MgGraph. This command lets you access and manage a wide range of Microsoft 365 and Entra ID services, including users, devices, licenses, security, Intune, Teams, SharePoint, Exchange, and more.
You can use below commands to install and verify Microsoft Graph PowerShell module on your computer. If you want to know more details like prerequisites, updating or uninstalling graph PowerShell modules, then refer to my other step-by-step guide: How To Install Microsoft Graph PowerShell Module. In this post, I will mainly focus on the connection part, which uses Connect-MgGraph.
Installing Microsoft Graph PowerShell module
#Install Microsoft Graph PowerShell module (Current user scope)
Install-Module Microsoft.Graph -Scope CurrentUser -Repository PSGallery -Force

#Install Microsoft Graph PowerShell module (All Users)
Install-Module Microsoft.Graph -Scope AllUsers -AllowClobber -Force

#Install Microsoft Graph Beta module (Current user scope)
Install-Module Microsoft.Graph.Beta -Scope CurrentUser -Force

#Install Microsoft Graph Beta module (All Users)
Install-Module Microsoft.Graph.Beta -Repository PSGallery -Force

#Verify
Get-InstalledModule Microsoft.Graph
Contents
Supported Authentication Methods
There are two supported authentication methods when using Connect-MgGraph, delegated and app-only access.
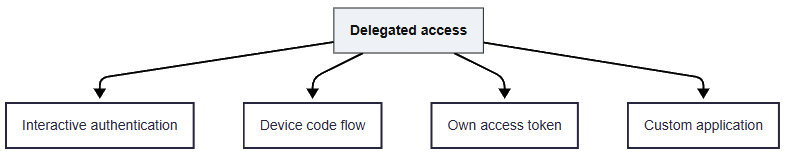
- Delegated Access: Delegated access runs as a signed-in user and uses OAuth scopes like User.Read, making it ideal for interactive admin work, ad hoc tasks, and scenarios that can handle prompts and MFA. When using delegated access, you have below four ways to connect using Connect-MgGraph.
- Interactive authentication
- Device code flow
- Bring your own access token
- Lastly, using a custom app
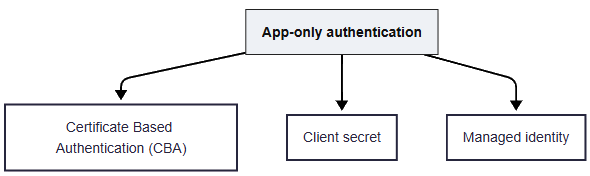
- App-only Access: App-only access runs as the application service principal with application permissions, best for automation and CI where no user interaction is possible, typically using a certificate, managed identity, or client secret after admin consent.
Below table summarizes the differences between delegated access and app only access methods.
| Category | Delegated access | App-only access |
|---|---|---|
| Identity | Signed-in user | Application service principal |
| Permission type | OAuth scopes (e.g., User.Read) | Application permissions (e.g., User.Read.All app) |
| Consent | User or admin grants scopes | Admin consent required |
| Usage | Interactive admin work, ad hoc tasks | Automation, background jobs, CI or runbooks |
| Auth prompts | Yes, user signs in | No user prompt after setup |
| Examples | Connect-MgGraph -Scopes “User.Read.All” | Connect-MgGraph -ClientId “<appId>” -TenantId “<tenantId>” -CertificateThumbprint “<thumb>” |
| Headless option | -UseDeviceCode | Managed identity or certificate or client secret |
| Token lifetime | User session based, respects policies | App token based, independent of users |
| Common issues | Over-broad scopes, MFA prompts | Missing admin consent or cert/secret issues |
Delegated Authentication
Now, let’s explore how to connect using delegated authentication and look at examples of each method in action.
Interactive Authentication
This method, as the name suggests, works for interactive authentication. Use this for ad-hoc tasks where you want to quickly connect with graph PowerShell and get your results. For connecting, you will have to provide the -scopes which define the level of permission you get to perform a certain task. You sign in, consent to the right scopes once, and PowerShell will cache the token for the interactive session. Below is an example of interactive authentication.
If you’re not sure which scopes to use, refer to my other post, where I cover several ways to identify the right level of scope for connecting to graph: 6 Ways to Find Microsoft Graph PowerShell Scopes.
Example of Interactive authentication
Connect-MgGraph -Scopes "User.Read.All","Group.ReadWrite.All"Device code flow
Best for headless sessions, jump boxes, or when the browser is locked down. You run the command, get a short code, and complete sign-in on another device at microsoft.com/devicelogin. You still get delegated user tokens with the scopes you request.
Example of Device code flow
Connect-MgGraph -Scopes "User.Read.All","Group.Read.All" -UseDeviceCode

or

Connect-MgGraph -Scopes "User.Read.All", "Group.ReadWrite.All" -UseDeviceAuthentication
Bring your Own Access Token
Choose this option when your pipeline already offers delegated tokens through another service or a custom device sign-in. Connect-MgGraph will honor whatever scopes are already inside the token. Great for advanced CI that centralizes auth. You can get the access token using various methods like Graph explorer, Get-MsalToken, az account, Get-AzAccessToken or by using Invoke-RestMethod.
When you are on Graph explorer, run your query and then go to the Access token tab. Click on the copy button to copy the access token and store that in $AccessToken variable. Then use the following command to connect to graph.
$AccessToken = "Your Access Token"
Connect-MgGraph -AccessToken $AccessToken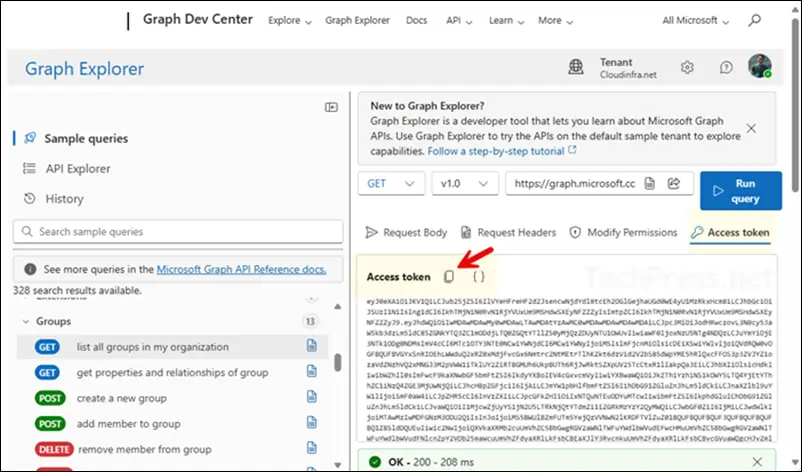
Using a Custom Application
This is also one of the delegated authentication methods for connecting with Graph. Unlike the previous, more interactive methods, this one requires an admin to create an application in the Entra portal and then provide the Client ID and Tenant ID parameters when running the Connect-MgGraph cmdlet. Let’s first look at the steps for creating an application.
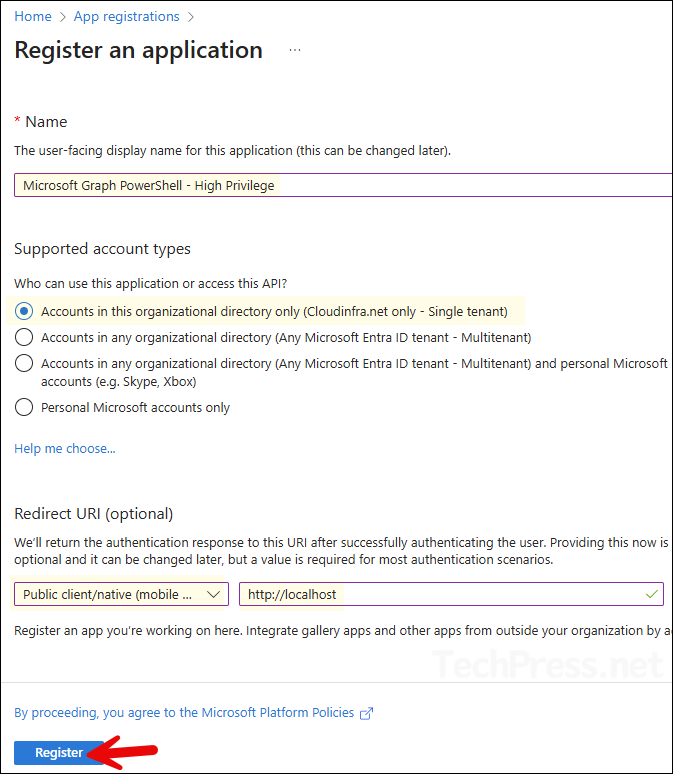
- Sign in to Entra admin center > Expand Entra ID > App registrations > Click + New registration.
- Provide a Name of the application. For example: Microsoft Graph PowerShell – High Privilege.
- Supported account types: Accounts in this organizational directory only.
- Redirect URI: Select Public client/native and set this to http://localhost.
- Click Register.
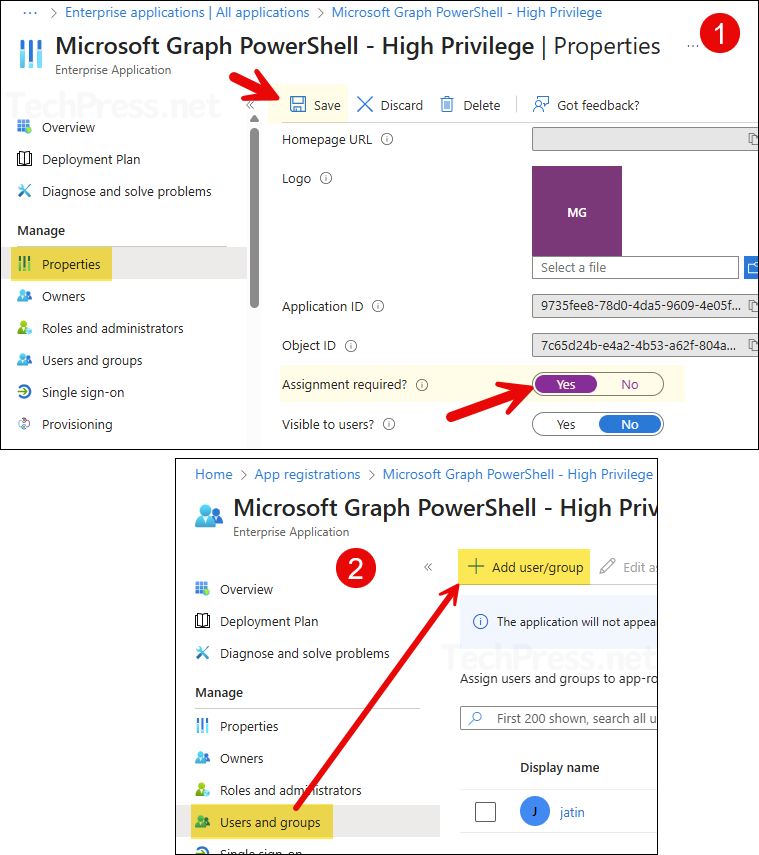
- Open the application > Properties and set Assignment required to Yes. Then go to Users and groups and assign the app to the users who will be permitted to use this application.
- Now, go to the new app registration and copy the client ID and tenant ID information. Use this information for establishing a connection using
Connect-MgGraph.
Connect-MgGraph -ClientId <YOUR_APP_ID> -TenantId <YOUR_TENANT_ID>

Example:
Connect-MgGraph -ClientId 9755fee8-9833-4da5-9609-4e05f1d2ecfd -TenantId 9dmin47d-f87c-44dd-a9ee-228hhd4h559e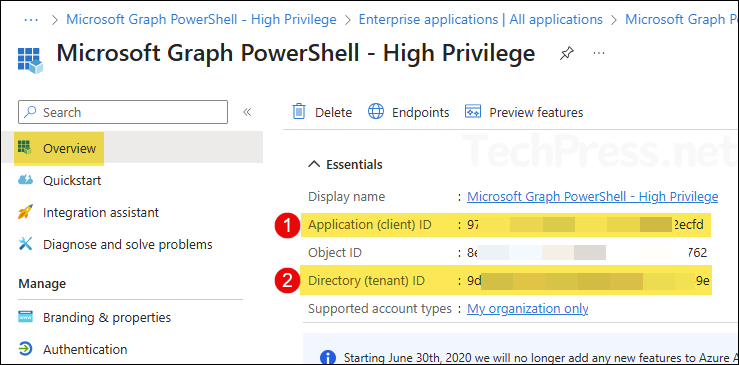
App Only Authentication
There are several ways to connect to Microsoft Graph when using app-only access. I’ll show you all the methods you can use, along with examples for each.
Certificate Based Authentication (CBA)
The first app-only method I’ll demonstrate is certificate-based authentication. In this method, we connect to Microsoft Graph PowerShell using a certificate, which can either be self-signed or issued by your internal certificate authority (CA). Create an app registration in Entra ID, upload the certificate, and then use below command to connect. For a detailed step-by-step process, refer to my post: Connect to Microsoft Graph PowerShell Using Certificate.
Connect-MgGraph -ClientId "YOUR_APP_ID" -TenantId "YOUR_TENANT_ID" -CertificateThumbprint "YOUR_CERT_THUMBPRINT"Client Secret
This method also requires an app registration in Entra and the creation of a client secret. For this example, I’ll use an existing app registration named PS-Graph-App, which I created while writing this blog post. I’ll demonstrate how to create a client secret and then connect to Microsoft Graph using that secret. If you want to create a new app registration from scratch, refer to the post linked above for detailed steps.
- Sign in to the Entra admin center > Expand Entra ID > App registrations. Click on the PS-Graph-App app or the app registration you created.
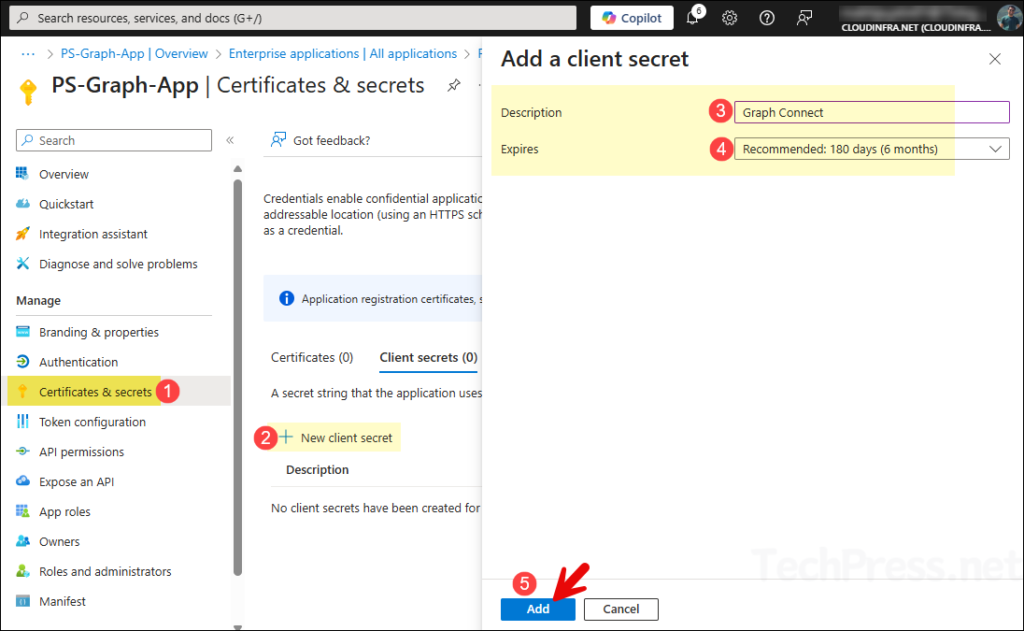
- Click on Certificates & secrets > + New client secret. Provide a description and expiry value, and then click on Add.
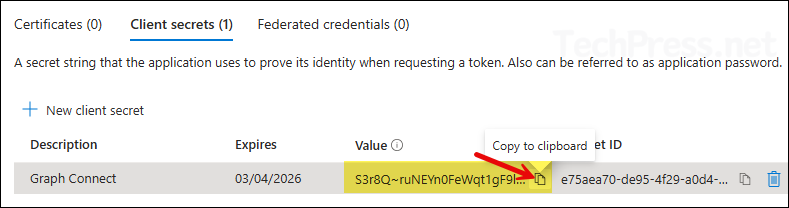
- Copy the client secret value immediately after creating it. The value is shown only for a short time, after that you will not be able to view or copy this value.
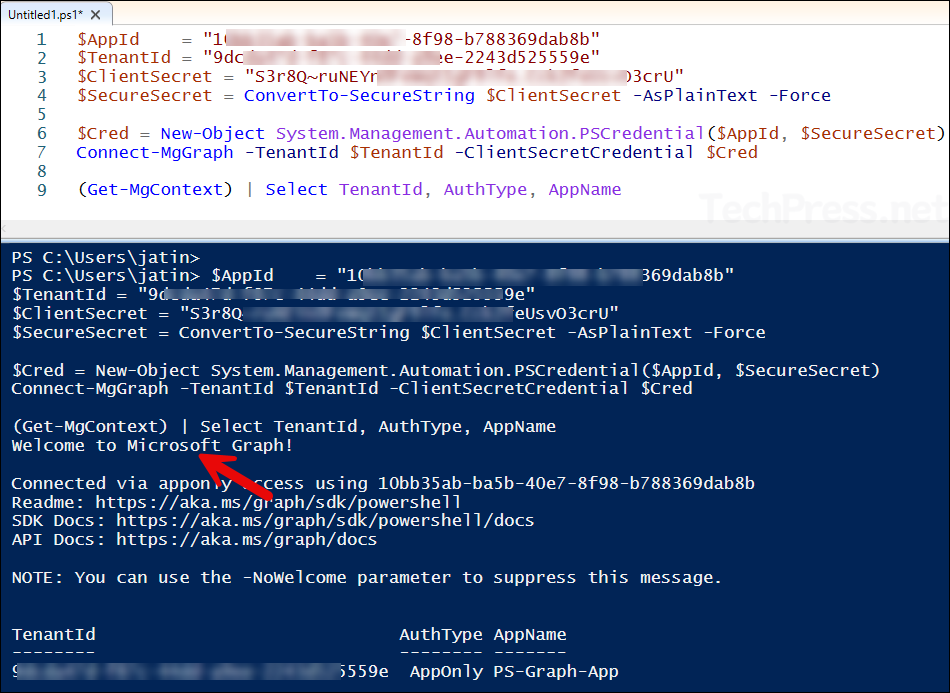
Connect to Graph using Client Secret
$AppId    = "<APP/CLIENT ID>"
$TenantId = "<TENANT ID>"
$ClientSecret = "<CLIENT SECRET>"
$SecureSecret = ConvertTo-SecureString $ClientSecret -AsPlainText -Force

$Cred = New-Object System.Management.Automation.PSCredential($AppId, $SecureSecret)
Connect-MgGraph -TenantId $TenantId -ClientSecretCredential $Cred

(Get-MgContext) | Select TenantId, AuthType, AppName
When using client secrets in scripts, keep them secure by never hard-coding them. Store secrets in a safe place like Azure Key Vault, limit who can access them, and rotate them regularly. Use certificates instead of secrets whenever possible for better security.
Managed Identity
This is the third app-only authentication method for Microsoft Graph PowerShell. It doesn’t require creating secrets or certificates. You can create either a system-assigned or user-assigned managed identity, grant the necessary application permissions, and then connect using the Connect-MgGraph -Identity command. Below is an example runbook in Azure where I have enabled System assigned identity.
- Go to the resource and enable System or User assigned Identity.

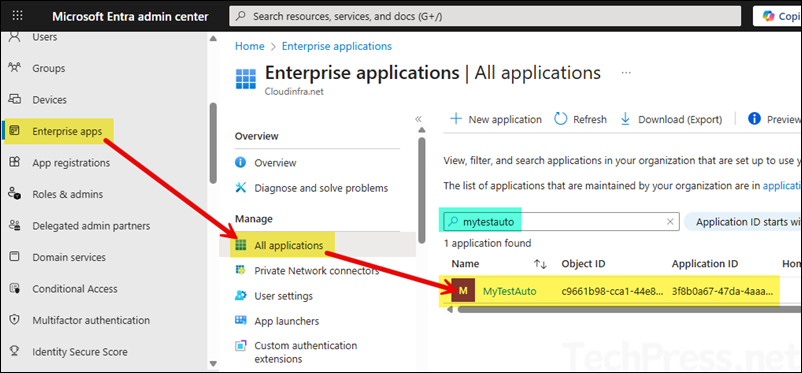
- Now go to Entra admin center > Enterprise applications and search for the managed identity. Click on it to open.
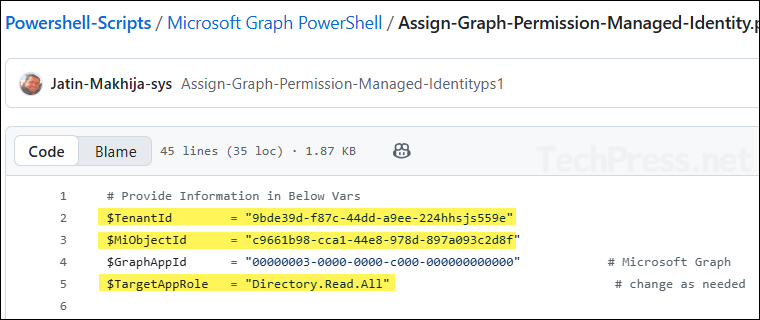
- To assign permissions to the system-managed identity, you can use the script (Assign-Graph-Permission-Managed-Identity.ps1) available in my GitHub repository. Update the variables $TenantId, $MiObjectId, and $TargetAppRole with your values, but do not modify $GraphAppId.
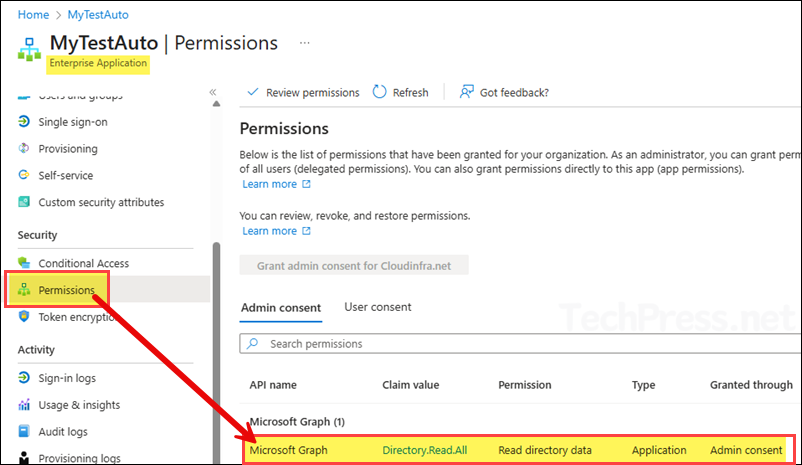
- After running the script, the permissions specified in
$TargetAppRolewill be added to the Enterprise application. You can verify this by going to the app’s Permissions section, where the granted permissions will appear under Admin consent.
After assigning the necessary permissions to the app, use one of the following commands, depending on whether you’re using a system-assigned or user-assigned managed identity.
System assigned managed identity
Connect-MgGraph -IdentityUser assigned managed identity
Connect-MgGraph -Identity -ClientId "<USER_ASSIGNED_MANAGED_IDENTITY_CLIENT_ID>"Conclusion
This post covered different ways to use the Connect-MgGraph cmdlet to connect to Microsoft Graph. No matter which method you choose, always assign only the minimum required permissions to the -Scopes parameter or the app registration or Managed Identity needed for your task. As a best practice, end your session by running Disconnect-MgGraph to free up the connection.