In this blog post, we’ll cover how to assign Microsoft 365 licenses to users using Graph PowerShell. Before getting started, ensure you meet the following prerequisites:
- All Microsoft 365 users must have a Usage Location set.
- Microsoft Graph scope must be set to
User.ReadWrite.All. - We would require SkuId of the License for assignment.
Contents
UsageLocation
Users must have a UsageLocation set in Entra ID which is a two character country or region code. If this attribute is not set, and you try to assign a license to the user using graph, you may get an error message License assignment cannot be done for user with invalid usage location.
Get UsageLocation using PowerShell
Use below commands to get the list of users where UsageLocation is not set.
# Install Microsoft Graph module if not already installed
Install-Module Microsoft.Graph -Scope CurrentUser# Import Microsoft Graph module
Import-Module Microsoft.GraphConnect to Microsoft Graph
Connect-MgGraph -Scopes Organization.Read.AllList of users where UsageLocation is not set
Get-MgUser -All -Property UserPrincipalName,UsageLocation | Where-Object {$_.UsageLocation -eq $null} | ft UserPrincipalName,UsageLocationList of users where UsageLocation is set
Get-MgUser -All -Property UserPrincipalName,UsageLocation | Where-Object {$_.UsageLocation -ne $null} | ft UserPrincipalName,UsageLocationGet UsageLocation from Entra admin center
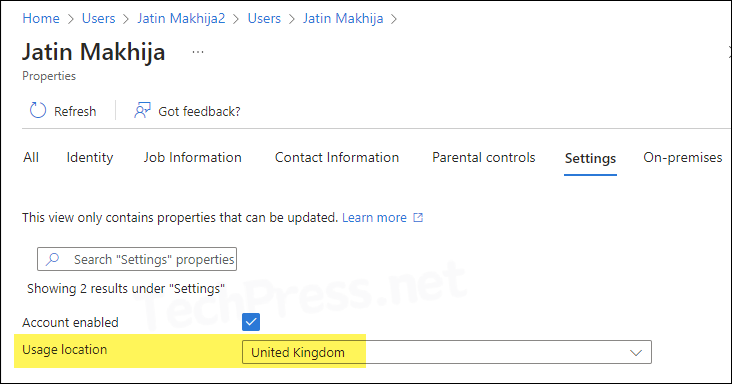
- Sign in to the Entra admin center.
- Users > All users > Click on the user > Edit properties.
- Click on Settings tab to find Usage location information.
Set UsageLocation
You can set usagelocation from either Entra admin center as shown above, or you can use PowerShell graph commands to update it. When connecting to graph, you will need to set the permission scope to User.ReadWrite.All.
To set usagelocation for a user, you will require user’s UPN and Usagelocation in ISO 3166-1 alpha-2 format, which is a 2 digit country/region code. You can refer to the link IBAN Country codes or Wikipedia link to check the alpha-2 country code and use it in below command.
Connect to Microsoft Graph
Connect-MgGraph -Scopes "User.ReadWrite.All"Update-MgUser
Update-MgUser -UserId <UPN> -UsageLocation <ISO 3166-1 alpha-2 country code>Example: Set UsageLocation for a User
Update-MgUser -UserId [email protected] -UsageLocation USExample: Set a given UsageLocation for all Users where UsageLocation is empty/null
Get-MgUser -All -Property Id, UserPrincipalName,UsageLocation | ? {$_.UsageLocation -eq $null} | % {Update-MgUser -UserId $_.Id -UsageLocation "<Alpha-2 code>"}User.ReadWrite.All
Assigning and removing licenses from Microsoft 365 users requires User.ReadWrite.All permission. Therefore, when connecting to Microsoft graph, set the scope parameter to User.ReadWrite.All.
Get the SkuId of Microsoft 365 License
For assigning a license to a user, we would require Microsoft 365 license SkuId. To find it, you can run below command on a PowerShell console. Ensure that you are still connected to Microsoft graph. As an example, I want to assign DeveloperPack_E5 license (SkuId: c42b9cae-ea4f-4ab7-9717-81576235ccac) to users. For more information on license service plan name mapping, refer to the link: licensing-service-plan-reference.
Get SkuId
Get-MgSubscribedSku | Select -Property Sku*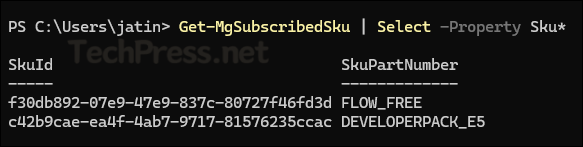
Assign a License to Microsoft 365 User
Now that we have gone through all the prerequisites, we can begin license assignment. In the previous step, we have noted the SkuId of DeveloperPack_E5 license. We will use this SkuId and assign it to users.
# Install Microsoft Graph module if not already installed
Install-Module Microsoft.Graph -Scope CurrentUser# Import Microsoft Graph module
Import-Module Microsoft.Graph# Connect to Microsoft Graph with required permissions
Connect-MgGraph -Scopes User.ReadWrite.All, Organization.Read.All
Assign M365 license to a user
Set-MgUserLicense -UserId <userUPN> -AddLicenses @{SkuId = "<SkuId>"} -RemoveLicenses @()Example:
Set-MgUserLicense -UserId [email protected] -AddLicenses @{SkuId = "c42b9cae-ea4f-4ab7-9717-81576235ccac"} -RemoveLicenses @()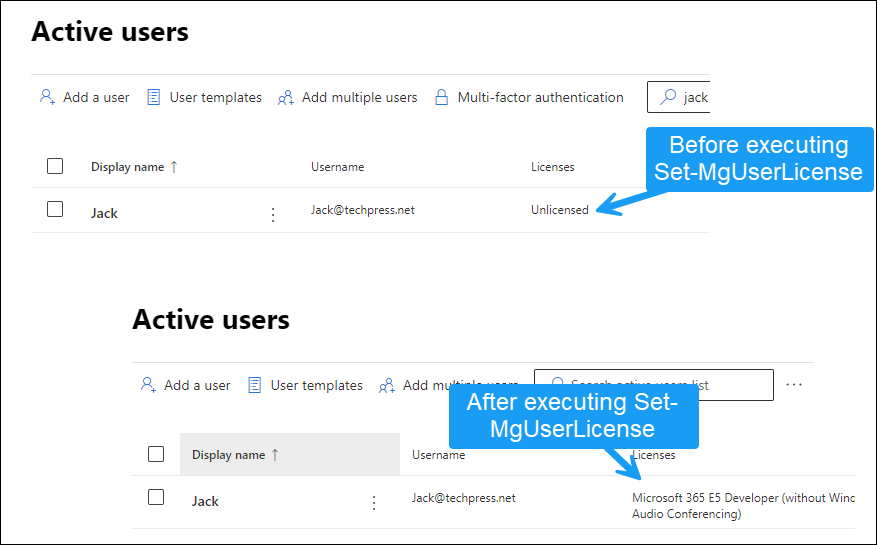
If you don’t know the SkuId of a license, you can use below command to extract this information using SkuPartNumber.
Another way to assign license to a user
$license= Get-MgSubscribedSku -All | Where SkuPartNumber -eq 'DeveloperPack_E5'
Set-MgUserLicense -UserId "[email protected]" -AddLicenses @{SkuId = $license.SkuId} -RemoveLicenses @()
Assign Multiple Licenses to a Microsoft 365 User
You can also assign more than one license to a M365 user using Powershell graph cmdlet Set-MgUserLicense. Provide SkuPartNumber values and store it in $license variable.
Assign Multiple Licenses to a M365 User
$license1 = Get-MgSubscribedSku -All | Where SkuPartNumber -eq 'DeveloperPack_E5'
$license2 = Get-MgSubscribedSku -All | Where SkuPartNumber -eq 'FLOW_FREE'
$addLicenses = @(
    @{SkuId = $license1.SkuId},
    @{SkuId = $license2.SkuId}
)

Set-MgUserLicense -UserId "[email protected]" -AddLicenses $addLicenses -RemoveLicenses @()
Assign a Microsoft 365 License to Multiple Users
You can also assign a specific license (skuId) to multiple users or even everyone in the organization. For this, you can use below powershell script.
- Replace the skuId to the one you want to assign to the users.
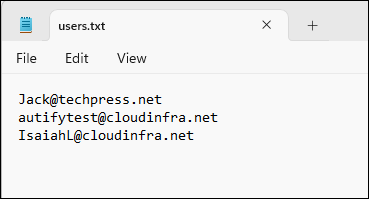
- Create a text file and add users UPN information (e.g., users.txt)
- Update
$upnListvariable and provide the path to users.txt file. - Execute the PowerShell script.
Assign_License_Multiple_M365_Users.ps1
# Connect to Microsoft Graph
Connect-MgGraph -Scopes "User.ReadWrite.All" -NoWelcome

# Define license SKU (replace with your own SKU ID)
# To find the SKU ID, run Get-MgSubscribedSku and note the 'SkuId' of the desired license.
$skuId = "c42b9cae-ea4f-4ab7-9717-81576235ccac"

# Path to the text file containing user UPNs
$userUPNFile = "C:\temp\users.txt"

# Read user Upn from the file
$upnList = Get-Content -Path $userUPNFile

# Loop through each user and assign the license
foreach ($upn in $upnList) {
    $user = Get-MgUser -Filter "userPrincipalName eq '$upn'"

    if ($user) {
        # Prepare the license assignment object
        $licenseAssignment = @{
            AddLicenses = @(@{SkuId = $skuId})
            RemoveLicenses = @()
        }

        # Assign license to the user
        try {
            Set-MgUserLicense -UserId $user.Id -AddLicenses $licenseAssignment.AddLicenses -RemoveLicenses $licenseAssignment.RemoveLicenses
            Write-Host "Successfully assigned license to $upn"
        } catch {
            Write-Host "Failed to assign license to $upn. Error: $_"
        }
    } else {
        Write-Host "User $upn not found"
    }
}

# Disconnect from Microsoft Graph
Disconnect-MgGraph | out-null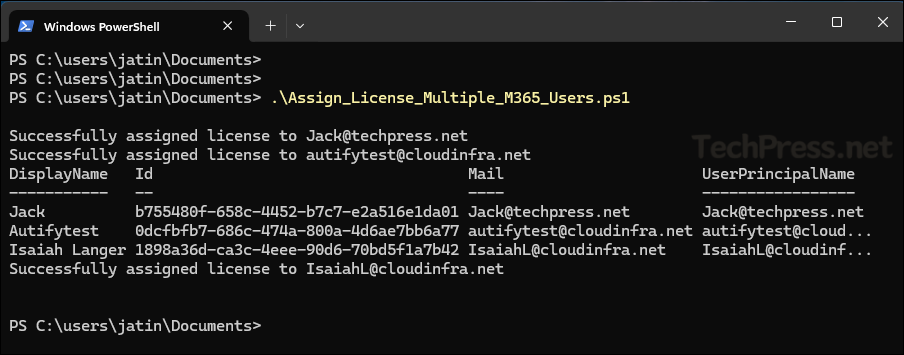
Assign Multiple Microsoft 365 Licenses to Multiple Users
You can also assign multiple licenses (skuIds) to a list of users given in a text file.
- Create a text file and provide the list of skuId which you want to assign to users. (e.g. skuids.txt)
- Create a text file and add users UPN information (e.g., users.txt).
- Update
$upnListvariable and provide the path to users.txt file. - Update
$skuIdsvariable and provide the path to skuids.txt file. - Execute the PowerShell script.
Assign_Multiple_Licenses_Multiple_Users.ps1
# Connect to Microsoft Graph
Connect-MgGraph -Scopes "User.ReadWrite.All", "Directory.ReadWrite.All"

# Path to the text files containing user UPNs and SKU IDs
$userUPNFile = "C:\Path\To\users.txt"
$skuFile = "C:\Path\To\skuids.txt"

# Read user UPNs and SKU IDs from the respective files
$upnList = Get-Content -Path $userUPNFile
$skuIds = Get-Content -Path $skuFile

foreach ($upn in $upnList) {
    # Get user by UPN
    $user = Get-MgUser -Filter "userPrincipalName eq '$upn'"

    if ($user) {
        # Prepare the license assignment object
        $licenseAssignment = @{
            AddLicenses = @()
            RemoveLicenses = @()
        }

        # Add all SKU IDs from the skuids.txt file to the AddLicenses array
        foreach ($skuId in $skuIds) {
            $licenseAssignment.AddLicenses += @{SkuId = $skuId}
        }

        # Assign licenses to the user
        try {
            Set-MgUserLicense -UserId $user.Id -AddLicenses $licenseAssignment.AddLicenses -RemoveLicenses $licenseAssignment.RemoveLicenses
            Write-Host "Successfully assigned licenses to $upn"
        } catch {
            Write-Host "Failed to assign licenses to $upn. Error: $_"
        }
    } else {
        Write-Host "User $upn not found"
    }
}

# Disconnect from Microsoft Graph
Disconnect-MgGraph
Assign a Microsoft 365 License with Certain services disabled
You can also assign a license to a user with certain services or apps disabled. For example, we want to assign a Microsoft 365 developer license to the user with Microsoft Booking disabled. You can also run below script even if the license is already assigned to the user, but you only want to disable certain service plans or apps.
$skuId:Provide the skuId of the license you want to assign to the user.$userUPN:Provide UPN of the user.$disabledPlans:Provide comma separated list of service plan IDs which you want to disable.
Assign_license_disable_Service_Plan.ps1
# Connect to Microsoft Graph
Connect-MgGraph -Scopes "User.ReadWrite.All"

# Define the SKU ID, User UPN, and Service Plan IDs to disable
$skuId = "c42b9cae-ea4f-4ab7-9717-81576235ccac"
$userUPN = "[email protected]"
$disabledPlans = @("199a5c09-e0ca-4e37-8f7c-b05d533e1ea2")

# Get the user and assign the license with disabled services
$user = Get-MgUser -Filter "userPrincipalName eq '$userUPN'"
if ($user) {
    Set-MgUserLicense -UserId $user.Id -AddLicenses @(@{SkuId = $skuId; DisabledPlans = $disabledPlans}) -RemoveLicenses @()
    Write-Host "License assigned with disabled services to $userUPN"
} else {
    Write-Host "User $userUPN not found"
}

# Disconnect from Microsoft Graph
Disconnect-MgGraph | out-null
Copy Licenses from One User to Another Microsoft 365 User
First, you will need to copy assigned licenses from one user into a variable called $copyUser and use that variable to assign licenses to another user.
Copy License from one user and assign to another
$copyUser = Get-MgUser -UserId "[email protected]" -Property AssignedLicenses
Set-MgUserLicense -UserId "[email protected]" -AddLicenses $copyUser.AssignedLicenses -RemoveLicenses @()
Assign Microsoft 365 License to Guest/External Users
You can assign a Microsoft 365 license to a guest or external user using a PowerShell graph. We will use the same cmdlet for assigning the license, that is Set-MgUserLicense.
Assign M365 License to Guest/External Users
Set-MgUserLicense –UserId jatin_cloudinfra.net#EXT#@techpress.net -AddLicenses @{SkuId = 'c42b9cae-ea4f-4ab7-9717-81576235ccac'} -RemoveLicenses @()Microsoft 365 Group-based Licensing
Instead of assigning a license to each user individually, you can assign a license to an entra security group. This way, all users within the group will automatically receive the assigned license. If a new user needs the same license, simply add them to the group, and the license will be applied automatically. We will utilize Set-MgGroupLicense cmdlet for assigning a license to the group. Let’s take a look:
- Ensure that you have installed and imported the Microsoft Graph PowerShell module.
Set-MgGroupLicensecmdlet will use one of the Graph submodules called Microsoft.Graph.Groups. If you have imported Microsoft.Graph, this module is already included.
Assign license to entra security group
Add-MgGroupLicense -GroupId <GroupId> -AddLicenses @{SkuId="<LicenseSkuId>"} -RemoveLicenses @()- Provide Group Id and SkuId to assign license to an entra group. You can get the group Id from entra admin center or by using
Get-MgGroupcmdlet.
Example:
Add-MgGroupLicense -GroupId 0f8f84ae-3c22-4cfb-a8cc-e890e3bf456f -AddLicenses @{SkuId="c42b9cae-ea4f-4ab7-9717-81576235ccac"} -RemoveLicenses @()