Contents
What is DNS Aging and Scavenging?
DNS Aging
DNS Aging is the process of identifying stale resource records on the DNS Server. Stale resource records can lead to issues with name resolution, such as the creation of duplicate DNS records, unnecessary space utilization, and degradation of DNS server performance.
It keeps track of the timestamps of individual resource records (RR). The age of a resource record is determined from its last timestamp to the current time of the server. The obtained value is utilized in the scavenging operation and is responsible for cleaning up the stale resource records from the DNS Server.
DNS Scavenging
DNS Scavenging is an automatic recurring-scheduled process that runs on the DNS Server, It checks for the stale resource records and deletes it from the server.
Key Points Before Enabling DNS Scavenging
- Ensure that all DNS resource records for your critical services are created as static records. For example, Servers, Printers or any Web service record should be created with as a static record. This ensures that these are not affected by the scavenging operation.
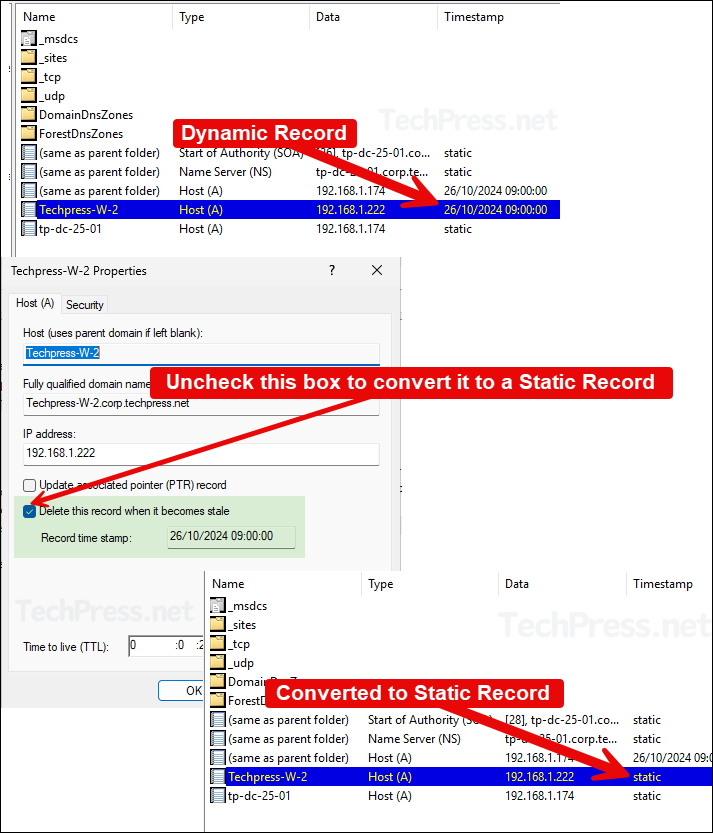
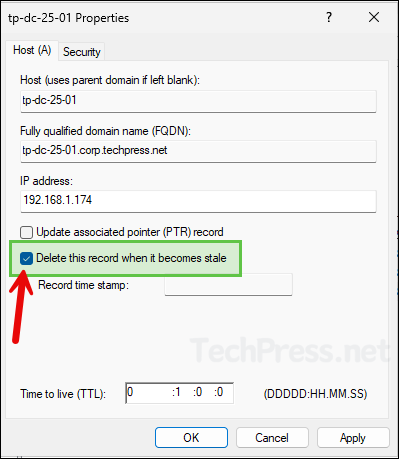
- To convert a dynamic DNS record to a static record, simply open the DNS record and uncheck Delete this record when it becomes stale checkbox, click OK to save. Please note, when a record becomes static, it will not be deleted by a DNS scavenging process. You will have to manually cleanup any stale static records.
- As a best practice, enable scavenging only from one DNS server. This reduces conflicts during the scavenging process. If AD replication is working fine, a scavenged record will be automatically removed from other DNS servers as well.
- Ensure careful configuration of the non-refresh and refresh intervals, as incorrect settings may lead to duplicate records, especially when not aligned with the DHCP lease. Adjust these values to ensure that record scavenging occurs after the DHCP Lease expires. Set the DHCP lease according to the non-refresh interval and refresh interval values.
As an example, If the DHCP Lease is set to 14 days, you can set the refresh interval to 7 days and no refresh interval to 7 days. The only reason to align these values with DHCP lease is so that DNS server will have less stale records by not keeping the records of the resources which have not renewed the DHCP lease.
You can check the DHCP lease and divide it by two, If there is an uneven number, set the refresh interval higher than the no refresh interval. For example, If DHCP lease time is of 7 days, set the No-refresh to 3, and refresh to 4.
Take a Backup of DNS Records using a PowerShell Script
When scavenging process runs, it will delete all records which are marked as stale. It’s a best practice to take a backup of all DNS records, in case you want to find out information about a deleted record or restore a deleted record.
- Below PowerShell script can be used to take a backup of all DNS records to a CSV file. You can change the location of the CSV file using
$outputPathvariable.
Backup_DNS_Records.ps1
# Provide the Output file path and file name
$outputPath = "C:\temp\DNS_Backup.csv"

$dnsRecords = @()
$dnsZones = Get-DnsServerZone

foreach ($zone in $dnsZones) {
    $records = Get-DnsServerResourceRecord -ZoneName $zone.ZoneName
        foreach ($record in $records) {
        $dnsRecords += [PSCustomObject]@{
            ZoneName        = $zone.ZoneName
            RecordType      = $record.RecordType
            RecordName      = $record.HostName
            RecordData      = $record.RecordData
            TimeToLive      = $record.TimeToLive
            Timestamp       = $record.TimeStamp
        }
    }
}
$dnsRecords | Export-Csv -Path $outputPath -NoTypeInformation -Encoding UTF8
Write-Output "DNS records have been exported to $outputPath"
About DNS Aging Configuration
Non-Refresh Interval
The time interval during which the resource record cannot be refreshed, which also helps to reduce DNS replication traffic as per configured value. Please note, dynamic DNS update is exempt from Non-Refresh Interval. Therefore, the record will still be updated during dynamic DNS update irrespective of the non-refresh interval value.
Refresh Interval
The time interval during which the resource record is allowed to be refreshed.
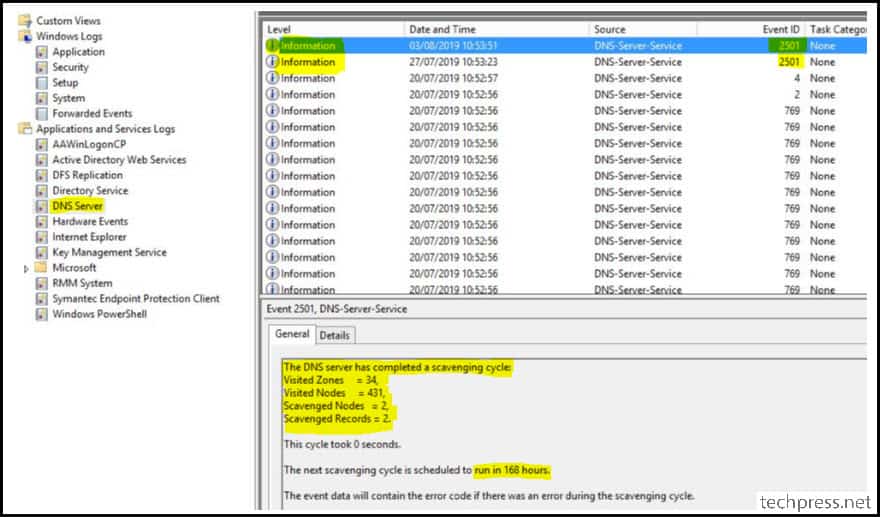
If you set the Non-Refresh Interval to 7 Days and the Refresh Interval to 7 Days, the resource record would be eligible for scavenging after 14 Days. Scavenging process occurs based on the last scheduled event on the DNS Server. You can check the last scavenging date and time using event ID 2501.
Note
- Event ID 2501: When records were scavenged.
- Event ID 2502: When no resource records were scavenged.
Enable DNS Aging/Scavenging
Configuring DNS scavenging on a DNS server is a two-step process. First step is to enable DNS scavenging, and second one is to enable Automatic Scavenging of stale records setting. The first step of the process will identify and mark stale DNS records, and the Second step of the process will actually delete those records.
You can enable DNS scavenging either at the DNS server level, which will apply it to all DNS Zones. You can also apply scavenging to a specific DNS zone or a specific resource record.
- Enable DNS Scavenging
- Enable Scavenging at DNS server level.
- Enable Scavenging at DNS Zone level.
- Enable Scavenging at Resource record (RR) Level.
- Enable Automatic Scavenging of Stale Records Setting
Enable Aging/Scavenging at the DNS Server Level
Enabling DNS scavenging at the DNS server level will enable it on all DNS zones. Let’s check the steps:
If you do not want to enable scavenging for all the DNS zones, then please skip this step and proceed to enable aging/scavenging at the DNS Zone level. Please note that enabling aging/scavenging at the DNS Server level setting will not be replicated to other DNS Servers.
Note
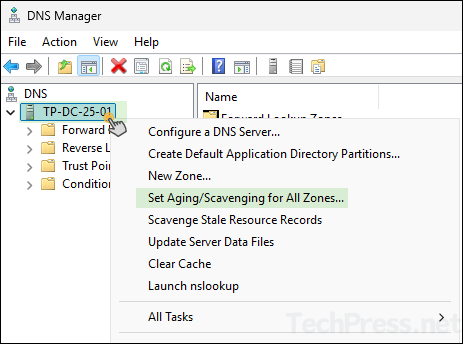
- Right-click on DNS server and click on Set Aging/Scavenging for All Zones…
- Set the No-Refresh Interval and Refresh Interval Values
- As mentioned earlier, align these values with the DHCP lease. For example: If DHCP lease value is 14 days, then you can leave these values to default 7 days.
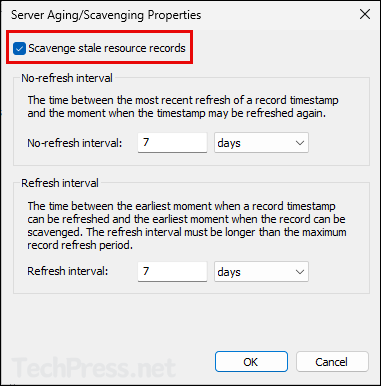
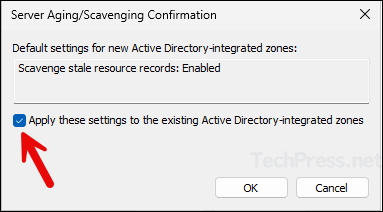
- Scavenge stale resource records: Enabled
- Apply these settings to the existing Active Directory-Integrated zones – Enable
- To verify if Aging/Scavenging has been enabled at the DNS server level, you can use
dnscmd /infocommand.
dnscmd /info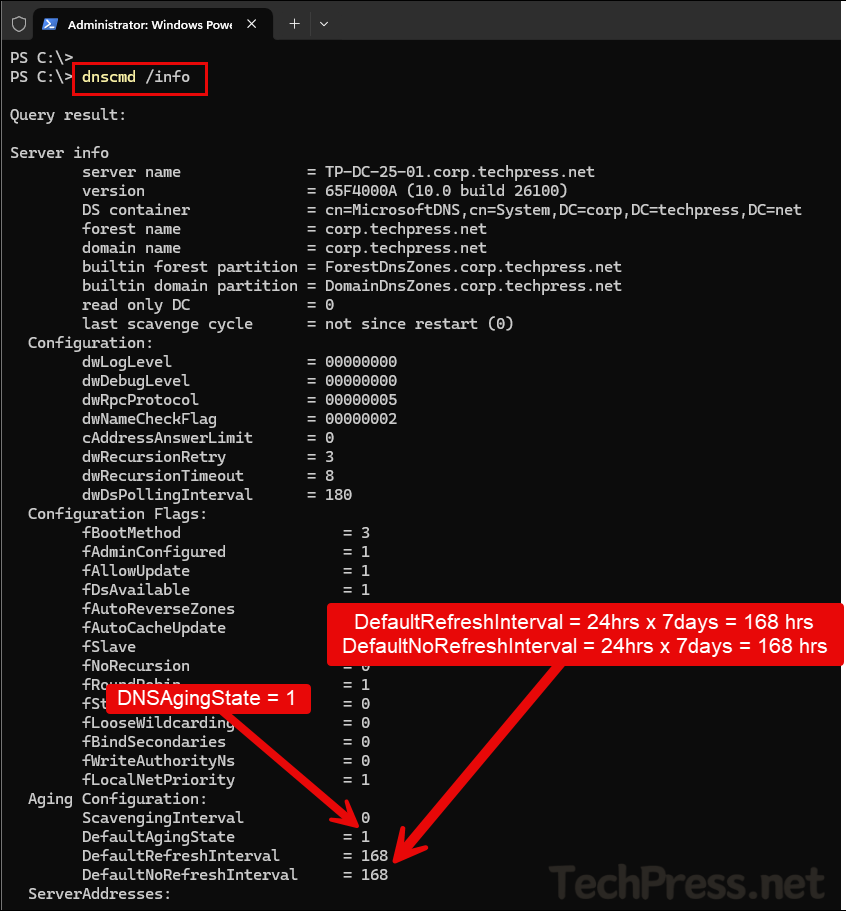
Enable Aging/Scavenging at the DNS Zone Level
If you only want to enable Aging/Scavenging on a specific DNS Zone level without affecting other DNS zones, the follow below steps:
- Open DNS Manager (dnsmgmt.msc).
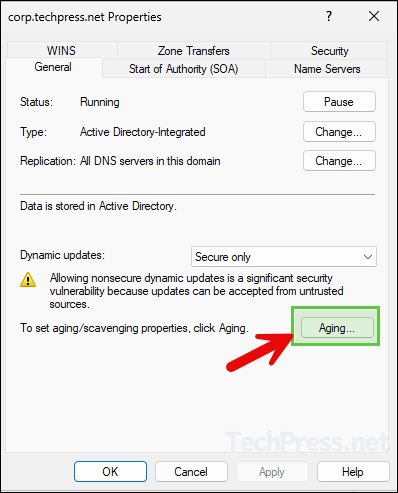
- Right-click on the DNS zone and click on Properties.
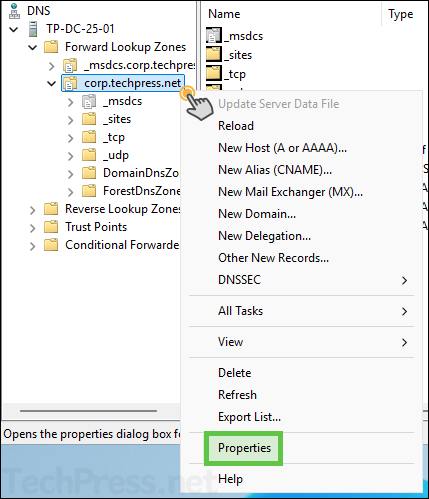
- Click on the Aging button.
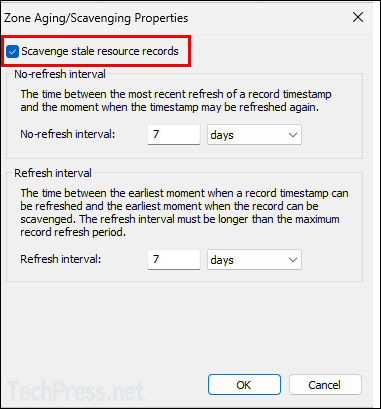
- Enable the checkbox Scavenge stale resource records and modify the non-refresh and refresh interval values according to your requirements.
- Verify Aging/Scavenging configuration at the zone level using
dnscmd /zoneinfo <zonename>command.
dnscmd /zoneinfo <zonename>Example:
dnscmd /zoneinfo corp.techpress.net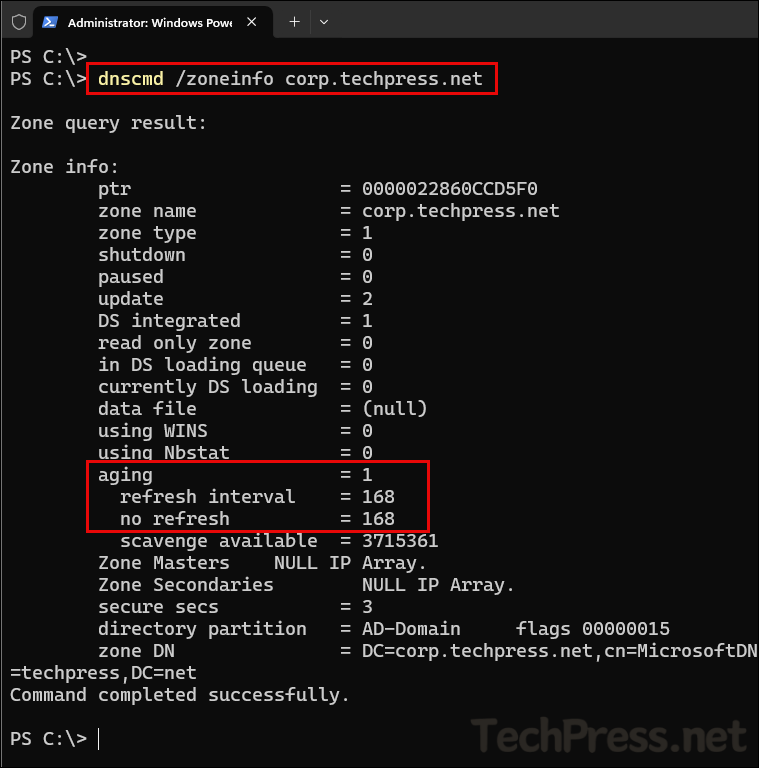
Enable Aging/Scavenging at the Resource Record (RR) Level
You can also enable Aging/Scavenging at the resource record level as well. Let’s check the steps:
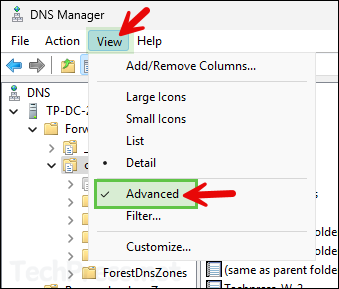
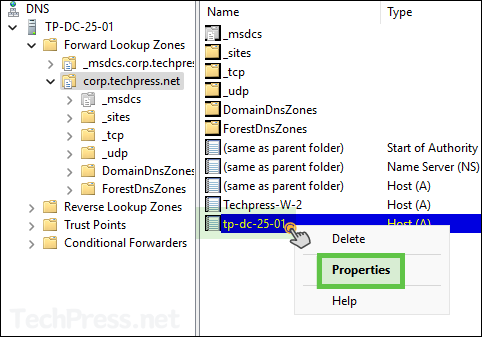
- DNS Manager > View > click on Advanced to enable advanced features in DNS Manager console.
- Right-click on the record and click on Properties.
- Select the checkbox Delete this record when it becomes stale.
Enable Automatic Scavenging of Stale Records Setting
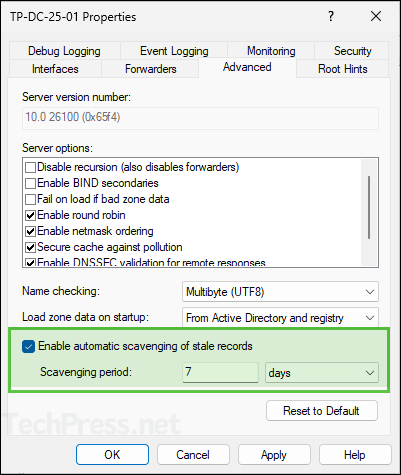
After enabling DNS Aging/Scavenging, which will just identify and mark stale records but will not delete them. To ensure that stale records are deleted automatically, you will need to enable automatic scavenging of stale records setting. It ensures the deletion of stale records from DNS server when they become eligible according to the Aging configuration.
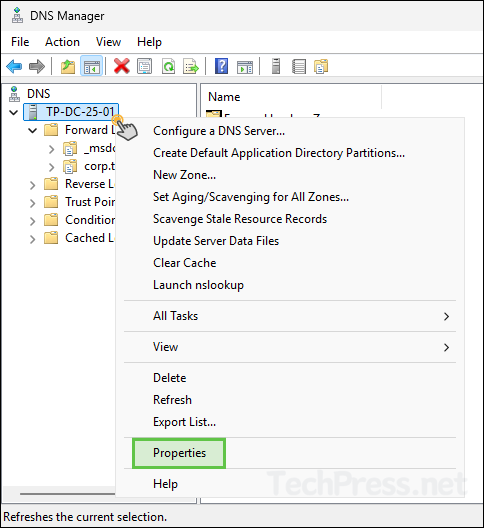
- Open DNS Manager > right-click on the DNS Server > Select Properties.
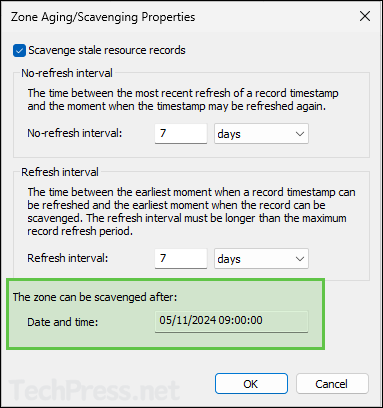
- Check the box next to Enable automatic scavenging of stale records and provide a value in days or hours. I have set this to 7 days, this means that a scavenging process will run every 7 days to check for any eligible stale records and delete them from the DNS server. It will repeat the process every 7 days to find and delete the stale records.
- Now, right-click on any DNS Zone where scavenging is configured and go to Properties > click on Aging button.
- Notice the Date and time stamp for the zone can be scavenged after.
