When a user is synced from the On-Prem Active Directory to Entra ID via Entra connect, user account sync status shows as Synced from on-premises and shows a symbol ![]() on Microsoft 365 admin center. In the next sections of this blog post, we will see how you can convert Entra ID synced users to Cloud-only users.
on Microsoft 365 admin center. In the next sections of this blog post, we will see how you can convert Entra ID synced users to Cloud-only users.
✅Convert One Entra synced user to Cloud Only user on Microsoft 365.
✅Convert All Entra synced users to Cloud Only users on Microsoft 365.
Contents
Convert One Entra Synced user to Cloud Only User
- We will need an active directory OU which is not getting synced with Entra ID. If you already have one, you can use it. If not, then you can create an OU and then exclude it from synchronization.
- Launch Entra Connect > Customize synchronization options > In Domain and OU Filtering Page > Select Sync Selected domains and OUs to exclude an active directory OU from sync.
- Move the user account (that you want to convert to cloud only) to this OU. You can also move a group of other synced object to convert it to cloud only. It doesn’t just have to be a user object.
- Run Entra ID delta Sync.
Run delta sync
Start-ADSyncSyncCycle -PolicyType delta
- After delta sync is completed, the link between the user and Entra ID will break, and it will be moved to Deleted users on Microsoft 365 admin center (refer to the below screenshot)
There is no data loss when a user account is moved to Deleted Users. Microsoft keeps a deleted user account for 30 days before permanent deletion.
Note
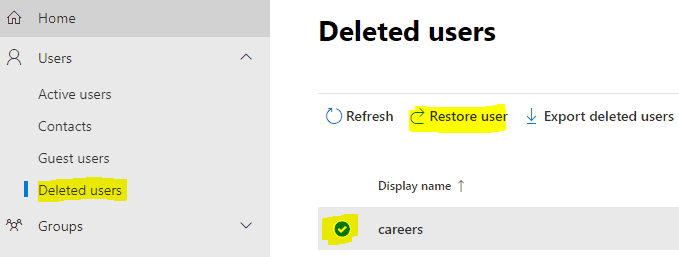
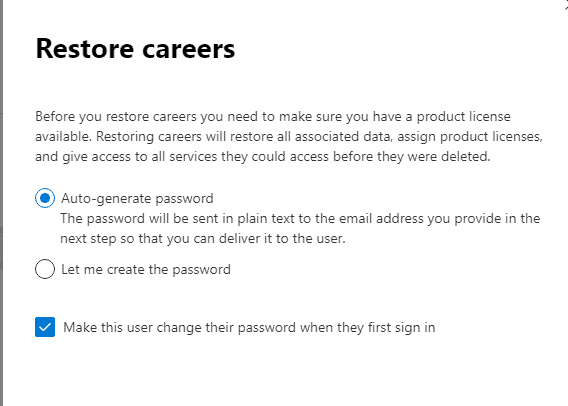
- Select the User account from Deleted users page and click on Restore User. You will have to reset user’s password to restore the user.
- Once user account has been restored, it will now show in Users > Active Users on Microsoft 365 admin center. Notice the Icon for the Sync Status column will be changed to cloud
 symbol which means that the user account is now a cloud only account.
- Update OnPremisesImmutableId of the user on Microsoft 365 to $null using below command [Optional Step].
[Optional] Set OnPremisesImmutableId to $null
Install-Module Microsoft.Graph -Scope CurrentUser -Force
Connect-MgGraph -Scopes "User.ReadWrite.All"

# Clear the onPremisesImmutableId
Update-MgUser -UserId "[email protected]" -OnPremisesImmutableId $null

# Verify
Get-MgUser -UserId "[email protected]" -Property "onPremisesImmutableId,onPremisesSyncEnabled" |
  Select-Object UserPrincipalName, OnPremisesImmutableId, OnPremisesSyncEnabled
Once a user account is converted to cloud-only, its identity provider changes to Entra ID. All account management must be performed in the Entra admin center or the Microsoft 365 admin center.
Convert All Entra Synced Users to Cloud Only Users
In the previous section of the blog post, I demonstrated the steps to convert a single Entra-synced user account to a cloud-only account. The process is straightforward; however, it does require the user to reset their password.
Now, we will look at the steps to convert all Entra-synced users into cloud-only users at once. This option is useful in scenarios where you want to decommission the Entra Connect server and exclusively manage all users through Entra ID/Microsoft 365.
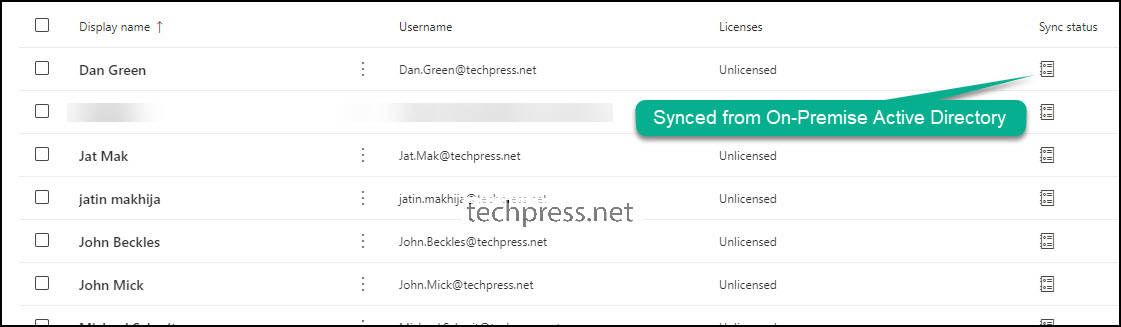
Before we proceed with the steps, let’s review the current status of user accounts in the Microsoft 365 admin center. As shown in the screenshot below, the sync status icon indicates that these users are synced from the on-premises Active Directory.
- Login to the Microsoft Entra Connect sync server.
- Copy below code into notepad and save it as Disable_Dir_Sync.ps1.
- Launch the PowerShell console (as admin) and execute the script.
onPremisesSyncEnabled attribute is set to True when the sync between Entra ID and Active directory is enabled. Changing the value of this attribute to false will disable the directory sync at the organization level. The process to update this value may take upto 72 hours.
The onPremisesSyncEnabled attribute in Microsoft Entra ID controls whether the tenant is prepared to accept synchronization of objects from on-premises AD DS. For more information, refer to the link: ineffective-troubleshooting-practices.

Disable_Dir_Sync.ps1
#Install Graph module and Connect with required permissions
Install-Module Microsoft.Graph -Scope CurrentUser -Force
Connect-MgGraph -Scopes "Organization.ReadWrite.All","Directory.ReadWrite.All"
# Check current sync status
Get-MgOrganization | Select-Object Id, OnPremisesSyncEnabled
# Disable directory synchronization
$orgId = (Get-MgOrganization).Id
$params = @{ onPremisesSyncEnabled = $false }
Update-MgOrganization -OrganizationId $orgId -BodyParameter $params
# Verify
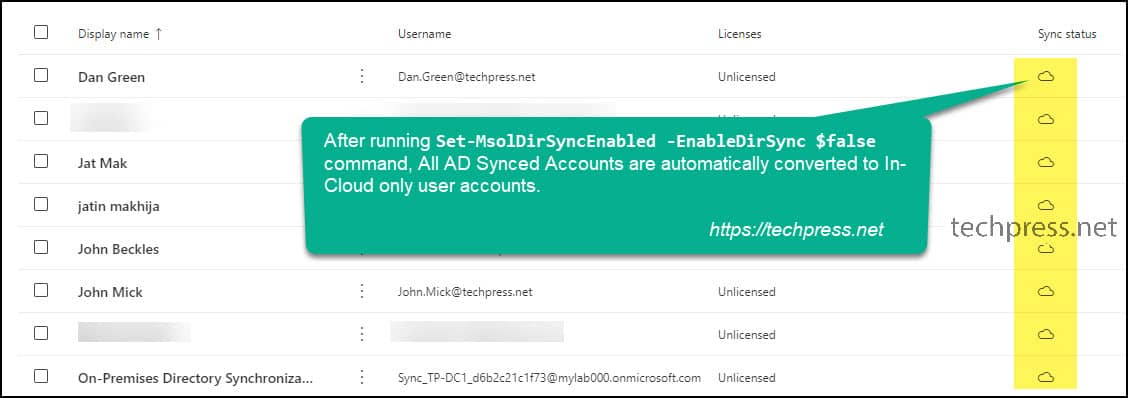
Get-MgOrganization | Select-Object Id, OnPremisesSyncEnabledOnce directory synchronization has been successfully disabled, refresh the Microsoft 365 admin center and check the sync status of users. It should display a cloud symbol, indicating that the user accounts are now cloud-only and managed through the Microsoft 365 or Entra admin center. (Ignore the command Set-MsolDirSyncEnabled in the screenshot, as this is no longer valid. Use the above script instead).
Below script will set the OnPremisesImmutableId to $null for users objects where this value is not null, and they are cloud only users.
[Optional] Set OnPremisesImmutableId to $null
# Connect (needs admin consent once):
Connect-MgGraph -Scopes "User.ReadWrite.All,Directory.ReadWrite.All" -NoWelcome

# Pull all users with the properties we need
$users = Get-MgUser -All -Property Id,UserPrincipalName,OnPremisesImmutableId,OnPremisesSyncEnabled

# Filter: only users with an anchor, and skip still-synced users
$targets = $users | Where-Object {
  $_.OnPremisesImmutableId -ne $null -and -not $_.OnPremisesSyncEnabled
}

foreach ($u in $targets) {
  try {
    Update-MgUser -UserId $u.Id -OnPremisesImmutableId $null
    Write-Host "Cleared: $($u.UserPrincipalName)"
  } catch {
    Write-Warning "Failed to clear ImmutableId for $($u.UserPrincipalName): $($_.Exception.Message)"
  }
}
Conclusion
In this blog post, we have learned how to convert an AD synced account to cloud only user account. You can perform this change for all users at once or one user as per your requirement. For reconfiguration of Entra connect sync app and Customize synchronization options, refer to the link: reconfigure-entra-connect-sync.
To temporarily suspend directory synchronization instead of turning off directory sync, Use the command: Set-ADSyncScheduler -SyncCycleEnabled $false. To re-enable the directory sync, use below commands:
Re-enable Directory sync
#Get your tenant organization ID
$org = Get-MgOrganization

#Enable directory synchronization (DirSync)
Update-MgOrganization -OrganizationId $org.Id -OnPremisesSyncEnabled:$true
Good article – Does this need to be done if we were using an on-prem exchange server? All users have been migrated to the cloud and all computers have been removed from the domain and are now authenticating via AzureAD.
Microsoft states this is all that needs to be done to convert –
https://learn.microsoft.com/en-us/microsoft-365/enterprise/turn-off-directory-synchronization?view=o365-worldwide
Thanks!
Set-MsolDirSyncEnabled -EnableDirSync $false command is used to switch off directory sync and convert all synced users to In-Cloud users. When a user is converted to In-Cloud, it will be full managed via Azure AD and not on-prem AD.
Once all users are converted to In-Cloud Users, you can remove Azure AD Connect from On-Prem Server.
But will all the user accounts still showing the premise icon be deleted in 365 and then need to be restored? Think that is the piece I am missing.
Hi Lance, No the accounts will not be removed and need to be restored. It will be converted to In Cloud accounts once the command Set-MsolDirSyncEnabled -EnableDirSync $false is run.
I’m very curious about this part as well, also if their passwords will be reset or require an change.
Hi Wil, Password reset is not required after converting all user accounts to In Cloud user accounts. I have also updated the blog post related to this and some more information on it. Hope this helps.
Thanks so much!
I have some users I want to use Active Directory sync and some I want cloud only.
So far, I haven’t found a way to migrate mailboxes from on premise to a user that was manually created as cloud only.
After reading this post I’m wondering if I can;
Sync both OUs, the one for cloud only users and the one for users that will continue to sync.
Use the command in your post to disable sync.
Reconfigure Azure AD Connect and remove the OU for cloud only users from the configuration.
Re-enable directory sync and force a sync from Azure AD Connect.
Question is, what happens to the “cloud Only” users who are no longer syncing?
Will their accounts in the cloud be deleted?
That’s what normally happens to a sync’d account that is removed from the OU that is syncing.
Thank you! I converted a few users and everything seems to be good. Outlook, onedrive etc. But some users are missing teams channels after the change. When i login to the teams admin center, all the permissions are still the same, but no channels in teams. I fix this by deleting / add the user again and then the teams channel is back. But it is a lot of work to do this for all users!
Note: Some users had no issue.
Is this a sync issue? Can i force it? Or maybe i need to wait 24 hours+ ?
Any help would be great.
Thanks
I believe we are experiencing quite a huge issue after this migration. If you could provide some insight to our issue, that would be great.
After migrating all our users, some on-premesis attributes are still present. Most notably and the ones causing the issues are “On-premises SAM account name” and “On-premises domain name”. These properties are still respected even after Azure AD sync is turned off. For example, for my migrated users, if they Azure AD join a Windows device, the user will be created as OnPremDomain\OnPremSAM or company.local\jdoe. Compared to true Azure AD cloud only accounts, they are created like AzureAD\jdoe.
This has become a problem when someone changes their name. The “On-premises SAM account name” attribute does not change when changing the name of the Azure AD user. For example, let’s say Jane Doe’s last name is changed to Fox, making her last Name Jane Fox. The name change will be reflected on all Microsoft apps, but not on a Windows Azure AD device. The user will still be created as company.local\jdoe. This causes many issues with certificate validation and a lot more.
Is there any resolution for this?
Not sure about this, you could uncheck that attribute to be synced to Azure AD and then migrate the usre ? IF you have already completed migration then you could clear those unwanted attributes for all users in Azure AD using a powershell script ? Using cmdlet like Set-msoluser.
I unchecked the attributes on the AD side, but they still were present in Azure AD. I ended up opening a support ticket with Azure Identity and it looks like they are going to remove the attributes manually for all my users by collaborating with the engineer team.
Set-MSOLUser doesn’t work because the attributes are read-only.
During my support case they confirmed there’s no way for the attributes to be removed after the user is migrated, whether it’s migrating one by one or disabling sync to convert all users at once. There seems to be no ability to remove the attributes after AD sync.
I’ve opened a Feedback thread, so feel free to vote on it:
https://feedback.azure.com/d365community/idea/01186207-3cd9-ed11-a81c-000d3ae51e62
Just checking if the ALL User solution worked for someone without any issues?
I need to decommission our old DC (Cloud Only), all the devices are already all removed from DC and Azure joined.
Another question – SSO setup has nothing to do with this correct?
Thanks for this great article. What will happen to synced groups? Will they get migrated too?
Didn’t work for me. They get hard deleted and you cannot restore them from trashbin. Have you found any alternative?
I know this article is getting old, but I have 2 simple questions :
“Update Immutable ID of the user on Microsoft 365 to $null using below command”
Q1 : Why update this value if the user has stopped being synced?
“How to Convert All Entra ID Synced Users to Cloud Only Users?”
Q2 : Do users lose their on-prem attibutes value once this is done?
Attributes I’m talking about :
On-premises sync enabled
On-premises last sync date time
On-premises distinguished name
On-premises immutable ID
On-premises provisioning errors
On-premises SAM account name
On-premises security identifier
On-premises user principal name
On-premises domain name
We are migrating users from on-prem to cloud in phases. We have discovered an issue in Self-Service Password Reset. When a cloud user tries to change their password, they receive an error. The event from SSRP logs is this:
Synchronization Engine returned an error hr=80230405, message=The operation failed because the object cannot be found
When we set the ImmutableID to $null on the account, the password reset fails with “Internal Error”. I assume this is happening because some on-prem attributes are still attached to these accounts and we have write-back enabled.
Curious if you know of a work around for this problem?
I would love some help on this one. I have successfully converted a few accounts to cloud only. However, I have discovered that users of those accounts cannot change their passwords themselves (yes, another Entra admin can change it for them).
This has me concerned about moving the rest of the tenant to cloud only. Does this get resolved after converting all accounts? Has anyone else experienced this?
Maybe it’s a coincidence or maybe it’s because of a recent update, but I converted a few accounts earlier this year and password reset / sspr was working fine until recently.
Since our local AD isn’t used anymore, I’ll see if stopping password sync both ways fixes the problem until I entirely shut down the connector and have Microsoft delete On-Premises attributes.
Having the same issue…converted accounts cannot reset their own passwords. MS support was not that helpful. Any luck with a solution?
@Jatin Makhija
Has anything changed in this guide since 2022 when it was written?
Added question can this method be used on converting Groups to Online only Grousp maybe with some changes to the script?
/Karsten Vendler
The command to update ImmutableId doesn’t work for me.
# Clear the onPremisesImmutableId
Update-MgUser -UserId “[email protected]” -OnPremisesImmutableId $null
The good one was :
Invoke-MgGraphRequest -Method PATCH `
-Uri “https://graph.microsoft.com/v1.0/users/” `
-Body @{ onPremisesImmutableId = $null }
Thanks