In this blog post, we will learn different ways to create Microsoft 365 groups using PowerShell. A simple way to create a Microsoft 365 group is by using New-UnifiedGroup cmdlet which is a part of Exchange Online PowerShell V3 module.
Contents
Create a M365 Group Using New-UnifiedGroup cmdlet
Please note, when you use New-UnifiedGroup cmdlet to create a Microsoft 365 group, it will not create a corresponding Sharepoint site. If you want to create a M365 group with a Sharepoint site (with or without Teams) then use New-PnPMicrosoft365Group instead.
- Install EXO V3 PowerShell module.
- Execute the following command to create a Microsoft 365 group.
Create M365 Group
New-UnifiedGroup -DisplayName "MyTest M365 Group 1" -Alias "mytestgroup1" -PrimarySmtpAddress [email protected] -AccessType Private
Connecting with SharePoint Online using PnP PowerShell
You can create a Microsoft 365 group with a Sharepoint site (with or without Teams) using New-PnPMicrosoft365Group cmdlet which is a part of PnP.Powershell module.
PnP.Powershell module no longer works with Powershell 5.1 version. You will need to Install Powershell 7.2 or later version to work with this module. Refer to this link for downloading and Installing Powershell 7.x.
Note
Creation of Microsoft 365 groups using PnP PowerShell module will require creating an App registration in Entra ID and generating a self signed certificate for establishing a connection with Sharepoint online using Connect-PnPOnline command. Let’s check the steps:
Create an Entra ID App Registration
To create an App registration on the Entra admin center. Follow the below steps:
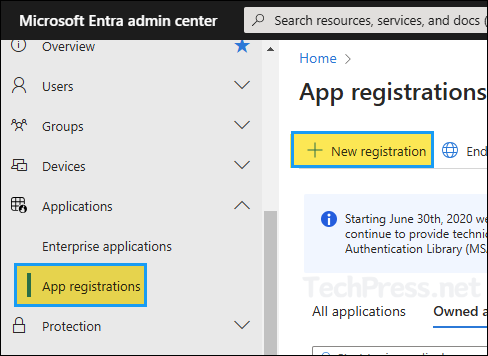
- Sign in to the Entra admin center > Identity > Applications > App registrations.
- Click on New registration.
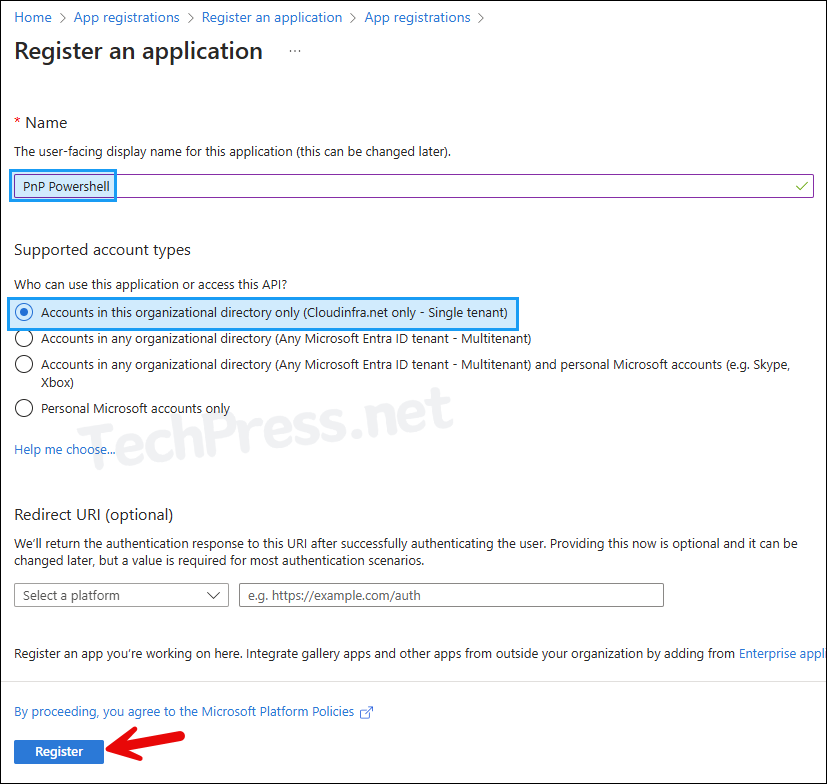
- Provide the display name of the application and select Accounts in this organizational directory only (<tenant> only -Single tenant). Click Register.
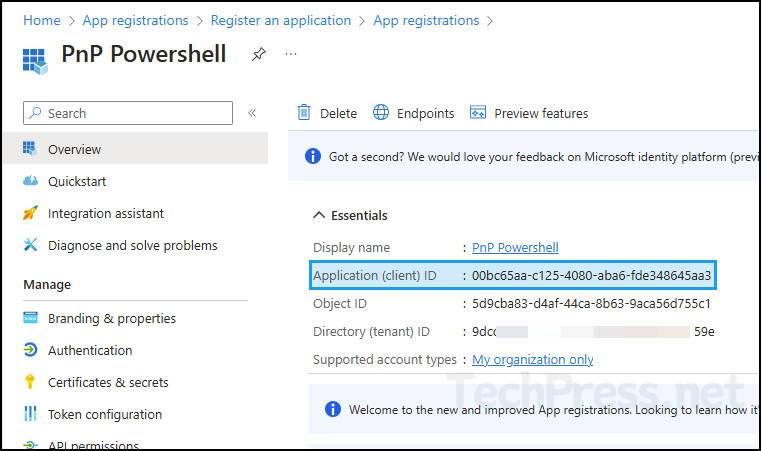
- Once the application is created, open the App registration > Overview page > Copy Application (client) ID.
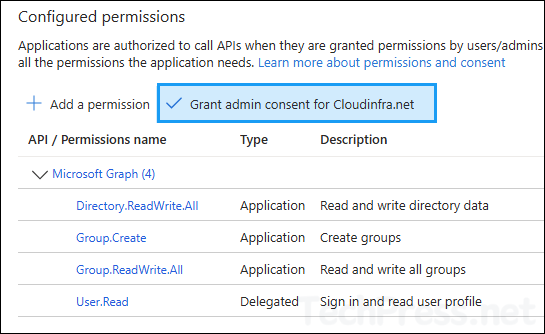
- The next step is to grant minimum permissions to this app for our task. To do this, click on API Permissions and then select Add a Permission.
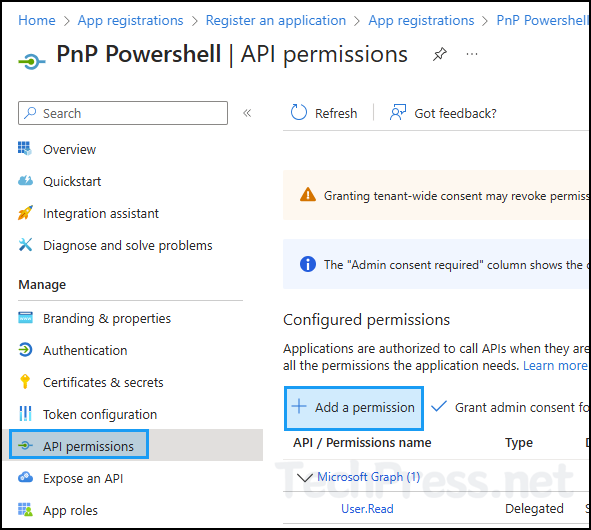
- Click on Microsoft Graph.
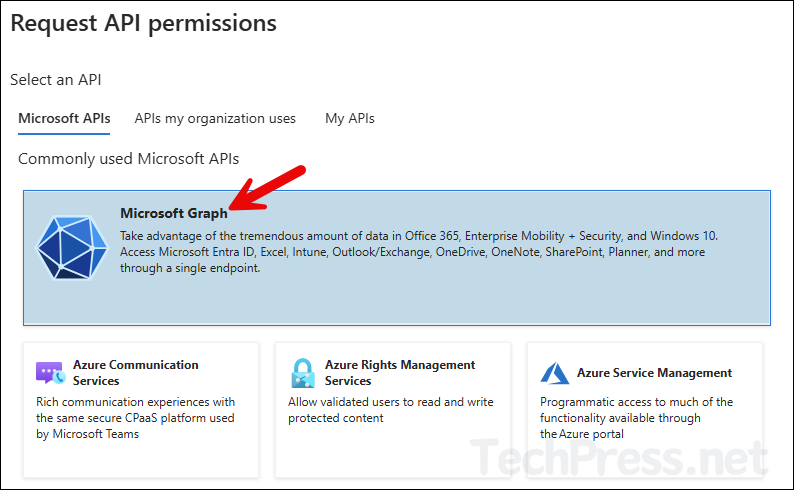
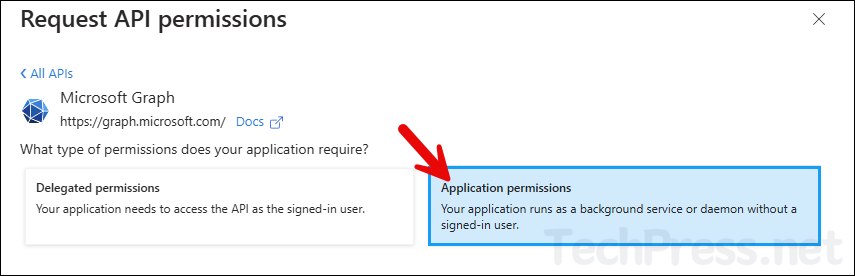
- Click on Application Permissions.
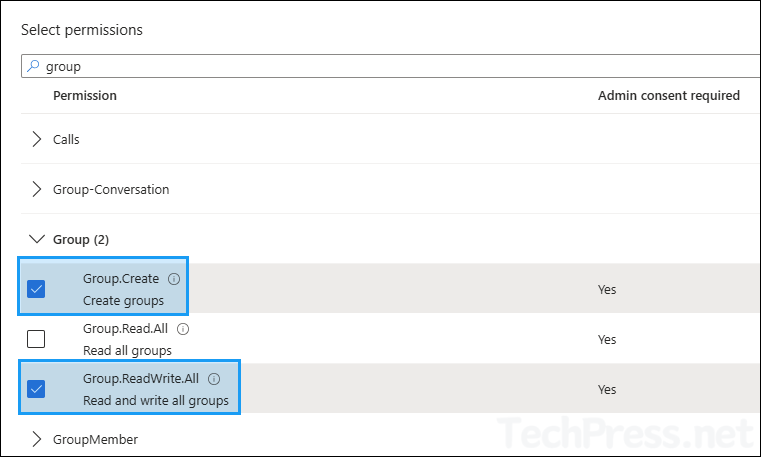
- Search for group and provide Group.ReadWrite.All Permission.
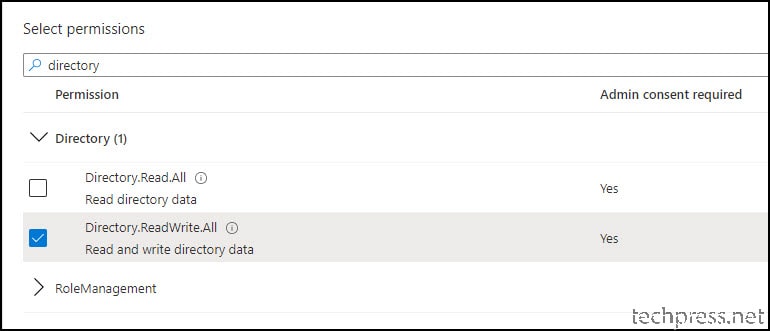
- Search for directory and provide Directory.ReadWrite.All permission.
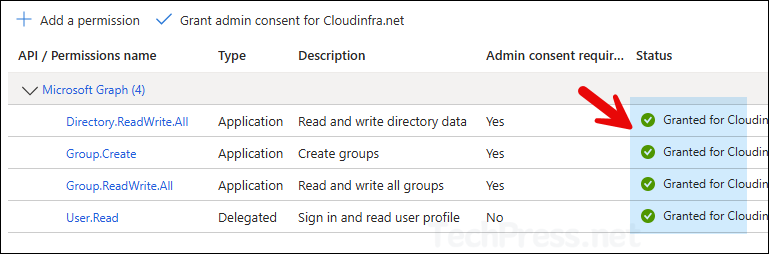
- Grant admin consent. Click on Yes when prompted.
- Admin consent granted.
Create a Self-signed Certificate
We will create a self-signed certificate and upload it to the application we created in the previous step. For creating a self-signed certificate, follow below steps.
- Copy the PowerShell script code from the page: security-apponly-azuread and paste it in a notepad. Save the file as Create-SelfSignedCertificate.ps1.
- Open PowerShell console as an administrator and use the following command to generate a self-signed certificate. Please note that the date format is yyyy-mm-dd. Adjust the start date and end date according to your requirements.
Create a Self-Signed Certificate
.\Create-SelfSignedCertificate.ps1 -CommonName "TechPress" -StartDate 2024-10-28 -EndDate 2025-10-28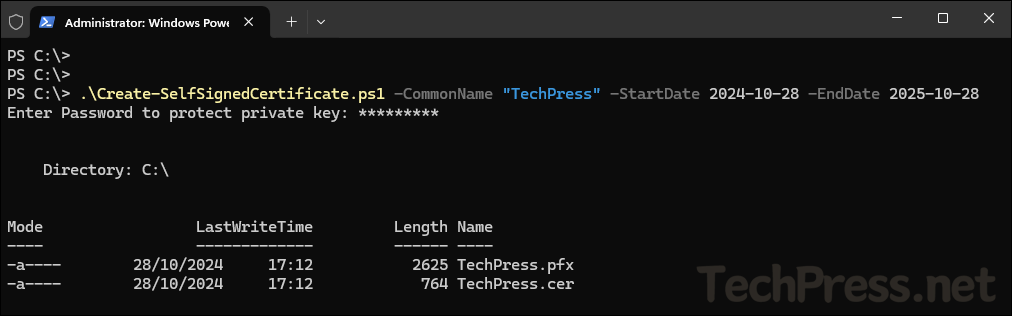
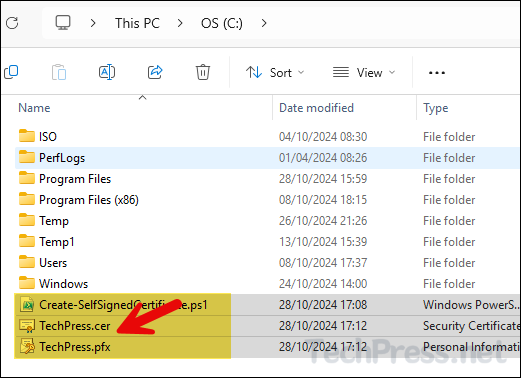
- Self-signed certificate has been generated.
Upload the Self Signed Certificate
Upload the self-signed certificate generated in the previous step to the App registration.
- Sign in to the Entra admin center > Identity > Applications > App registrations.
- Open PnP Powershell app registration we created earlier.
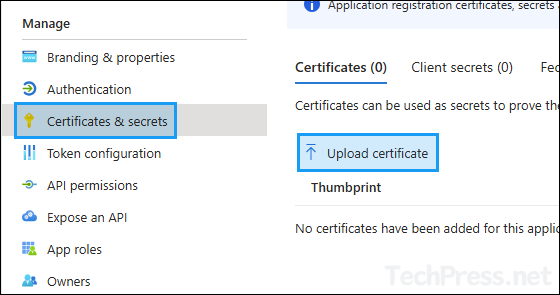
- Click on the Certificates & Secrets > Click on Certificates tab > Upload certificate.
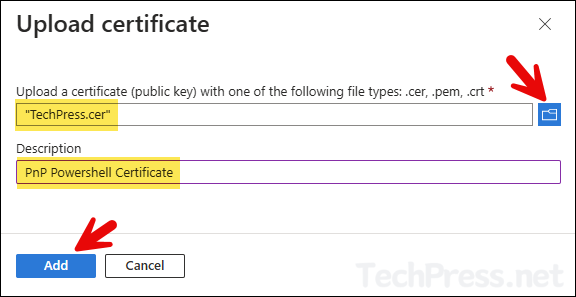
- Browse to the location where self-signed certificate are generated. We only need to upload .cer file here. Click on Add to add the certificate.
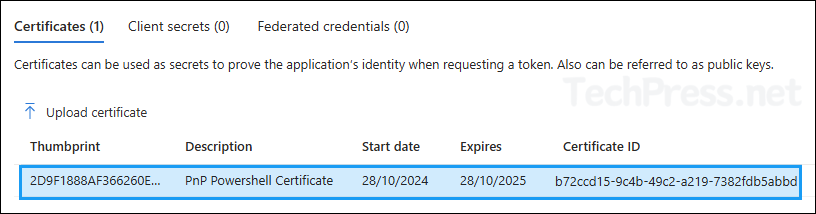
- Once the certificate is uploaded to the app, you will be able to see information about the certificate like Start date, End date, Certificate Thumbprint etc.
Now that we have created the application and configured the permissions along with certificates, we can use it to establish connection with sharepoint online using Connect-PnPOnline command. We will need to get below details:
- Client ID – Copy the Application (client) ID of PnP Powershell app.
- Certificate Password – PFX file password we provided while creating a self-signed certificate.
- URL – Sharepoint site admin URL.
- Tenant name – Get the .onmicrosoft.com tenant name.
Install PnP.Powershell
PnP.Powershell module no longer works with Powershell 5.1 version. You will need to Install Powershell 7.2 or later version to work with this module. Refer to this link for downloading and Installing Powershell 7.x.
Note
- Open Powershell 7.2 or later console as an administrator and execute below command.
Install PnP.PowerShell module
Install-Module -Name PnP.PowerShell -Force -AllowClobberConnect using Connect-PnPOnline
Connect-PnPOnline
$props= @{
    ClientId             = "<ClientID>"
    CertificatePath      = "<CertificatePath>"
    CertificatePassword  = (ConvertTo-SecureString -AsPlainText "<Password>" -Force)
    Url                  = "https://<SharepointSite URL>"
    Tenant               = "<Tenant Name>"
}

Connect-PnPOnline @props
Example:
$props = @{
    ClientId             = "00bc65aa-c125-4080-aba6-fde348645aa3"
    CertificatePath      = "C:\TechPress.pfx"
    CertificatePassword  = (ConvertTo-SecureString -AsPlainText "Welcome123" -Force)
    Url                  = "https://73dvgy.sharepoint.com/"
    Tenant               = "73dvgy.onmicrosoft.com"
}

Connect-PnPOnline @props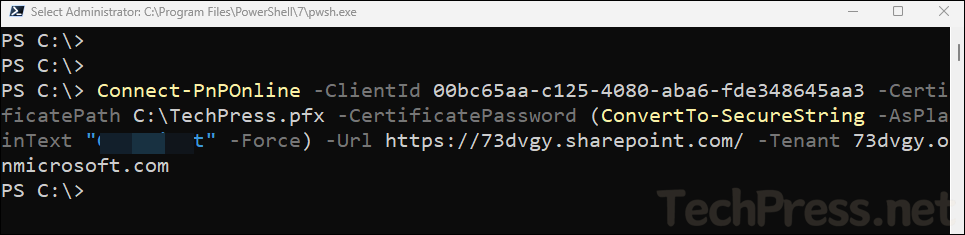
Create a Single Microsoft 365 Group without Teams
We will first create a single Microsoft 365 without an associated Microsoft Teams Team. We will use New-PnPMicrosoft365Group cmdlet for this. Please note that this cmdlet will still create a Sharepoint site unlike New-UnifiedGroup cmdlet which just creates a Microsoft 365 group.
- Open Powershell 7.2 or later console as an administrator.
- Copy below code and update the variable as per your requirement.
- Execute the code.
Create a Microsoft 365 group withoout a Team
$displayname = "London Finance"
$nickname = "LondonFinance"
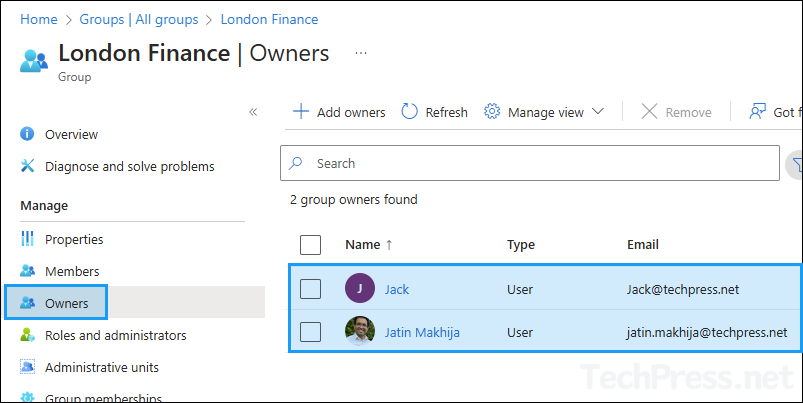
$arrayOfOwners = "[email protected]", "[email protected]"
$arrayOfMembers = "[email protected]"
New-PnPMicrosoft365Group -Displayname $displayName -Description "TechPress Finance Group" -MailNickname $nickname -Owners $arrayOfOwners -Members $arrayOfMembers -IsPrivate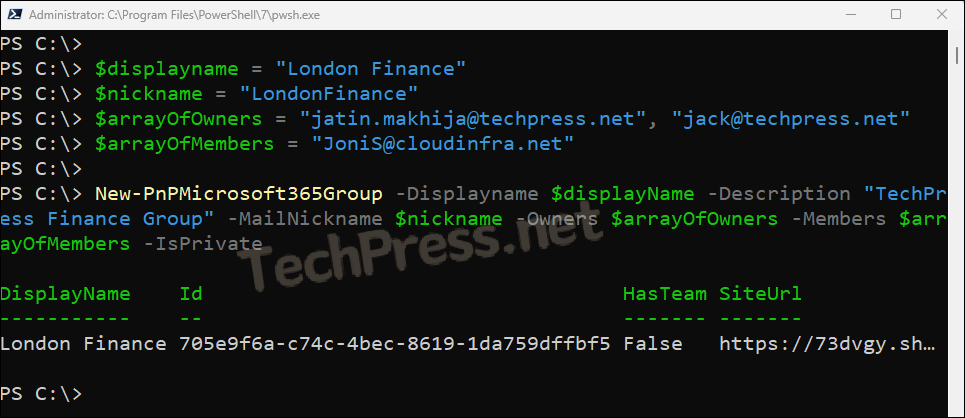
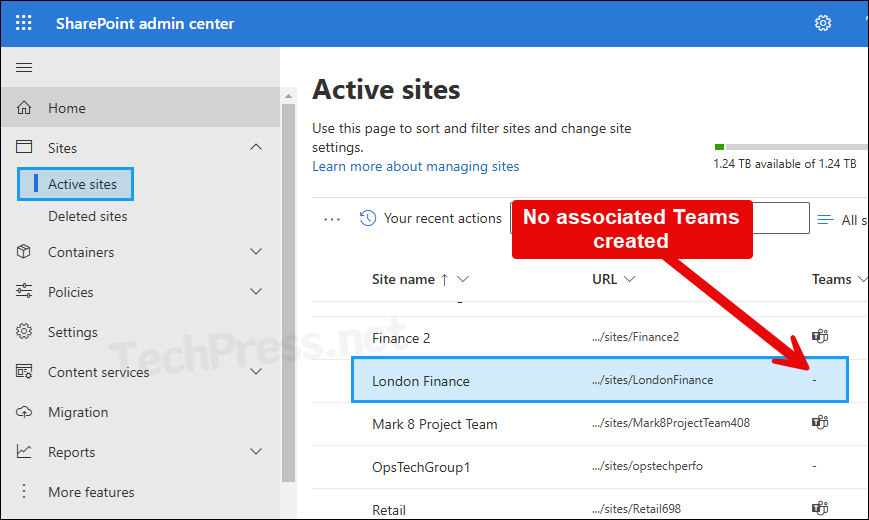
- On the Sharepoint admin center, you can verify that the London Finance Sharepoint site has been created without an associated Teams Team.
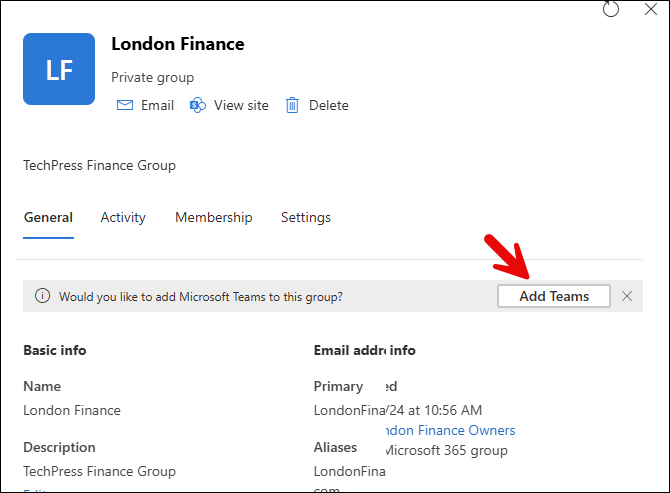
- You can further confirm this by clicking on the site and in the General tab, you will get a notification and a button offering you to Add Teams to this Sharepoint site. This confirms that the Sharepoint site is created without a Team.
Create a Single Microsoft 365 Group with Teams
Let’s now create a single Microsoft 365 group with an associated Teams this time. We will be using the same code as before and using the same cmdlet New-PnPMicrosoft365Group but with an additional switch -CreateTeam.
Create a Microsoft 365 group with an associated Team
$displayname = "Information Technology"
$nickname = "IT"
$arrayOfOwners = "[email protected]", "[email protected]"
$arrayOfMembers = "[email protected]"
New-PnPMicrosoft365Group -Displayname $displayName -Description "Info Tech Group" -MailNickname $nickname -Owners $arrayOfOwners -Members $arrayOfMembers -IsPrivate -CreateTeam
As you can see from below screenshot, HasTeam column in the output shows as False despite using -CreateTeam switch. You can safely ignore this as it takes some time to create and associate Team with the Sharepoint site for a Microsoft 365 group. Check back later to confirm if the Team has been created.

Create Microsoft 365 Groups in Bulk
You may have the requirement to create Microsoft 365 groups in bulk. You can use below PowerShell script for this. This script is also available in my Github Repo. Below are some important points about the script.
| Script requirements and Important Points |
|---|
| – You can use -verbose switch to generate full information output on the console. The script still works without this switch but won’t have much information to display on the console. – A CSV File is required as a source data for this script. A sample CSV file is shown in the later section. You can also download a sample CSV from my Github repo. Create a CSV File using the same headings and update the data. When this script is executed without CSVPath switch, it will prompt for CSV file path. You can use CSVFilePath parameter with the command as well like Create-M365GroupwithSPOSite -CSVFilePath “C:\Path\To\Groups.csv” -Verbose – Script will only work with Powershell version 7.2 or later – Script creates Log files everytime its run and its stored at C:\Apps\Logs. You can change the value of the variables $Logfile and $Logfolder as per your requirement. – After dot sourcing the script, you can check more information about the script using get-help Create-M365GroupwithSPOSite. – You will need to update below variables in the script. $arrayOfOwners = “[email protected]”, “[email protected]” $arrayOfMembers = “[email protected]” $ClientID = “<clientID>” $CertPath = “<Path of the Certificate File>” $SiteUrl = “<Sharepoint Site URL>” $tenant = “<Entra ID tenant name>” 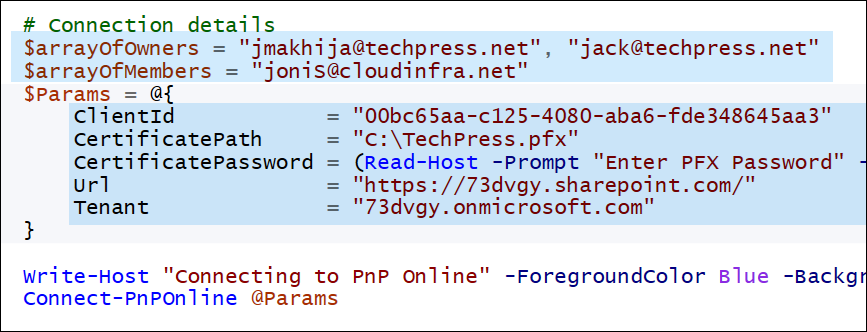 |
| Sample M365Groups.csv File |
|---|
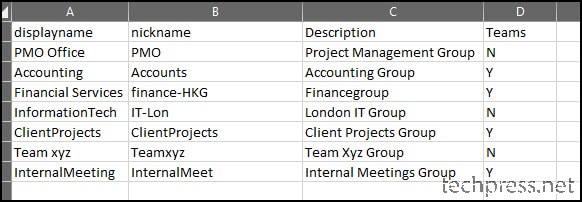 |
| If Teams Column is set to Y > Microsoft 365 group + SPO Site + Team will be created If Teams Column is set to N > Microsoft 365 group + SPO Site will be created without Teams |
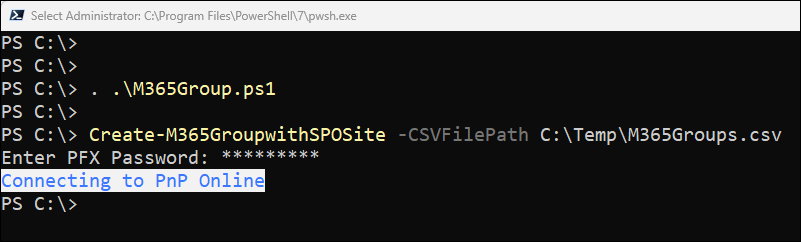
After you have updated all the variables and also prepared the CSV file. Let’s check how to execute the script.
| Script Folder contains Powershell script and CSV File |
|---|
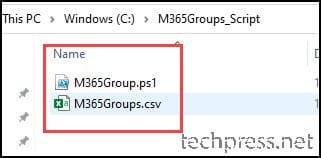 |
| Copy these two files in a folder and on powershell console dot source it like >. .\<script>.ps1 |
After dot sourcing the script, you can check more information about the script using get-help Create-M365GroupwithSPOSite.
get-help Create-M365GroupwithSPOSite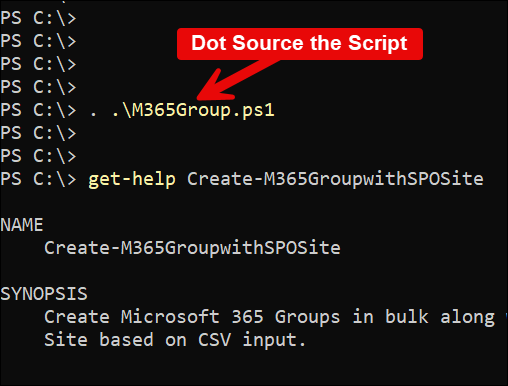

When you do not use -Verbose switch with Create-M365GroupwithSPOSite, it will create all the required groups as per the CSV and generate the log file as well. However, there will not be much information on the console (refer to below screenshot).
| C:\Apps\Logs\M365GroupLog-08-13-2021_06-54-59.csv File |
|---|
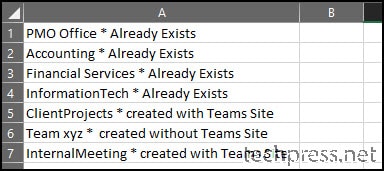 |
| Tip – Use Excel -> Data -> Text to Colums and use the Delimeter as * to separate data it in two columns |
Create-M365GroupwithSPOSite.ps1
Function Create-M365GroupwithSPOSite {
<#
.SYNOPSIS
Create Microsoft 365 Groups in bulk along with Sharepoint Sites.If Teams Column value is Y
Teams Site will also be linked to the group else Teams Site will not be linked/created.

.DESCRIPTION
This is Create-M365GroupwithSPOSite Function which can be used to create Microsoft 365 Groups
with Sharepoint Sites (with or without Teams).

.PARAMETER CSVFilePath
Path to the CSV file containing group information.

.NOTES
    Author     : Jatin Makhija
    Version    : 1.0.2
    DateCreated: 13-08-2021
    DateUpdated: 24-08-2021
    Blog       : https://www.techpress.net

.EXAMPLE
PS> Create-M365GroupwithSPOSite -CSVFilePath "C:\Path\To\Groups.csv" -Verbose
#>

    [CmdletBinding()]
    param (
        [parameter(Mandatory = $true, Position = 0, HelpMessage = "Please Enter the Path to CSV File")]
        [string]$CSVFilePath
    )

    # Check PowerShell version
    if ($PSVersionTable.PSVersion -lt [Version]"7.2") {
        Write-Warning "This script requires PowerShell version 7.2 or later. Please upgrade PowerShell and try again."
        return
    }

    # Log setup
    $LogFolder = "C:\Apps\Logs"
    $LogFile = Join-Path -Path $LogFolder -ChildPath "M365GroupLog-$(Get-Date -Format 'MM-dd-yyyy_hh-mm-ss').csv"
    if (!(Test-Path -Path $LogFolder)) {
        New-Item -ItemType Directory -Path $LogFolder | Out-Null
    } else {
        Write-Verbose "Log folder exists at $LogFolder"
    }

    Function LogWrite {
        param ([string]$LogString)
        Add-Content -Path $LogFile -Value $LogString
    }

    # Check for PnP PowerShell module
    Try {
        if (!(Get-Module -Name "PnP.PowerShell" -ListAvailable)) {
            Write-Host "PnP.PowerShell module is not available" -ForegroundColor Yellow
            if ((Read-Host "Install module? [Y/N]") -match "[yY]") {
                Install-Module -Name "PnP.PowerShell" -Force -Confirm:$False
                Import-Module -Name "PnP.PowerShell" -ErrorAction Stop
            } else {
                Write-Warning "PnP PowerShell module is required."
                Exit
            }
        }
    } Catch {
        Write-Warning "Failed to load PnP PowerShell module: $_"
        return
    }

    # Connection details
    $arrayOfOwners = "[email protected]", "[email protected]"
    $arrayOfMembers = "[email protected]"
    $Params = @{
        ClientId            = "00bc65aa-c125-9999-aba6-fde345245aa3"
        CertificatePath     = "C:\TechPress.pfx"
        CertificatePassword = (Read-Host -Prompt "Enter PFX Password" -AsSecureString)
        Url                 = "https://8756dvgy.sharepoint.com/"
        Tenant              = "8756dvgy.onmicrosoft.com"
    }

    Write-Host "Connecting to PnP Online" -ForegroundColor Blue -BackgroundColor White
    Connect-PnPOnline @Params

    # Processing CSV
    Import-Csv -Path $CSVFilePath | ForEach-Object {
        $displayName = $_.displayname
        $nickname = $_.nickname
        $description = $_.description
        $teams = $_.Teams

        if (Get-PnPMicrosoft365Group -Identity $displayName) {
            Write-Verbose "M365 Group '$displayName' already exists"
            LogWrite "$displayName * Already Exists"
        } else {
            $groupParams = @{
                DisplayName   = $displayName
                Description   = $description
                MailNickname  = $nickname
                Owners        = $arrayOfOwners
                Members       = $arrayOfMembers
                IsPrivate     = $true
            }

            if ($teams -eq 'Y') {
                Write-Verbose "Creating M365 Group + SPO Site with connected Teams for '$displayName'"
                $groupParams.Add("CreateTeam", $true)
                Try {
                    New-PnPMicrosoft365Group @groupParams | Out-Null
                    LogWrite "$displayName * Created with Teams Site"
                } Catch {
                    LogWrite "$displayName * Creation failed with Teams"
                }
            } else {
                Write-Verbose "Creating M365 Group + SPO Site without Teams for '$displayName'"
                Try {
                    New-PnPMicrosoft365Group @groupParams | Out-Null
                    LogWrite "$displayName * Created without Teams Site"
                } Catch {
                    LogWrite "$displayName * Creation failed without Teams"
                }
            }
        }
    }
}
Error Using -useWebLogin with Connect-PnPOnline
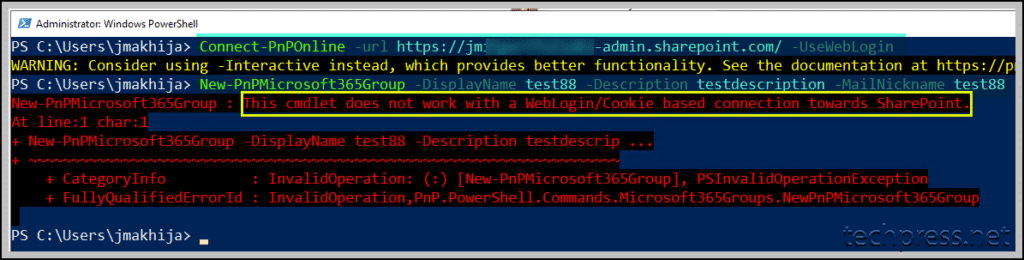
Please note that New-PnPMicrosoft365Group cmdlet does not work when you use Connect-PnPOnline with -useWeblogin parameter.
Connect-PnPOnline -Url https://<yoursitename>.sharepoint.com -UseWebLoginA window will show for providing username and password.
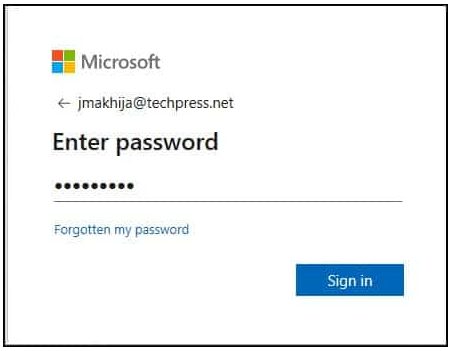
After authenticating using the -UseWebLogin switch, try to create a Microsoft 365 group using the New-PnPMicrosoft365Group cmdlet. It will fail with below error message. Use the app registration and certificate to establish connection using Connect-PnPOnline.
This cmdlet does not work with WebLogin/Cookie based connection towards Sharepoint
Error Using -Interactive switch with Connect-PnPOnline
When you use -Interactive switch with Connect-PnPOnline command, It will show below error. This switch is no longer supported with Connect-PnPOnline command. Use an app registration in Entra ID (as shown above) to connect using Connect-PnPOnline.
Connecting with -Interactive used the PnP Management Shell multi-tenant App Id for authentication. As of
 September 9th, 2024 this option is not available anymore. Refer to https://pnp.github.
 io/powershell/articles/registerapplication.html on how to register your own application.
Create a M365 Group using Graph Powershell without Team
You can also create a Microsoft 365 group using Microsoft graph PowerShell commands. The cmdlet we will use to create the group is New-MgGroup. This cmdlet will create a Sharepoint site with the group.
- Open PowerShell console as an administrator and execute below commands.
# Install Microsoft Graph module if not already installed
Install-Module Microsoft.Graph -Scope CurrentUser# Import Microsoft Graph module
Import-Module Microsoft.Graph# Connect to Microsoft Graph with required permissions
Connect-MgGraph -Scopes "Group.ReadWrite.All"Update below variables in the script:
- $groupName = “Test M365 Group”
- $groupDescription = “This is a test group created with Microsoft Graph PowerShell”
- $groupMailNickname = “testm365group”
- $isPrivate = $true # Set to $false for a public group
CreateM365_Group_Graph.ps1
# Parameters for the new group
$groupName = "Test M365 Group"
$groupDescription = "This is a test group created with Microsoft Graph PowerShell"
$groupMailNickname = "testm365group"
$isPrivate = $true  # Set to $false for a public group

# Set visibility based on the $isPrivate variable
$visibility = if ($isPrivate) { "Private" } else { "Public" }

# Check if the group already exists
$existingGroup = Get-MgGroup -Filter "displayName eq '$groupName'" -ErrorAction SilentlyContinue

if ($existingGroup) {
    Write-Host "Group '$groupName' already exists. Skipping creation."
} else {
    # Create the group if it doesn't exist
    New-MgGroup -DisplayName $groupName `
                -Description $groupDescription `
                -MailNickname $groupMailNickname `
                -GroupTypes "Unified" `
                -MailEnabled `
                -SecurityEnabled:$false `
                -Visibility $visibility

    Write-Host "Microsoft 365 Group '$groupName' created successfully."
}
Create a M365 Group using Graph Powershell with Team
If you want to create a Microsoft 365 group with Graph Powershell with an associated Sharepoint site and Team, you can use below Powershell script.
Update below variables in the script:
- $groupName = “Test M365 Group”
- $groupDescription = “This is a test group created with Microsoft Graph PowerShell”
- $groupMailNickname = “testm365group”
- $isPrivate = $true # Set to $false for a public group
CreateM365_Group_withTeam_Graph.ps1
# Parameters for the new group
$groupName = "Test M365 Group"
$groupDescription = "This is a test group created with Microsoft Graph PowerShell"
$groupMailNickname = "testm365group"
$isPrivate = $true  # Set to $false for a public group

# Set visibility based on the $isPrivate variable
$visibility = if ($isPrivate) { "Private" } else { "Public" }

# Check if the group already exists
$existingGroup = Get-MgGroup -Filter "displayName eq '$groupName'" -ErrorAction SilentlyContinue

if ($existingGroup) {
    Write-Host "Group '$groupName' already exists. Skipping creation."
    # Retrieve the group ID to add the team later
    $groupId = $existingGroup.Id
} else {
    # Create the group if it doesn't exist
    $newGroup = New-MgGroup -DisplayName $groupName `
                            -Description $groupDescription `
                            -MailNickname $groupMailNickname `
                            -GroupTypes "Unified" `
                            -MailEnabled `
                            -SecurityEnabled:$false `
                            -Visibility $visibility

    Write-Host "Microsoft 365 Group '$groupName' created successfully."
    # Retrieve the new group ID for creating the team
    $groupId = $newGroup.Id
}

# Create a team associated with the group
if ($groupId) {
    try {
        New-MgTeam -GroupId $groupId
        Write-Host "Teams successfully created for group '$groupName'."
    } catch {
        Write-Warning "Failed to create Teams for group '$groupName': $_"
    }
} else {
    Write-Warning "Group ID not found. Unable to create a team."
}
Love this guide! Having an issue at the very end however. It seems like the script will create one group from the csv file and then hang. After a bit i get the below error. The group does actually get created in O365 but no group after that one will be created. If i run the script again it does see the first group was created and moves on to the next, then i get the same issue where it hangs and the below message appears
New-PnPMicrosoft365Group : Access denied
At C:\Scripts\M365Group.ps1:115 char:10
+ New-PnPMicrosoft365Group -DisplayName $displayname -Descript …
+ ~~~~~~~~~~~~~~~~~~~~~~~~~~~~~~~~~~~~~~~~~~~~~~~~~~~~~~~~~~~~
+ CategoryInfo : InvalidOperation: (:) [New-PnPMicrosoft365Group], PSInvalidOperationException
+ FullyQualifiedErrorId : InvalidOperation,PnP.PowerShell.Commands.Microsoft365Groups.NewPnPMicrosoft365Group
Hi Jestoner, Thanks for the feedback. Make sure Directory.ReadWriteAll and Groups.ReadWriteAll Permissions are granted to the App in Azure AD. As it says Access Denied, I suspect this could be due to permissions issue. I understand you manage to create one group which is a bit strange. I had tested and used this scripts on different tenants but didn’t face any issues. I will test it again to replicate the issue, update the changes and release the updated version of the script.
Update: Just tested this script again by using the csv file and adding a test group and it seems to be working fine.
Thanks for the quick reply. I checked the permissions and they are both granted for Directory.ReadWriteAll and Groups.ReadWriteAll and to make things even more odd, i thought the script was failing after creating the first group however that is not actually the case. It just hangs for about 5 minutes before moving on to the next group while spitting out that error each time. So this works exactly as intended, just slowly and with “errors”. I’ve attached a screenshot of my powershell screen. While it might be annoying that it doesn’t do this quickly, I am happy that i can at least queue it up and let it do it’s thing.
Hey Jestoner, No Problem.Thanks for the screenshot. I have seen this error while working on the script. The script creates groups as intended and then displays the created groups on the console as you would be able to see it in the screenshot i shared in the blog post. Only the part where it displays the groups on the console is failing. This error is caused by Azure AD app registration API permissions.Make sure Powershell is run as admin, Grant Consent is approved for both Directory.ReadWriteAll and Group.ReadWriteAll in azure app.
Permissions Required by New-PnPMicrosoft365Group
One of Directory.ReadWrite.All, Group.Create, Group.ReadWrite.All
I can try to hide this in the next version of the script so that it does not display the groups on the console as log file will have the information about the groups creation status. However, with required permissions provided, this error should not appear.
UPDATE: Script has been updated now (To version 1.0.1) to not produce the console output for created group and also a bit of error handling has been added. This should fix the error message you are getting on Powershell console. You can download the updated copy from GitHub link: https://github.com/Techpress-net/Powershell-Scripts/tree/master/CreateM365GroupswithSPOSite
or get it from this blog post.
Thank you so much! It was the group.create that i didn’t have permissions granted for.
On a side note, is it possible to disable the automated email that gets sent out to the members when the group is created?
You’r Welcome Jestoner. I thought so that it could be a permission issue. I am glad that you finally found the root cause of the error. However as the script has been updated, there is not need to provide Groups.ReadWriteAll.
Disable Welcome Message to users in Microsoft 365 Groups:
Connect to EXO PS Module and run below command to disable the Welcome message. Let me know if it works fine.