In this post, I will show you how to deactivate application in Entra ID. If you want to temporarily stop an application from being used in Microsoft Entra ID without deleting it, you can now deactivate the app registration. Deactivation is a reversible action that blocks the application from getting new access tokens while keeping the application’s configuration, permissions, and metadata intact. Existing access tokens remain valid until they expire, so deactivation stops new sign-ins and new token issuance, but it does not instantly invalidate already issued tokens.
This is useful during security investigations, temporary suspensions, ownership reviews, or when you need to pause an app without losing its registration and settings. The deactivated state is reflected on the enterprise application, but the action itself must be performed on the app registration, not directly on the service principal. For more information, refer to the link: Deactivate an app registration – Microsoft Entra ID | Microsoft Learn.
Contents
What happens when you deactivate an application?
When an app is deactivated, the following happens immediately:
- New access token requests are denied.
- Users can’t sign in to the application.
- The application can’t access protected resources with new tokens.
At the same time, these items are preserved:
- Existing access tokens remain valid until they expire.
- Application configuration, permissions, and metadata stay intact.
- The application remains visible in the enterprise applications list.
- The service principal object stays in the tenant.
That makes deactivation different from deleting the application. Deactivate is reversible and preserves configuration, while delete removes the app and only offers recovery through the recycle bin window. It’s also good to note the difference between deactivate and disable sign-in, where disable sign-in is tenant-specific, while deactivation is tied to the app registration and affects the app more broadly.
Once the app is deactivated, users trying to access the app will receive the AADSTS7000112 – Application is disabled error message.
Deactivate vs Disable sign-in vs Delete
Before proceeding, make sure you understand the difference between deactivating, disabling sign-in, and deleting an application in Entra ID. The table below summarizes the difference between these.
| Action | What it does | Scope | Reversible | Configuration preserved |
|---|---|---|---|---|
| Deactivate | Blocks new token issuance and blocks users from signing in | Global for the app registration | Yes | Yes |
| Disable sign-in | Blocks users from signing in to the enterprise app in your tenant | Single tenant | Yes | Yes |
| Delete | Removes the app or service principal | Global for the object | Yes, for a limited recycle-bin period | No |
Deactivation uses the
isDisabledproperty on the application object, while tenant-only sign-in blocking usesaccountEnabledon the service principal.
Prerequisites
| Requirement | Required role | Notes |
|---|---|---|
| Admin role | Cloud Application Administrator | Can deactivate and reactivate application registrations in Microsoft Entra ID |
| Admin role | Application Administrator | Can manage application registrations, including deactivation |
| Custom role | microsoft.directory/applications/disablement/update | Required action if you are using a custom admin role |
| Microsoft Graph permission | Application.ReadWrite.All | Required when managing app deactivation through Microsoft Graph |
| Microsoft Graph permission | Application.ReadWrite.OwnedBy | Supported only for applications that you own |
Deactivating Application using Entra Admin Center
Use these steps to deactivate the app registration from the portal:
- Sign in to the Microsoft Entra admin center as a cloud application administrator/application administrator/global administrator.
- Go to Entra ID > App registrations > All applications.
- Select the application you want to deactivate.
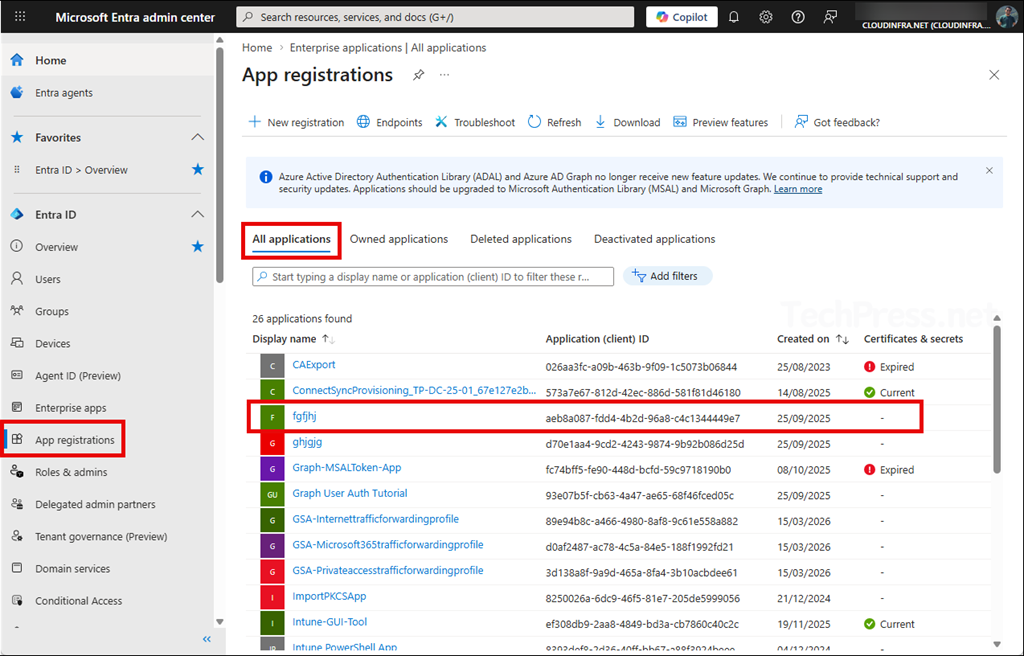
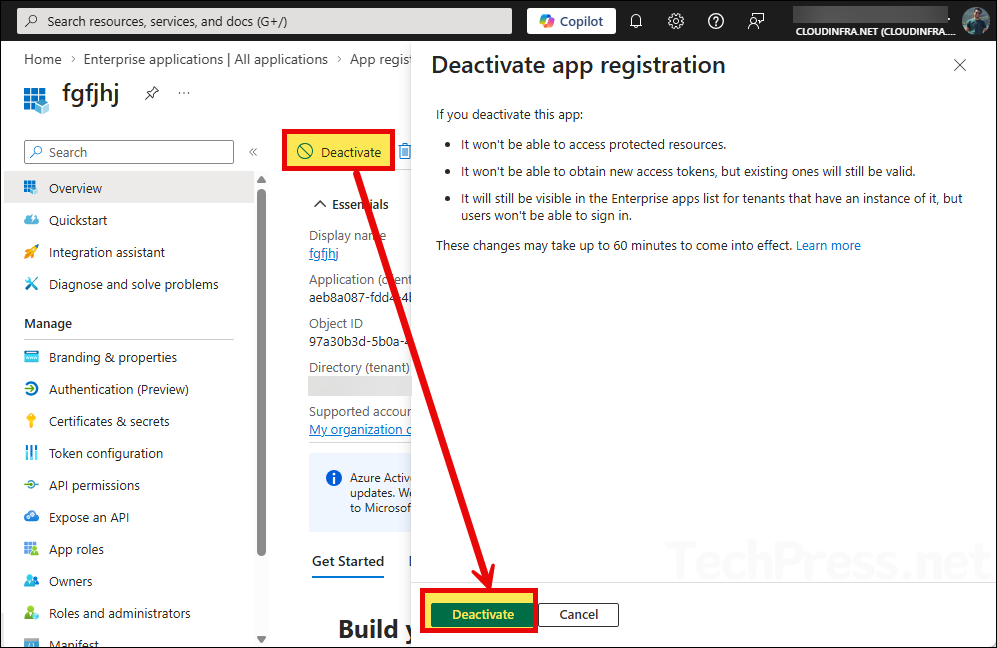
- On the app registration page, select Deactivate.
- Review the deactivation information pane.
- Select Deactivate again to confirm.
Change takes effect immediately and sets the application’s
isDisabledproperty totrue. After that, you can verify the updated status on the app registration page.
Important note before you deactivate the app
I highly recommend reviewing app owners before deactivation. If the app has assigned owners, those owners appear in the deactivation pane. If you want to prevent someone else from reactivating the app later, it recommends removing all other owners before you deactivate it. This is especially important for high-risk apps, shared line-of-business apps, and app registrations that were created by former administrators or developers.
Verify Application Deactivation
Click on App registrations and check under the Deactivated applications tab to view all currently deactivated applications.
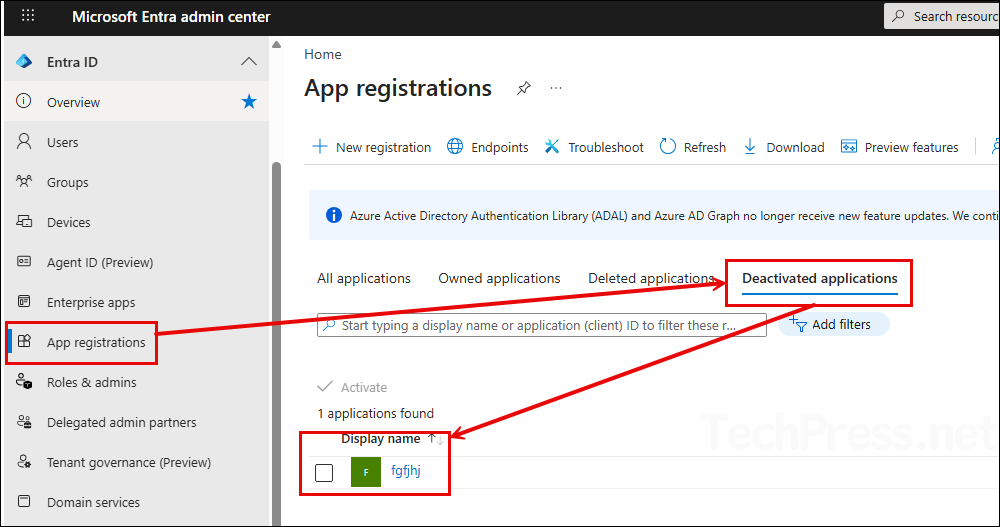
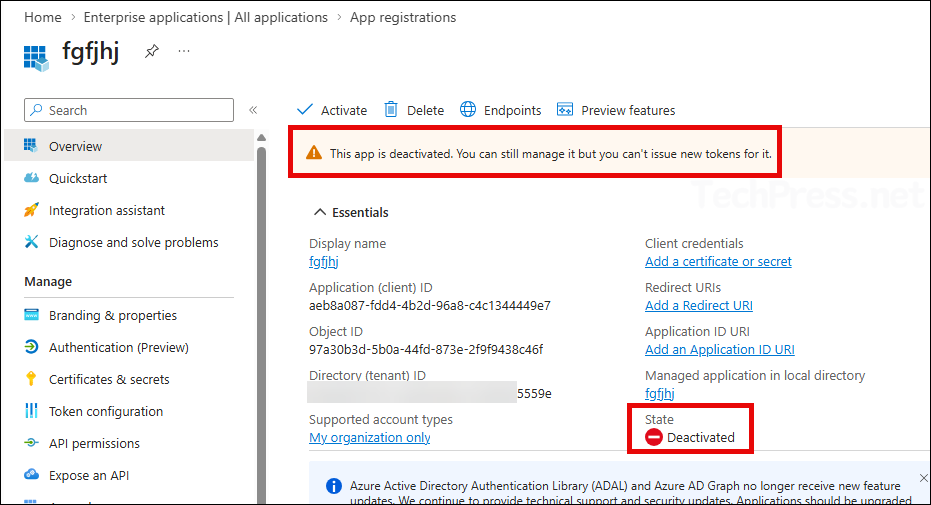
You can also confirm the deactivation state by clicking on the application and checking the state, which shows as Deactivated.
Reactivating Entra Application
If you need to restore access, you can reactivate the application from the same area:
- Sign in to the Microsoft Entra admin center > Go to App registrations.
- Open the deactivated applications tab > Select the app you want to restore.
- Click Activate and click Activate once again.
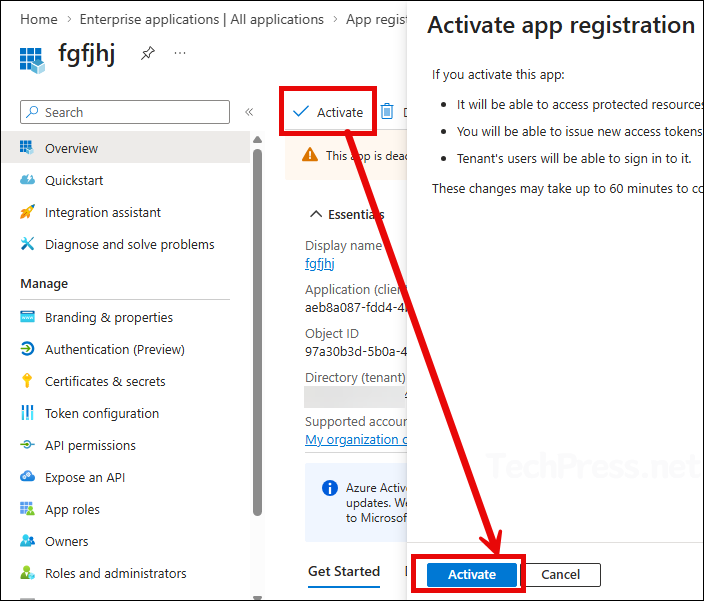
Reactivation is immediate and sets the
isDisabledproperty back tofalse. After reactivation, the app can again obtain new access tokens, and users can sign in.
Deactivate Entra Application using Microsoft Graph
For automation or bulk operations, you can perform deactivation through Microsoft Graph by updating the application object and setting isDisabled to true.
PATCH https://graph.microsoft.com/beta/applications/{applicationObjectId}
Content-Type: application/json

{
    "isDisabled": true
}
You can also target the app by AppId:
PATCH https://graph.microsoft.com/beta/applications(appId='{appId}')
Content-Type: application/json

{
    "isDisabled": true
}
Verify the result with a GET request and confirm that "isDisabled": true is returned. For more information, refer to the link: Deactivate app using Graph.
Deactivate Application using Update-MgApplication cmdlet
Another way to deactivate the application in Entra is by using the Update-MgApplication cmdlet. The Update-MgApplication cmdlet does accept arbitrary properties through -BodyParameter or -AdditionalProperties. Let’s check the steps:
Step 1: Install Microsoft Graph PowerShell module
Open the PowerShell console as an administrator and install Microsoft Graph PowerShell module. After that, connect to the graph using required scopes.
Install-Module Microsoft.Graph -Scope AllUsers -AllowClobber -ForceStep 2: Connect to Microsoft Graph with required scopes
Connect-MgGraph -Scopes "Application.ReadWrite.All"Step 3: Deactivate Entra ID Application
After you have successfully connected to graph with the required scopes, use below code to deactivate an application. Provide an app Id in the code and run the script to deactivate the app.
# Get the application object by AppId or display name
$app = Get-MgApplication -Filter "appId eq 'xxxxxxxx-xxxx-xxxx-xxxx-xxxxxxxxxxxx'"

# Deactivate the app registration
$params = @{
    isDisabled = $true
}

Update-MgApplication -ApplicationId $app.Id -BodyParameter $params

# Verify
Get-MgApplication -ApplicationId $app.Id | Select-Object Id, AppId, DisplayName, @{N='isDisabled';E={$_.AdditionalProperties['isDisabled']}}
To reactivate the application later
To reactivate the application after you have deactivated it, use below code snippet and set isDisabled = $false.
Update-MgApplication -ApplicationId $app.Id -BodyParameter @{
    isDisabled = $false
}
Auditing Application Deactivation Events
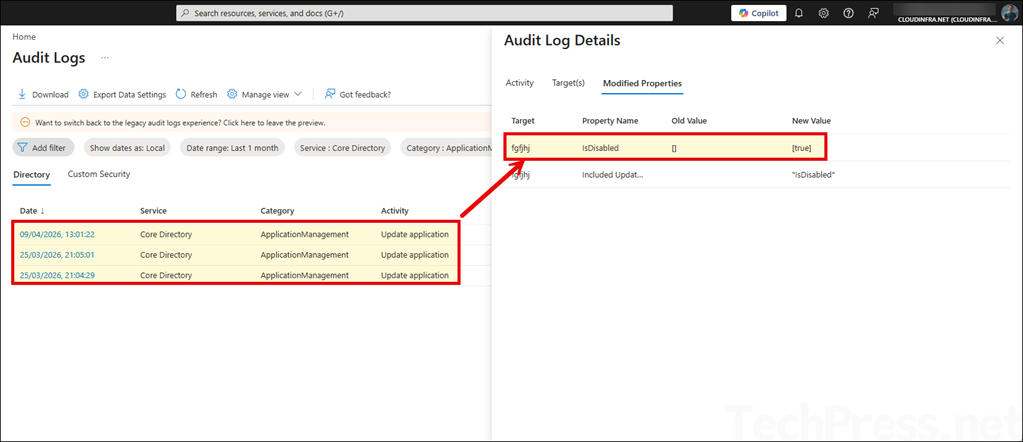
Deactivation and reactivation generates an audit log event. In the Microsoft Entra admin center, you can review these events under Monitoring & health > Audit logs. Use below filters to narrow down your results.
- Service: Core Directory
- Category: ApplicationManagement
- Activity: Update application
Best practices
- Deactivate instead of delete when you may need the app again later, because deactivation preserves configuration and permissions.
- Review and remove unnecessary owners before deactivation if you want tighter control over reactivation.
- Check audit logs after the action so you have a record of who changed the application state.
- If the app is suspicious, investigate permissions, authentication settings, certificates, and sign-in activity before deciding whether to reactivate or permanently delete it.
Conclusion
Deactivating an application in Microsoft Entra ID is now the cleanest way to temporarily shut down an app registration without deleting it. It blocks new access tokens and user sign-ins, keeps the configuration intact, and gives you a quick path to reactivate the app later if required. Just remember that existing access tokens remain valid until they expire, so deactivation is best viewed as a strong containment step, not an instant kill switch for already issued tokens.