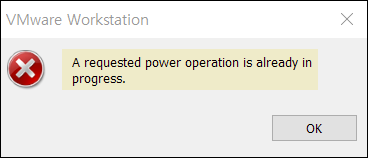
If you see the error “A requested power operation is already in progress” in VMware Workstation, the problem is usually not the Workstation installer itself. In most cases, it appears when you try to power on, power off, reset, or start a VM for guest OS installation. VMware believes a previous power action is still active or the VM is stuck in a suspended or hung state.
Frozen VMs, suspend-state issues, and Windows 11 host conflicts all point to the same pattern: a stale VM process, bad suspend state, or host hypervisor conflict can block the next power action. For more information, refer to this Broadcom article: Forcing a frozen virtual machine to power off in VMware Workstation for Windows.
In this guide, I will show you the fixes in the order that typically works best: force-stop the stuck VM process, clear stale suspend and lock files, check for Hyper-V and Memory Integrity conflicts on Windows 11, and only then move to reinstalling VMware Workstation if needed as the last resort.
Contents
Reason for this Error Message
This error commonly shows up when a VM is frozen, when a shutdown or suspend did not complete cleanly, or when the VM’s suspend state file was not saved correctly. Windows 11 host-side cases where VMware Workstation VMs fail to start after an OS upgrade because Hyper-V, Windows Hypervisor Platform, Device Guard, or Memory Integrity are still active on the host.
Third-party virtualization software such as VMware can fail to start VMs or fall back to a slower mode, when Hyper-V and Hyper-V-based security features are running.
Fix 1: Force the stuck VM to power off
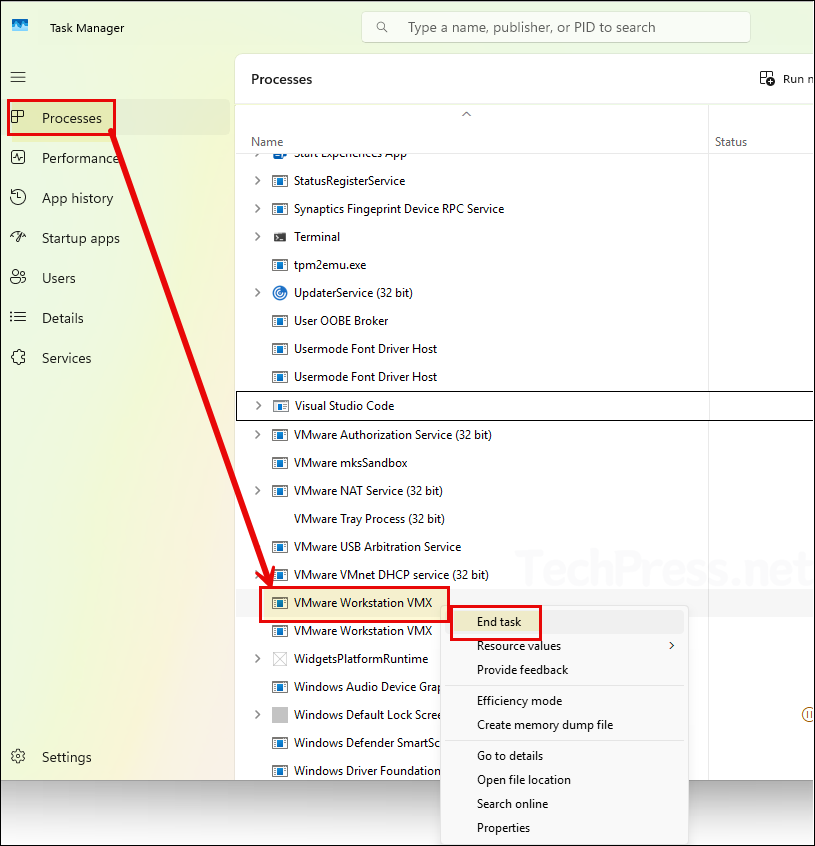
Start with the least disruptive path. In VMware Workstation, try VM > Power > Power Off first. If the VMware Workstation interface is frozen or the VM does not respond, use Windows Task Manager to end the vmware-vmx.exe process. Killing vmware-vmx.exe stops the VM process and forces it to power off.
Steps
- Open Task Manager.
- Go to the Processes tab. Under Background Processes, find VMware Workstation VMX.
- Right-click on it and select End task.
- Reopen VMware Workstation and start the VM again.
Make sure you end the correct process. If there are multiple VMware Workstation VMX instances, identify the one associated with your stuck VM by using the process ID (PID) and the vmware.log file. The next section outlines the steps to identify the correct process.
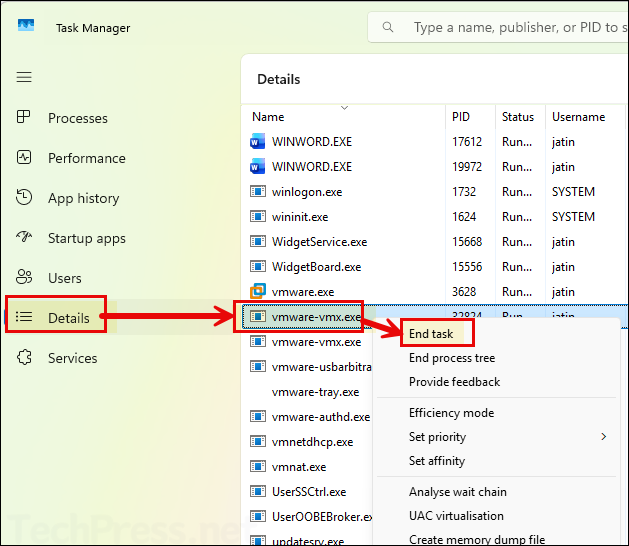
Alternatively, you can go to the Details tab and search for the vmware-vmx.exe process, right-click on it, and select End task. This is the same thing as we did before but using the Details tab.
A hard power-off has the same effect as switching off a physical computer and can cause data loss or file system corruption inside the guest OS. Use it only when the VM is stuck and the normal power options do not work.
Fix 2: Make sure you are ending the correct VM process
If you have multiple VMs on the same host, there may be several vmware-vmx.exe processes. If vmware-vmx.exe is running, at least one VM is powered on. You can match a specific VM to its process by comparing the PID in Task Manager with the PID shown on the first line of that VM’s vmware.log file.
How to identify the correct process
- In Task Manager, enable the PID column if it is not already visible.
- Note the PID for each vmware-vmx.exe process.
- Open the affected VM’s vmware.log file.
- Compare the PID in the log to the PID in Task Manager.
Fix 3: Remove stale suspend state and lock files
If the VM was suspended, shut down incorrectly, or crashed during a power action, the suspend state may not have been saved correctly. In that case, VMware can continue to think a prior operation is still in progress. Fix is to remove the suspend state from the VM by deleting the .vmss and .lck files and clearing the checkpoint.vmState entry in the VM’s .vmx file.
Steps
- Close VMware Workstation.
- Locate the affected VM’s folder.
- Delete the .vmss files and any .lck files in that VM folder.
- Open the VM’s .vmx file in a text editor.
- Find the line that starts with
checkpoint.vmState. - Clear the value so it reads:
checkpoint.vmState = ""- Save the file.
- Open VMware Workstation and try powering on the VM again.
Where to find the VM files
The default location for a Windows-hosted VM is typically under the user’s profile, historically in the user’s documents area, and if you cannot find it, you can search the host for .vmx files. Search using dir \*.vmx /s/p on Windows to locate VM configuration files.
Deleting the suspend state has the same effect as a hard reset. Any unsaved work inside the guest OS is lost.
Fix 4: If the VM hangs on black screen or takes too long to power off
This is an additional Workstation tweak for cases where a VM gets stuck on a black screen when powering off or takes too long to shut down. The fix is to add several settings to the global Workstation config.ini file under C:\ProgramData\VMware\VMware Workstation.
Add these lines to config.ini:
prefvmx.minVmMemPct = "100"
mainMem.useNamedFile = "FALSE"
mainMem.partialLazySave = "FALSE"
mainMem.partialLazyRestore = "FALSE"
Then save the file, reopen VMware Workstation, and try starting the VM again. This as a workaround for VMs that hang while shutting down or powering off.
Fix 5: Check Hyper-V, Windows Hypervisor Platform, and Memory Integrity on Windows 11
On Windows 11 hosts, another common cause is a hypervisor conflict. Third-party virtualization apps such as VMware cannot properly run alongside Hyper-V, Memory Integrity, or Credential Guard because only one software component at a time can use the hardware virtualization extensions. The workaround is to disable Hyper-V and its dependent security features.
For VMs that no longer start after upgrading the host OS. Try disabling Hyper-V, Windows Hypervisor Platform, Device Guard / Virtualization Based Security, and Memory Integrity.
How to check whether Hyper-V is active
Open System Information (msinfo32) and look for this message: A hypervisor has been detected. Features required for Hyper-V will not be displayed. If you see that line, Windows is still running a hypervisor layer.
How to disable Hyper-V
- Control Panel > Programs and Features > Turn Windows features on or off > clear Hyper-V Hypervisor
- Using PowerShell command:
Disable-WindowsOptionalFeature -Online -FeatureName Microsoft-Hyper-V-Hypervisor - Or by using DISM:
DISM /Online /Disable-Feature /FeatureName:Microsoft-Hyper-V-Hypervisor
Additional Steps for Windows 11 Hosts
- Disable Hyper-V and HV Host Service in Services.
- Uncheck Hyper-V and Windows Hypervisor Platform in Windows Features.
- Run below command:
bcdedit /set hypervisorlaunchtype off- Disable Turn on Virtualization Based Security under Device Guard policy.
- Turn Memory Integrity off in Core isolation.
Fix 6: Reboot the Host and Try Again
After ending the VM process, clearing suspend state, or disabling host hypervisor features, reboot the host before retesting. A reboot finally clears a stuck vmware-vmx.exe state or a lingering host hypervisor change.
Fix 7: Reinstall VMware Workstation only as a last resort
If the error started after a host OS upgrade or after repeated failed launches, last-resort path is to uninstall VMware Workstation Pro, clean the registration state, reboot, perform additional cleanup, reinstall Workstation, and reboot again.
That means reinstalling Workstation should be your last fix, not the first one. Most cases are resolved earlier by stopping vmware-vmx.exe or clearing the stale VM suspend state.
Recommended repair order (Summary)
- Try VM > Power > Power Off.
- End vmware-vmx.exe in Task Manager.
- Remove stale .vmss and .lck files and clear
checkpoint.vmState. - Disable Hyper-V, Windows Hypervisor Platform, VBS, and Memory Integrity if you are on Windows 11.
- Reboot the host.
- Reinstall VMware Workstation only if the issue still persists.
Conclusion
The “A requested power operation is already in progress” error in VMware Workstation usually means the VM is stuck between power states, not that VMware Workstation itself failed to install correctly. The most reliable fixes are to stop the vmware-vmx.exe process, clear stale suspend and lock files, and eliminate Hyper-V / Memory Integrity conflicts on Windows 11 hosts. If you hit the error while trying to boot a brand-new VM to install Windows or Linux, follow the same repair steps because the root problem is still the VM power state, not the guest installer.