In this blog post, I will demonstrate the steps to setup and configure Universal Print anywhere (Pull-print printers). Universal Print Anywhere provides pull-print printer functionality that follows the user. It’s built on top of the Universal Print cloud service. Pull-print printing is a feature where print jobs are sent to a virtual queue instead of a specific printer. The user can then release the job from any participating printer by authenticating at the printer, allowing flexibility and improved security.
- User sends print job: Instead of targeting a specific printer, the job is sent to a pull-print virtual queue registered in Universal Print.
- Print Job is stored in Microsoft’s cloud: The print data is encrypted in transit and at rest and remains in the Universal Print service until released.
- User authenticates at any participating pull-print printer: This could be done using Secure QR code.
- Job is released to the selected printer: The printer retrieves the job from the cloud queue and prints it immediately.
Contents
Prerequisites
- Printers with Job release options set to QR code.
- Users assigned a Universal Print license.
- Users with a Microsoft 365 corporate account.
Create a Universal Print Anywhere (Pull-Print Printer)
Let’s start by creating a Universal Print Anywhere (Pull-Print Printer) print queue. Use the following steps to create:
- Sign in to Microsoft Azure portal using Global administrator or Print administrator rights.
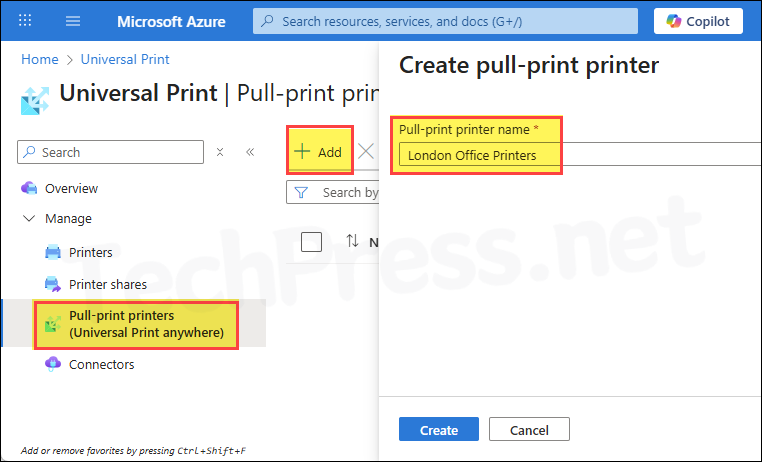
- Universal Print > Manage > Pull-print printers (Universal Print Anywhere).
- Click on Add and provide Pull-print printer name.
- Click Create.
Let’s take an example scenario: I am creating a pull-print virtual print queue called London Office Printers. Since the office is small and occupies only a single floor, I will add all office printers to this print queue. Whenever a user prints to this queue, they can walk to any office printer and release the print job using the secure release QR code option. Currently, Universal Print only supports QR code as a secure release method. If more options are added in the future, they could also be used by users to release their print jobs.
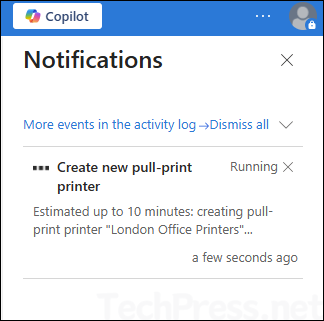
- If this is the first time you are creating a pull-print queue, it may take up to 10 minutes. This is because pull-print printers are designed to handle high volumes of users simultaneously submitting and releasing print jobs to participating printers. Microsoft provisions a scalable storage queue in the backend, which takes some time. Once the storage is provisioned, creating a pull-print queue will be much faster in the future.
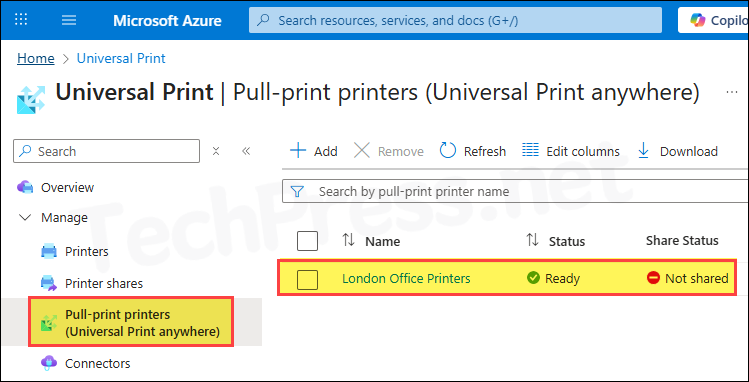
- Universal Pull-print printer queue is created and currently shows the Share Status as Not shared.
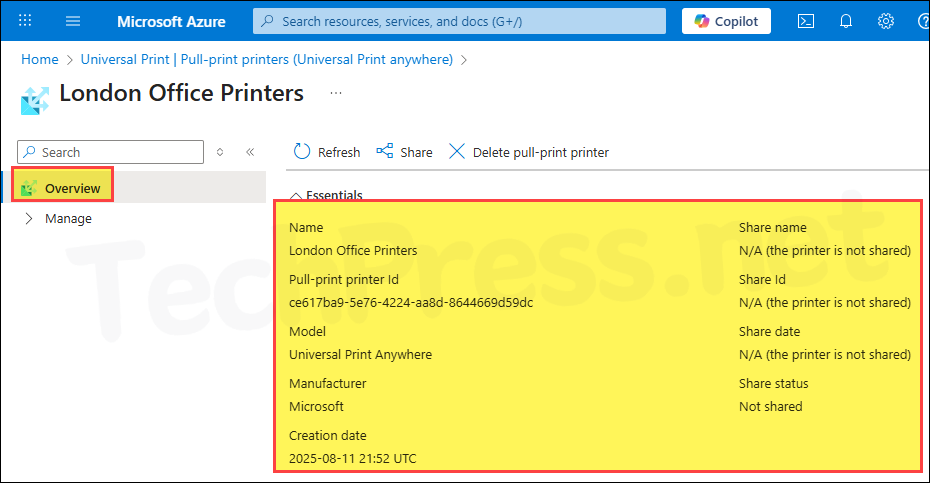
- Click the print queue London Office Printers to view all the details about the pull-print printer queue, such as the pull-print printer ID, model, and creation date. The share name, share ID, and other related information will be populated once the printer is shared.
Add Member Printers to Universal Print Anywhere Printer
- Let’s add printers to our pull-print queue. Sign in to Microsoft Azure portal using Global administrator or Print administrator rights. > Universal Print > Pull-print printers (Universal Print Anywhere) > Manage > Member Printers. Click on Add and then select the printers you want to add to the pull-print printer queue. Finally, click on Add button.
If you do not see any printers in the selection list, it could be due to the job release options. Each participating printer must have the secure release option enabled. Currently, Universal Print only supports the QR code secure release option, so ensure that the printer you are adding is configured with the job release option set to QR code.
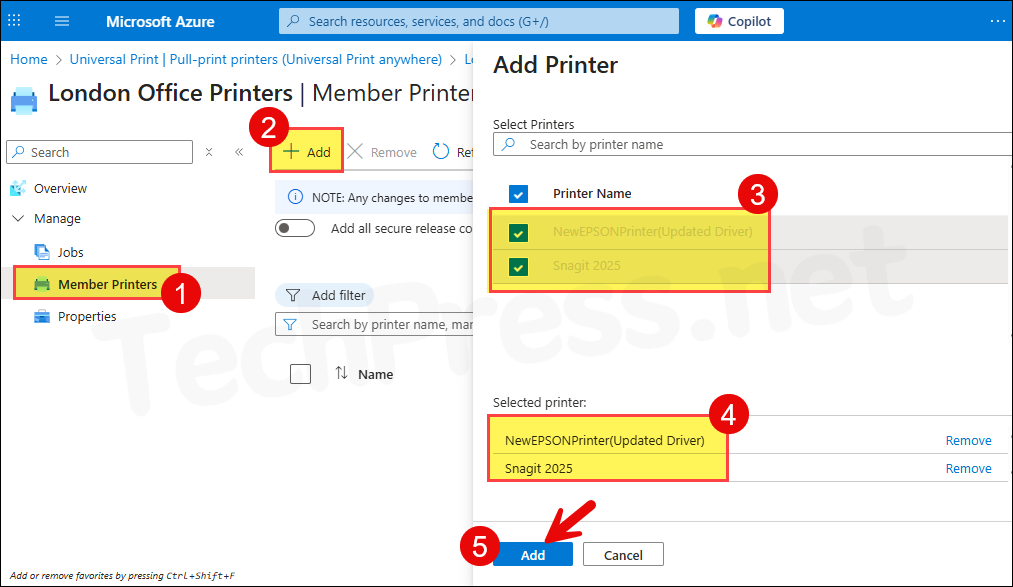
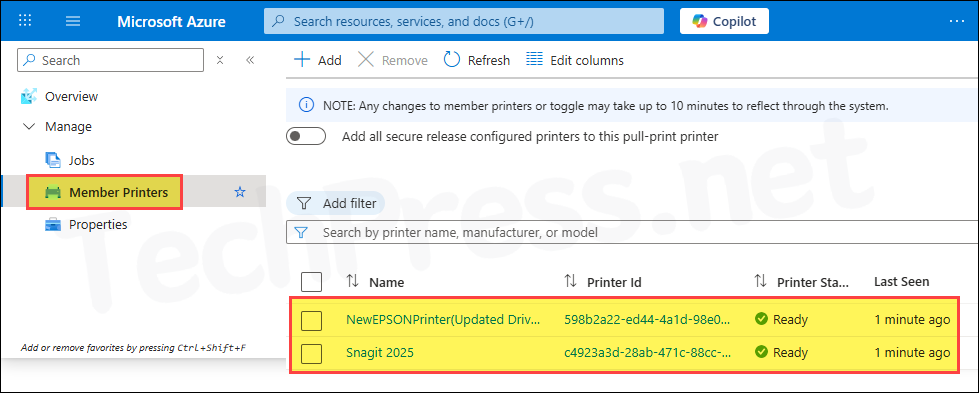
- I have added two printers to the pull-print queue. You can add any number of member printers to a pull-print queue. A Universal Print registered printer can be part of one or multiple pull-print queues, and it can also function as a direct standalone printer.
Share Universal Print Anywhere (Pull-Print Printer)
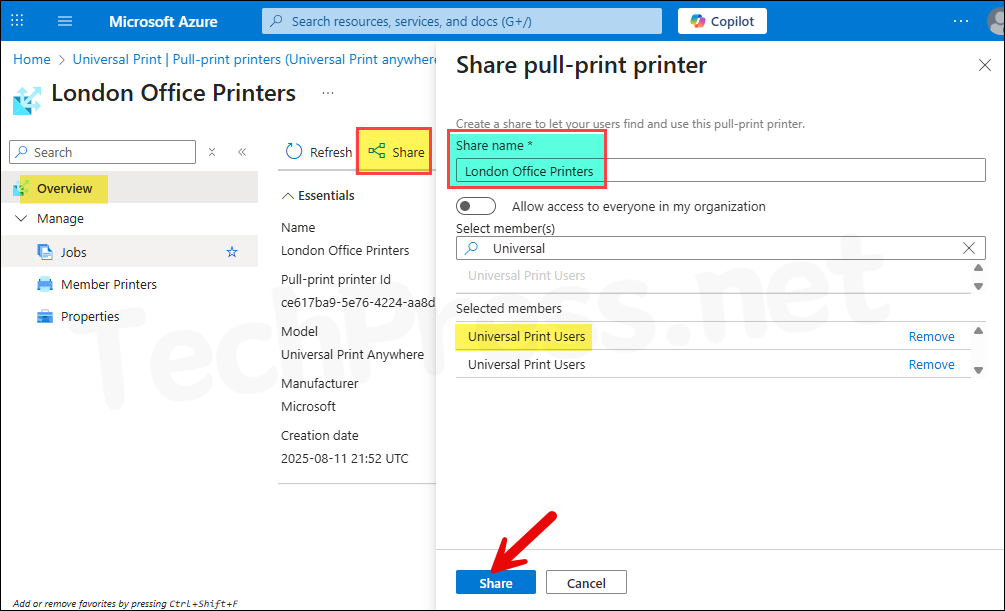
Let’s share the pull-print queue and make it available to users. When creating a printer share, you can also change its share name. Share name is what users see when they search for and add the cloud printer on their devices.
- Sign in to the Azure portal using an account with Global Administrator or Print Administrator rights. Go to Universal Print > Pull-print printers (Universal Print Anywhere), click the pull-print printer (for example, London Office Printers), then click Share. Enter the share name, select the members, and click the Share button to share this printer.
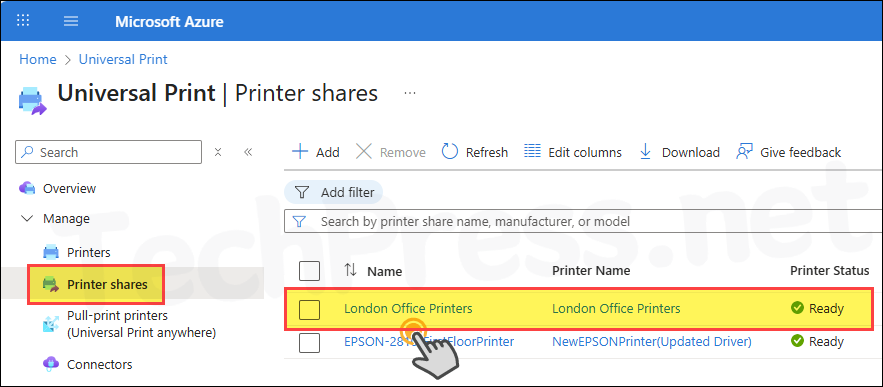
- Click Printer Shares and confirm that the pull-print printer share is displayed and that the printer status is Ready. Then click on the pull-printer printer share.
Configure Universal Print Anywhere Printer Options
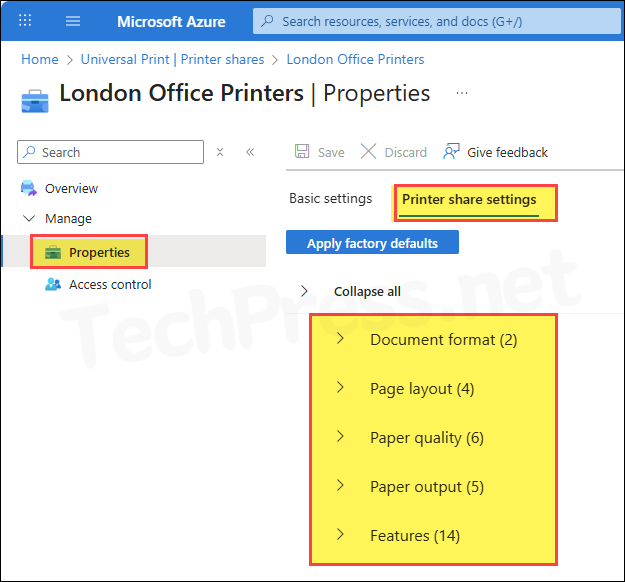
- Under Manage, click Properties > click Printer Share Settings tab. Universal Print Anywhere defines a fixed master list of supported printer options. As an administrator, you can configure these options based on the printers added to the queue, keeping in mind that not all printers will support every available option. For example, some printers may not support hole punch or stapling, while others might. Review the capabilities of all member printers and configure the printer options accordingly.
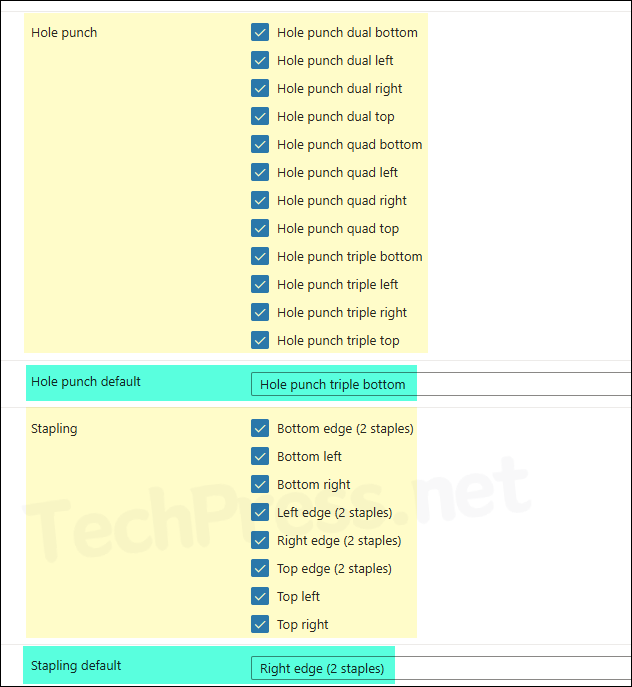
- In the Printer Share Settings, review the Hole Punch and Stapling options. Ensure that the default settings for these features are also selected.
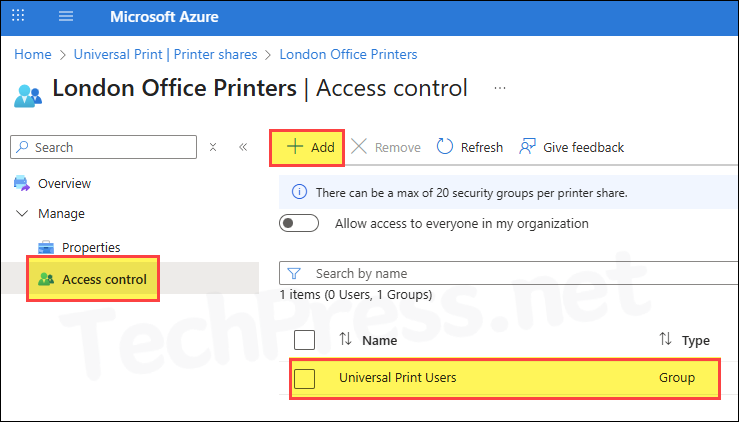
- Click Access Control to view the groups and users that currently have access to this printer. You can click Add to grant access to additional users or groups, or Remove to revoke access.
End User Experience
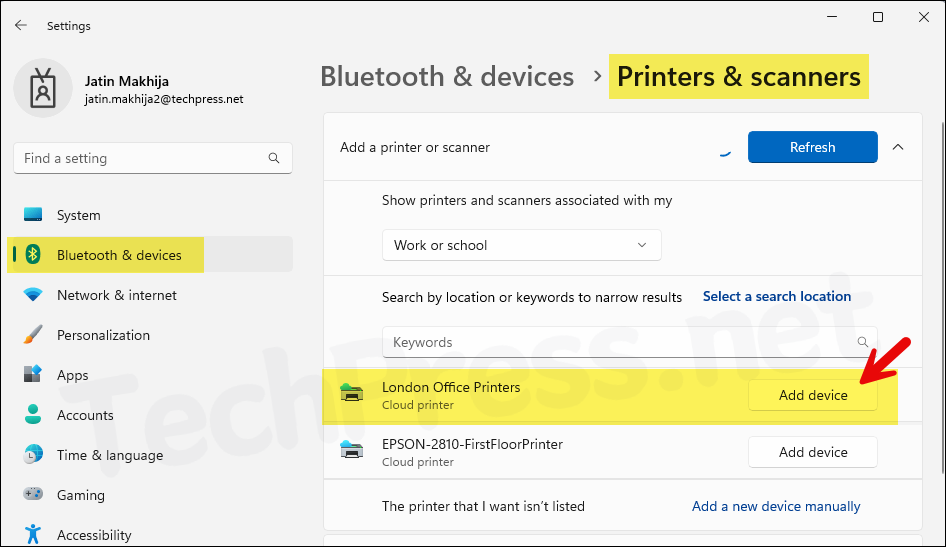
Let’s now add our Universal Print Anywhere print queue (pull-print printer) to a Windows device. Open the Settings app and go to Bluetooth & devices > Printers & scanners. Click Add device, then click the Sign in button. Enter your Microsoft 365 credentials to authenticate.
Select Show printers and scanners associated with my: Work or school. You will see a list of cloud printers assigned to you. Our Universal Print Anywhere (pull-print printer) is now displayed in the list; click Add device to add the printer.
- Universal Print Anywhere printer has now been added successfully. In this example, we added the printer to a device manually. If you are managing your devices using Intune, you can deploy this print queue using a Settings Catalog policy. For more details, refer to the link: Deploy Universal Print Printer Using Intune.

