In this blog post, I will demonstrate how to setup Universal Print. Universal Print is a Microsoft cloud-based printing service that provides a secure way to print without the need to maintain any on-premises infrastructure. If your printer is Universal Print ready, then that’s all you need in terms of physical print infrastructure. With the Universal Print solution, you do not need any print servers or print drivers.
Universal Print works on both Windows and macOS devices and integrates with Entra ID. All print management tasks are performed through the Microsoft Azure portal, which also provides centralized reporting for all registered printers. Universal Print works seamlessly with Microsoft products such as Microsoft 365 apps for enterprise, OneDrive, and macOS.
Universal Print in Azure communicates with printers using the Mopria standard. Printers that support and are certified with this standard can connect to and register directly with the Universal Print. Along with that these printers also have the firmware which supports Universal Print. These printers are referred to as Universal Print ready printers.
If your printer is not Universal Print ready, you will need to use the Universal Print Connector. It’s a small Windows app that needs to be installed on a computer with direct access to the printer. Universal Print also supports the IPP INFRA protocol for the discovery of cloud printers and for printing.
Contents
Key Features of Universal Print
- Integrated with Windows, macOS, and other Microsoft products.
- No need for print servers and printer drivers management.
- Manage all Printers and printer settings from Azure.
- Utilize Universal Print PowerShell module for bulk changes.
- Deploy and configure printers using Intune.
License Requirements
Universal Print is included in the following Microsoft 365 licenses and is also available as a standalone license through the Microsoft 365 admin center. Below is a list of licenses that include Universal Print, along with the number of print jobs allowed per licensed user per month.
For example, if you have 10 users with Microsoft 365 E3 or E5 licenses, you will receive 100 × 10 = 1,000 print jobs in a shared pool. This pool is accessible to all users with a Universal Print license in the tenant.
If you exceed this limit, users will not be prevented from printing. However, the organization must ensure that additional Universal Print Volume Add-on licenses are purchased to increase the available print job volume. This add-on is applied at the organization level, not per user.
Ensure that the Universal print license is assigned to all users who will use this for printing. It could be a part of your existing license (e.g. Microsoft 365 E3). If not, then purchase Universal Print add-on license.
| License | Print Jobs Per Month |
|---|---|
| Microsoft 365 E3, E5, Business Premium | 100 |
| Microsoft 365 F3 | 5 |
| Windows 10 Enterprise E3, E5, | 5 |
| Universal Print (standalone) | 5 |
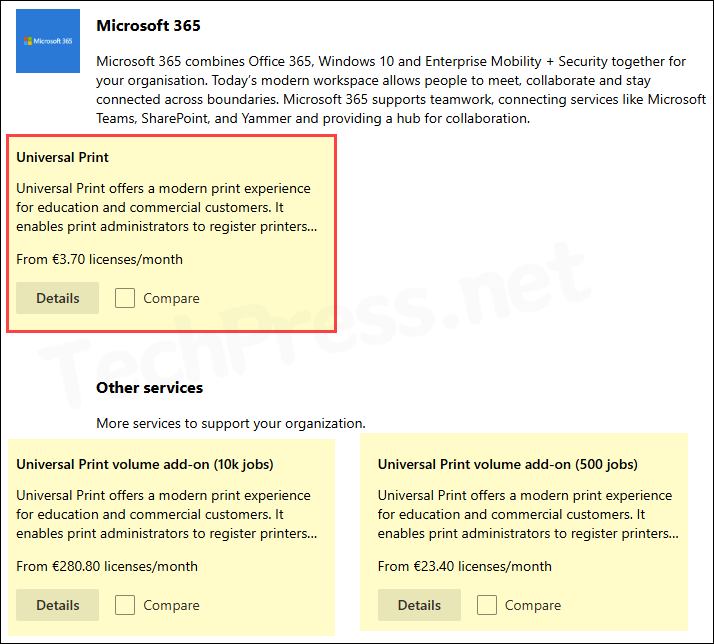
The screenshot below shows the Universal Print standalone license. I have also highlighted two additional Universal Print add-on licenses: Universal Print Volume Add-on (10,000 jobs) and Universal Print Volume Add-on (500 jobs). These add-on licenses allow your organization to extend its monthly print job capacity beyond the standard allocation.
Prerequisites
To print using Universal print solution, client devices needs to ensure the below prerequisites:
- Windows version 1903 or later. (Windows server is not supported).
- macOS 13.3 or later.
- Client device must be allowed to access below endpoints:
- Print service = https://print.print.microsoft.com/
- Registration service = https://register.print.microsoft.com/
- Discovery service = https://discovery.print.microsoft.com/
- Notification service = https://notification.print.microsoft.com/
- Graph service = https://graph.print.microsoft.com/
- Microsoft Entra ID = https://login.microsoftonline.com/
- Resource/Audience uri for access token = https://print.print.microsoft.com
- Entra joined or Entra hybrid joined devices.
Universal Print RBAC roles
For managing the Universal Print solution, Microsoft provides built-in roles. Assign the appropriate role to administrators based on the tasks they will perform in relation to Universal Print management.
| Admin Role | Permissions |
|---|---|
| Global Administrator | Purchase and assign Universal Print licenses Manage all printers Configure global settings Assign access to printers and delegate administration |
| Printer Administrator | Manage all printers Configure global settings Assign access to printers and delegate administration |
| Printer Technician | Manage a specific list of printers using delegated administration |
Step 1: Check if your Printer is Universal Print Ready
Now that we have some basic knowledge about Universal Print, we can begin the setup process. The first step is to check whether your printer is Universal Print ready. To verify this, refer to the following link: Check if your Printer is Universal Print Ready.
Even if your printer is not Universal Print ready, it can still be configured to work with Universal Print by using the Universal Print Connector software. You can install it on a computer which has direct access to the Printer. It will discover the connected printers and allow you to select the printers you want to register with Universal Print.
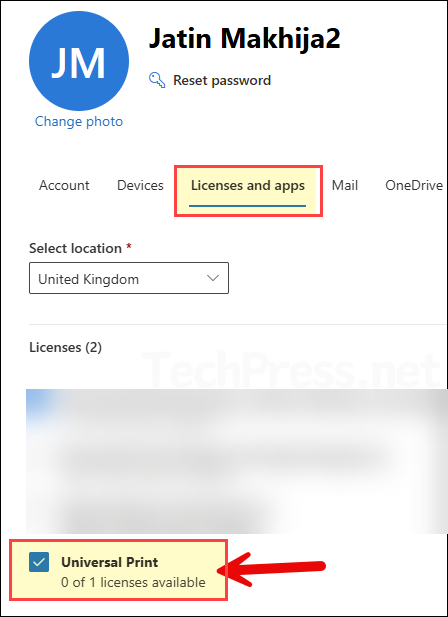
Step 2: Assign Universal Print License to Users
Ensure that users are assigned a Universal Print license, either as a standalone license or as part of an existing Microsoft 365 subscription. Please note that the administrator responsible for managing the Universal Print solution must also be assigned a Universal Print license.
Step 3: Register Printer with Universal Print
For a Universal Print Ready Printer
If a printer is Universal Print ready, you can register it directly with the Universal Print. Refer to the printer’s documentation, which usually provide specific instructions for connecting your printer to the Universal Print.
For example, If you are using a Xerox B310 printer, you can navigate to: Settings > Network/Ports > Universal Print, then click Register. Follow the on-screen instructions to complete the registration process with the Universal Print. Similarly, you could login on admin portal of other Universal Print compatible printers and register them.
For a Not Universal Print Ready Printer
If your printer is not Universal Print ready, it cannot connect to the Universal Print directly. In this case, you will need to install the Universal Print Connector on a client device that resides on the same network as the printer. For registering Printers using Universal Print connector, refer to the link: Install and Configure Universal Print Connector. Its a step-by-step guide on Installing a Universal Print connector and registering printers with Universal Print in Azure.
Important: The connector machine must not install the printer using a print server share path (e.g., \\PrintServer\Printer01). Instead, printers must be installed locally and directly on the connector machine.
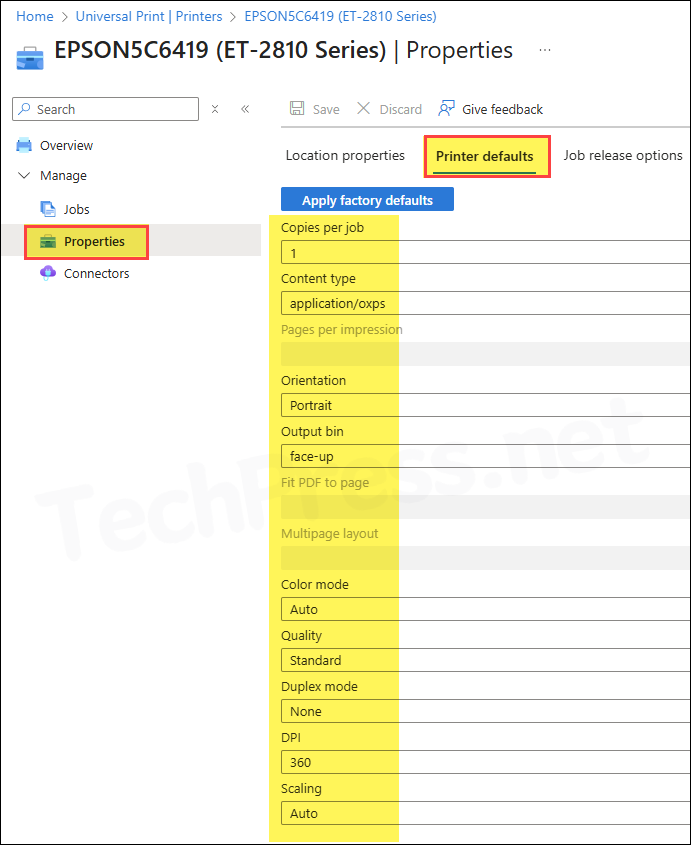
Step 4: Configure Printer Settings
After the Printers are registered, Configure Printer settings, add location information and configure job release options. To check the Printer settings:
- Sign in to Microsoft Azure portal using Global administrator or Print administrator rights.
- Universal Print > Printers > Click on a Printer, then click on Properties.
- Configure Location properties, Printer defaults and Job release options here.
Location properties
I recommend adding location information for all printers registered with Universal Print. This helps users quickly locate nearby printers. This also enhances the overall printing experience. Review all the available text boxes and fill in the details based on each printer’s physical location.
Printer defaults
Configure which settings are available to users, and which are selected by default when printing. For example, If you want users to print in black and white by default or setting a default duplex mode etc.
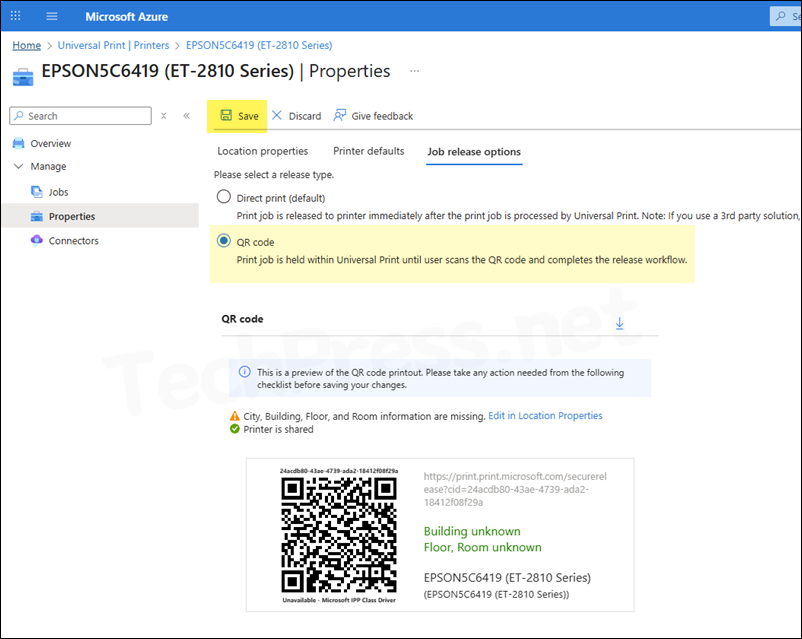
Job release options
There are two options for releasing a Print job:
- Direct print (default): Print job is released to printer immediately after the user sends it to Printer.
- QR code: A print job is held in Universal Print until the user scans the QR code and completes the release workflow. This helps prevent waste from unwanted printing. You can use the Microsoft 365 mobile app for secure release. Print the QR code and place it on the printer, so users can scan it to release their print jobs. (Please note that the scanning of QR code may not currently work from Apple iPad).
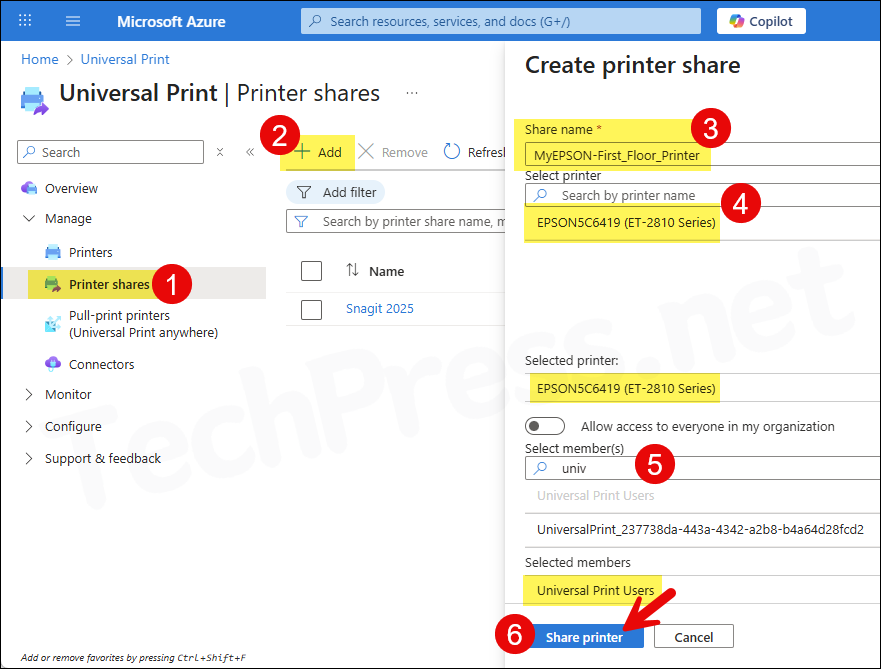
Step 5: Share Printers with End Users
Select the printers you want to share with users and click Share in the top menu. Sharing a printer controls who can use the printers and what name they will see when discovering printers. You can use the toggle switch Allow access to everyone in my organization to allow all users to discover and print, or create a specific group of users.
For this demonstration, I have created an Entra security group called Universal Print Users and shared the printers only with this group.
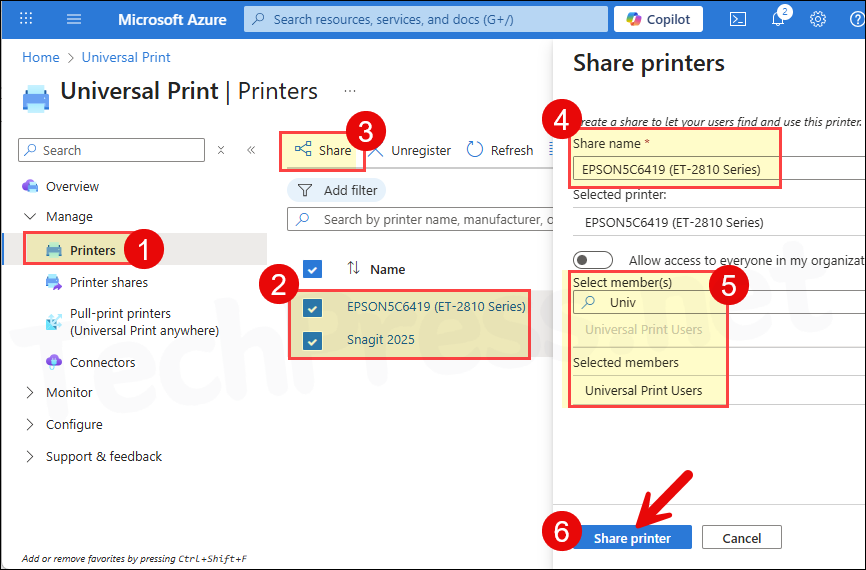
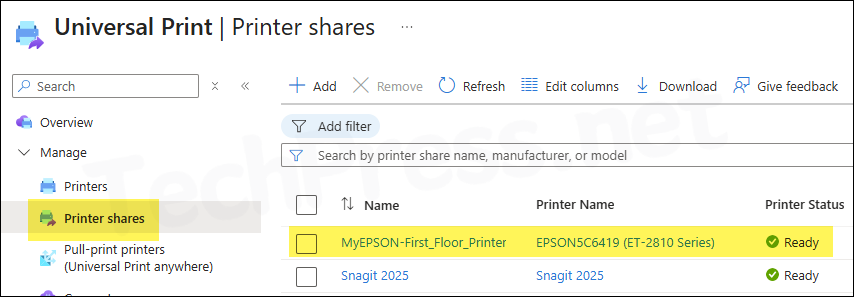
Check the Share Status column and confirm that the status now shows as Shared.

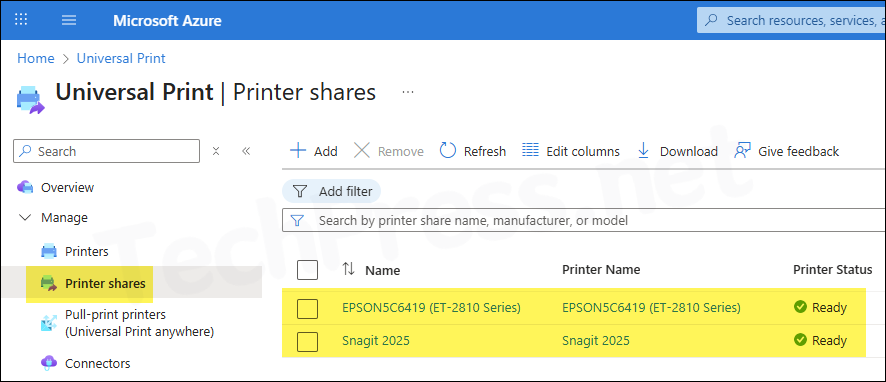
Once the printers are shared, you can also find them on the Printer Shares page. Click on Add button to share more printers.
End User Experience
Once the printers are shared with end users, they can easily discover and add the cloud printers to their computers using the Settings app. Let’s now explore the Universal Print user experience.
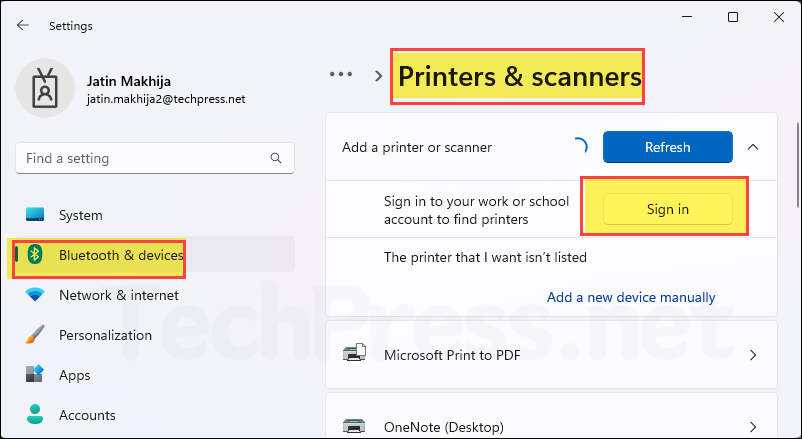
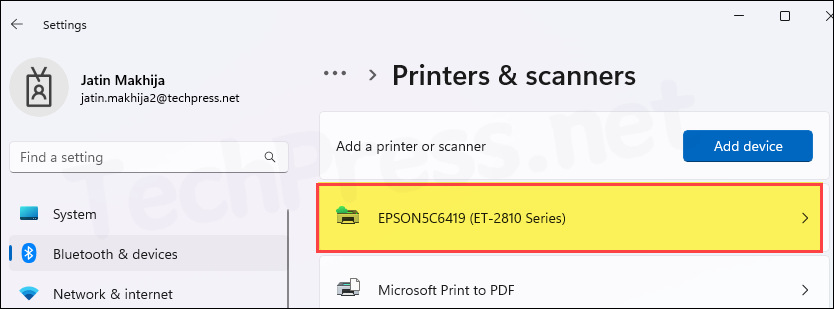
- Open the Settings app and go to Bluetooth & devices > Printers & scanners. Click Add device, then click the Sign in button. Enter your Microsoft 365 credentials to authenticate.
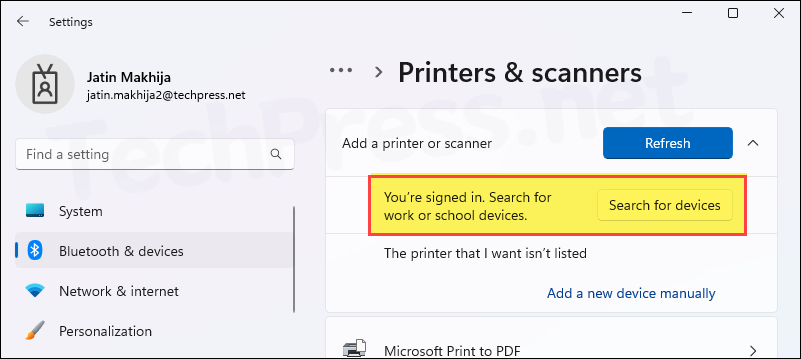
- Once you are successfully authenticated, you will see a Search for devices button. Click it to search for all printers assigned to you.
- Select Show printers and scanners associated with my: Work or school. You will see a list of cloud printers assigned to you. Click Add device next to the printer you want to use.

- Selected printer will be installed on your computer. Click on the printer to check printer properties and send a test print to confirm if it’s working fine.
Updating Printer Share Name Experience
For demonstration purposes, I have removed the EPSON printer share and am now re-adding it from the Printer Shares page. I will rename it to MyEPSON-First_Floor_Printer this time.
The printer is now shared and listed on the Printer Shares page. Let’s now check the experience from an end user’s device.
Open the Settings app, go to Bluetooth & devices > Printers & scanners, and click the Refresh button. For Show printers and scanners associated with my, select Work or school. The system will scan and list all printers assigned to you, including the renamed print queue MyEPSON-First_Floor_Printer. Click Add device next to it to add the printer.
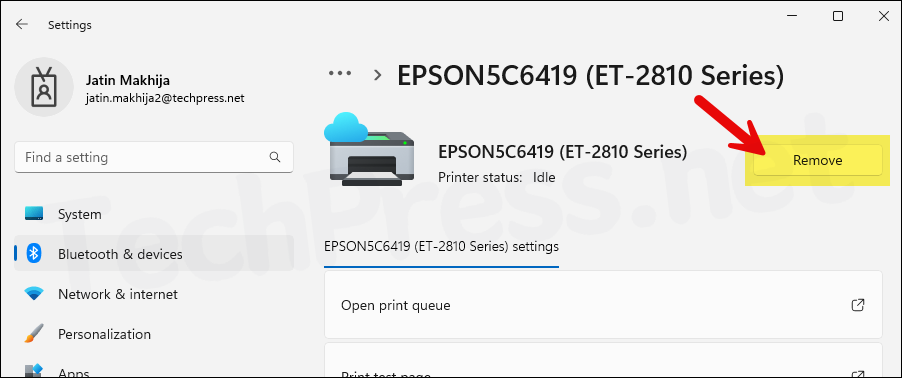
During my testing, I found that the old print queue still remained on my computer. The old printer share name was not removed automatically, even after restarting the computer.
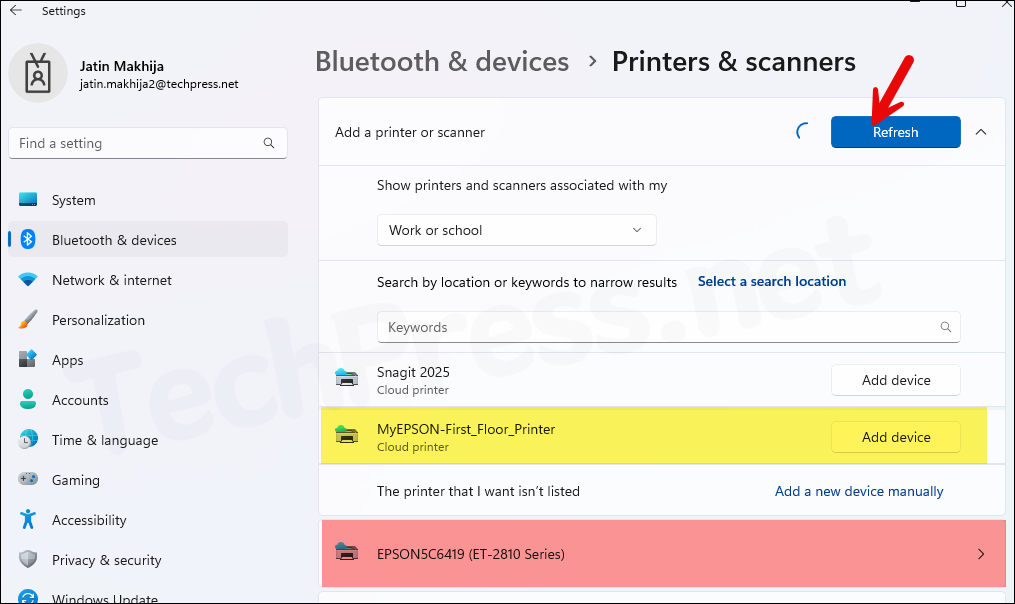
Click the old printer queue, then click Remove to manually remove the printer for cleanup.
Monitoring Universal Print
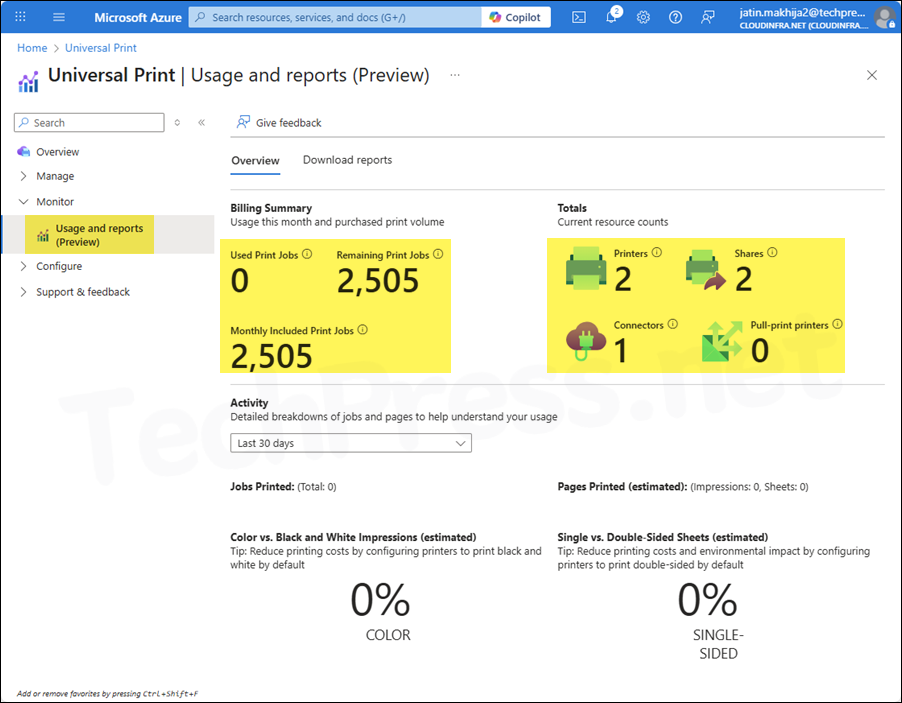
Once you have completed the setup of Universal Print and users are also starting to print using their assigned printers, Universal Print will keep a record of usage and health of the Printers. You can monitor the usage and health of Printers from Azure Portal.
- Usage and reports: Sign in to Microsoft Azure portal using Global administrator or Print administrator rights. Universal Print > Monitor > Usage and reports. Overview tab will show Billing Summary, Total resources, Color vs. Black and White usage and Single vs Double-Sided Sheets usage. Explore the reports to check printing usage across your organization.
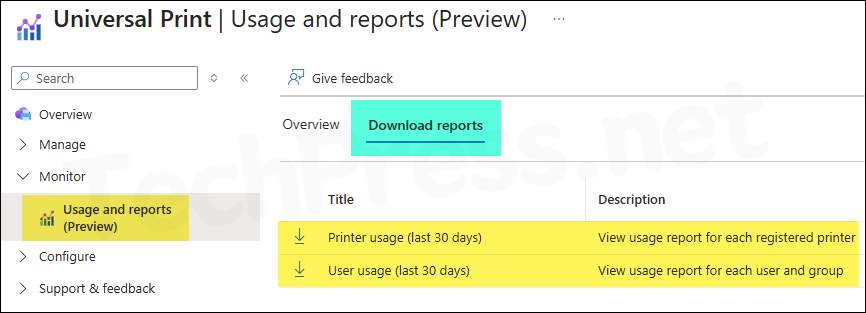
Click on Download reports tab to download Printer usage and User usage last 30 days reports to a CSV file.
Universal Print Global Settings
There are a few tenant-wide settings that impact all users, printers, and shares across the organization. To configure global settings, follow below steps:
- Sign in to Microsoft Azure portal using Global administrator or Print administrator rights. Universal Print > Configure > Settings.
Document conversion
Universal Print provides a document conversion option. When enabled, it can convert documents into the correct format before sending them to the printer. When a printer is registered with Universal Print, it sends its supported content type information, which is checked whenever a print job is submitted.
If the content is already in a supported format, it will be sent directly to the printer. If the content is not in a supported format, it will be converted into one of the supported rendering formats. If this feature is disabled and a document requires conversion, the print job will fail, and an error will be reported to the user.
Universal Print supports conversion from XPS <-> PDF.
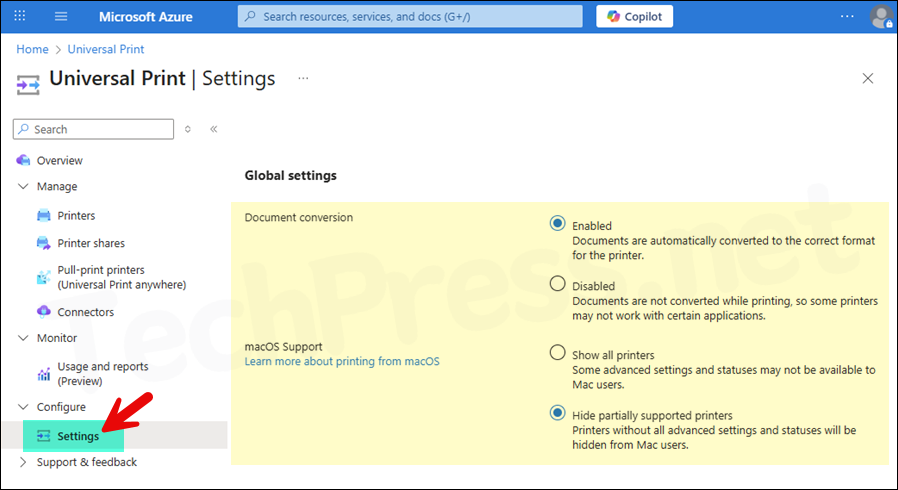
macOS Support
You can control if you want to show partially supported printers to the end users. Partially supported printers may lack advanced functionality like page flipping, toner level indicator and other settings.
- Show all printers: Select show all printers when you want to show all printers including partially supported printers.
- Hide partially supported printers: Select this option to hide partially supported printers.
Deploy Universal Print Printer using Intune
It’s easy for users to add a cloud printer to their devices using the Settings app. However, you can also use Intune to deploy the printer, eliminating the need for users to manually add or install it. For guidance on creating an Intune policy to deploy Universal Print printer(s), refer to the following link: Deploy Universal Print Printer Using Intune.
Manage Universal Print using PowerShell
Microsoft provides a PowerShell module called UniversalPrintManagement. Install this module on your device and connect using an account with Global Administrator or Print Administrator rights. With the cmdlets available in this module, you can retrieve printer lists, view printer shares, grant or revoke printer access, export reports for inventory purposes, and more. For detailed guidance, refer to the following link: Manage Universal Print Using PowerShell.
Best Practices
- Share Universal Print printers with users by creating an Entra group instead of using the toggle switch to allow all users access to a printer.
- Add location information for all Universal Print registered printers.
- If a Printer supports it, use a secure QR code method for Print job release.
- Configure Print settings as per business requirements. For example, If your organization policy allows only black and white printing then set that as Printer defaults.
More Information
For more information on Universal Print solution, refer to the following links: