In this blog post, I will demonstrate the steps to set desktop and lock screen wallpaper via group policy. We will also look into the steps to deploy desktop and lock screen background in a VPN scenario or to say where a device may have intermittent connectivity to the domain network.
Requirements:
- Desktop and Lock Screen Wallpaper files in JPEG or JPG format.
- Wallpaper files copied to SYSVOL folder on one of the domain controllers.
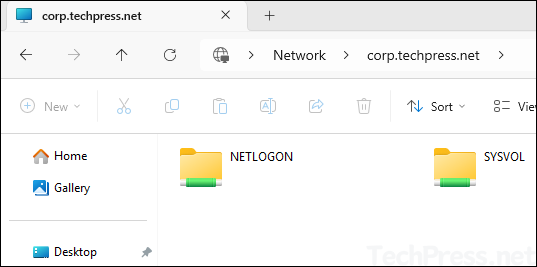
By default, all domain users have read permissions on SYSVOL folder and it’s accessible from all domain joined computers. You can also use NETLOGON folder instead of SYSVOL.
Contents
1. Desktop and Lock Screen Wallpaper files
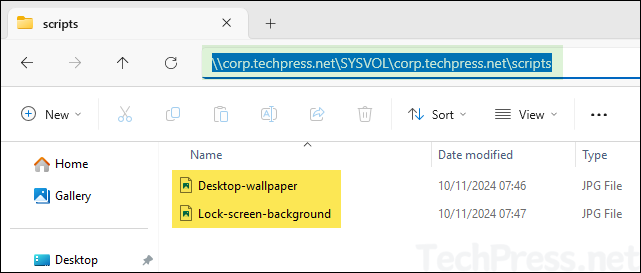
Prepare desktop and lock screen wallpaper files in JPEG or JPG format. For demonstration purpose, I have created two files Desktop-wallpaper.jpg and Lock-screen-background.jpg.
2. Copy Wallpaper files to SYSVOL folder
Next step is to copy wallpaper files to the SYSVOL folder on one of the Active directory domain controllers. To copy the files, follow below steps:
- Login to one of the Domain controllers.
- Go to the location \\<domain name\SYSVOL\domain name\scripts and paste the wallpaper files.
3. Create a Group Policy
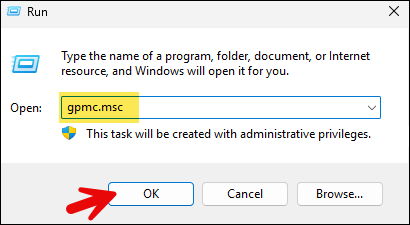
- Open Group policy management console (gpmc.msc).
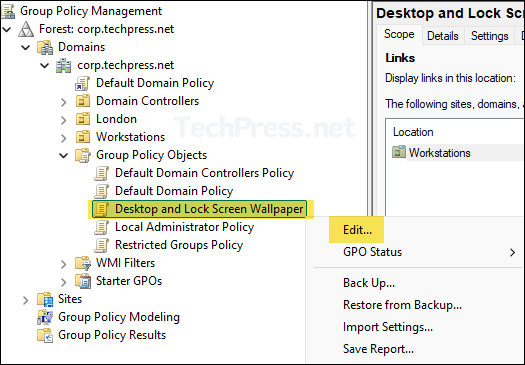
- Create and Edit a Group Policy. I have already created a group policy called Desktop and Lock Screen Wallpaper. Right-click on it and select Edit. We will be configuring three group policy settings to change desktop wallpaper and lock screen background image on the windows workstations.
3.1. Force a specific default lock screen and logon image
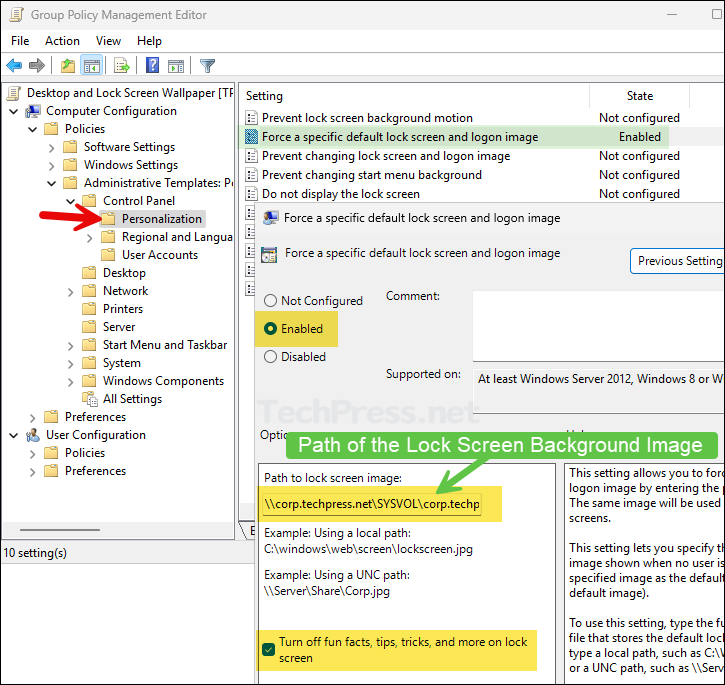
Navigate to the path Computer Configuration > Policies > Administrative Templates > Control Panel > Personalization and Enable Force a specific default lock screen and logon image policy.
- Path to lock screen image: Provide the path of the lock screen image. In our example, we have set the path to \\corp.techpress.net\SYSVOL\corp.techpress.net\scripts\Lock-screen-background.jpg.
3.2. Desktop Wallpaper Setting
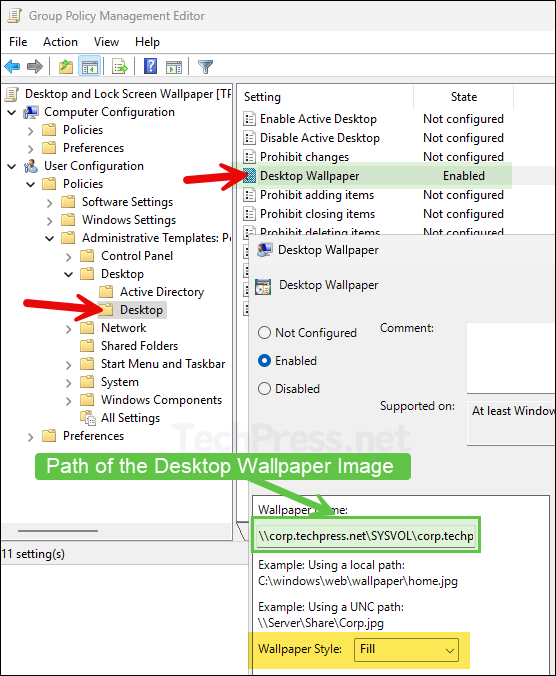
Navigate to the path User Configuration > Policies > Administrative Templates > Desktop > Desktop and Enable Desktop Wallpaper setting.
- Wallpaper Name: Provide the path of the desktop wallpaper image. In our example, we have set the path to \\corp.techpress.net\SYSVOL\corp.techpress.net\scripts\Desktop-wallpaper.jpg.
3.3. Loopback Processing Mode
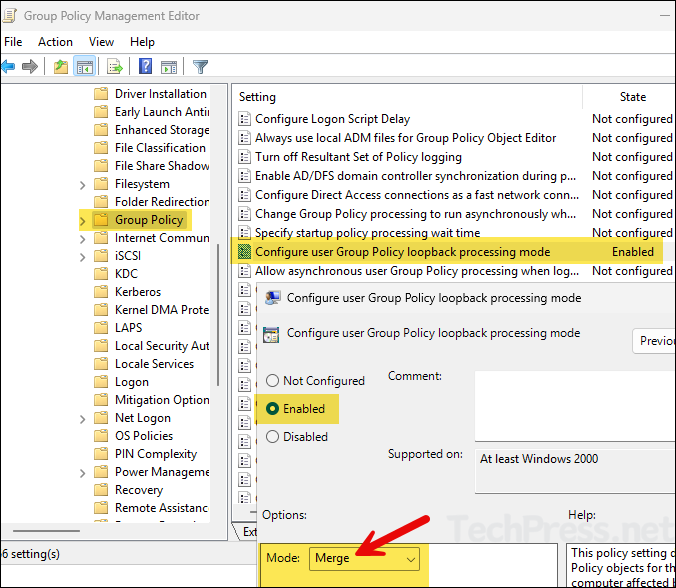
Set the loopback processing mode to Merge by navigating to Computer Configuration > Policies > Administrative Templates > System > Group Policy. Enable the policy setting Configure user Group Policy loopback processing mode and set it to Merge.
4. Add Domain Computers to the Security Filtering
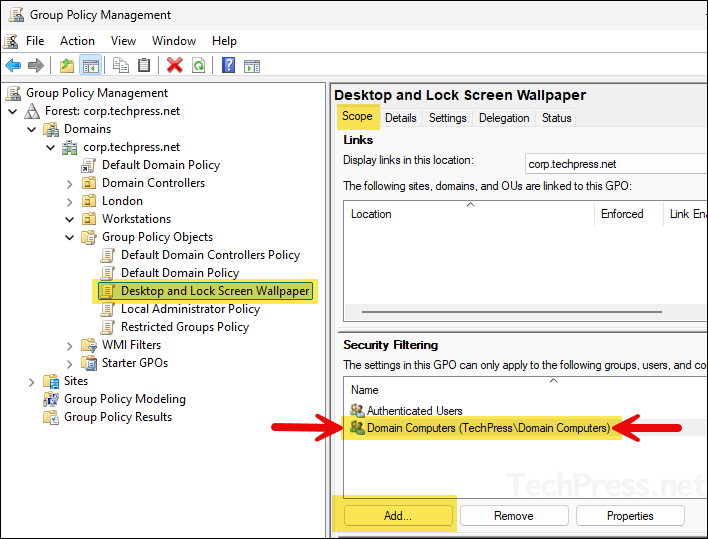
Select the Group Policy and add Domain Computers in the Security Filtering.
5. Link the GPO to Workstations OU
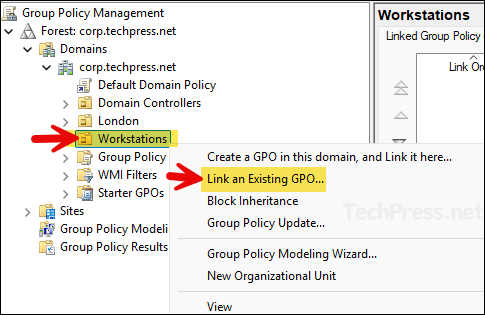
Once you have configured the GPO settings, link it to an OU containing Windows devices. Right-click on the OU and select Link an Existing GPO.
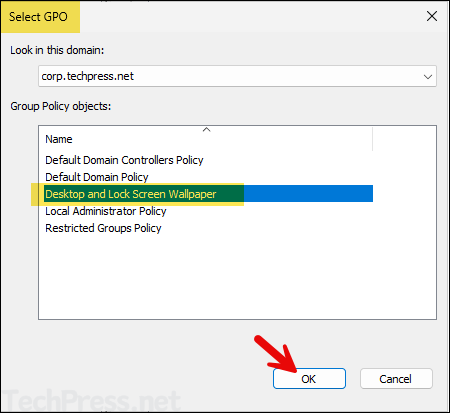
- Select the GPO Desktop and Lock Screen Wallpaper and click on OK to link.
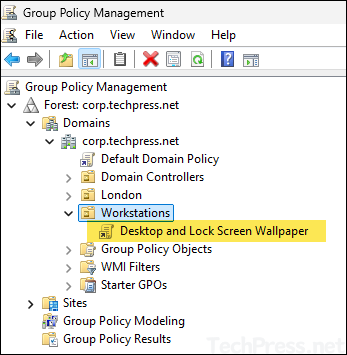
- GPO is now linked to the Workstations OU.
6. Test the Group Policy
- Login to one of the target Windows client device, open command prompt in admin mode and type
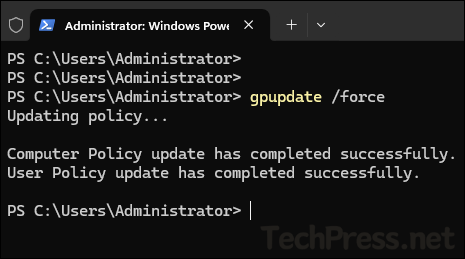
gpupdate /forceand Restart your computer.
- Desktop and Lock screen wallpapers will be set as per the GPO.
By default, group policy refreshes/updates every 90 minutes. To speed up the process, you can open command prompt or PowerShell console in Admin mode and execute
gpupdate /forcecommand.
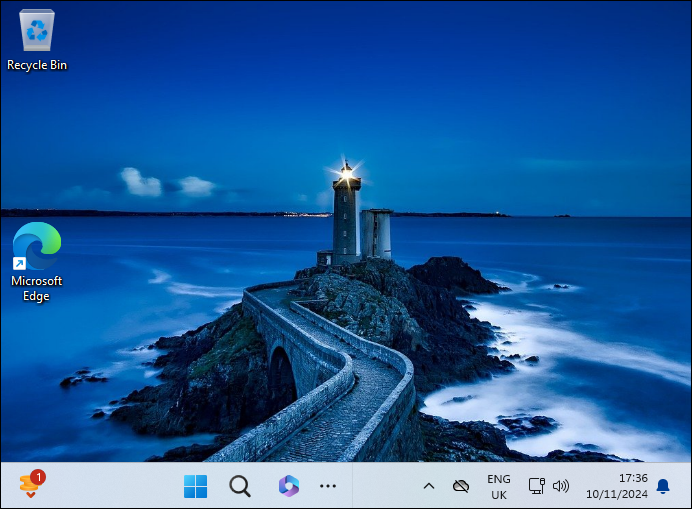
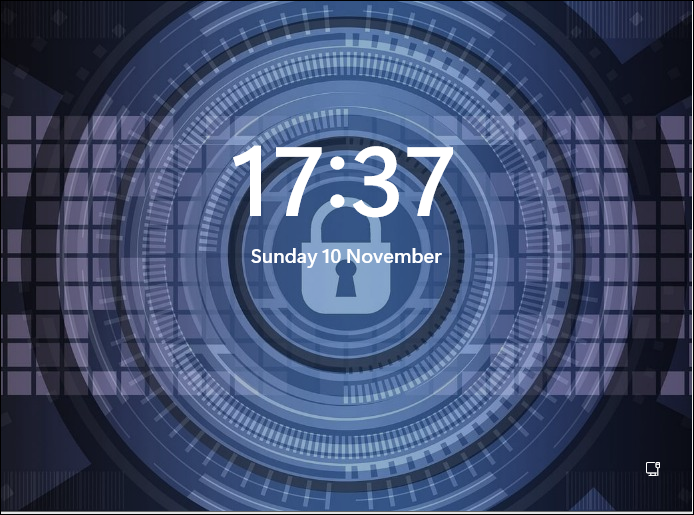
Verify Desktop and Lock Screen WallPaper Configuration from Registry Editor
Once the desktop and lock screen wallpapers GPO has been applied successfully, it will create registry entries at the following location in the Windows registry editor.
Open Registry editor regedit and Navigate to the following paths:
- For Desktop wallpaper: HKEY_CURRENT_USER\Software\Microsoft\Windows\CurrentVersion\Policies\System. There would be a REG_SZ entry called Wallpaper, which will be set to the path of the Desktop wallpaper image configured in the GPO.

For Lock Screen background: HKEY_LOCAL_MACHINE\SOFTWARE\Policies\Microsoft\Windows\Personalization. There would be a REG_SZ entry called LockScreenImage which will be set to the path of the lock screen image configured in the GPO.

Update Desktop and Lock Screen Wallpaper
Once you have configured desktop and lock screen wallpaper on windows devices, you may want to update them with new wallpaper images in the future. To update the wallpapers, follow below steps:
- Prepare new desktop and lock screen wallpaper images and keep the same name as the one copied in the SYSVOL location.
- Replace the new wallpaper files to overwrite the files at SYSVOL location. If required, you can first take a backup of old wallpaper files before replacing.
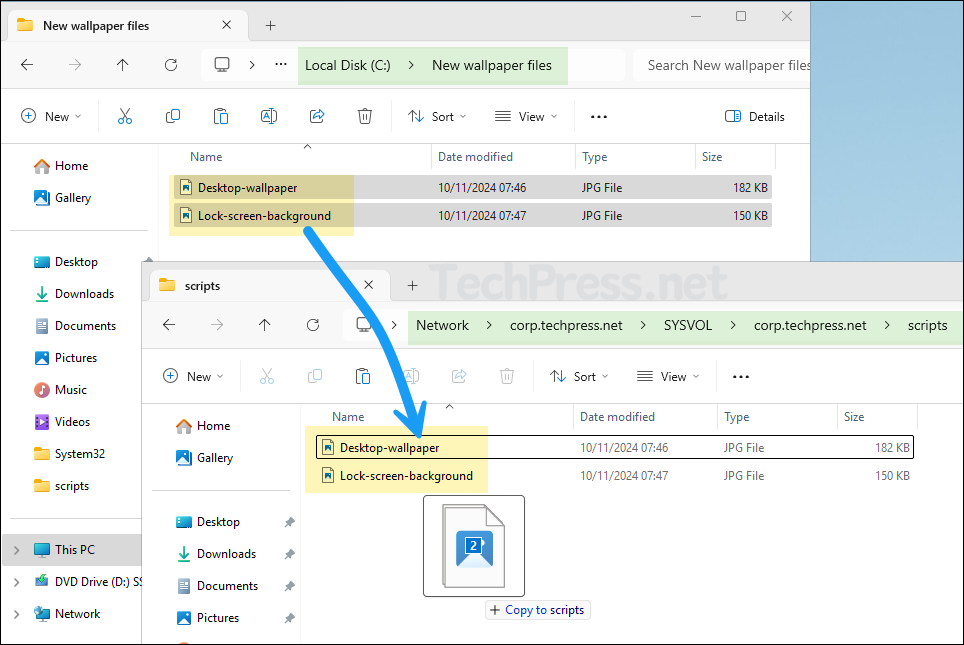
- If prompted, Select Replace the files in the destination.
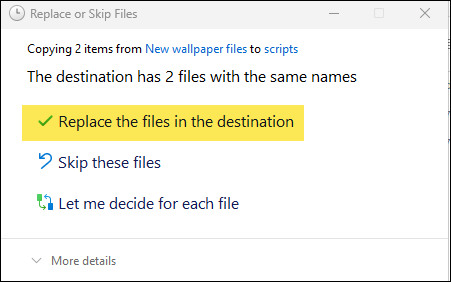
- That’s it! When GPO will refresh next time and users will reboot their devices. New Desktop and Lock Screen Wallpaper Images will be displayed. I have tested the policy for updating both wallpapers and it works fine.
Option 2: Setting Desktop and Lock Screen WallPaper by First Copying Wallpaper files on Client Devices
Previous option to configure desktop and lock screen wallpaper requires windows client devices access to SYSVOL folder. In some cases, if users have intermittent connectivity to the corporate network and does not always have access to SYSVOL folder, desktop and lock screen wallpaper might not set correctly.
Therefore, an alternative approach is to copy the desktop and lock screen image on the client devices first and use the local path of the wallpaper files in the GPO. In this case, even if users does not have access to SYSVOL folder, there will be no issues with desktop and lock screen wallpapers.
Prepare wallpaper.bat file
- Save Desktop and Lock screen wallpaper files in SYSVOL folder.
- Download wallpaper.bat file from my Github repo.
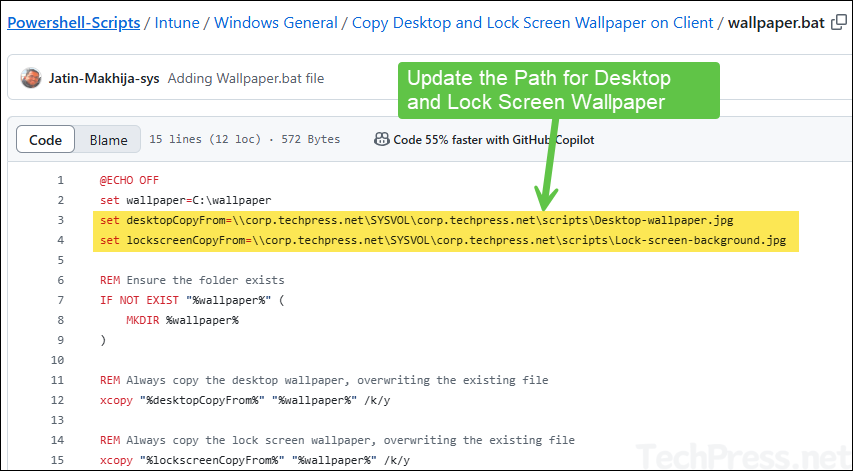
- Update
desktopCopyFromandlockscreenCopyFromvariables and point it to the desktop and lock screen wallpaper files.
Create a Group Policy
- Create and Edit a Group Policy. I have already created a group policy called Desktop and Lock Screen Wallpaper. Right-click on it and select Edit.

- Navigate to Computer Configuration > Policies > Windows Settings > Scripts.
- Double-click on Startup and click on Show Files button at the bottom.
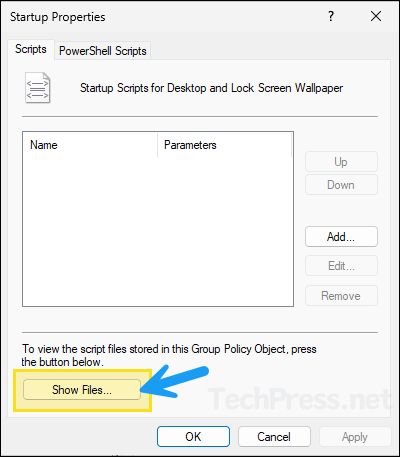
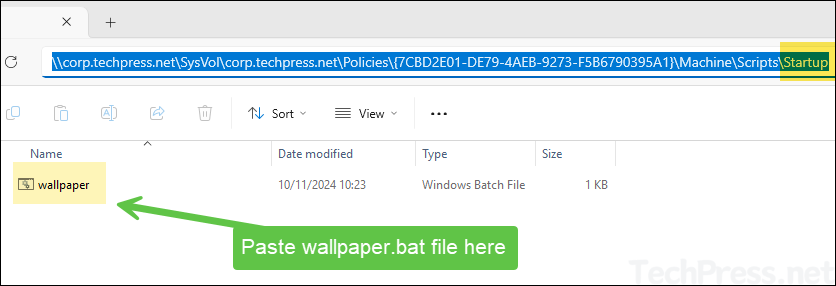
- Copy and Paste wallpaper.bat file in the Startup folder.
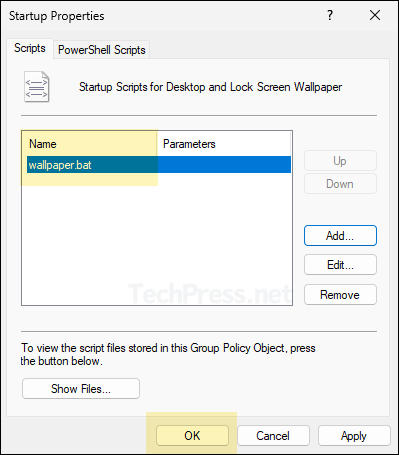
- Go back to the Startup Properties settings. Click on Add and then click on Browse button.
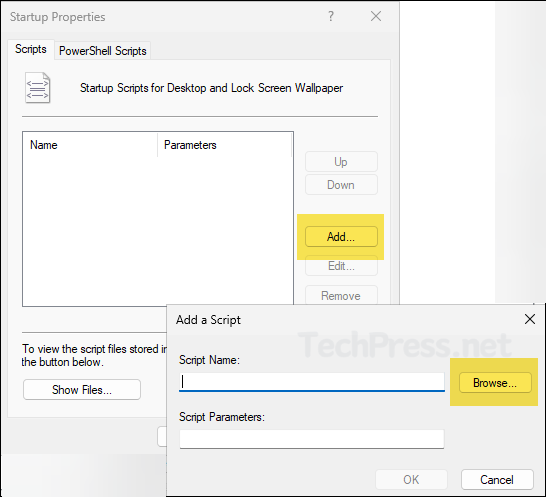
- Select wallpaper.bat file.

- wallpaper.bat file added.
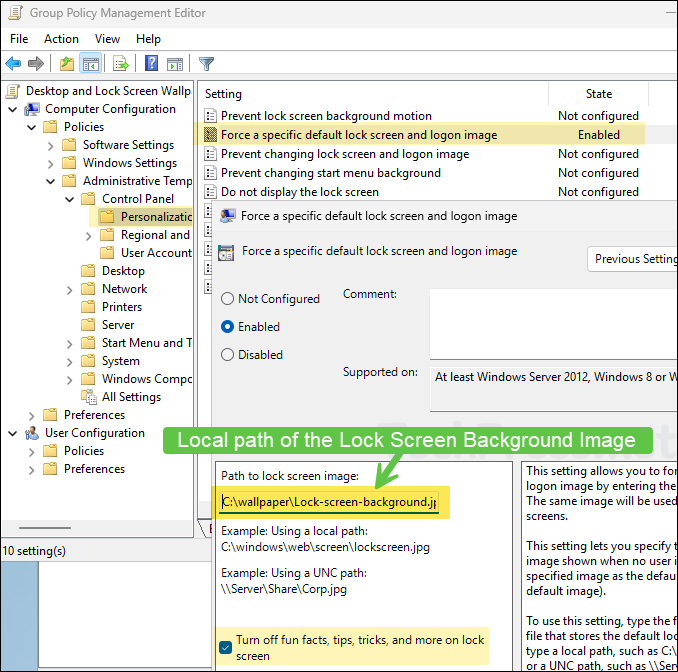
- Enable Force a specific default lock screen and logon image and set path to lock screen image as c:\wallpaper\<lockscreenimage>.jpg.
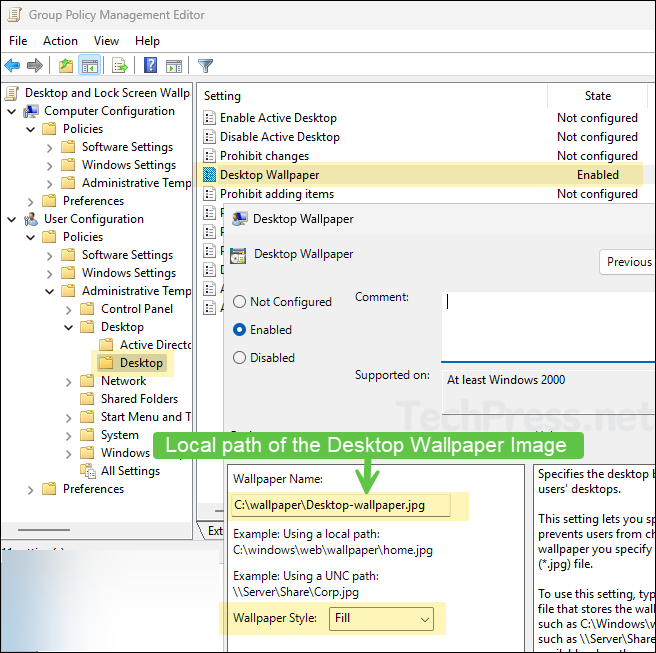
- Enable Desktop Wallpaper setting and set Wallpaper name to: C:\wallpaper\<desktopwallpaperimage>.jpg. Configure a Wallpaper Style.
- Enable Configure user Group Policy loopback processing mode and set it to Merge.

Add Domain Computers to the Security Filtering
Select the Group Policy and add Domain Computers in the Security Filtering.

Link the GPO to Workstations OU
Link the GPO to an OU containing Windows computers.

Test the Group Policy
You can wait for group policy refresh or to speed up the testing you can use gpupdate /force command and reboot the client computer. Let’s check the steps:
- Login to one of the target Windows computer.
- Open command prompt as an adminstrator and type gpupdate /force command.
- Reboot the computer and verify if desktop and lock screen wallpapers are set.
Deploy Desktop and Lock Screen Wallpaper (In a VPN Scenario)
Its more challenging to set desktop and lock screen wallpaper for remote users who do not connect to the corporate network very often. This may include the users who are working from home using domain joined windows computers and connect via VPN.
First solution we discussed configures wallpapers using SYSVOL location and In the second solution, we copied wallpaper files using a Startup script. In some cases, you may have Issues with the execution of Startup script and therefore wallpaper files are not copied on the client machine.
Either you can provide wallpaper.bat file to the user so that they can double-click on it and manually Execute it to fetch the wallpapers or you can also create a GPO that will copy Wallpaper. bat file from a shared location accessible from the device on to users desktop or any other location on their device (e.g. c:\temp).
Copy Wallpaper.bat file on Users desktop
- Create and Edit a Group Policy and navigate to User configuration > Preferences > Windows Settings > Files. Right-click on it > New > File.
- Source file: Provide the location of the wallpaper.bat file which is accessible from client devices. For example: \\corp.techpress.net\SYSVOL\corp.techpress.net\scripts\wallpaper.bat or it could be a shared folder on a file server \\fileserver01\batchfiles\wallpaper.bat.
- Destination file: C:\users\%username%\desktop to copy wallpaper.bat on to users desktop or you can provide c:\temp or any other location which users can easily access.
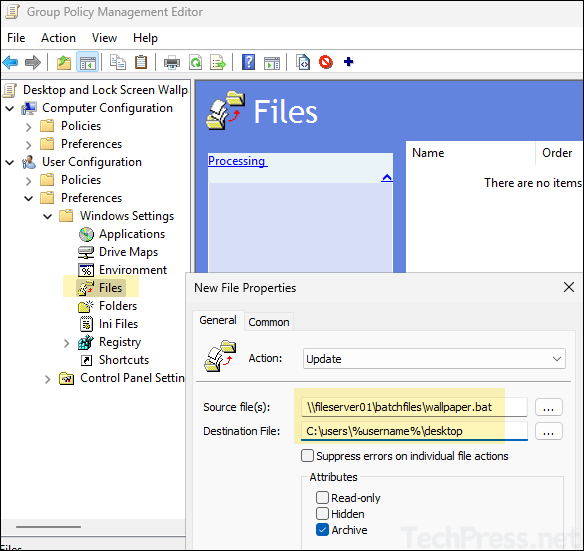
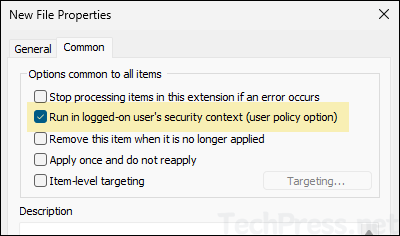
- Under Common tab, select Run in logged-in user’s security context.
Configure Execution of Wallpaper.bat file
To ensure that wallpaper.bat file is executed everytime the device is restarted. You can create an entry in the Run registry location: HKLM\SOFTWARE\Microsoft\Windows\CurrentVersion\Run.
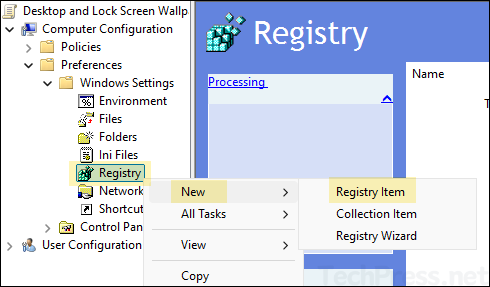
- Go to Computer Configuration > Preferences > Registry > Create a registry Item
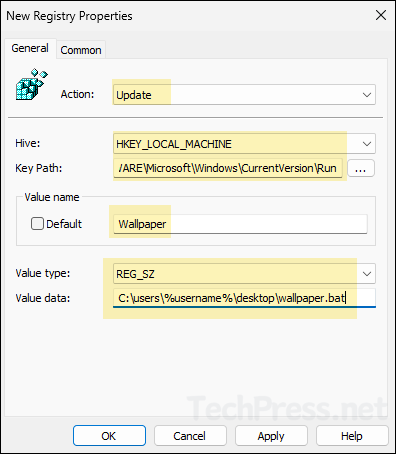
- Action: Update
- Hive: HKEY_LOCAL_MACHINE
- Key Path: /SOFTWARE\Microsoft\Windows\CurrentVersion\Run
- Value Name: Wallpaper
- Value type: REG_SZ
- Value data: C:\users\%username%\desktop\wallpaper.bat
- Make sure to enable Configure user Group Policy loopback processing mode and set it to Merge in the same GPO.
Group Policy Troubleshooting
If there are any issues with the GPO, you can follow below steps to troubleshoot.
- Ensure that the domain controllers are replicating fine. To force AD replication, open the command prompt as an administrator on a domain controller and run repadmin /syncall /APed.
- Run
gupdate /forcecommand on the workstation to force sync any policy changes.
- Run the command gpresult /r /v | more to get a list o policies applied on the computer. This will only show user configuration policy settings.
- To check the computer configuration policy, open the command prompt as an administrator and run the command gpresult /r /v /scope computer | more.
Gpresult User Configuration Policy

Gpresult Computer Configuration Policy


Great article! Thanks!!
Thank you, Worked perfectly on my test lab. even though I did not place the file on the client’s desktop to run on their end. but, if I am not connected to my network and have 2 different lockscreen and wallpaper images it won’t work for the wallpaper.
Does it work for non-enterprise machines? we have professional version and lock screen policy is not working in professional version.