In this blog post, I will demonstrate how to change SharePoint domain in Microsoft 365. When you first sign up for Microsoft 365, it creates an .onmicrosoft.com domain for you. Your M365 tenant name comes before .onmicrosoft.com value (<tenant name>.onmicrosoft.com). For example: techpress.onmicrosoft.com, where techpress is my M365 tenant name.
The tenant name is used across all Sharepoint and OneDrive URLs. Even if you later add a custom domain name (e.g., techpress.net), SharePoint and OneDrive URLs will still use the .onmicrosoft.com tenant name in their URLs.
Contents
Understanding SharePoint Domain Name
A SharePoint domain name is based on the .onmicrosoft.com domain, initially created with your Microsoft 365 tenant. The domain format is yourdomain.sharepoint.com, which is used across OneDrive and SharePoint sites.
For example, when I initially signed up for Microsoft 365, it created an .onmicrosoft.com domain called 73dvgy.onmicrosoft.com for me, where ‘73dvgy‘ is my tenant name. This name is used for my SharePoint and OneDrive URLs. As an example, below are my SharePoint and OneDrive URLs:
- https://73dvgy.sharepoint.com/sites/finance-HKG – Its a SharePoint site URL
- https://73dvgy-my.sharepoint.com/personal/jatin_makhija_techpress_net – Its a OneDrive URL of a user.
Microsoft now allows organizations to update this original URL — for example, from 73dvgy.sharepoint.com to techpress.sharepoint.com and OneDrive URL from https://73dvgy-my.sharepoint.com/personal/jatin_makhija_techpress_net to https://techpress-my.sharepoint.com/personal/jatin_makhija_techpress_net. This capability enables organizations to align SharePoint URLs with corporate rebranding, mergers, acquisitions, or other strategic changes, without needing to create a new Microsoft 365 tenant or manually migrate existing data.
Reasons to Change Your SharePoint Domain Name
Below are some key reasons to change your SharePoint online domain name.
- Rebranding: This is the most common reason organizations choose to change their SharePoint domain name — to reflect a new company name across SharePoint and OneDrive URLs.
- Mergers and Acquisitions (M&A): During mergers or acquisitions, the acquiring company may want to align the acquired company’s SharePoint and OneDrive domain names with its own.
- Improving clarity and consistency: Updating the SharePoint domain name to match your company’s official name helps maintain consistency and improves clarity across your digital environment.
- Search Engine Optimization (SEO): Although SharePoint Online and OneDrive sites are primarily used internally, if any sites are made public, and you want to improve their visibility in Google or Bing search results. Changing from a generic domain to your company’s domain name can help.
Import Points Before Proceeding
Important points to consider before changing your SharePoint domain name:
- Changing your SharePoint domain name does not impact email addresses.
- You can rename your SharePoint domain only once. For subsequent renames, you must contact Microsoft Support.
- Once the SharePoint domain is renamed, you cannot revert to the original name. For example, if you change from 73dvgy.sharepoint.com to techpress.sharepoint.com, you cannot revert to 73dvgy.sharepoint.com. This scenario is not supported.
- Custom domains added to Microsoft 365 cannot be used for the SharePoint domain name. For instance, if you have a custom domain called techpress.net, you cannot rename your SharePoint domain to techpress.net.sharepoint.com. You can only rename using an available onmicrosoft.com domain.
- If your organization has ever utilized multi-geo capabilities, you cannot rename your SharePoint domain.
- After the rename operation, Microsoft automatically creates a redirect from the old URL to the new URL, valid for one year. After this period, the redirect is removed.
- You can perform the rename operation only if your organization has fewer than 10,000 total sites (this includes SharePoint sites, OneDrive accounts, and SharePoint Embedded containers). If your organization has between 10,000 and 100,000 sites, you will require a SharePoint Advanced Management license to rename your SharePoint domain. This license also enables the capability to prioritize up to 4,000 sites.
- Any site deleted prior to the domain rename operation cannot be restored after the rename.
- Organizations using specialized clouds or government clouds cannot rename their SharePoint domain.

Check Domain Name Availability
A simple way to check if a domain name is available is to open a web browser and enter: https://<newdomain>.sharepoint.com. If the domain is available, you’ll see an error message stating: “This site can’t be reached.” However, if you are redirected to a Microsoft sign-in page instead, it means the domain is already in use, and you’ll need to choose a different domain name.
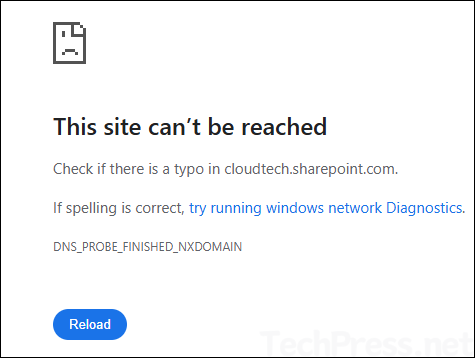
To change your SharePoint domain name, you must first add the new domain to Microsoft 365 as an .onmicrosoft.com domain (more on that later). Before doing so, ensure that the domain name is available. If the domain is already taken, you will receive the following error message:
“domainname.onmicrosoft.com is already in use by another organization. Please try a different domain name.”

If the new domain you want to use for the SharePoint domain is already added as an .onmicrosoft.com domain, then you do not need to make any changes in the Microsoft 365 admin center. You can proceed directly to the steps to change the SharePoint domain name.
Now that you’ve reviewed the key points and confirmed domain availability, we can move on to the steps required to change the SharePoint domain name. Follow the steps below to complete the process.
1. Add a new onmicrosoft.com domain in Microsoft 365
First step is to add a new onmicrosoft.com domain in Microsoft 365. This will be your new SharePoint domain as well. Let’s go through the steps:
- Sign in to the Microsoft 365 admin center.
- Click Settings > Domains.
- Click on your onmicrosoft.com domain.
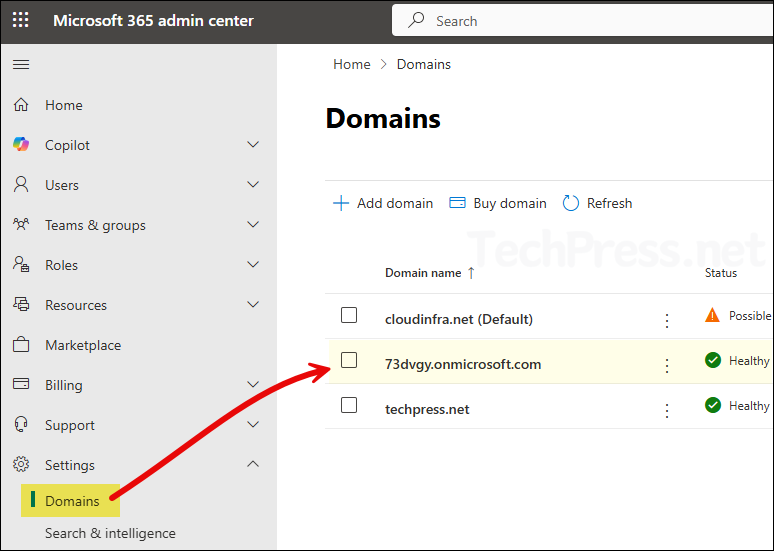
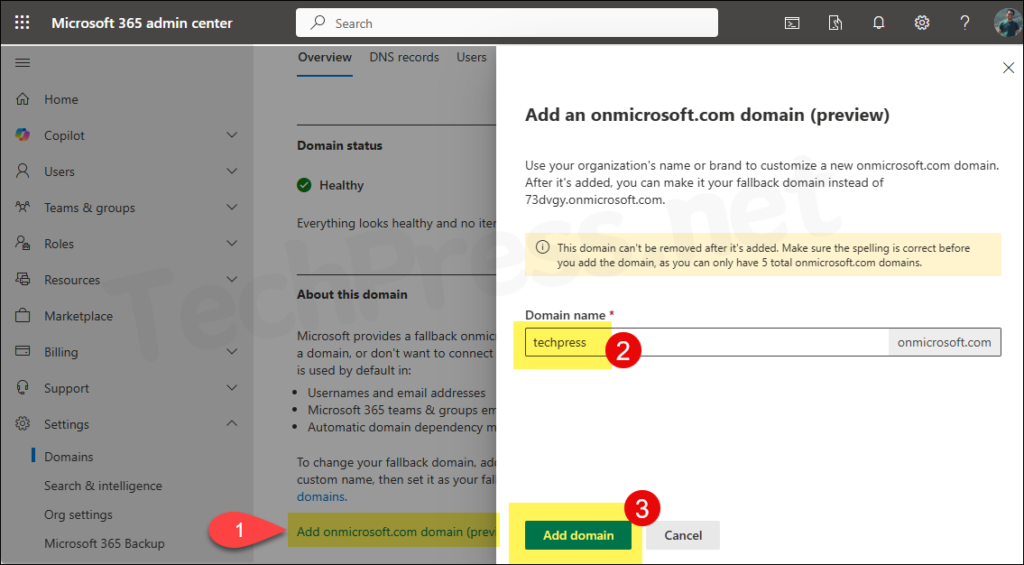
- Click on Add onmicrosoft.com domain link and type a new domain name.
- Click on Add domain button.
This domain can’t be removed after it’s added. Make sure the spelling is correct before you add the domain, as you can only have 5 total onmicrosoft.com domains.
Once the domain is added, go to the Domains page and verify that the new onmicrosoft.com domain is listed. Do not set it as the fallback domain yet. First, complete the SharePoint domain rename process, and then return to this page to set the new domain as the fallback domain.
For more information about adding onmicrosoft.com domain, refer to the guide: How to Change onmicrosoft.com Domain in Microsoft 365
2. Rename SharePoint Domain Name using PowerShell
- Install SharePoint Online Management Shell on your computer.
If you have open PowerShell as administrator
Install-Module -Name Microsoft.Online.SharePoint.PowerShell -Force -AllowClobberIf you have not opened PowerShell console as administrator
Install-Module -Name Microsoft.Online.SharePoint.PowerShell -Force -AllowClobber -Scope CurrentUserConnect to SharePoint Online and Sign-in with your administrator credentials
Connect-SPOService -url <sharepoint site admin URL>

Example:
Connect-SPOService -url https://mylab000-admin.sharepoint.com
Use the Start-SPOTenantRename cmdlet to initiate the SharePoint domain rename operation. Please note, Once the operation begins, sites using the original domain name will become temporarily inaccessible. They will only be accessible again after the rename process is complete, which can take anywhere from several hours to a few days, depending on the number of sites in your tenant.
Start-SPOTenantRename
Start-SPOTenantRename -DomainName <DomainName> -ScheduledDateTime <YYYY-MM-DDTHH:MM:SS> [-WhatIf] [-Confirm]- <DomainName>: It is the new domain name.
- ScheduledDateTime: It should be at least 24 hours in the future but less than 30 days. The date and time is based on your computer’s current date on which you are executing this PowerShell code.
Example:
Start-SPOTenantRename -DomainName "techpress" -ScheduledDateTime "2025-07-25T11:45:00"3. Monitor the Status of SharePoint Domain Rename Operation
After executing Start-SPOTenantRename cmdlet, rename operation will start and sites will be queued for rename operation. It may take a couple of hours to days, depending upon the number of sites. You can check the status of the rename operation by executing Get-SPOTenantRenameStatus.
After executing this cmdlet, you will get below Information on the PowerShell console. The information shows that the rename operation has been queued. It also provides information about total sites, In progress sites, how many sites are Renamed etc.
RenameJobId           : 94564480-d065-4081-a047-24f12e0e4ef5
Status                : Queued
Requested at          : 7/24/2025 16:18:11 AM (UTC)
Requested by          : [email protected]
Scheduled at          : 7/25/2025 11:45:00 AM (UTC)
New domain name       : techpress
Total sites           : 47
In progress           : 0
Renamed               : 0
Attention required    : 0
If you want to check the domain rename status of specific sites, then you can use Get-SPOSiteRenameState cmdlet.
Get-SPOSiteRenameState -Identity <Site URL>

Example:
Get-SPOSiteRenameState -Identity https://73dvgy.sharepoint.com/sites/finance-HKG
4. Verify SharePoint Domain Name Change
After the rename operation status changes from Queued to Success, verify the SharePoint and OneDrive URLs for a few users to confirm that the change was completed successfully. You can also sign in to the SharePoint admin center to confirm that the admin URL has been updated to reflect the new domain name.
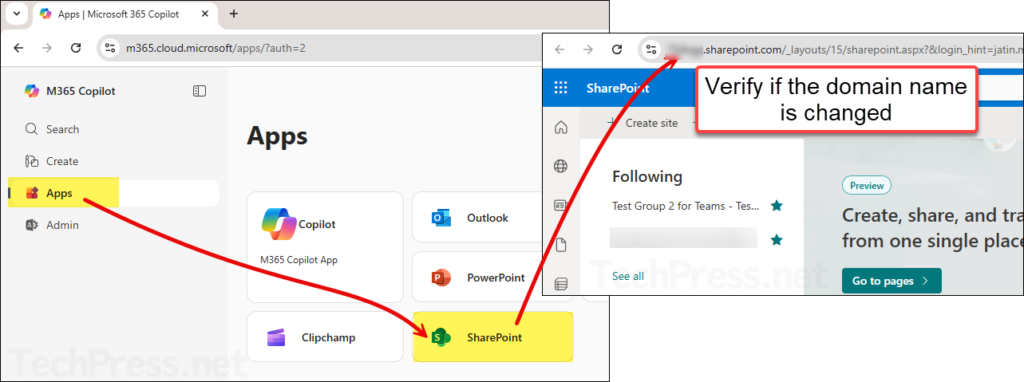
4.1 Verify SharePoint URL
- Go to https://m365.cloud.microsoft URL.
- Click on Apps > SharePoint.
- Verify the new domain name from the address bar.
https://techpress.sharepoint.com/_layouts/15/sharepoint.aspx?&login_hint=
4.2 Verify OneDrive URL
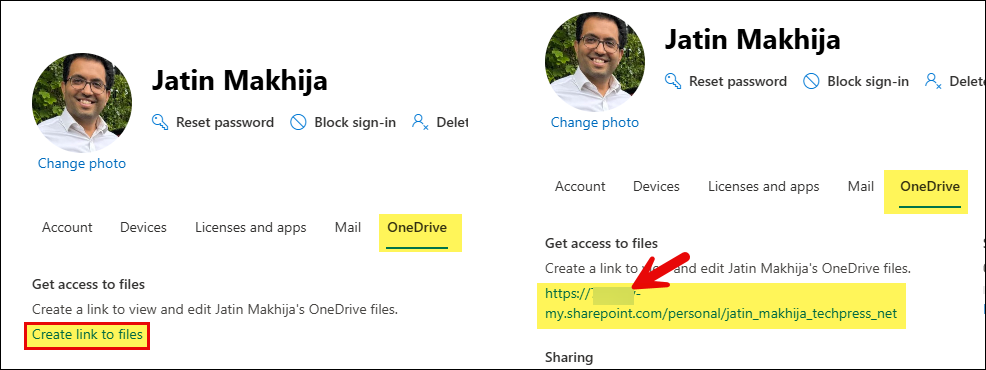
- Sign in to the Microsoft 365 admin center.
- Click on Users > Active users.
- Click on a user and then go to the OneDrive tab.
- Under Get access to files, click on Create link to files to reveal the URL.
- URL will show the new domain name.
https://techpress-my.sharepoint.com/personal/jatin_makhija_techpress_net
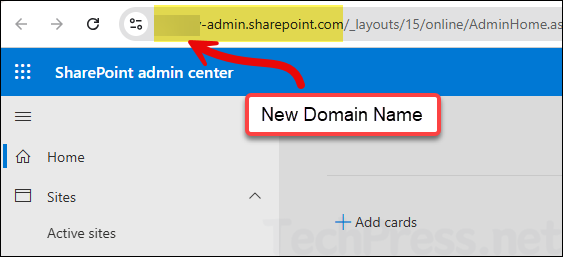
4.3 Verify SharePoint Admin URL
- Sign in to the Microsoft 365 admin center as administrator.
- Click on SharePoint under Admin centers.
- Check and confirm SharePoint admin URL, It should show the new domain name.
5. Change Fallback domain in Microsoft 365
After completing all checks and confirming there are no issues, you can set the newly added .onmicrosoft.com domain as the fallback domain. Here are the steps:
When you sign up for Microsoft 365, it provides you with an .onmicrosoft.com domain. This serves as your fallback domain. It is used in usernames, email addresses, Microsoft Teams, group email aliases, and more. Even if you’ve added a custom domain, the fallback domain remains your default email routing address.
- Sign in to the Microsoft 365 admin center as administrator.
- Go to Settings > Domains.
- Click on the newly added onmicrosoft.com domain.
- In the Overview tab, click on the button Make fallback domain.
- You will get a message highlighted in green: Yor fallback domain was changed to <newdomainname>.onmicrosoft.com.
Now that we have completed all the steps required for SharePoint domain rename operation. In the following sections of the post, I will provide you more related Information for the rename operation which could help during troubleshooting.
Cancel SharePoint Domain Rename Operation
You can only stop the domain rename operation before it starts using a cmdlet Stop-SPOTenantRename. Once rename operation has been started, it cannot be stopped.
Stop-SPOTenantRename
Stop-SPOTenantRename -Reason <provide reason>Example:
Stop-SPOTenantRename -Reason <Revalidating domain rename process>Prioritize SharePoint Sites Renames
You can prioritize the rename operation for SharePoint sites if you have a SharePoint Advanced Management license. This license allows prioritization for up to 4,000 sites. Make sure to submit the request before rename process begins. You can send a prioritization request up to two hours prior to the scheduled start time. Use the Set-SPOTenantRenameSitePrioritization cmdlet to set the priority.
Prioritize Site Rename for a Single Site
Set-SPOTenantRenameSitePrioritization -SiteUrl https://73dvgy.sharepoint.com/sites/finance-HKGPrioritize Site rename for Sites in CSV file
# Provide CSV file path
$csvPath = "C:\temp\SPOSitelist.csv"

# Importing the CSV file
$sites = Import-Csv -Path $csvPath

foreach ($site in $sites) {
    try {
        Write-Host "Prioritizing site: $($site.SiteUrl)" -ForegroundColor Cyan
        Set-SPOTenantRenameSitePrioritization -SiteUrl $site.SiteUrl
    } catch {
        Write-Warning "Failed to prioritize site: $($site.SiteUrl). Error: $_"
    }
}
What happens After Rename Operation
After the rename operation, users may need to manually update URLs to reflect the new domain. Microsoft automatically creates a redirection from the old URL to the new one, but this redirection only remains active for one year. To avoid potential issues in the future, it’s recommended to update all URLs as soon as possible.
- Review any scripts you’ve created that reference the old SharePoint or OneDrive URLs, and update them to use the new URLs.
- Update any Power Automate flows to point to the new SharePoint site URL.
- Check for any firewall rules that whitelist the old SharePoint domain, and update them to reflect the new domain name.
- Ensure the new SharePoint domain is trusted across all browsers in use. Perform thorough testing on multiple devices.
- Remind users to update any bookmarks or favorites in their browsers that still point to the old URLs.
Conclusion
SharePoint domain rename operation is a critical change that can impact the entire organization. Depending on the size of the organization, the process could take several days to complete. Therefore, it is recommended to perform this change over a weekend, preferably a long weekend if possible.
Communicate with users and share details about both the old and new domain names. Since Microsoft allows the SharePoint domain rename operation only once, it is essential to double-check the new domain name when running the Start-SPOTenantRename PowerShell command.
When you add a new .onmicrosoft.com domain in the Microsoft 365 admin center, it cannot be removed later. You should be cautious, as you can add only up to five .onmicrosoft.com domains in Microsoft 365.