This guide will cover the steps on how to block apps on macOS with Intune. You can use Applocker or App control for business (also referred to as WDAC) on Windows devices. But these application control mechanisms are not applicable for Mac devices managed with Intune.
To stop specific apps from running on a Mac, you can use a deny list (block few apps, allow the rest) or an allow list (allow few apps, block the rest). In practice, there are two common approaches: create a custom .mobileconfig using Apple’s Application Access payload to allow or deny apps by path or code signature, or use Santa app.
I will be using Santa app for its reliable control and its ability to uniquely identify application binaries by TeamID, SigningID, or hash. It shows clear pop-up messages when an app is blocked and includes a Request approval button which can open a custom URL. Apple’s Application Access is fine for quick, simple block lists, but it’s easier to bypass and doesn’t scale as well for full allowlisting.
What is Santa? Here’s the official definition, Santa is a high-performance open-source security agent for macOS that provides binary & file-access authorization and rich system event logging. You can use it to easily block unwanted applications on intune managed macOS devices.
Think of Santa as Applocker for macOS. It monitors every program launch and, based on rules you define, either allows it or blocks it. Santa has two modes: Monitor (everything runs; events are logged) and Lockdown (default deny; only approved software runs).
When you launch any binary on a Mac, Santa decides whether to allow or deny it based on the configured rules. If execution is allowed, the app opens normally and the decision is cached to speed up subsequent launches. If execution is denied, Santa displays a pop-up indicating that the app is not approved yet.
Contents
Requirements
- Santa PKG file deployed on Mac devices.
- Intune enrolled macOS version 13 onwards.
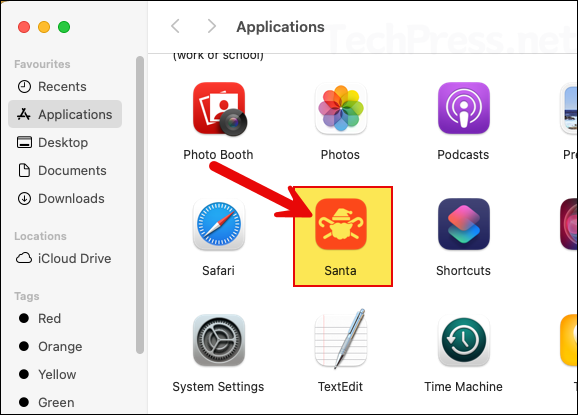
1. Deploy Santa App
You need to deploy the Santa app on every Mac where you want application control. Download Santa installer as a PKG or DMG, then deploy it using the corresponding Intune method. I have guides for both approaches, deploying a .pkg installer app via Intune and deploying a .dmg installer app via Intune. More specifically, I have a step-by-step guide on the deployment of Santa app using .pkg installer. Refer to any of these guides using your preferable installer type to roll out Santa to Mac devices via Intune.
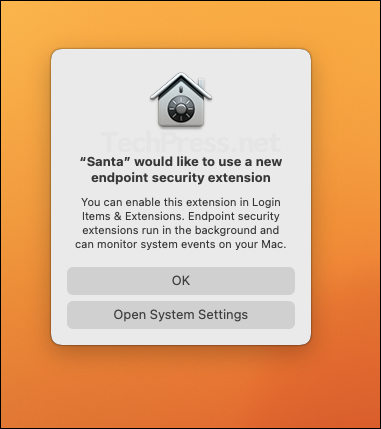
2. Enable Santa Endpoint Security Extension
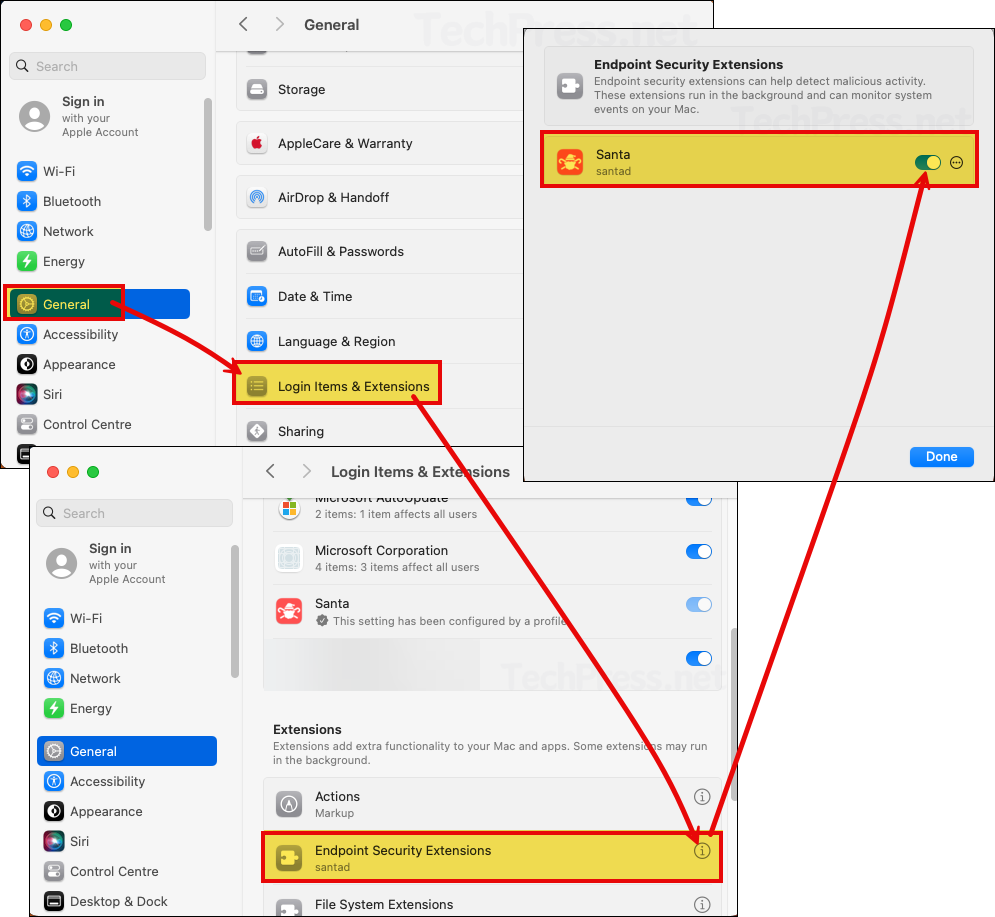
Santa uses an endpoint security extension (runs in the background) to monitor events on a Mac. After you deploy Santa app to target devices, a pop-up appears asking you to enable this extension. You don’t need to enable it manually, so you can simply click OK to dismiss the message. Instead, create an Intune policy to approve the extension. Once enabled through Intune, the extension becomes a managed setting and users will no longer be able to disable it in System Settings.
- Sign in to the Intune admin center > Devices > macOS > Configuration > Create > New Policy.
- Profile type: Settings catalog.
- Basics tab: Provide a name and description of the policy.
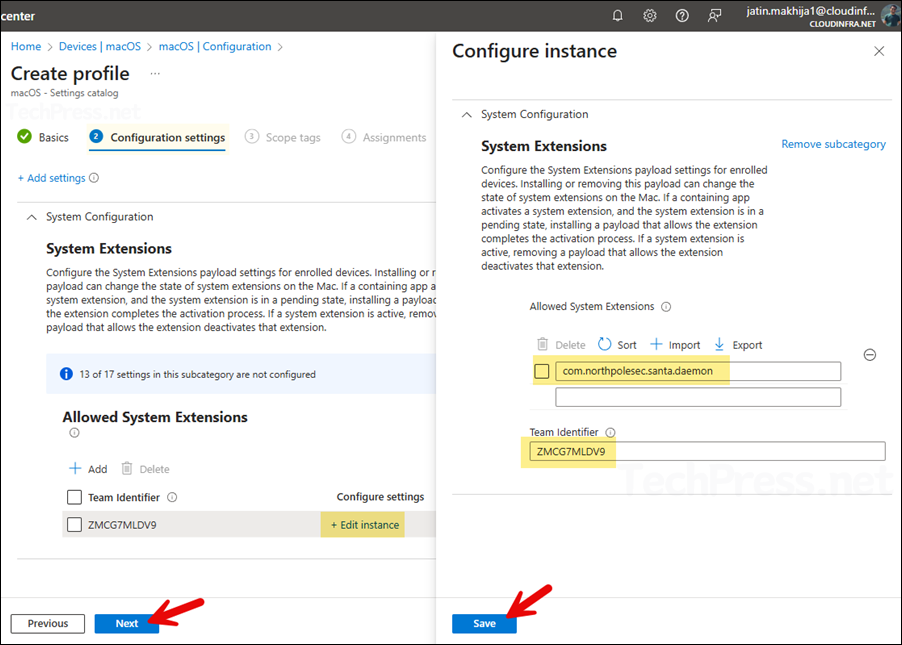
- On Configuration settings tab, click on + Add settings and use the Settings picker to search using system extension keyword and select System Configuration > System Extensions category. Select Allowed System Extensions.
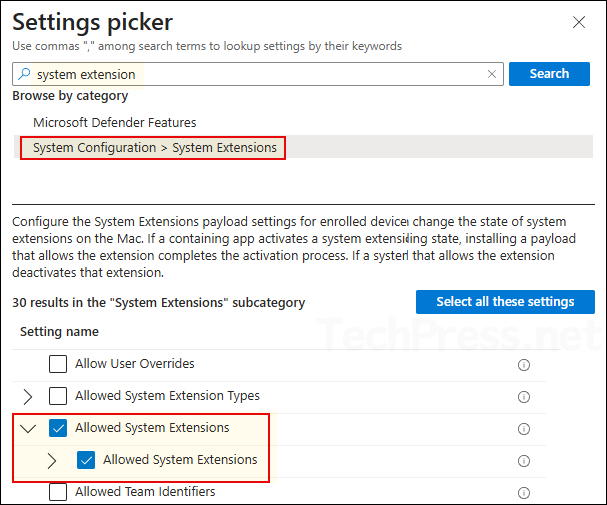
- Click on + Edit instance and configure below values:
- Allowed System Extensions: com.northpolesec.santa.daemon
- Team identifier: ZMCG7MLDV9
- Click on Save and then click on Next to proceed to the next step.
- Scope tags (optional): A scope tag in Intune is an RBAC label you add to resources (policies, apps, devices) to limit which admins can see and manage them. For more Information, read: How to use Scope tags in Intune.
- Assignments: Assign the policy to Entra security groups that contain the target users or devices. As a best practice, pilot with a small set first; once validated, roll it out more broadly. For guidance on assignment strategy, see Intune assignments: User groups vs. Device groups.
- Review + create: Review the deployment summary and click Create.
I have exported this settings catalog policy to a JSON file. You can download it from my GitHub repo (Allow Santa System Extensions.json) and import it directly into your Intune tenant.
Sync Intune Policies
The device check-in process might not begin immediately. If you’re testing this policy on a test device, you can manually kickstart Intune sync from the device itself or remotely through the Intune admin center.
Alternatively, you can use PowerShell to force the Intune sync on Windows devices. Restarting the device is another way to trigger the Intune device check-in process.
Confirm if Santa Endpoint Security Extension is Enabled
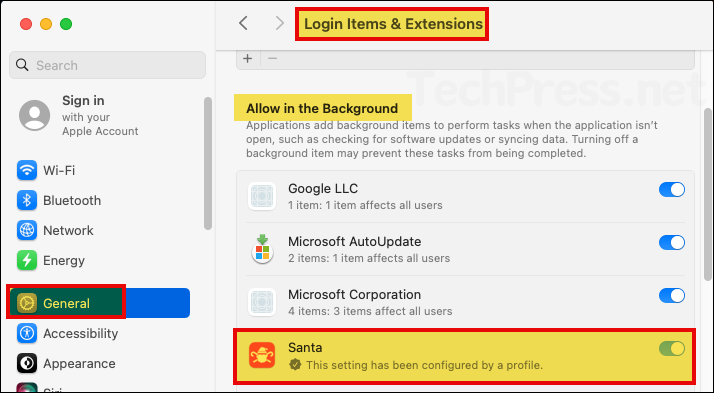
On one of the target Mac devices, check and confirm that the Santa Endpoint Security extension has been enabled. Also, verify that the Santa app is allowed to run in the background.
Open System settings > General > Login Items & Extensions > Under Extensions sections, click on the (i) icon next to Endpoint Security Extensions. Toggle switch next to Santa (santad) should be enabled.
- Under the System settings > General > Login Items & Extensions. Verify if Santa app is allowed to run in the background.
3. Configure Santa App Permissions
macOS requires Santa app to have Full Disk Access in order to perform authorization decisions, and Santa cannot start until this permission is granted. On macOS, this access is managed by a system called Transparency, Consent, and Control (TCC), which restricts access to files and devices to only those applications that you explicitly approve. We will configure the required permissions via Intune, let’s go through the steps:
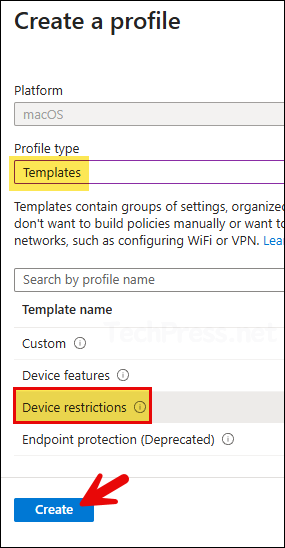
- Sign in to the Intune admin center > Devices > macOS > Configuration > Create > New Policy.
- Profile type: Templates
- Template name: Device restrictions
- Basics: Provide a name and description of the profile.
Configuration settings tab
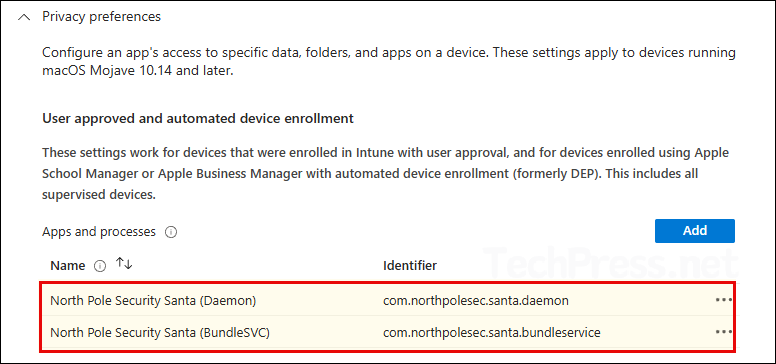
On the configuration settings tab, expand the category Privacy preferences and click on Add button. Then add below two apps and processes.
North Pole Security Santa (Daemon)
- Name: North Pole Security Santa (Daemon)
- Identifier type: Bundle ID
- Identifier: com.northpolesec.santa.daemon
- Code requirement: Copy and paste below value
identifier "com.northpolesec.santa.daemon" and anchor apple generic and certificate 1[field.1.2.840.113635.100.6.2.6] /* exists */ and certificate leaf[field.1.2.840.113635.100.6.1.13] /* exists */ and certificate leaf[subject.OU] = ZMCG7MLDV9- Enable static code validation: Not configured
- Full disk access: Allow
North Pole Security Santa (BundleSVC)
- Name: North Pole Security Santa (BundleSVC)
- Identifier type: Bundle ID
- Identifier: com.northpolesec.santa.bundleservice
- Code requirement: Copy and paste below value
identifier "com.northpolesec.santa.bundleservice" and anchor apple generic and certificate 1[field.1.2.840.113635.100.6.2.6] /* exists */ and certificate leaf[field.1.2.840.113635.100.6.1.13] /* exists */ and certificate leaf[subject.OU] = ZMCG7MLDV9- Enable static code validation: Not configured
- Full disk access: Allow
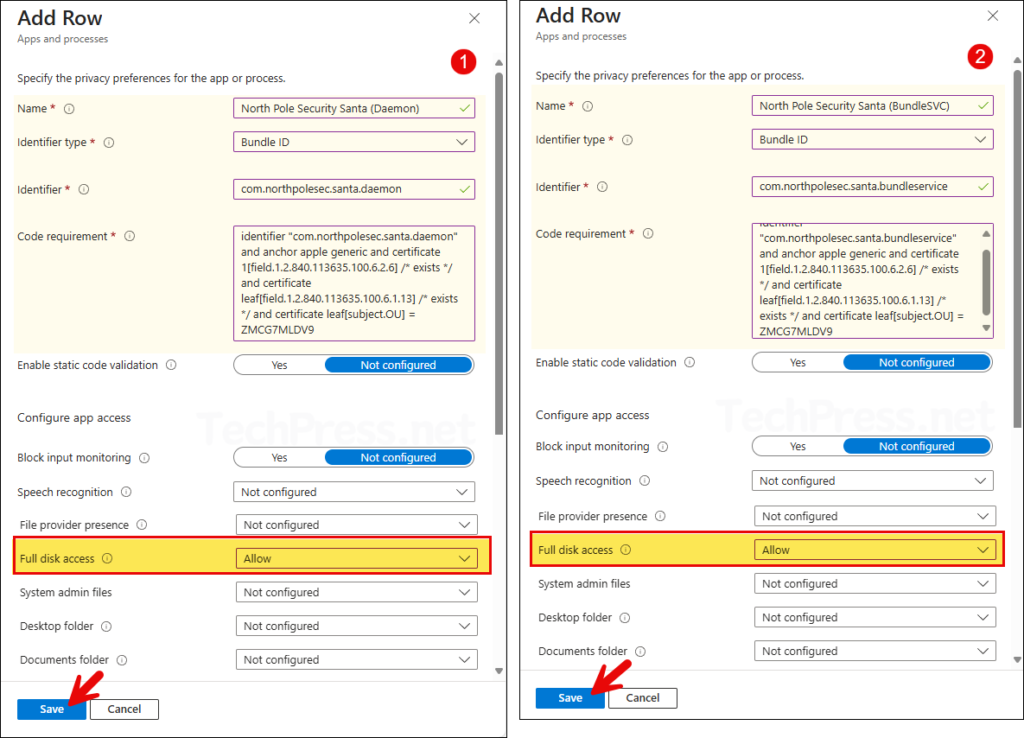
Under Privacy Preferences, you should now see two apps and processes, as shown in the below screenshot.
- Scope tags (optional): A scope tag in Intune is an RBAC label you add to resources (policies, apps, devices) to limit which admins can see and manage them. For more Information, read: How to use Scope tags in Intune.
- Assignments: Assign the policy to Entra security groups that contain the target users or devices. As a best practice, pilot with a small set first; once validated, roll it out more broadly. For guidance on assignment strategy, see Intune assignments: User groups vs. Device groups.
- Review + create: Review the deployment summary and click Create.
4. Allow Santa Notifications
Santa can show native macOS notifications to users when a block event happens. Use a settings catalog intune policy to configure notifications for Santa app.
- Sign in to the Intune admin center > Devices > macOS > Configuration > Create > New Policy.
- Profile type: Settings catalog.
- Basics tab: Provide a name and description of the policy.
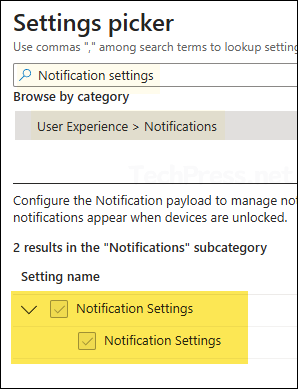
- On Configuration settings tab, click on + Add settings and use the Settings picker to search using Notification settings keyword and select User Experience > Notifications category. Select Notification Settings.
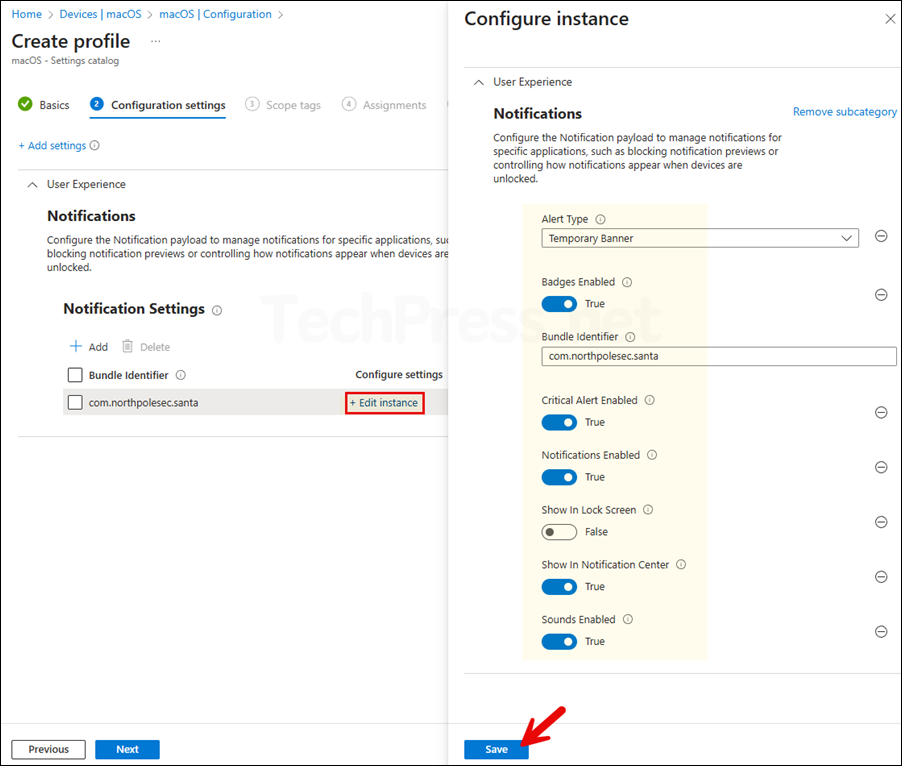
- Click on + Edit instance and configure below settings:
- Alert type: Temporary Banner
- Badges Enabled: True
- Bundle Identifier: com.northpolesec.santa
- Critical Alert Enabled: True
- Notifications Enabled: True
- Show in Lock Screen: False
- Show in Notification Center: True
- Sounds Enabled: True
- Scope tags (optional): A scope tag in Intune is an RBAC label you add to resources (policies, apps, devices) to limit which admins can see and manage them. For more Information, read: How to use Scope tags in Intune.
- Assignments: Assign the policy to Entra security groups that contain the target users or devices. As a best practice, pilot with a small set first; once validated, roll it out more broadly. For guidance on assignment strategy, see Intune assignments: User groups vs. Device groups.
- Review + create: Review the deployment summary and click Create.
5. Suppress Santa Background Notifications
Santa includes components that run in the background (for example, presenting notifications to users or handling sync). Starting with macOS 13 Ventura, users are notified whenever software is installed that can run in the background, so installing the Santa package may trigger Background Items Added notifications. These notifications can be suppressed by deploying a .mobileconfig file via Intune.
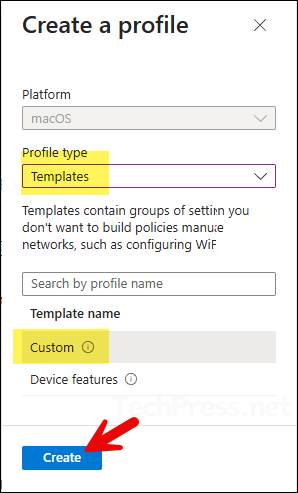
- Sign in to the Intune admin center > Devices > macOS > Configuration > Create > New Policy.
- Profile type: Templates
- Template Name: Custom
- Basics tab: Provide a name and description of the policy.
- Configuration settings:
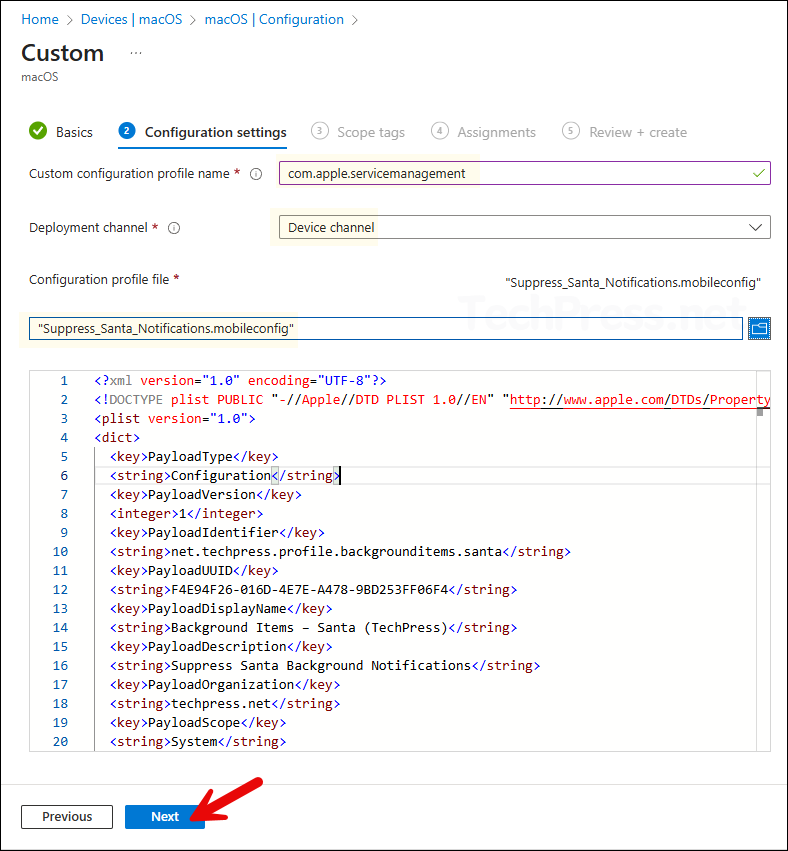
- Custom configuration profile name: com.apple.servicemanagement
- Deployment channel: Device channel
- Configuration profile file: Browse to the file Suppress_Santa_Notifications.mobileconfig. You can download it here: Suppress_Santa_Notifications.mobileconfig. Update the PayloadDisplayName, PayloadIdentifier, and PayloadOrganization values in the configuration file to match your organization’s name and domain.
- Scope tags (optional): A scope tag in Intune is an RBAC label you add to resources (policies, apps, devices) to limit which admins can see and manage them. For more Information, read: How to use Scope tags in Intune.
- Assignments: Assign the policy to Entra security groups that contain the target users or devices. As a best practice, pilot with a small set first; once validated, roll it out more broadly. For guidance on assignment strategy, see Intune assignments: User groups vs. Device groups.
- Review + create: Review the deployment summary and click Create.
6. Build Santa Configuration File (.mobileconfig)
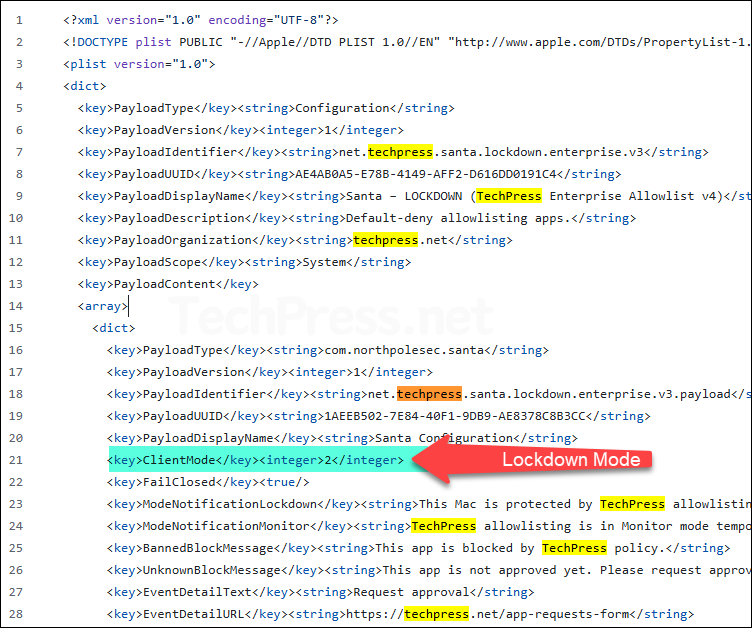
Now that we’ve set the foundation to deploy the Santa configuration, In the next steps i will create a .mobileconfig file. In this file, i will configure ClientMode to 2 (Lockdown) and create an AllowList of apps.
- ClientMode: Whether you will create an allowlist or denylist will depend upon the value of ClientMode. For example: If you set ClientMode value to 1, that means everything will be allowed to run on the device and you can create rules to block the execution of specific apps (DenyList). If you go with ClientMode value of 2, that means everything is blocked (except critical system files and Santa itself) and you can create rules to allow the execution of specific apps (AllowList). In summary:
- 1 (Monitor mode): Use it for creating a deny list.
- 2 (Lockdown mode): Use it for creating an allow list.
You can start with a ClientMode value of 1 (Monitor mode) and later switch to 2 (Lockdown mode) if needed. In the next steps, when I show you the demo, I will be using ClientMode value 2 (deny everything and create an allow list of apps).
- Identifier: Every allow or deny rule requires an identifier value. Identifier uniquely defines the app binary to which the rule will be applied. You can use any of the following four types of identifiers:
- TEAMID: Apple developer’s Team ID (e.g.,
UBF8T346G9). Matches all apps signed by the developer (e.g., Microsoft). - SIGNINGID: Apple developer’s Team ID followed by a colon and the app’s bundle identifier (e.g., UBF8T346G9:com.microsoft.Word). Uniquely identifier an app (across all its different versions).
- CDHASH: code directory hash of specific binary (hash string). One specific build of a app binary (changes if app is rebuilt)
- SHA256: SHA-256 hash of the binary file (full 64-character hash). One exact binary file (strongest, but breaks when app updates).
- TEAMID: Apple developer’s Team ID (e.g.,
To find the identifiers for an app, run the following command in the Terminal on a Mac where Santa and the app are already installed.
Find identifiers of an app
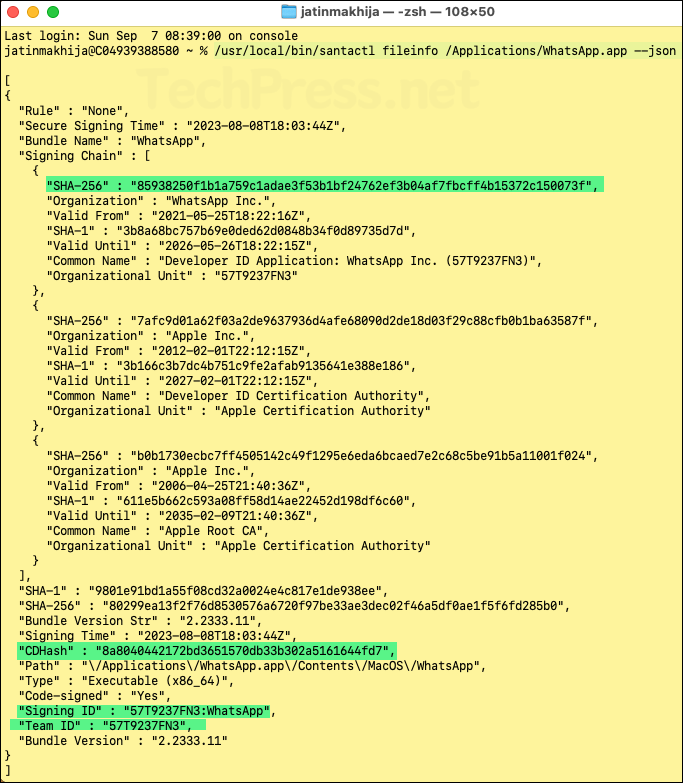
/usr/local/bin/santactl fileinfo /Applications/<AppName>.app --jsonFor example, to find all identifers of WhatsApp app installed on a Mac, execute below command.
[Example] Find all Identifiers of WhatsApp app
/usr/local/bin/santactl fileinfo /Applications/WhatsApp.app --json- SHA256 hash: If you want to create a rule based on SHA256, then i will recommend copy the leaf certificate SHA-256 value (application vendor certificate), as it will ensure that the updates to the app versions are covered by the rule automatically. In our example scenario, it is v85938250f1b1a759c1adae3f53b1bf24762ef3b04af7fbcff4b15372c150073f.
- Team Identifier: 57T9237FN3
- CDHash: 8a8040442172bd3651570db33b302a5161644fd7
- SIGNINGID: 57T9237FN3:WhatsApp
6.2 Create an Allow or Deny List of Apps
Depending on the ClientMode value, you can build an allow or deny list of apps. When you set the ClientMode to 2 (Lockdown mode), all apps are denied execution by Santa unless you specifically create rules to allow certain apps (an allow list).
In summary, If you use ClientMode value of 1, you can create a deny list, If you use ClientMode value of 2, you can create a allow list of apps. You can monitor the apps in use within your organization using Intune App Discovery and then create an allow list.
To create an allow or deny list of apps, I recommend preparing a document with the following information. Once you’ve gathered all the details, it becomes much easier to create and manage the configuration file.
- Prepare a list of all the apps you want to allow or deny.
- Decide on whether you want to allow or deny the app using its TEAMID, SIGNINGID, CDHASH or SHA256 value.
- Build a list of apps with their identifer information.
6.3 Create .mobileconfig file
A .mobileconfig file is an Apple configuration profile in XML format that defines and enforces policies, settings, and restrictions on macOS and iOS devices. You can build StaticRules inside this configuration file which defines which apps are allowed or denied.
You also have the option to add rules later (using santactl) by deploying a separate .mobileconfig file that defines the app rules. Note that static rules take priority over rules deployed dynamically.
- Download a sample file Santa-Lockdown-Enterprise-v4.mobileconfig.
Update the Config file
- Search for the word techpress and replace it with your organization’s name and domain.
- Update PayloadIdentifier: Use a string that matches your organization’s domain. Example: I used net.techpress.santa.lockdown.enterprise for my domain techpress.net.
- Update PayloadOrganization: Set this to your organization’s domain name.
- Update EventDetailURL (optional): When an app is blocked, Santa displays a block pop-up with the Request Approval button. When users click on it, it opens the link you specify in EventDetailURL. Create an app request process by setting up a self-service portal where users can submit their app requests. The form can then send the request to an admin for review and approval of the blocked app by making necessary changes in the mobileconfig file.
- Under StaticRules section, you can use <dict> tags and build a Allowlist or Denylist. As an example, with ClientMode value of 2 (Lockdown mode), I have created an Allowlist of below apps:
If you use SigningID or CDHash rules to allow only a specific binary, you must also allow any helper processes that the app relies on. For example, allowing Google Chrome with its SigningID EQHXZ8M8AV:com.google.Chrome won’t cover Chrome’s crashpad or helper binaries, and Santa will block them. To prevent these issues, either add separate rules for each helper or use the broader TeamID identifier to trust all components signed by the same developer.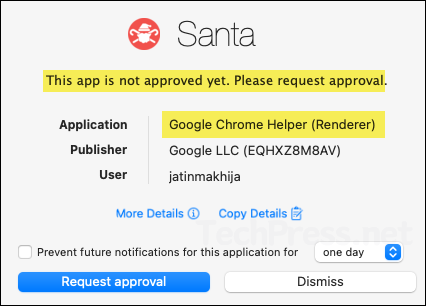
| Identifier | Rule Type | Apps Covered |
|---|---|---|
| UBF8T346G9 | TEAMID | Microsoft Corporation (Covers Microsoft 365 apps (Word, Excel, Outlook, Teams, OneDrive, Company Portal, Edge, Defender, etc.). Basically all Microsoft Apps. |
| BQR82RBBHL:com.tinyspeck.slackmacgap | SIGNINGID | Matches Slack App (all versions) |
| BJ4HAAB9B3:us.zoom.xos | SIGNINGID | Matches Zoom desktop client (all versions) |
| EQHXZ8M8AV | TEAMID | Matches Google chrome and its helper functions. |
| DE8Y96K9QP | TEAMID | Covers Cisco Secure Client / AnyConnect VPN and related tools |
| 2BUA8C4S2C | TEAMID | Covers all 1Password apps signed by AgileBits |
| EG7KH642X6 | TEAMID | Covers VMware apps and VMware Tools on macOS (Fusion, Workstation components) |

7. Deploy Santa Config File (.mobileconfig)
Now that we have created a .mobileconfig file that prevents the execution of any app on a Mac device except the ones in the AllowList (ClientMode = 2), we can deploy it by creating a custom Intune device configuration profile. Let’s go through the steps.
- Sign in to the Intune admin center > Devices > macOS > Configuration > Create > New Policy.
- Profile type: Templates
- Template name: Custom
- Configuration settings:
- Custom configuration profile name: Santa_Config_App_Allowlist
- Deployment channel: Device channel
- Configuration profile file: Browse to the file Santa-Lockdown-Enterprise-v4.mobileconfig (as created in the previous step). Click Next.
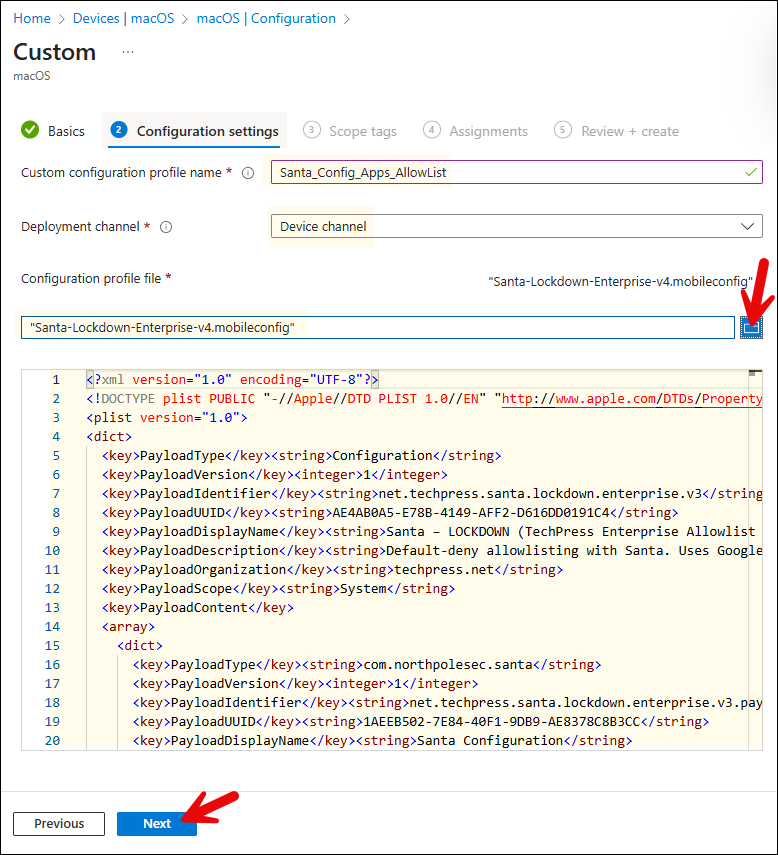
- Scope tags (optional): A scope tag in Intune is an RBAC label you add to resources (policies, apps, devices) to limit which admins can see and manage them. For more Information, read: How to use Scope tags in Intune.
- Assignments: Assign the policy to Entra security groups that contain the target users or devices. As a best practice, pilot with a small set first; once validated, roll it out more broadly. For guidance on assignment strategy, see Intune assignments: User groups vs. Device groups.
- Review + create: Review the deployment summary and click Create.
End User Experience
After you have deployed Santa-Lockdown-Enterprise-v4.mobileconfig file on Mac devices, you can verify if its working fine.
- Sign in to one of the target Mac device.
- Open System settings > General > Device Management > You will find Santa_Config_Apps_AllowList configuration in the profile list. Double-click on it to verify the Static rules and other values from the config file.
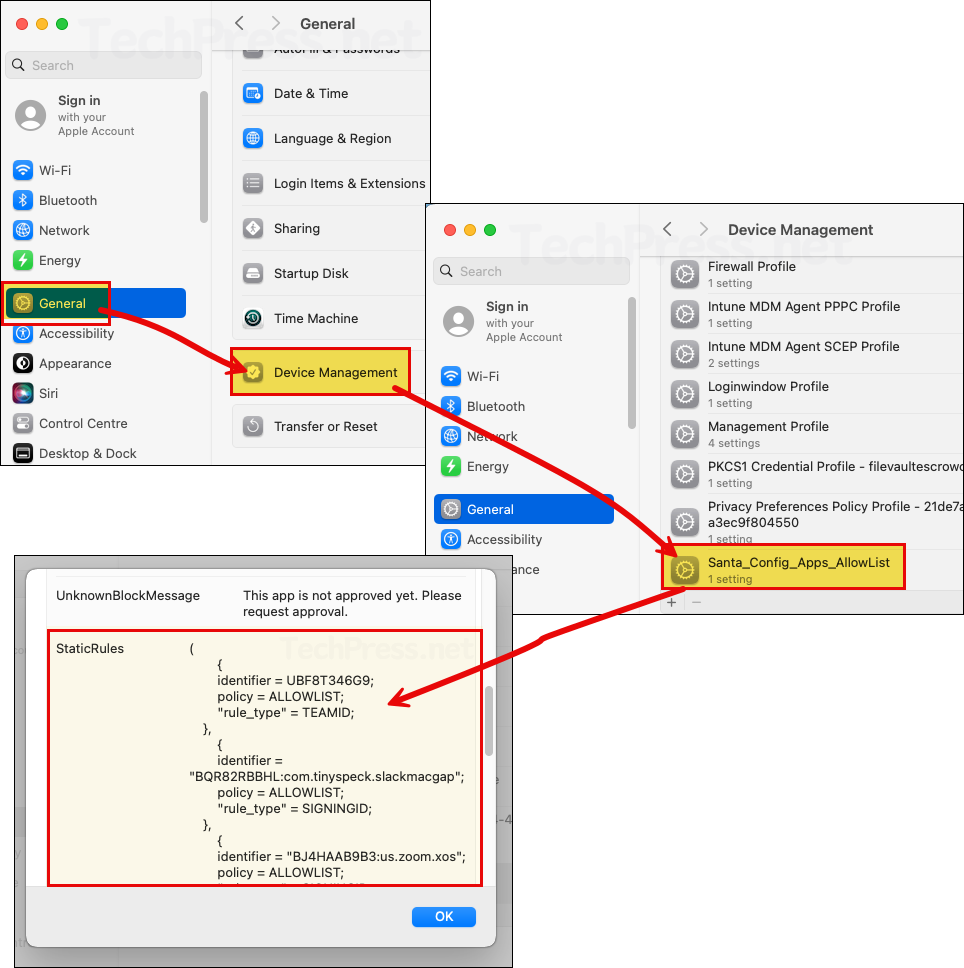
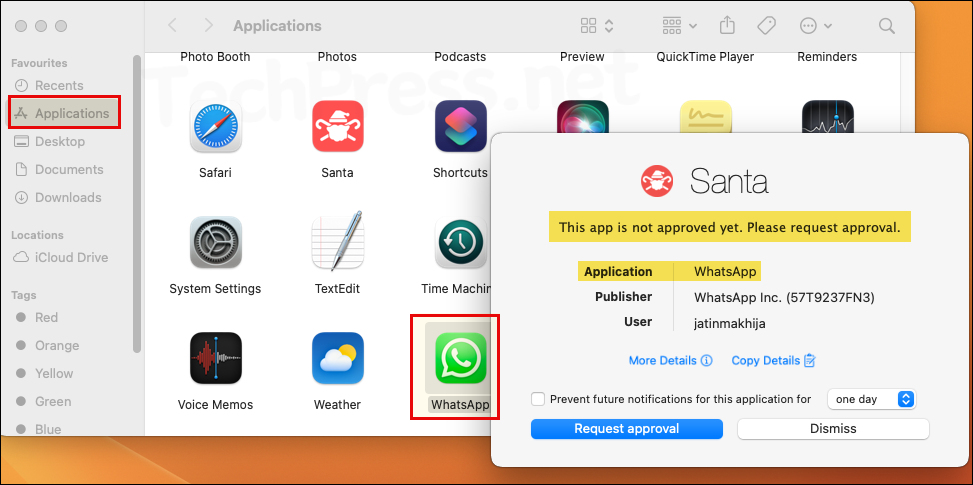
Let’s launch an app that is not part of the AllowList and see the end-user experience. For this demonstration, I deployed WhatsApp on a Mac device and tried to launch it. Since the app is not allowed, Santa displays a pop-up message: This app is not approved yet. Please request approval. You can prevent further block pop-ups by clicking on the checkbox Prevent future notifications for this application for: One day, One week or One month.
If you click the Request Approval button, it opens the link configured in the EventDetailURL of the config file. In my case, I set it to https://techpress.net/app-requests-form, so that URL will be launched.
Troubleshooting
In case of any issues, you can login on any of the target Mac device and investigate it using below commands:
Check Santa Installation
which santactl && santactl version
ls -l /Library/LaunchDaemons | grep -i santa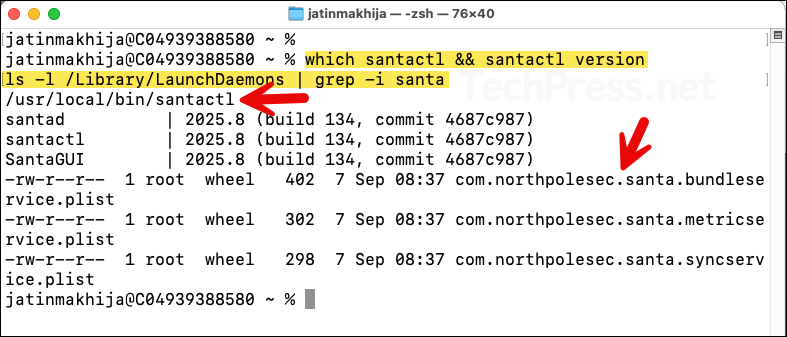
- Check Santa health using below commands.
santactl statuswill show its operating mode andsantactl doctorwill show if there are any related errors.
Check Santa Health
/usr/local/bin/santactl status
sudo /usr/local/bin/santactl doctor
Check if System extension is loaded and enabled
systemextensionsctl list | grep -i santa
Conclusion
Once you deploy the required Santa configuration, blocking apps and allowing only what you need becomes straightforward. You can update the .mobileconfig at any time to add to your allow list and redeploy it. Start in Monitor mode, then move to Lockdown. Use Intune app discovery to see which apps are in use on Macs and build your allow list accordingly. For more information, refer to the link: https://northpole.dev/intro/.