This blog post will help you get started with Azure PowerShell module. At the time of writing this blog post, the current version of Azure PowerShell is 14.2.0, release notes. After installing this PowerShell module, you can manage and administer Azure resources from PowerShell.
Azure PowerShell module, known as the Az PowerShell module, can be installed on Windows, Linux, and macOS devices. Microsoft recommends using PowerShell version 7 or higher when working with this module.
You can install Azure PowerShell module in two ways — directly from the PowerShell console or by using an MSI installer file. In the next sections, I’ll walk you through both methods step-by-step and also share an optimized way of Installing Az module.
Microsoft does not support having both the AzureRM and Az modules installed in Windows PowerShell 5.1 on the same device. AzureRM module was deprecated on February 29, 2024. If your device already has AzureRM PowerShell module installed, uninstall it first and then install the latest supported Az module.
Note
Contents
Prerequisites
- PowerShell version 7 or later (recommended).
Installing Azure PowerShell Module (Az)
As mentioned earlier, Azure PowerShell module (Az) is available for download and installation on multiple platforms, including Windows, Linux, and macOS. Regardless of the platform you are using, following commands will work to install this module on your device.
- Launch PowerShell console on your device and execute below commands to Install the latest version of Az PowerShell module. If you have not opened PowerShell console as administrator, then use the command with
-CurrentUserscope.
Check the current version of PowerShell
$PSVersionTable.PSVersionSet the Execution policy
Set-ExecutionPolicy -ExecutionPolicy RemoteSigned -Scope CurrentUserInstall Az PowerShell module (use on windows/linux/macOS)
Install-Module -Name Az -Repository PSGallery -ForceInstall Az PowerShell module (for CurrentUser scope)
Install-Module -Name Az -AllowClobber -Scope CurrentUser- AzureRM and Az PowerShell modules are not supported on the same system at the same time. Since AzureRM module is now legacy and no longer supported by Microsoft, you can safely uninstall it using the Uninstall-AzureRm command. We uninstall AzureRM after installing the Az module because the
Uninstall-AzureRmcommand becomes available only after the Az module is installed.
Check if you have AzureRM module Installed
Get-Module -Name AzureRM -ListAvailableUninstall AzureRM PowerShell module
Uninstall-AzureRmUpdate Az PowerShell module
Update-Module -Name Az -ForceConnect to your Azure Account
After successfully installing Az PowerShell module, you can connect to your Azure account using the Connect-AzAccount cmdlet. Once you execute this command, you will get prompted to sign-in for authentication. Enter your credentials and complete MFA.
Connect to Azure Account
Connect-AzAccount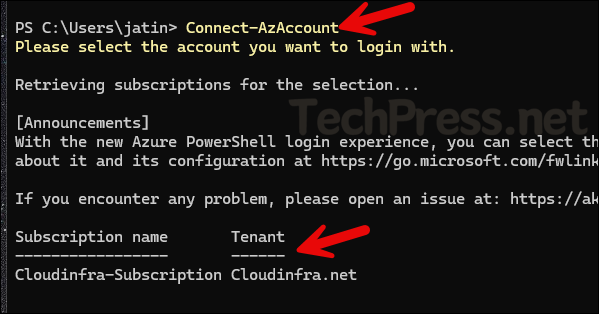
Immediately after connecting to your Azure account, run the Get-AzContext cmdlet to verify SubscriptionName, SubscriptionId, and Account information. This ensures you are connected to the correct subscription.
Get current context information
Get-Azcontext
Test and validate the connection using simple commands to retrieve basic information from your azure account.
Test your Azure connection using below simple commands
Get-AzSubscription - List all subscriptions

Get-AzResourceGroup - List all resource groups

Get-AzResource - List All Azure Resources

Get-AzAccount - Show your Azure account information

Get-AzLocation - Check Azure location availability
List all commands available in Az PowerShell module
Get-Command -Module Az.*List all commands available in specific Az module
Get-Command -Module Az.ComputeInstalling Azure PowerShell Module (Az): Using MSI
You can also install Azure PowerShell module using an MSI Installer file as well.
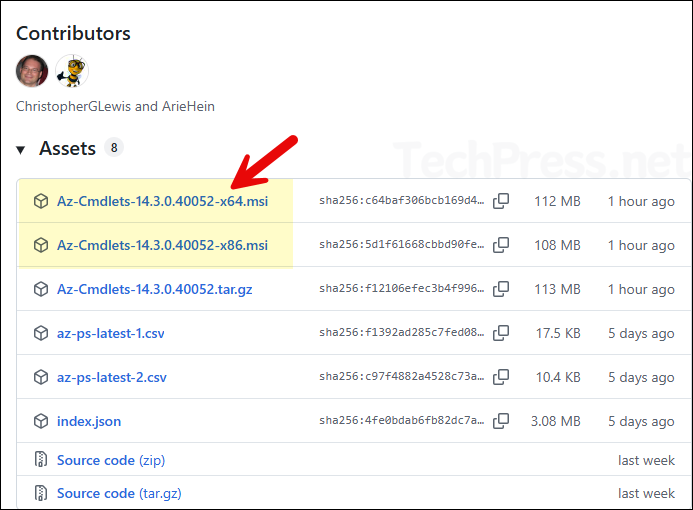
- Go to the website Github Azure PS releases.
- Scroll down on the page to find Az-cmdlets-<version>-x64.msi and Az-cmdlets-<version>-x86.msi files.
- Click on the files to begin download and Install it on your computer (You can deploy this MSI from Intune as well).
- Please note that if you are installing Az PowerShell module using MSI, you can uninstall it using Settings app or programs and features on your Windows device.
Optimized Installation of Az Module
An improved package manager, Microsoft.PowerShell.PSResourceGet, was introduced with PowerShell version 7.4. It can be used to install the Az PowerShell module in a more optimized and efficient way compared to PowerShellGet.
The Az PowerShell module contains one module per service, such as Az.Compute, Az.Network, and Az.Storage. Each of these service modules depends on the Az.Accounts module. When you use Install-Module (PowerShellGet) to install the Az PowerShell module, it will download and install the Az.Accounts module separately for each submodule.
However, when you use PSResourceGet, it downloads and installs the Az.Accounts module only once, making the installation process faster and more efficient.
Install Az PowerShell module using Install-PSResource
Install-PSResource -Name AzInstall Az Preview PowerShell module (Includes all GA and preview cmdlets)
Install-PSResource -Name AzPreviewInstall only the Az modules you require for your work
Install-PSResource -Name Az.StorageOffline Installation of Az PowerShell module
If your computer does not have internet access, and you want to install the Az PowerShell module, you can do so using an offline copy of the module downloaded from another computer with access to internet. For step-by-step PowerShell commands, refer to Microsoft learn link: Install from tar archive.
Uninstall Az PowerShell module
If you no longer need the Az PowerShell module on your computer, you can remove it by using the following PowerShell cmdlet: Uninstall-Module -Name Az. Note: If you installed the Az module using an MSI file, you should uninstall it via the Settings app or Programs and Features on Windows instead of using PowerShell.
Check currently installed Az module
Get-InstalledModule -Name Az*
Remove all versions of Az and its submodules
Get-InstalledModule -Name Az* | Uninstall-Module -AllVersions -ForceTroubleshooting
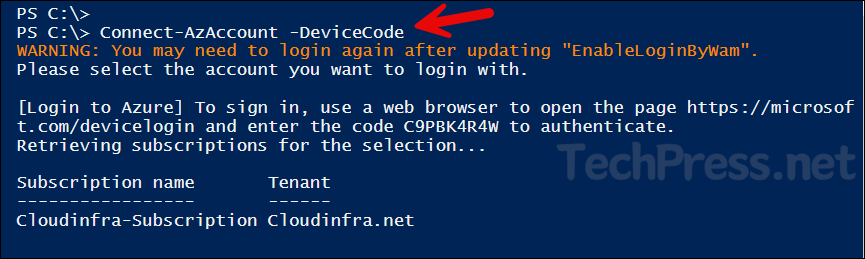
While working in PowerShell ISE and attempting to connect to my Azure account using the Connect-AzAccount cmdlet, I encountered an error message. To fix this, use Connect-AzAccount -DeviceCode to authenticate with Azure. You have to browse to the link and enter the code as shown on the console.
Connect-AzAccount : InteractiveBrowserCredential authentication failed: A
window handle must be configured. See
https://aka.ms/msal-net-wam#parent-window-handles
At line:1 char:1
- Connect-AzAccount
~~~~~
- CategoryInfo : CloseError: (:) [Connect-AzAccount], Authenticat
ionFailedException- FullyQualifiedErrorId : Microsoft.Azure.Commands.Profile.ConnectAzureRmA
ccountCommand