In this post, I will show you how to Fix BSOD Hypervisor Error in Windows 11. This blue screen of death (BSOD) error can occur when you have hypervisor software installed on your system, such as Hyper-V or VMware Workstation. When this issue appears, your PC will show a blue screen with an error message and reboot without giving you a chance to save your work. In the next section, I explain in detail what this error means, the different causes behind it, and several approaches to fix the issue.
This post focuses specifically on the HYPERVISOR_ERROR stop code. You can still follow this guide even if you are troubleshooting other BSOD issues, because some of the methods apply to general stop errors as well. Microsoft also provides a general troubleshooting guide for unexpected restarts and BSOD errors, and I recommend reviewing those basic steps to see if they help resolve your problem: Troubleshooting Windows unexpected restarts and stop code errors – Microsoft Support.
Contents
What is HYPERVISOR_ERROR?
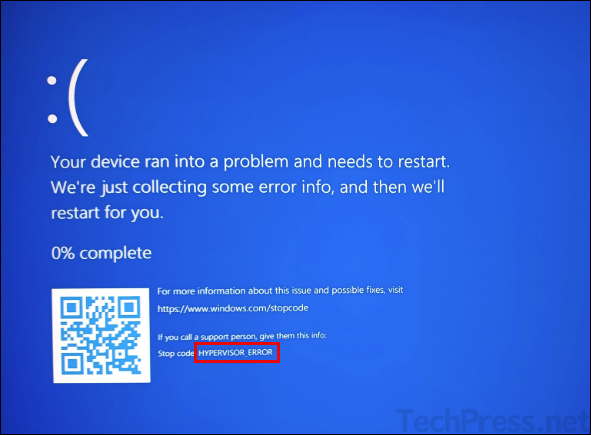
You will see a Stop code HYPERVISOR_ERROR on blue screen of death (BSOD) when hypervisor hits a fatal condition and forces the system to stop to prevent corruption. Hypervisor is the low-level virtualization layer used by Hyper-V, Windows Subsystem for Linux (WSL2), Virtual Machine Platform, Windows Hypervisor Platform, and security features like Virtualization-Based Security (VBS) and Core Isolation.
When something conflicts with that layer, such as a faulty driver, unstable firmware setting, or virtualization software mismatch, Windows may crash with this stop code. You may also see an error code 0x00020001 associated with this crash.
Below is the screenshot of the HYPERVISOR_ERROR which shows a generic message on the screen: Your device ran into a problem and needs a restart. We’re just collecting some error info, and then we’ll restart for you.
What is the Cause of HYPERVISOR_ERROR?
Below are the most common reasons which causes BSOD stop code HYPERVISOR_ERROR:
- Virtualization conflicts: When you have Hyper-V enabled while also using VMware or VirtualBox in a way that conflicts with Windows hypervisor APIs.
- Corrupted system files or Windows image: Damaged hypervisor binaries or virtualization stack can cause this error.
- VBS / Core Isolation incompatibility: Memory Integrity or other VBS components causing issues with older drivers or some gaming anti-cheat / kernel tools.
- Outdated or buggy BIOS / UEFI firmware: If BIOS is outdated or if it has been misconfigured, it could cause the Hypervisor error. Especially on newer Intel/AMD platforms where microcode updates impact virtualization.
- Unsupported Virtualization Hardware: To use the hypervisor on a Windows 11 device, you will need virtualization support (Intel VT-x or AMD-V). If your computer does not support this or if it has not been enabled at the BIOS/UEFI level, then it might cause the error.
- Corrupt Drivers: If the drivers on your PC are not up-to-date or corrupted, more specifically the ones which are directly used by the virtualization layer.
- Software Issues: If you are using an Anti-virus program or any other third-party software which conflicts with the virtualization process.
- General Hardware Incompatibility: In general, if the hardware is too old or does not support the virtualization capability, this issue could occur.
Investigating Hypervisor Errors
Now that we understand different causes of the HYPERVISOR_ERROR, I will show you several ways to begin your investigation. Before we look at the actual solutions to fix the issue, it is important to understand why the error occurred in the first place.
Analyse Memory Dump Files
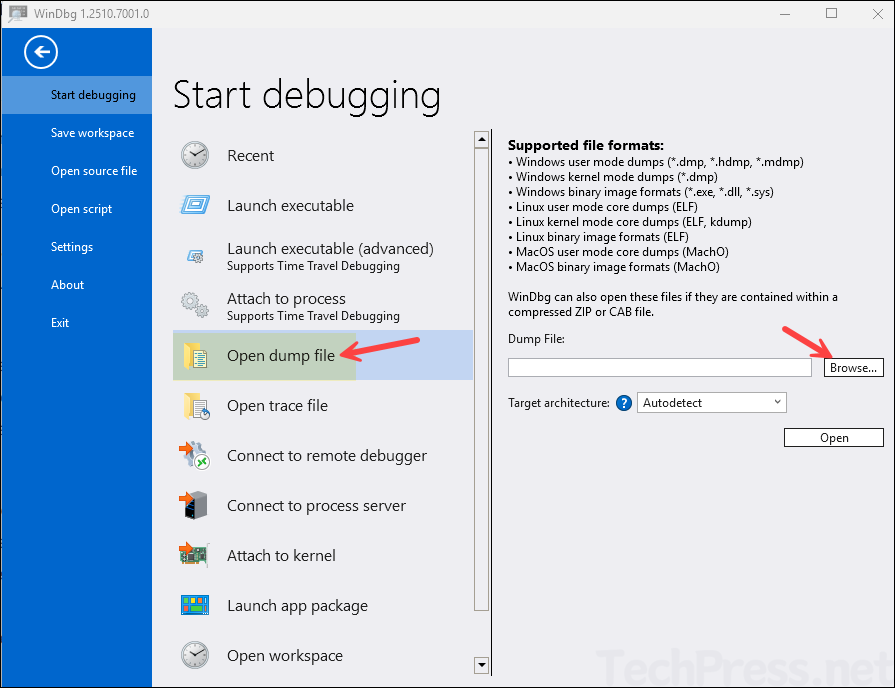
When a Windows device encounters a Blue screen of death (BSOD), a memory dump file is created automatically. You can use this dump file to investigate the root cause of the crash.
Memory dump files are stored at C:\Windows\Minidump\*.dmp. Go to the folder and open the latest dump file by using a tool called WinDbg or a third-party tool called BlueScreenView to analyze the dump files.
Below screenshot shows different options in the tool WinDbg including opening the memory dump files. Browse to the above location to select the dump file to analyze and find the root cause of the BSOD error.
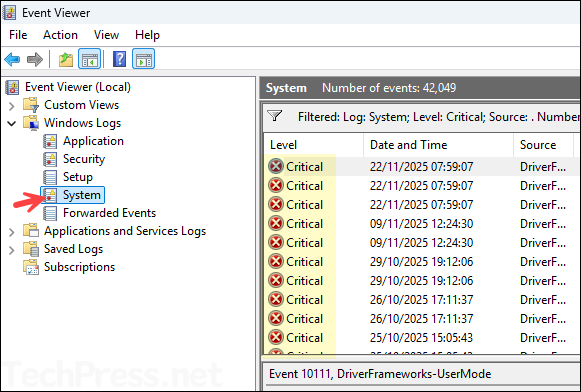
Review Event Logs
When a blue screen of death (BDOD) issue occurs, a critical event is logged in the event viewer. Open Event viewer > Go to Windows Logs > System and filter critical alerts. Go through the events to find the one related to the Hypervisor error.
How to Fix HYPERVISOR_ERROR
The starting point is always going to be investigating the error to find the root cause using the steps shown above. Once you know the root cause, you can take the action accordingly to fix this issue. For example, if you analyze the memory dump and find that one of the driver caused this crash, then you will either have to update or if possible remove the faulty driver.
In this section, I will show you general checks and troubleshooting approaches which could help you in fixing the hypervisor issues. There is no one solution which would work here, you will need to make sure that you are following the best practices and ensure everything is configured correctly on your device with respect to hypervisor.
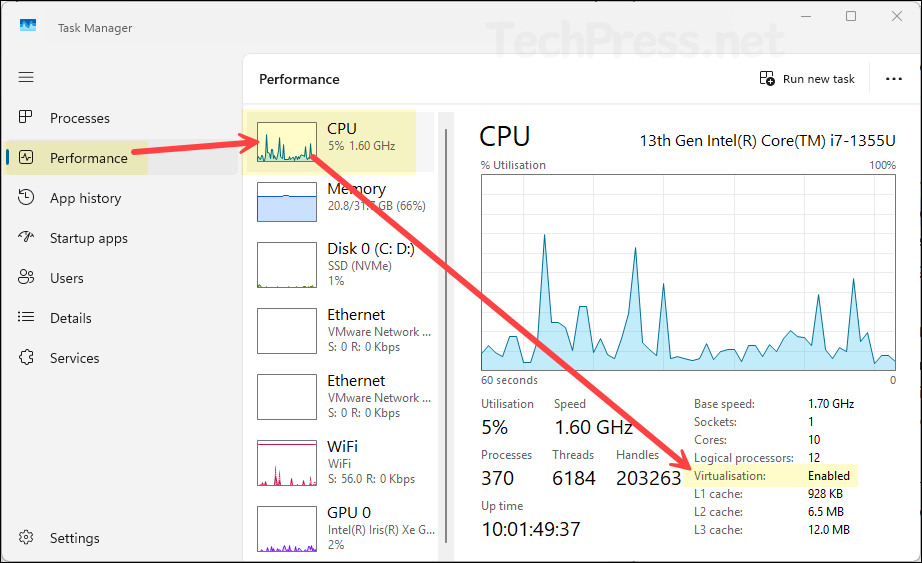
1. Enable Virtualization in BIOS/UEFI
Windows hypervisors like Hyper-V and WSL2 require CPU virtualization (Intel VT-x or AMD-V) to function. This was also listed as one of the possible causes of the issue. Therefore, make sure virtualisation is enabled in the BIOS or UEFI.
To check whether virtualisation is enabled on your Windows 11 device, press Ctrl + Shift + Esc to open Task Manager. Go to the Performance tab and select CPU. Look for Virtualization: Enabled/Disabled. If it shows Disabled, you will need to enable it in the BIOS, as explained in the next step.
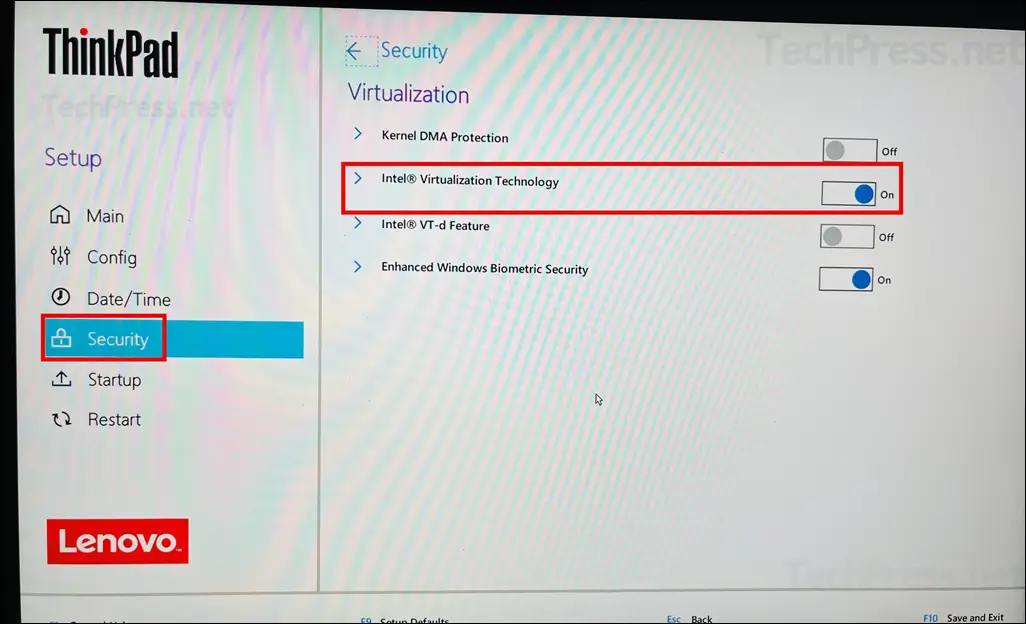
To enable virtualization from BIOS, hold the Shift key and click Restart to enter the Windows Recovery Environment (WinRE). From there, access BIOS. You can also use other methods to enter the BIOS if you prefer. In the BIOS settings, look for Intel Virtualization Technology and make sure the toggle is set to On.
I am using a ThinkPad laptop, so the option to configure Intel Virtualization Technology is located under Security > Virtualization. Depending on your BIOS version, device make, and model, this setting may appear in a different section. Check the advanced options or browse through all BIOS categories until you find it.
When discussing the possible causes of hypervisor errors, one of the reasons mentioned was incorrectly configured BIOS settings, such as an overclocked CPU. If you are unable to pinpoint the specific BIOS setting causing the issue, you can try resetting the BIOS to its default configuration. Most BIOS menus include an option to restore default settings. Select that option and then check if the issue is resolved.
2. Update BIOS Firmware and Drivers
You should regularly update your system’s BIOS or UEFI firmware and device drivers. This is not only helpful for fixing this issue, but is also a best practice to keep your system software up to date.
To update the BIOS or UEFI firmware, download the latest version from your OEM’s website and install it on your device. Similarly, use Device Manager in Windows 11 to identify any outdated drivers, especially those related to virtualization, and update them.
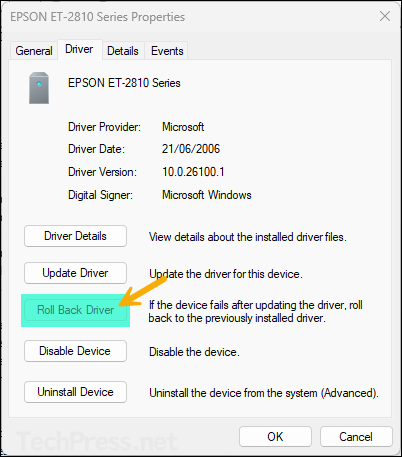
If you have done the memory dump analysis and found a faulty driver which has caused the crash, you can check if there is an updated version of the driver available. If not, try to roll back to its previous version using below steps:
- Press Win + X > select Device Manager. Find the driver category.
- Right-click the device and select Update driver > Search automatically.
- If the BSOD started after a driver update. Then right-click the driver > Properties > Driver tab > Roll Back Driver (see example screenshot).
- Reboot.
3. Repair System File Corruption
Launch Command Prompt as an administrator and check for any system file corruption. Run below commands in order to scan for corrupted files and restore them automatically. Reference: Using System File Checker in Windows – Microsoft Support.
Command 1
DISM /Online /Cleanup-Image /RestoreHealthCommand 2
sfc /scannow4. Disable or Remove Conflicting Softwares
When you run multiple virtualization solutions like Hyper-V and VMware on the same machine, it may result in BSOD HYPERVISOR_ERROR. To avoid this, make sure you are using only one virtualization platform on your device.
In some cases, third-party antivirus programs such as McAfee or Bitdefender can conflict with the hypervisor. As part of your troubleshooting, temporarily disable the antivirus solution you are using and check whether the issue is resolved. If disabling the antivirus fixes the problem, you will need to check with the antivirus vendor to confirm whether the product is compatible with virtualization software. You may find this information in AV product documentation.
5. Repair or Reinstall Hypervisor
This is another possible solution to fix hypervisor errors on your machine. However, repairing or reinstalling the hypervisor should not be your first troubleshooting step. Doing so can reset the hypervisor settings to their default state, which may require additional manual configuration afterward.
If you are using Hyper-V then try turning Hyper-V feature Off and On using below steps:
- Press Start and search and open Optional features > Click on More Windows features
- Uncheck Hyper-V, Windows Hypervisor Platform and Virtual Machine Platform.
- Restart your computer.
- Open Optional features and enable them again. Restart your computer again.
- Check and confirm if the issue is resolved.

If you are using VMware Workstation, go to Programs and Features to uninstall the software, then reinstall it. After reinstalling, check for and apply the latest updates for the application.
6. Install Latest Windows Updates
If your system is not updated with the latest security and feature updates, the issue may be caused by a system bug that led to the HYPERVISOR_ERROR. To check for updates, open the Settings app, go to Windows Update, and select Check for updates.
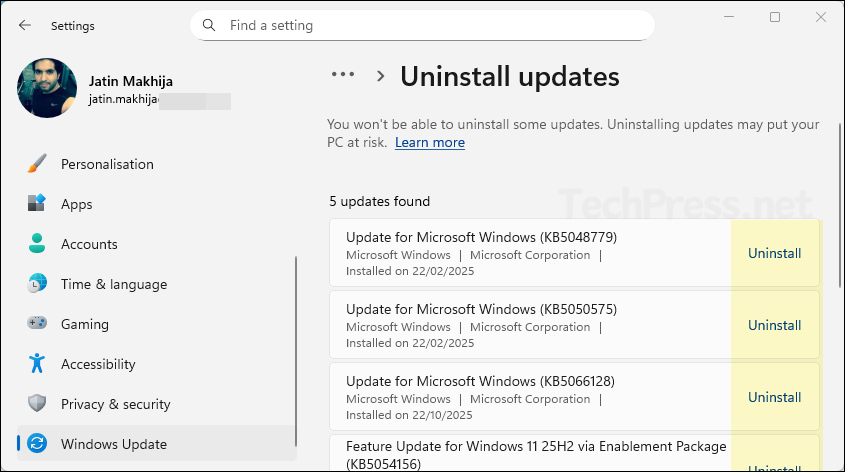
7. Remove faulty Windows Update
If you have already installed the latest updates and the issue is still not resolved, check whether a previous Windows update might be causing the problem. There is no easy way to identify a faulty update KB ID. Check with your team members to confirm whether the issue started after a recent patching event. If it did, uninstall the most recent update applied to the device and restart your computer to see if the issue is fixed. Then note down the KB ID of the update which caused this issue and plan to roll it back from other computers as well.
You can also try removing updates one by one, starting from the most recent patch and working backwards. Stop when the issue is resolved. This helps identify which particular update caused the problem.
To remove an update, go to Settings > Windows Update > Update history > Uninstall updates. Another method is to remove the update using PowerShell, and I have provided the steps for that in the post: Uninstall Windows Updates Using PowerShell.
8. Check for Hardware Compatibility Issues
In general, if your Windows PC is not compatible with virtualisation then you may get BSOD issues including HYPERVISOR_ERROR. Investigate it using the memory dump, event viewer methods as explained in the previous sections to confirm if its a hardware issue.
Check the make and model of your computer and find manufactures documentation which may provide more insight if your device is compatible with virtualisation technology or not.