In this blog post, I will demonstrate the steps to export Entra ID PIM role assignments report to CSV file. A PIM (Privileged Identity Management) role allows organizations to manage, control, and monitor access to important resources. Essentially, it enables just-in-time privileged access.
A PIM role may grant elevated rights to certain areas in Entra ID. For example, Application administrator role provides users access to create and manage all aspects of app registrations and enterprise apps. Therefore, leaving this role assigned to a user longer than the required time could pose security risk. If the work related to app registration is completed, you can remove the PIM role assignment for the user.
You can generate a PIM (Privileged Identity Management) role assignment report from Entra ID to review all users with privileged roles. This report helps identify users who may have been incorrectly assigned a PIM role, allowing administrators to take corrective action. Regularly generating and analyzing this report ensures better access control, reduces security risks, and helps maintain principle of least privilege by removing unnecessary role assignments. This proactive approach strengthens security and prevents unauthorized access to sensitive resources.
Contents
Export PIM role assignments from Entra ID
Let’s check the steps to export PIM role assignments report from Entra admin center:
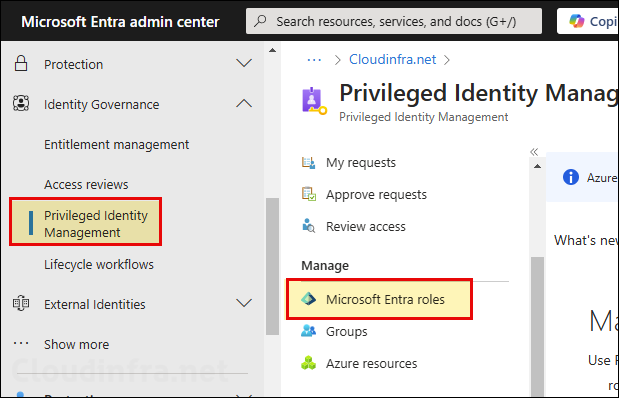
- Sign in to Microsoft Entra admin center > Identity > Identity Governance > Privileged Identity Management > Microsoft Entra roles.
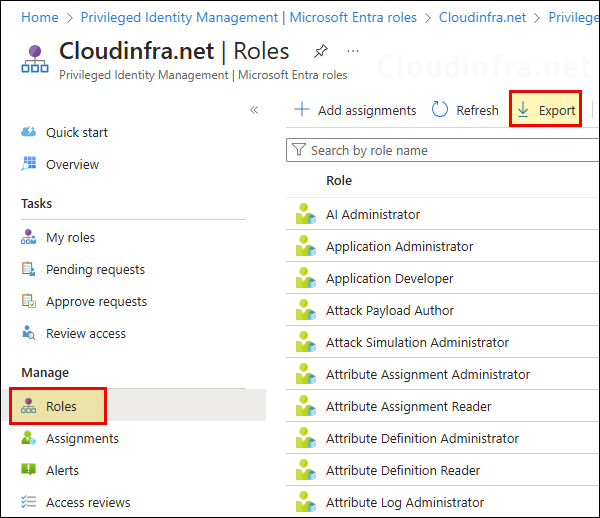
- Click on Roles > Export to export the PIM role assignments in a CSV file.
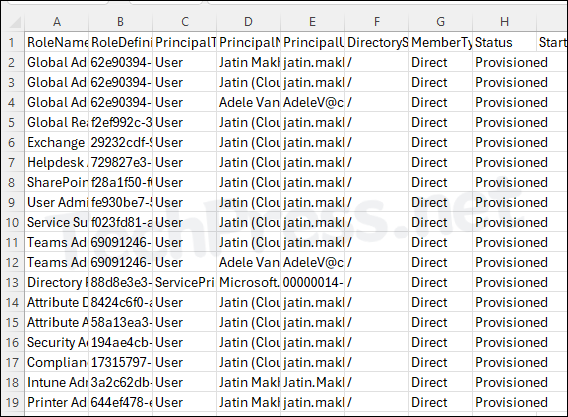
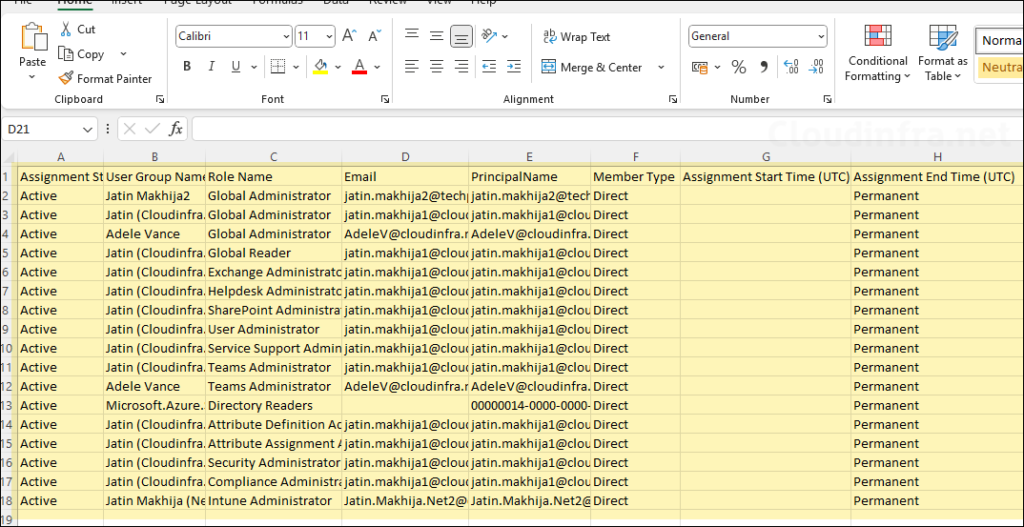
- Report has been exported successfully. In the CSV file, you will find the following Information:
- Assignment State
- User Group Name
- Role Name
- PrincipalName
- Member Type
- Assignment Start Time (UTC)
- Assignment End Time (UTC)
- Review the list for each user and check if a user should have the PIM role assigned or not. If a PIM role is not required for a user, you can remove the role and re-export the report. You can also keep a monthly copy of the report for record.
Export Entra ID PIM Assignments using PowerShell
You can follow the below steps to export Entra ID PIM assignments using PowerShell:
Install and Import Required Microsoft graph PowerShell module (more Installation methods)
Install-module Microsoft.Graph.Identity.Governance -Scope CurrentUser -Repository PSGallery -Force
Import-Module Microsoft.Graph.Identity.Governance
Connect to Microsoft Graph
Connect-MgGraph -Scopes "RoleManagement.Read.Directory" -NoWelcomeExport Eligible and Assigned PIM role assignments
We will use Get-MgRoleManagementDirectoryRoleEligibilitySchedule cmdlet, which is part of the Microsoft.Graph.Identity.Governance PowerShell module. According to the official definition, this cmdlet retrieves the schedule for a role eligibility operation.
For exporting assigned PIM role assignments, we will use Get-MgRoleManagementDirectoryRoleAssignmentSchedule cmdlet. It retrieve the schedule for an active role assignment operation.
Below script will export the CSV files: C:\Temp\Eligible_PIMRoles.csv and C:\Temp\Assigned_PIMRoles.csv. You can update the CSV file export location as per your requirement.
Export-Eligible-Assigned-PIM-Roles.ps1
$role=@{}; (Get-MgRoleManagementDirectoryRoleDefinition -All)|%{ $role[$_.Id]=$_.DisplayName }

Get-MgRoleManagementDirectoryRoleEligibilitySchedule -All |
  Select @{n='RoleName';e={$role[$_.RoleDefinitionId]}},RoleDefinitionId,PrincipalId,DirectoryScopeId,MemberType,Status,StartDateTime,EndDateTime |
  Export-Csv "C:\Temp\Eligible_PIMRoles.csv" -NoTypeInformation

Get-MgRoleManagementDirectoryRoleAssignmentSchedule -All |
  Select @{n='RoleName';e={$role[$_.RoleDefinitionId]}},RoleDefinitionId,PrincipalId,DirectoryScopeId,MemberType,Status,StartDateTime,EndDateTime |
  Export-Csv "C:\Temp\Assigned_PIMRoles.csv" -NoTypeInformation
Export Eligible and Assigned PIM role assignments (Github Script)
The above script works just fine, however it does not resolve user’s GUID to their actual display names. You can use the script Export_PIM_Roles.ps1 script which will provide you the roles with users display names for better readability. I have also copied the script code below for your reference:
Export_PIM_Roles.ps1
<#
.SYNOPSIS
Exports Entra ID (Azure AD) Privileged Identity Management (PIM) directory role
eligibility and assignment schedules to CSV.

.DESCRIPTION
Connects to Microsoft Graph (PowerShell SDK v2+), builds a role map (RoleDefinitionId -> RoleName),
retrieves PIM directory role eligibility and assignment schedules, and resolves each PrincipalId
to a User, Group, or Service Principal (with display name and UPN/Mail/AppId). Outputs two CSV files:

- C:\Temp\PIM_Eligible.csv
- C:\Temp\PIM_Assigned.csv

Notes:
- Uses the v2 SDK, which does not require Select-MgProfile (v1.0 is default).
- Exports *schedules* (who is eligible / assigned). For realized activations/time windows,
  consider the *ScheduleInstance* cmdlets instead.

.REQUIREMENTS
- PowerShell 5.1+ or PowerShell 7.x
- Microsoft Graph PowerShell SDK v2+  (Install-Module Microsoft.Graph -Scope CurrentUser)
- First-run admin consent for scopes
- Network access to login.microsoftonline.com / graph.microsoft.com

.PERMISSIONS
The script connects with:
- RoleManagement.Read.Directory   (read directory role management data)
- Directory.Read.All              (resolve users & groups)
- Application.Read.All            (resolve service principals; optional if not needed)

.OUTPUTS
CSV files with columns:
- RoleName, RoleDefinitionId
- PrincipalType (User | Group | ServicePrincipal | Unknown)
- PrincipalName, PrincipalUPN_Mail
- DirectoryScopeId, MemberType, Status
- StartDateTime, EndDateTime

.EXAMPLE
# Run interactively; will prompt for sign-in
Connect-MgGraph -Scopes "RoleManagement.Read.Directory","Directory.Read.All","Application.Read.All" -NoWelcome
# …then execute the script to produce:
#   C:\Temp\PIM_Eligible.csv
#   C:\Temp\PIM_Assigned.csv

.EXAMPLE
# If you only need GUIDs (faster; no principal resolution), drop extra scopes:
Connect-MgGraph -Scopes "RoleManagement.Read.Directory" -NoWelcome
# …and remove the principal-resolution section from the script.

.TROUBLESHOOTING
- "Select-MgProfile not recognized": Expected on SDK v2; the cmdlet was removed (no action needed).
- Empty or partial CSV: Ensure you used the -All switch on Graph list cmdlets and that your account
  has access to view PIM data.
- 403/Authorization errors: Confirm the scopes above were granted and admin-consented.
- Slow in large tenants: Principal lookups are per-unique ID. Consider batching with:
  Get-MgDirectoryObject -DirectoryObjectId @($ids) to reduce round-trips.

.LIMITATIONS
- Exports *schedules* (eligibility/assignment definitions). Use the corresponding
  *…ScheduleInstance* cmdlets for actual activation occurrences over time.
- Does not expand nested group membership; results reflect the principal recorded on the schedule.

.NOTES
Author   : Jatin Makhija
Version  : 1.0
LastEdit : 2025-08-13
License  : techpress.net

.LINK
Microsoft Graph PowerShell SDK               : https://learn.microsoft.com/graph/powershell/
Role management (directory) API overview     : https://learn.microsoft.com/graph/api/resources/rolemanagement-directory
PIM for directory roles (concepts)           : https://learn.microsoft.com/azure/active-directory/privileged-identity-management/pim-configure
#>


# Connect (v2 SDK – no Select-MgProfile needed)
Connect-MgGraph -Scopes "RoleManagement.Read.Directory","Directory.Read.All","Application.Read.All" -NoWelcome

# Role map (id -> display name)
$role = @{}
(Get-MgRoleManagementDirectoryRoleDefinition -All) | ForEach-Object { $role[$_.Id] = $_.DisplayName }

# Pull schedules
$elig = Get-MgRoleManagementDirectoryRoleEligibilitySchedule -All
$asgn = Get-MgRoleManagementDirectoryRoleAssignmentSchedule -All

# Build a principal resolver cache (User/Group/ServicePrincipal)
$principalMap = @{}
$principalIds = @($elig.PrincipalId + $asgn.PrincipalId) | Sort-Object -Unique
foreach ($id in $principalIds) {
    if (-not $id) { continue }
    $u = Get-MgUser -UserId $id -ErrorAction SilentlyContinue
    if ($u) { $principalMap[$id] = [pscustomobject]@{ Type='User';              Name=$u.DisplayName;           UPNorMail=$u.UserPrincipalName }; continue }

    $g = Get-MgGroup -GroupId $id -ErrorAction SilentlyContinue
    if ($g) { $principalMap[$id] = [pscustomobject]@{ Type='Group';             Name=$g.DisplayName;           UPNorMail=$g.Mail }; continue }

    $sp = Get-MgServicePrincipal -ServicePrincipalId $id -ErrorAction SilentlyContinue
    if ($sp){ $principalMap[$id] = [pscustomobject]@{ Type='ServicePrincipal';   Name=$sp.DisplayName;          UPNorMail=$sp.AppId }; continue }

    $principalMap[$id] = [pscustomobject]@{ Type='Unknown'; Name=$id; UPNorMail=$null }
}

# Export Eligible
$elig | Select-Object `
    @{n='RoleName';e={$role[$_.RoleDefinitionId]}},
    RoleDefinitionId,
    @{n='PrincipalType';e={$principalMap[$_.PrincipalId].Type}},
    @{n='PrincipalName';e={$principalMap[$_.PrincipalId].Name}},
    @{n='PrincipalUPN_Mail';e={$principalMap[$_.PrincipalId].UPNorMail}},
    DirectoryScopeId, MemberType, Status, StartDateTime, EndDateTime |
  Export-Csv "C:\Temp\PIM_Eligible.csv" -NoTypeInformation

# Export Assigned
$asgn | Select-Object `
    @{n='RoleName';e={$role[$_.RoleDefinitionId]}},
    RoleDefinitionId,
    @{n='PrincipalType';e={$principalMap[$_.PrincipalId].Type}},
    @{n='PrincipalName';e={$principalMap[$_.PrincipalId].Name}},
    @{n='PrincipalUPN_Mail';e={$principalMap[$_.PrincipalId].UPNorMail}},
    DirectoryScopeId, MemberType, Status, StartDateTime, EndDateTime |
  Export-Csv "C:\Temp\PIM_Assigned.csv" -NoTypeInformation
Output CSV files
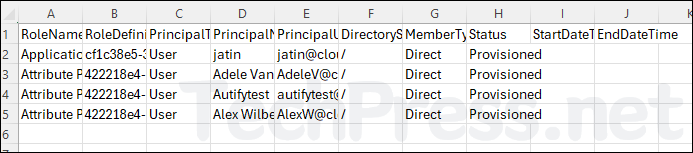
After executing Export_PIM_Roles.ps1 script, you can go to the C:\Temp\ location and open the respective CSV files. The script will list below details:
- RoleName
- RoleDefinitionId
- PrincipalType
- PrincipalName
- PrincipalUPN_Mail DirectoryScopeId
- MemberType
- Status
- StartDateTime
- EndDateTime