In this post, I will show you how to enable or disable Windows Sandbox in Windows 11. Windows Sandbox (WSB) is an optional Windows 11 feature that provides a lightweight, disposable desktop environment, essentially a clean Windows instance, designed for safely testing applications, scripts, and configuration changes without impacting the host system.
Windows Sandbox is especially useful when inspecting suspicious files, opening unfamiliar web links, or testing third-party or unknown software. Instead of using your primary Windows environment, you can run these items inside the sandbox and observe their behavior. When you close Windows Sandbox, all data, applications, and changes made within it are permanently discarded. Since Windows Sandbox relies on virtualization, supported hardware and virtualization features must be enabled before it can be used.
Starting with Windows 11, version 22H2, data is preserved through restarts initiated within the sandbox, useful for applications requiring a reboot.
Contents
General Prerequisites
- Windows edition: Windows Sandbox is supported on Windows 11 Pro, Enterprise, and Education (not available on Home). For more information, refer to the link: Windows Sandbox | Microsoft Learn.
- Hardware virtualization: CPU virtualization extensions must be supported and enabled in BIOS/UEFI (Intel VT-x/VT-d or AMD-V/IOMMU). Refer to the link to check and enable virtualization in BIOS/UEFI: Fix BSOD Hypervisor Error in Windows 11 [8 Fixes].
- Admin rights: You need local administrator permissions to enable/disable optional features.
Windows 11 OS Requirements
To enable Windows 11 Sandbox on your Windows 11 system, ensure the following prerequisites are met:
- Arm64 (for Windows 11, version 22H2 and later) or AMD64 architecture.
- At least 4 GB of RAM (8 GB recommended).
- At least 1 GB of free disk space (SSD recommended).
- At least two CPU cores (four cores with hyper-threading recommended).
By default, Windows Sandbox is disabled on Windows 11 devices. There are several ways to enable or disable it. Let’s explore each method and use the one that best meets your requirements.
Method 1: Enable or Disable Windows Sandbox via Settings
Follow the steps below to enable or disable Windows Sandbox on a Windows 11 device using Settings.
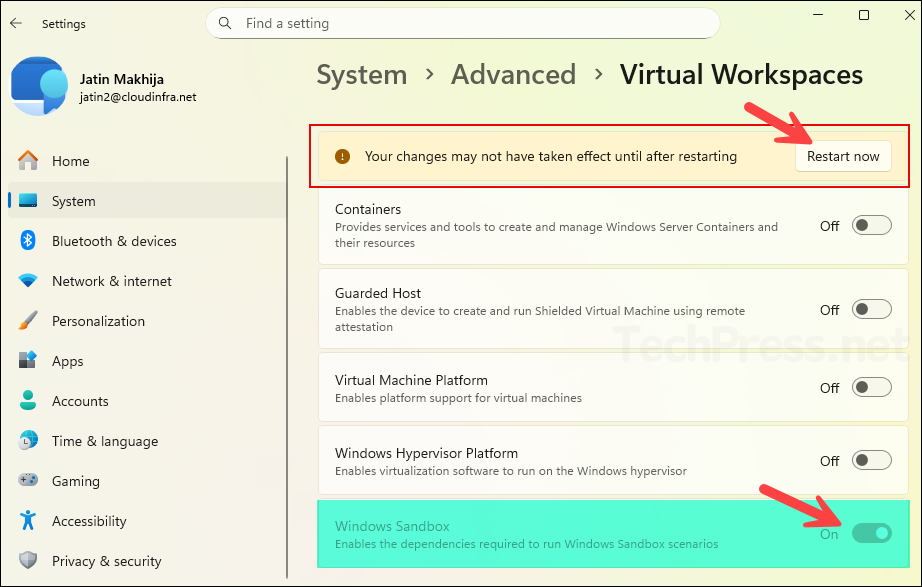
- Press Win + I to open the Settings.
- Go to System > Advanced > Virtual Workspaces.
- Use the toggle switch next to Windows Sandbox to enable or disable it. Restart the device.
Method 2: Enable or Disable Windows Sandbox via Optional Features
Another method to enable or disable Windows Sandbox is through Optional Features. Optional features are useful when you want to install or enable specific components that are not turned on by default but are available on the Windows device. I previously demonstrated the use of Optional Features when installing the Group Policy Management Console on Windows 11. Refer to the guide: How to Install RSAT on Windows 11.
To open the optional features and enable or disable Windows Sandbox, follow the steps below:
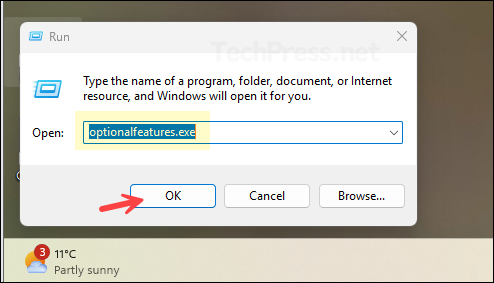
- Press the Win + R keys to open the Run dialog box.
- Type OptionalFeatures.exe and press Enter to open the Windows Features window.
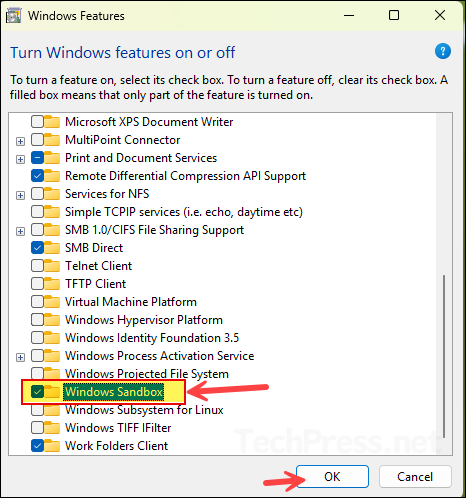
- Scroll down the list of features and select Windows Sandbox, then click OK to enable it. If it is already enabled and you want to disable it, simply clear the checkbox, click OK, and restart the device.
Method 3: Enable or Disable Windows Sandbox via PowerShell
You can use a quick one-liner PowerShell command to enable or disable Windows Sandbox on a Windows 11 computer. Open PowerShell as administrator and run the below commands to enable or disable Windows Sandbox.
Enable Windows Sandbox
Enable-WindowsOptionalFeature -Online -FeatureName "Containers-DisposableClientVM" -AllAfter you run Enable-WindowsOptionalFeature, it will prompt you to confirm if you want to restart your computer. Enter Y to restart and N to restart later.

Disable Windows Sandbox
Disable-WindowsOptionalFeature -Online -FeatureName "Containers-DisposableClientVM"Method 4: Enable or Disable Using DISM (Command Prompt)
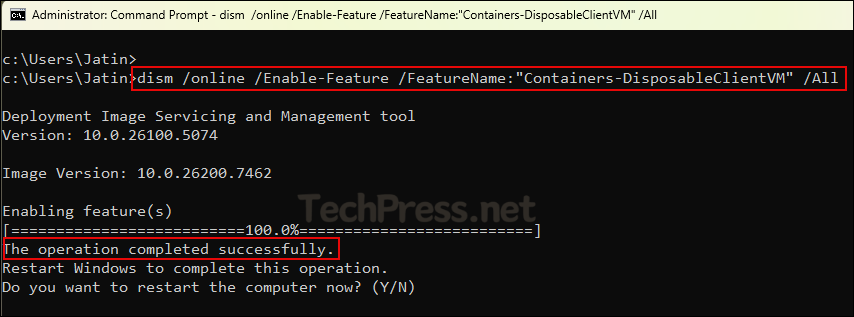
Another way to enable or disable Windows Sandbox on a Windows 11 computer is by using the command prompt. More specifically, using DISM.exe (Deployment Image Servicing and Management). On the device where you want to enable or disable Windows Sandbox, open the Command Prompt (cmd.exe) window as an administrator and run below commands to enable or disable Windows Sandbox.
Enable Windows Sandbox
dism /online /Enable-Feature /FeatureName:"Containers-DisposableClientVM" /AllThe screenshot below shows the execution of the command above. It installs Windows Sandbox successfully and requires a system restart. Enter Y to restart the system immediately or N to restart it later.
Disable Windows Sandbox
dism /online /Disable-Feature /FeatureName:"Containers-DisposableClientVM"Limitations of Windows Sandbox
Windows Sandbox has certain limitations, which are listed below:
- Not available on all editions: Windows Sandbox is not supported on Windows 11 Home.
- Requires hardware virtualization: If virtualization is not supported or is disabled in BIOS/UEFI, Sandbox will not run.
- Performance overhead: Because it uses virtualization, Sandbox can be slower on low-RAM/low-CPU devices and can impact performance while running.
- No persistence by design: Any apps installed, files created, or configuration changes made inside Sandbox are discarded when you close it. You must export anything you want to keep before closing.
- Limited hardware access: Peripheral passthrough is limited. Some hardware-dependent workflows (specialized USB devices, GPU-dependent apps, certain drivers) may not behave the same as on the host.
- Not ideal for driver or kernel-level testing: Scenarios involving drivers, kernel components, or deep OS-level changes are not reliable for validation in Sandbox.
- Networking considerations: Sandbox uses a virtualized network adapter, and its networking can be restricted or impacted by organizational security controls. Some environments may block or limit outbound access.
- Potential conflicts in highly restricted environments: Certain enterprise security baselines, virtualization-based security configurations, or hypervisor restrictions can prevent Sandbox from starting.
- Not a replacement for full isolation: It improves safety for ad-hoc testing, but it is not equivalent to a fully isolated physical machine or dedicated lab environment for high-risk analysis.
Conclusion
Windows Sandbox is a useful feature for quickly testing applications, scripts, and configuration changes in a clean and disposable Windows environment. In Windows 11, you can enable or disable it using the Windows Features UI, the Settings app, PowerShell, or DISM. For more information about Windows Sandbox, refer to the Microsoft documentation: Windows Sandbox | Microsoft Learn.