In this blog post, I will show you 8 ways to enable Memory Integrity on Windows 11 devices. Memory Integrity (also called Hypervisor-protected Code Integrity, or HVCI) is a Windows 11 security feature that uses virtualization-based security (VBS) to protect the Windows kernel from malicious or untrusted code.
In simpler terms: it makes sure only trusted, properly signed drivers and kernel-mode code can run, blocking many rootkits and bring-your-own-vulnerable-driver (BYOVD) attacks. For more details on Memory Integrity, refer to the link: Enable virtualization-based protection of code integrity.
Contents
Key Features of Memory Integrity
- Hypervisor-isolated code integrity (HVCI/VBS) to protect kernel trust decisions.
- Blocks untrusted kernel drivers (unsigned, tampered, or incompatible).
- Mitigates kernel-level malware and BYOVD ((Bring Your Own Vulnerable Driver) or rootkit attacks.
- Works with Secure Boot and virtualization for layered protection.
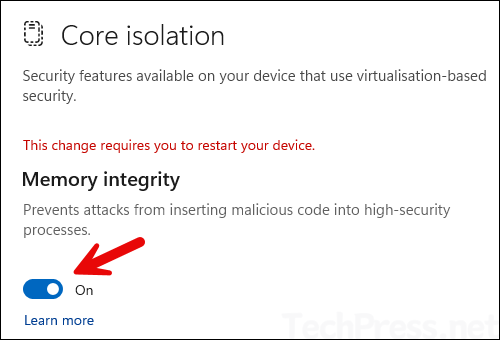
1. Enable Memory Integrity using Windows Security App
Follow the below steps to enable memory integrity on Windows 11 devices using Windows security app.
- Open Windows Security App > Device security > Core isolation > Click Core isolation details link > Memory integrity. Set the toggle switch to On.
2. Enable Memory Integrity using Intune
Follow the below steps to enable memory integrity on Windows 11 devices using Microsoft Intune.
1. Sign in to the Intune Admin center. Select Devices > Windows > Configuration Profiles > Create > New Policy.
2. Platform: Windows 10 and later and Profile Type: Settings Catalog
3. Under Configuration settings > Settings picker > Select Hypervisor-Protected Code Integrity. Set it to (Enabled with UEFI lock) Turns on Hypervisor-Protected Code Integrity with UEFI lock.

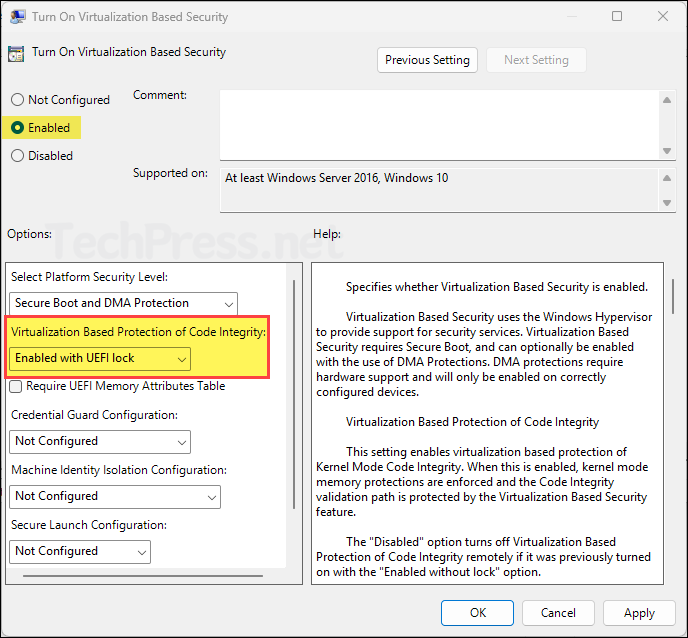
3. Enable Memory Integrity Using Local Group Policy Editor (gpedit.msc)
Follow the below steps to enable memory integrity on Windows 11 devices using local group policy editor (gpedit.msc).
- Press Windows + R keys to open the Run dialog box.
- Type gpedit.msc and press Enter to open Local group policy editor.
- Navigate to Computer Configuration > Administrative Templates > System > Device Guard.
- Double-click Turn on Virtualization Based Security. Select Enabled and set Virtualization Based Protection of Code Integrity to Enabled with UEFI lock.
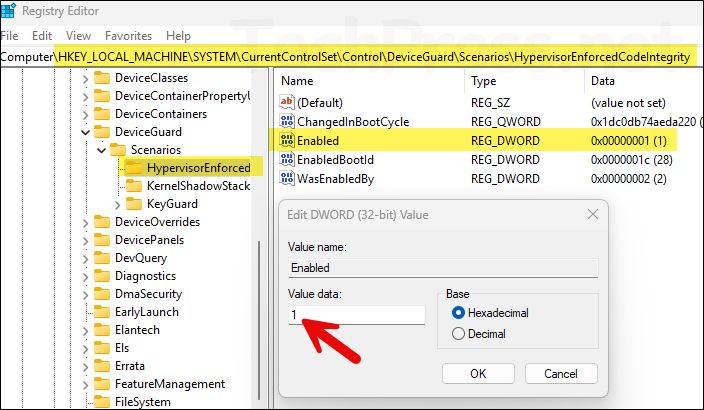
4. Enable Memory Integrity Using Registry Editor
Follow the below steps to enable memory integrity on Windows 11 devices using Windows registry editor (regedit).
- Open the registry editor on the target device.
- Navigate to HKEY_LOCAL_MACHINE\SYSTEM\CurrentControlSet\Control\DeviceGuard\Scenarios\HypervisorEnforcedCodeIntegrity. Double-click on Enabled entry and set its value to 1.
5. Enable Memory Integrity Using Group Policy
This one is similar to local group policy editor, except that a GPO can be applied to an active directory OU to target multiple devices at once.
- Login to a domain controller.
- Open Group policy management console (gpmc.msc).
- Create a new GPO and navigate to Computer Configuration > Policies > Administrative Templates > System > Device Guard.
- On the right-hand side, find Turn on Virtualization Based Security. Edit it and set it to Enabled with UEFI lock.
6. Enable Memory Integrity using SCCM
You can also enable Memory integrity on Windows 11 devices using SCCM by following below steps:
- Verify prerequisites (UEFI, Secure Boot, virtualization enabled) and resolve incompatible drivers.
- Create a Configuration Item (CI) to detect and enforce Memory Integrity (HVCI).
- Add the CI to a Configuration Baseline and enable remediation.
- Deploy the baseline to a pilot collection on a recurring schedule.
- Orchestrate a reboot (baseline, client notification, or separate task).
- Monitor compliance reports, validate results, then roll out to production.
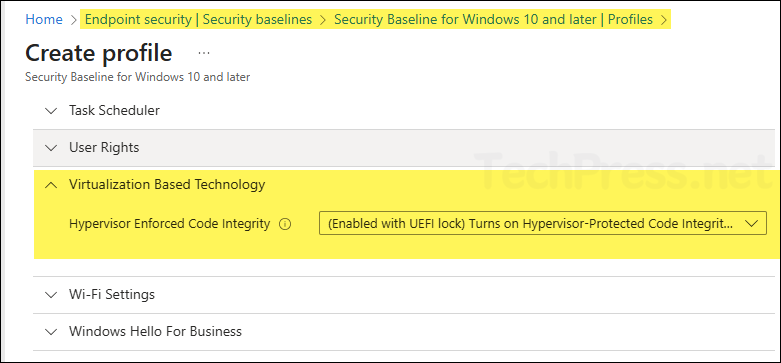
7. Using Intune Security Baseline
You can create an Intune security baseline policy to enable memory integrity. Go to Intune admin center > Endpoint security > Security baselines.
8. Unattended/Imaging (Microsoft-Windows-DeviceGuard)
In your deployment image/answer file, configure Microsoft-Windows-DeviceGuard component to enable VBS and HVCI (and required platform features). Apply during image build or first-boot; reboot completes enablement.
9. Enable or Disable Memory Integrity via PowerShell
You can also enable or disable Memory integrity using PowerShell. Open PowerShell console as an administrator and execute below commands:
Enable Memory Integrity
Set-ItemProperty -Path 'HKLM:\SYSTEM\CurrentControlSet\Control\DeviceGuard\Scenarios\HypervisorEnforcedCodeIntegrity' -Name Enabled -Type DWord -Value 1Disable Memory Integrity
Set-ItemProperty -Path 'HKLM:\SYSTEM\CurrentControlSet\Control\DeviceGuard\Scenarios\HypervisorEnforcedCodeIntegrity' -Name Enabled -Type DWord -Value 0Verify Memory Integrity using PowerShell
Use below PowerShell code snippet to verify if Memory Integrity has been enabled on your device.
Verify_Memory_Integrity.ps1
$dg = Get-CimInstance -Namespace root\Microsoft\Windows\DeviceGuard -ClassName Win32_DeviceGuard

[pscustomobject]@{
  VBSStatus      = $dg.VirtualizationBasedSecurityStatus   # 0=Off, 1=Enabled, 2=Running
  HVCI_Configured= ($dg.SecurityServicesConfigured -contains 2)
  HVCI_Running   = ($dg.SecurityServicesRunning   -contains 2)
}
Output
VBSStatus HVCI_Configured HVCI_Running
--------- --------------- ------------
        2            True         True