In this post, I will show you how to enable/disable transparency effects in Windows 11. Transparency Effects is a Windows 11 visual feature that adds a subtle blur and see-through look to areas like the taskbar, Start menu, quick settings, and some app surfaces.
It is part of Microsoft’s Fluent Design, making the UI feel modern and layered. While many users like the aesthetic, others prefer turning it off to improve performance on older PCs, reduce distractions, or save a bit of battery on laptops. The good news is that Windows 11 lets you toggle transparency quickly, and there are also registry and command-line methods for admins or power users.
Windows uses visual materials and effects that give UI elements a more realistic, physical appearance. These materials fall into two main categories: occluding and transparent. Occluding materials, such as acrylic and mica, are used as base layers beneath interactive UI elements. Transparent materials, such as smoke, are used to highlight immersive or layered surfaces. For more information about how Windows 11 uses these materials and how they look, refer to Microsoft’s documentation: Materials used in Windows apps – Windows apps | Microsoft Learn.
Contents
What Happens When you Enable or Disable Transparency Effects
When you toggle Transparency Effects in Windows 11, you are basically switching between a blurred see-through UI and a solid color UI. Here’s what changes in practice:
If You Enable Transparency Effects (Prettier Fluent blur/see-through UI)
When you enable transparency effects, you’ll notice a subtle transparency / blur (Acrylic or Mica style) applied to below supported system surfaces. Windows looks more modern and layered because parts of your wallpaper faintly show through those UI areas. The change applies instantly when you flip the toggle.
- Taskbar.
- Start menu and Start/search panels.
- Quick Settings and Notification Center.
- Settings app sidebars and some flyouts.
- Some built-in apps that support Fluent materials.
If You Disable Transparency Effects (Solid, Simpler UI)
Windows switches those same areas to opaque, solid colors. The desktop looks simpler and more uniform, with no wallpaper see-through.
- Taskbar and Start does not have the blur/see-through look.
- Flyouts look flatter and more basic.
- Overall UI becomes cleaner and less visually busy.
Method 1: Enable/Disable Transparency Effects via Settings App
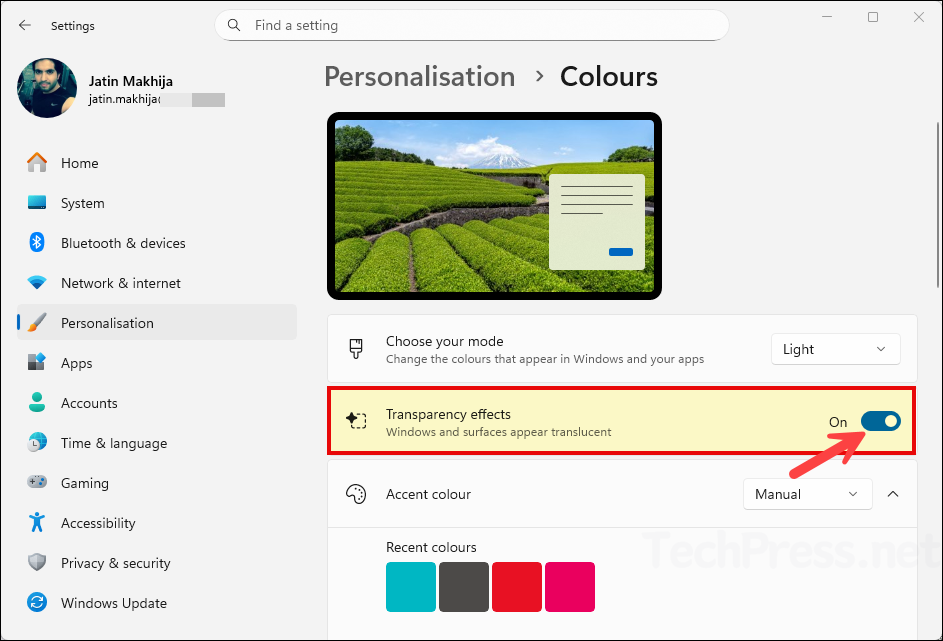
There are several methods to manage transparency effects setting on Windows 11 devices. One of the first ways is we will see is the use of Settings app > Personalization settings.
- Press Win + I to open Settings. Go to Personalization. Click Colours. Scroll down to Transparency effects.
- Toggle it On to enable transparency or off to disable it.

Method 2: Enable/Disable Transparency Effects via Accessibility
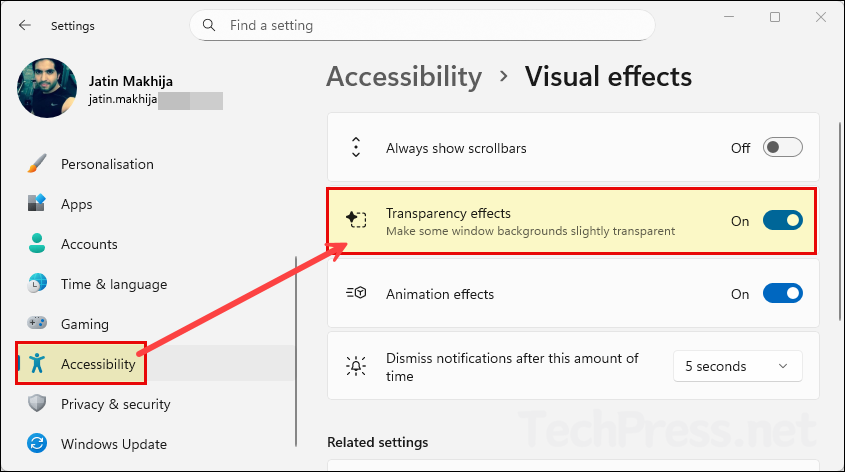
Windows 11 also exposes the same toggle in Accessibility. This method is especially useful for users who are customizing visuals for focus or accessibility reasons.
- Press Win + I to open Settings > Go to Accessibility > Select Visual effects.
- Toggle Transparency effects On or Off.

Method 3: Enable/Disable Transparency Effects via Registry Editor
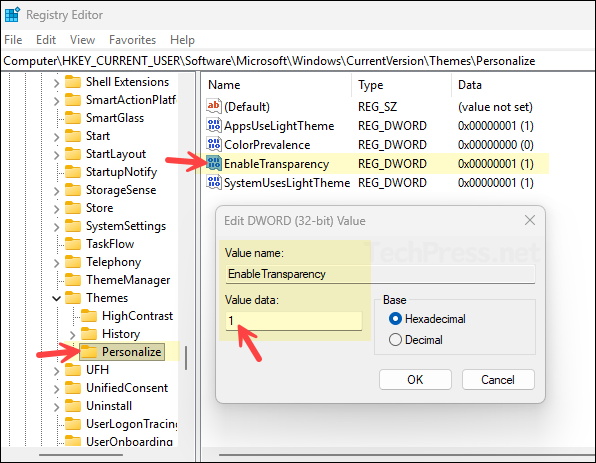
Use this if the Settings UI is unavailable or if you want a direct per-user configuration. This method is more advanced and can be used by IT administrators to manage this setting across multiple Windows 11 devices.
- Press Win + R, type regedit, press Enter to open the Windows registry editor.
- Navigate to below registry location:
HKEY_CURRENT_USER\Software\Microsoft\Windows\CurrentVersion\Themes\Personalize- In the right pane, find EnableTransparency (If it does not exist, right-click and create a new DWORD (32-bit) Value named EnableTransparency).
- Double-click EnableTransparency and set:
- 1 = Enable transparency
- 0 = Disable transparency
- Click OK and restart Windows Explorer or sign out and sign back in if needed to apply this change.

Method 4: Enable/Disable Transparency Effects via Command Prompt
You can also use Command Prompt to enable or disable transparency effects on a Windows 11 devices. For this, we will use the reg add command, which modifies the same registry value we saw in the previous section, but through the command line.
- Sign in to the Windows 11 computer.
- Open Command prompt as an administrator and run below commands to enable or disable transparency effects.
Enable Transparency Effects
reg add "HKCU\Software\Microsoft\Windows\CurrentVersion\Themes\Personalize" /v EnableTransparency /t REG_DWORD /d 1 /fDisable Transparency Effects
reg add "HKCU\Software\Microsoft\Windows\CurrentVersion\Themes\Personalize" /v EnableTransparency /t REG_DWORD /d 0 /fAfter you run the command, you will need to sign out and sign back in once to apply the change. If you do not want to sign out, then you have to close the explorer process on your device and restart it using below command. Make sure to save your work before you run below command.
Kill explorer.exe and Start again
taskkill /f /im explorer.exe & start explorer.exeMethod 5: Enable/Disable Transparency Effects via PowerShell
You can also use a PowerShell script to enable or disable transparency effects. This is especially useful if you want to deploy the change to multiple Windows 11 devices using Intune or Group Policy. Below is the main code you can run to enable or disable transparency effects on Windows 11. You can place this code in a .ps1 file and deploy it through Intune or GPO.
- Sign in to the Windows 11 computer.
- Open PowerShell as an administrator and run below commands to enable or disable transparency effects.
Enable transparency
Set-ItemProperty -Path "HKCU:\Software\Microsoft\Windows\CurrentVersion\Themes\Personalize" -Name EnableTransparency -Type DWord -Value 1Disable transparency
Set-ItemProperty -Path "HKCU:\Software\Microsoft\Windows\CurrentVersion\Themes\Personalize" -Name EnableTransparency -Type DWord -Value 0Troubleshooting
If you experience issues when turning transparency effects on or off, you can follow the below troubleshooting steps to help identify and resolve the problem.
- When you use the toggle for transparency effects in the Settings app, the change is applied immediately. However, if you use any other method and do not see the change take effect, sign out of the device and sign back in to check again.
- Ensure that your Windows 11 device is activated. If it is not activated, you may not be able to manage transparency effects, as Windows must be activated to allow personalization features.
- No transparency even when enabled: Some visual effects are reduced if Accessibility > Visual effects > Animation effects or other performance related options are disabled, or if Windows is in a reduce visual effects mode.
- Performance still feels slow after disabling: Transparency is only one small GPU effect. Consider also turning off Animation effects and Visual effects under Accessibility, or check for driver issues.
- Remote/VDI sessions look different: In RDP, AVD, or VDI, Windows may automatically limit transparency for performance, even if the toggle is on.
