In this post, I will show you 2 ways to disable Security defaults in Entra ID. Security defaults provide out-of-the-box protections such as blocking legacy authentication and requiring MFA. They are great for small or new tenants that do not have Conditional Access.
Many organizations grow beyond these basics and need granular controls, staged rollouts, and exceptions. In those cases, you will typically switch from security defaults to Conditional Access so you can enforce stronger, targeted policies without breaking critical workflows.
Contents
Why should you disable Security Defaults?
Disable security defaults only when you will replace them with equal or stronger controls. Common reasons:
- You require granular MFA enforcement with Conditional Access policies.
- You must exempt service accounts, break-glass accounts, or specific apps from MFA.
- You require location, device state, sign-in risk, or session controls not possible with security defaults.
- You are integrating third-party identity or MFA solutions.
- You require staged rollouts, pilot groups, or per-app enforcement.
- You want to unblock secure non-interactive flows that are impacted by security defaults
Important: Turning security defaults off without replacing them increases risk. At minimum, create Conditional Access policies that 1) block legacy authentication, 2) require MFA for privileged roles, and 3) require MFA for users outside trusted scenarios.
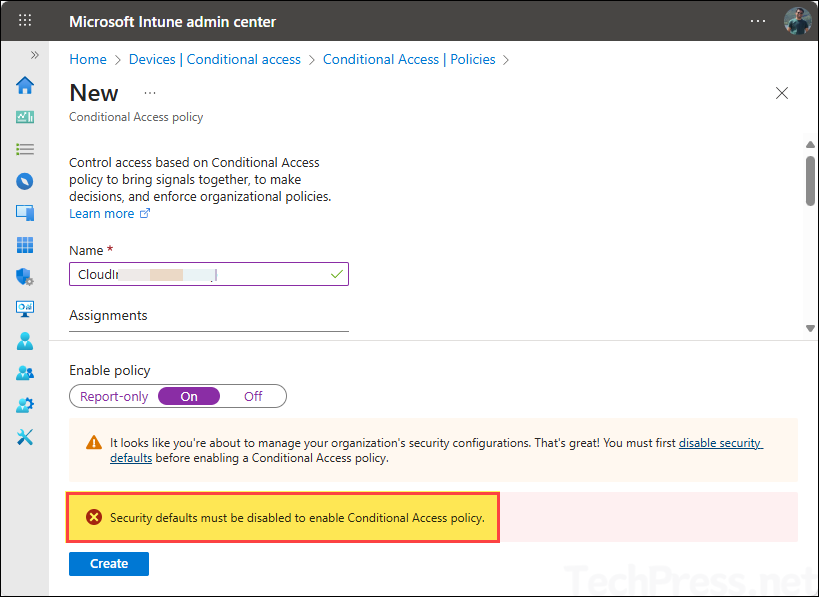
If you want to use Conditional access in your organization, then you must disable Security defaults, else you will get an error message while creating a conditional access policy: Security defaults must be disabled to enable Conditional Access policy. You may also see below warning message as well.
It looks like you’re about to manage your organization’s security configurations. That’s great! You must first disable security defaults before enabling a Conditional Access policy.
Prerequisites
- Role: Global Administrator in the tenant.
- Entra ID P1 for Conditional Access.
- If using PowerShell, Microsoft Graph PowerShell module installed and ability to consent required scopes
1. Disable Security Defaults using Entra admin center
Follow below steps to disable security defaults using Entra admin center.
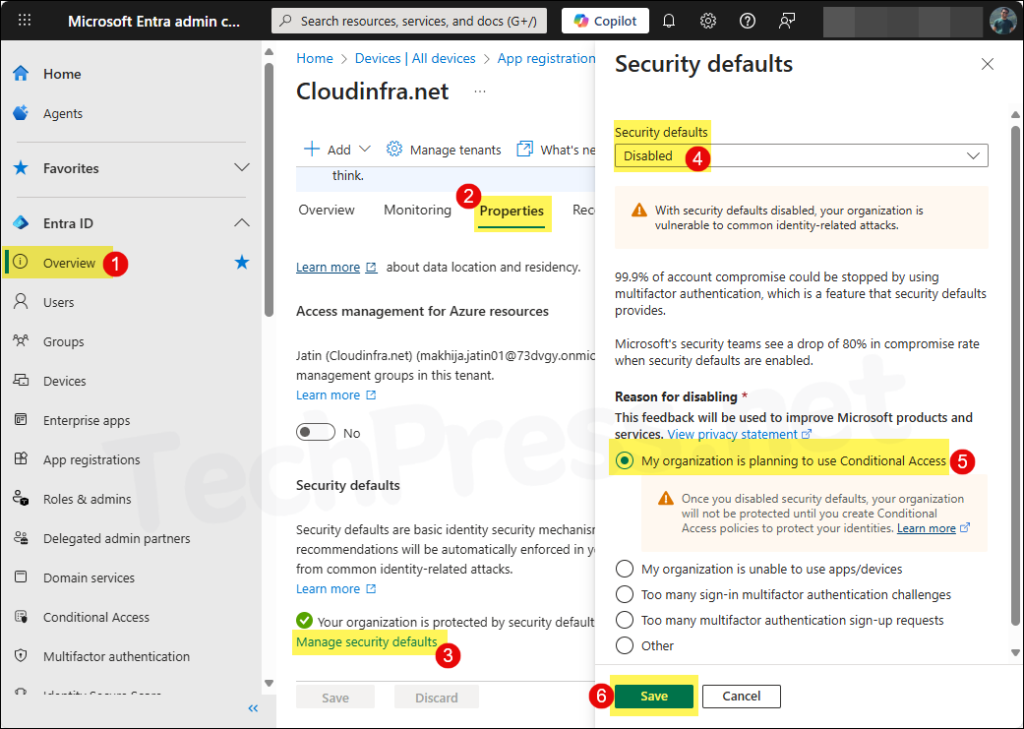
- Sign in to the Entra admin center > Entra ID > Overview > Properties.
- Click on Manage security defaults link.
- Set Security defaults to Disabled and then select a Reason for disabling security defaults.
- Click Save.
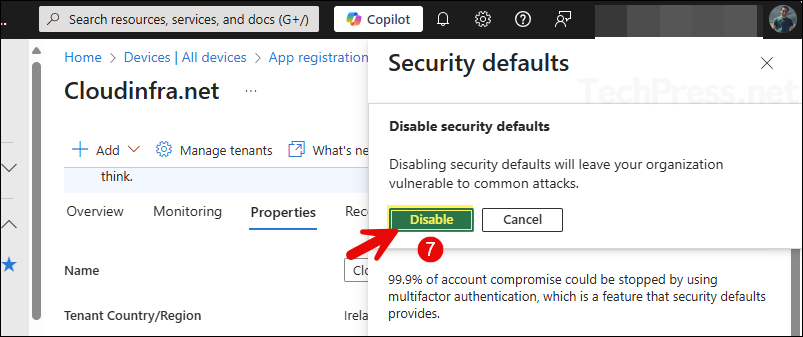
- You will get another prompt to confirm, click on Disable button.
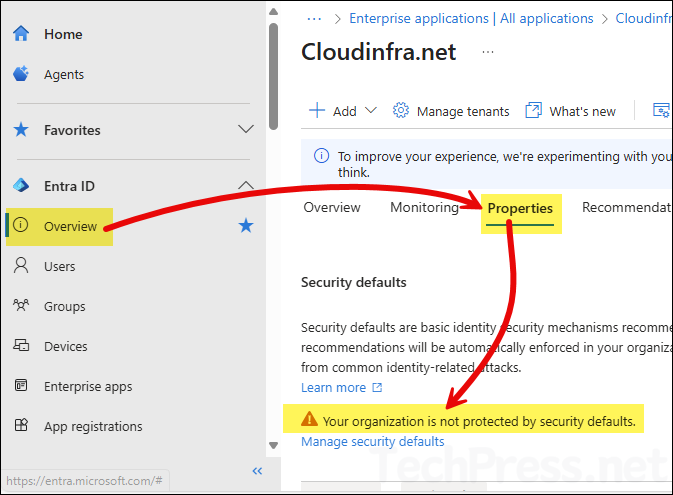
- To check and confirm if Security defaults are disabled in your tenant, Go to Entra admin center > Entra ID > Overview > Properties and scroll down on the page to check a warning message Your organization is not protected by security defaults. That means, it’s disabled.
2. Disable Security Defaults using Microsoft Graph PowerShell
You can also disable Security defaults using Microsoft Graph PowerShell. Open a PowerShell console and execute below commands.
# Install the Graph module if needed
Install-Module Microsoft.Graph -Scope CurrentUser -Force# Connect to Graph with the right scope
Connect-MgGraph -Scopes "Policy.ReadWrite.SecurityDefaults"# Disable Security Defaults
Update-MgPolicyIdentitySecurityDefaultEnforcementPolicy -IsEnabled:$false# Verify if Security Defaults are disabled
Get-MgPolicyIdentitySecurityDefaultEnforcementPolicy | Select-Object DisplayName, Id, IsEnabledDisplayName Id IsEnabled
----------- -- ---------
Security Defaults 00000000-0000-0000-0000-000000000005 False
