Cross-tenant message recall lets users recall emails sent to another Microsoft 365 organisation. The receiving organisation must enable the feature and add the sender’s tenant ID to its allow list. It is disabled by default. Microsoft announced this capability in July 2026. For more details, refer to this Microsoft TechCommunity link.
Example: Tenant A sends email to Tenant B. Configure Tenant B to permit recalls from Tenant A. For recalls in both directions, configure the reverse permission separately.
Contents
Prerequisites
- Administrative access to the receiving tenant.
- An account with the Exchange RBAC permissions needed to run the configuration commands.
- Exchange Online PowerShell module.
Step 1: Install Exchange Online PowerShell Module
First, make sure that the Exchange Online PowerShell module is installed on your computer. This module is required to connect to Exchange Online and run the PowerShell commands needed to configure Cross-Tenant Message Recall.
Install-Module -Name ExchangeOnlineManagement -Scope CurrentUserIf the module is already installed and you want to update it, use the below command:
Update-Module -Name ExchangeOnlineManagementStep 2: Connect to Exchange Online PowerShell
In a fresh PowerShell window, connect using Tenant B’s administrator account. Complete the sign-in and MFA prompts. Replace the example account with your administrator’s actual sign-in address.
Connect-ExchangeOnline -UserPrincipalName [email protected]Check the connection before making changes:
Get-ConnectionInformation | Format-List UserPrincipalName, TenantID, Organization, StateStep 3: Check Current Cross-Tenant Recall Configuration
Run the following command to view the current Cross-Tenant Message Recall configuration for your Exchange Online organisation. If the CrossTenantRecallEnabled property is set to False, the feature is currently disabled.
Get-CrossTenantRecallConfiguration | Format-List *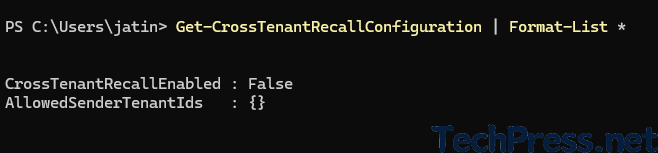
Step 4: Obtain the Sending Tenant’s ID
Request the Tenant ID from the administrator of the Microsoft 365 organisation that is sending the email and wants to recall messages sent to users in your tenant. You will add this Tenant ID to the AllowedSenderTenantIds list in your Exchange Online configuration.
The sending organisation’s administrator can obtain their tenant ID by signing in to the Microsoft Entra admin center or by connecting to Exchange Online PowerShell and running the command below:
Get-ConnectionInformation | Format-List *TenantId*Step 5: Enable Recall Feature and Add the Trusted Tenant
Run the following PowerShell commands to enable Cross-Tenant Message Recall and add the trusted tenant to the AllowedSenderTenantIds list. This allows trusted Microsoft 365 organisations to recall messages sent to users in your Exchange Online tenant.
Enable Cross-Tenant Recall
Set-CrossTenantRecallConfiguration -CrossTenantRecallEnabled $trueNext, run the Set-CrossTenantRecallConfiguration command as shown below and replace <Tenant-A-GUID> with the Tenant ID of the sending Microsoft 365 organisation. This adds the sending organisation’s Tenant ID to the AllowedSenderTenantIds list, allowing it to recall messages sent to users in your Exchange Online tenant.
$SenderTenantId = "<Tenant-A-GUID>"
Set-CrossTenantRecallConfiguration -AllowedSenderTenantIds @{Add = $SenderTenantId}
Example:
$SenderTenantId = "9999999-777-2222-9999-8839939933"
Set-CrossTenantRecallConfiguration -AllowedSenderTenantIds @{Add = $SenderTenantId}
Add multiple trusted tenants:
Set-CrossTenantRecallConfiguration -AllowedSenderTenantIds @{Add = "<Tenant-A-GUID>", "<Tenant-C-GUID>"}Step 6: Verify the Configuration
Use Get-CrossTenantRecallConfiguration to verify the cross tenant recall configuration and confirm that the changes are in place.
Get-CrossTenantRecallConfiguration | Format-List *Step 7: Test Message Recall in Outlook
For a simple first test:
- Send a message from the Tenant A test account to the Tenant B test account.
- Use a clear subject, such as Cross-tenant recall test 01.
- Confirm delivery in Tenant B, initially leaving the message unread.
- In the sender’s new Outlook or Outlook on the web, open Sent Items.
- Double-click the message to open it in a separate window.
- Select Recall Message, then confirm with OK.
- Open the Message Recall Report received by the sender.
- Follow its link to check whether the request succeeded, remained pending, or failed.
Record the sender, recipient, test time, and result. If your organisation needs recall in both directions, repeat the test with the accounts roles reversed after configuring that direction.
Remove a Tenant or Disable the Feature
To remove a tenant from cross-tenant recall configuration, use the Set-CrossTenantRecallConfiguration command.
Set-CrossTenantRecallConfiguration -AllowedSenderTenantIds @{Remove = "<Tenant-A-GUID>"}Example:
Set-CrossTenantRecallConfiguration -AllowedSenderTenantIds @{Remove = "9999999-777-2222-9999-8839939933"}To disable cross tenant recall feature completely, execute below command:
Set-CrossTenantRecallConfiguration -CrossTenantRecallEnabled $falseTroubleshooting
| Issue | Suggestion |
|---|---|
| Command is not recognised | Confirm that you connected successfully, updated the module, and opened a fresh session. Check administrator permissions and feature availability for your tenant. |
| Access denied | Review the account’s Exchange RBAC permissions. |
| Configuration looks correct, but the test fails | Recheck the tenant GUID, connected organisation and recall report. Retest using a newly sent message. |
| Recall report is missing | Check message trace and quarantine for the report email. |
| Report remains pending | Recheck later; the recall service can continue processing requests for up to 24 hours. |