In this post, I will show you how to install Enterprise root certificate authority. A root certificate authority is at the top of the certifcation hierarchy and the most important component of the your certificate infrastructure. If root CA is compromised, all other CAs and its issued certificates will be considered as compromised. Therefore, you must protect the root CA and maximize the security of it.
You can configure a root CA to be a standalone CA or an Enterprise CA. Standalone root CA is considered to be more secure than the Enterprise CA as it is not domain joined and is typically kept offline after initial setup. It does not publish to Active Directory, does not use templates, and is used only to sign subordinate CA certificates during tightly controlled maintenance windows.
An Enterprise root CA integrates with Active Directory, publishes to the Configuration partition, and supports template-based issuance and autoenrollment, but it must be domain joined and is usually online, which increases exposure. Recommended design is to create a standalone offline root CA with one or more Enterprise subordinate issuing CAs. For more information, refer to the link: What is the Certification Authority Role Service in Windows Server? | Microsoft Learn.
Microsoft strongly recommends a multi-tier PKI with an offline, standalone root CA and one or more online Enterprise issuing CAs, rather than a single Enterprise Root CA that stays online all the time. In lab environments or very small organizations, you can deploy an Enterprise Root CA and use it to issue certificates as well. Make sure to follow the best practices for configuration and apply proper security hardening.
Contents
Standalone CA vs Enterprise CA
Below table shows the key differences between a Standalone CA and Enterprise CA.
| Area | Standalone CA | Enterprise CA |
|---|---|---|
| AD integration | None | Full AD DS integration |
| Domain join | Not required | Required |
| Typical role | Offline root CA | Online issuing CA |
| Templates | Not supported | Supported (AD templates) |
| Autoenrolment | No | Yes (via GPO) |
| Subject/SAN data | Manual in request | Auto from AD attributes |
| Publish to AD (AIA/CDP, NTAuth) | No | Yes |
| Smart card logon | Hard to support | Supported and common |
| Intune SCEP/PKCS | Not suitable alone | Required for scale workflows |
| Revocation URLs | Usually HTTP only | HTTP and LDAP to AD; OCSP common |
| Security posture | Highest when offline | Larger attack surface (online, domain joined) |
| Best use | Trust anchor only | Day-to-day issuance at scale |
Requirements for Installing Enterprise Root CA
Below are the requirements for installation of an Enterprise Root CA.
- Domain-joined Windows Server with a static IP and correct time.
- You are a member of both Enterprise Admins and Domain Admins group.
- Ensure that the server name is finalized. Do not rename the server after installation.
- Separate volume for the CA database and logs is preferable.
- DNS CNAME record reserved for your HTTP CDP/AIA site, for example pki.corp.techpress.net (use pki.techpress.net (via IIS) if you are making CDP and AIA publicly available).
- Decide key algorithm and sizes: RSA 4096, SHA-256.
- Validity periods: Root CA certificate validity: 10 to 20 years is common. Decide on the value, as we will require this when installing the root CA. CRL: 26 weeks or 52 weeks for a root is typical. Do not configure delta CRLs on the root.
- Security: Harden the server. Limit admin access. Enable CA auditing. Keep the root CA dedicated to CA services. Do not install any extra roles on the server.
Planning for Certificate Authority in General
Before you start setting up an Enterprise Root CA, it’s important to plan the overall architecture of your Public Key Infrastructure (PKI). Creating a root CA is not something you do regularly and is often a one time setup, so careful design and planning are essential before you deploy it.
- Decide PKI hierarchy (single-tier vs. two-tier with offline Root CA?).
- Identify CA roles (root CA, issuing CA, web/CDP/AIA servers?).
- Choose server locations and security zones for each CA.
- Define usage scenarios (TLS, VPN, Wi-Fi, user/device auth, code signing).
- Agree on key algorithms and key sizes (e.g., RSA 4096, SHA-256).
- Set certificate and CA validity periods for root CA certificate and certificates it will issue.
- Design CRL and AIA distribution (HTTP, AD, reachable from all clients).
- Plan naming conventions (CA names, URLs, CPS/CP OIDs).
- Define admin roles and responsibilities (CA admin, template admin, security admin).
- Plan backup, restore, and disaster recovery strategy.
- Plan monitoring and auditing approach for CA activity.
- Document all design decisions before starting the installation.
Best Practices for Configuring a Root CA
Below are some of the best practices for installing and configuring a root CA.
- Host the CA on a dedicated server (not a domain controller).
- Apply a hardened security baseline and restrict local/RDP logon.
- Protect the CA private key with an HSM where feasible.
- Use strong cryptography (RSA 4096, SHA-256 or higher).
- Define root CA validity sensibly (for example, ~10 years).
- Use
CAPolicy.infto control root certificate properties and defaults. - Carefully design CRL and AIA locations (HTTP + AD, highly available).
- Configure realistic CRL lifetimes and renewal schedules.
- Separate roles for OS admin, CA admin, and certificate managers.
- Lock down certificate templates and their security permissions.
- Remove or disable unused and legacy certificate templates.
- Restrict enrollment permissions on high-impact templates (e.g., smart card, enrollment agent).
- Enable AD CS auditing on the CA and forward logs to a central SIEM.
- Monitor for unusual enrollment activity and template/CA configuration changes.
- Regularly back up CA database, logs, keys, and configuration. Store at least one backup set offline in a secure, fireproof location.
- Document power-on, signing, CRL publishing, renewal and recovery procedures.
- Periodically review PKI design, templates, CRLs, and expiry timelines.
Now that we understand the requirements for installing an Enterprise Root CA and have reviewed the planning considerations and best practices, let’s begin the steps to install and configure the Enterprise Root CA on a dedicated server with no other roles installed.
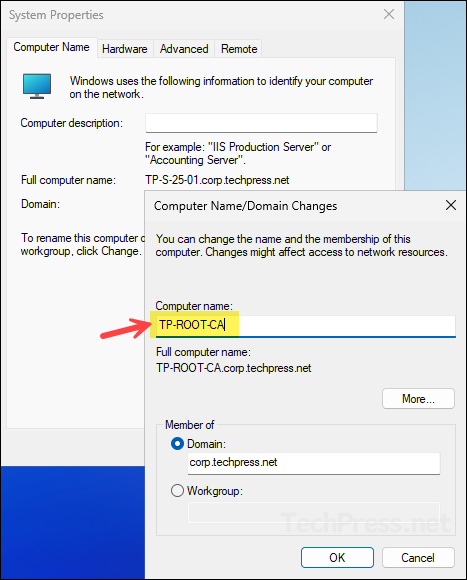
Renaming Windows Server
Ensure that the server name is finalized. Do not rename the server after the installation. Below screenshot shows that I am updating the server name from TP-S-25-01 to TP-ROOT-CA. The server must remain joined to the domain, as this is required for an Enterprise Root CA. For the demonstration, I will be using a Windows server 2025 datacenter edition.
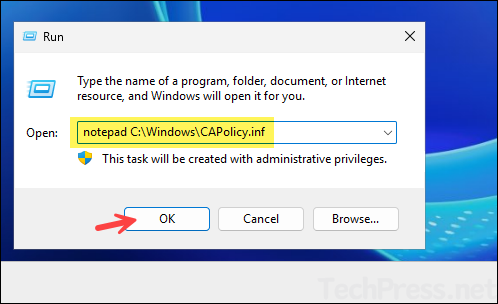
Create CAPolicy.Inf file
Microsoft recommends using a CAPolicy.inf file to control key settings of your root CA certificate and define CA behavior. The file must be present in C:\Windows before you run the CA configuration wizard.
- Sign in to the Root CA server (TP-ROOT-CA).
- Press Win + R to open the Run dialog box.
- Type notepad C:\Windows\CAPolicy.inf and press Enter.
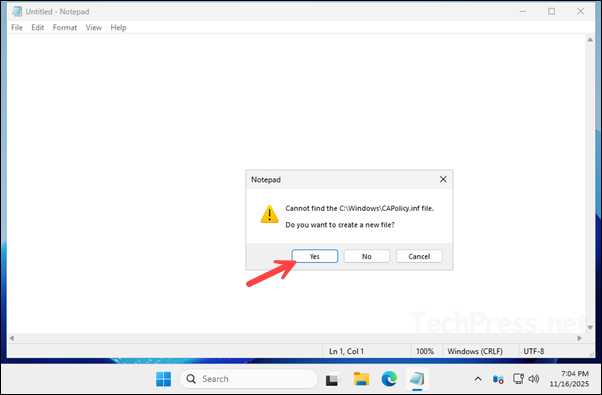
- It will open a notepad with the prompt Do you want to create a new file?, click Yes.
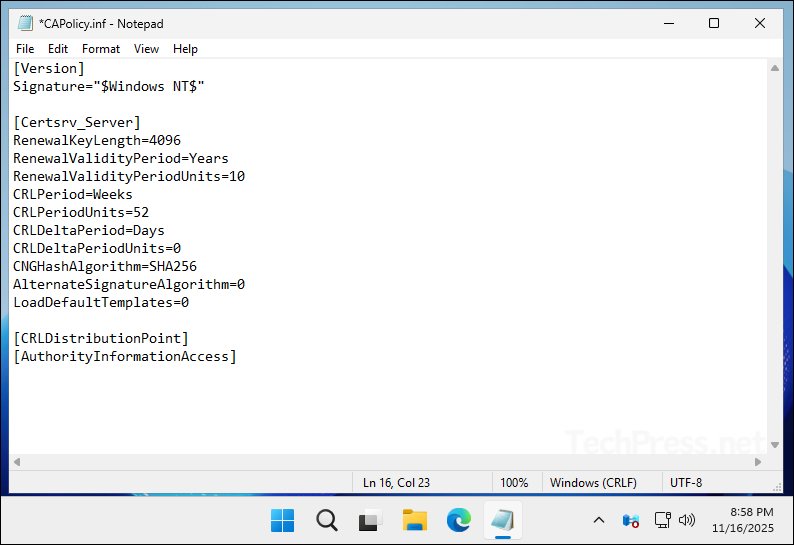
- Copy and paste below contents into CAPolicy.inf file. I have used the recommended settings for installing an Enterprise Root CA. You can modify certain values based on your specific requirements. Do not change the CNGHashAlgorithm value or add any entries under [CRLDistributionPoint] or [AuthorityInformationAccess]. For more information, refer to the link: Prepare the CAPolicy.inf File | Microsoft Learn
CAPolicy.inf
[Version]
Signature="$Windows NT$"

[Certsrv_Server]
RenewalKeyLength=4096
RenewalValidityPeriod=Years
RenewalValidityPeriodUnits=10
CRLPeriod=Weeks
CRLPeriodUnits=52
CRLDeltaPeriod=Days
CRLDeltaPeriodUnits=0
CNGHashAlgorithm=SHA256
AlternateSignatureAlgorithm=0
LoadDefaultTemplates=0

[CRLDistributionPoint]
[AuthorityInformationAccess]- Save CAPolicy.inf file.
Install Active Directory Certificate Services Role
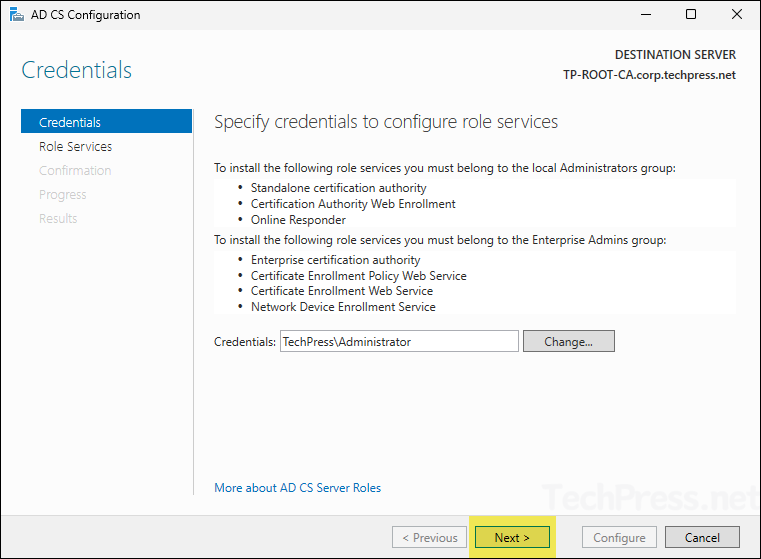
To install an Enterprise Root Certificate Authority, you must first add the Active Directory Certificate Services role on the server. Sign in using an account that is a member of both the Enterprise Admins and Domain Admins groups. You don’t need these permissions to install the AD CS role, but they are needed during the Enterprise Root CA configuration phase to publish CA information to Active Directory. To avoid signing out and switching accounts later, I am using an account that has both Enterprise admin and Domain admin rights.
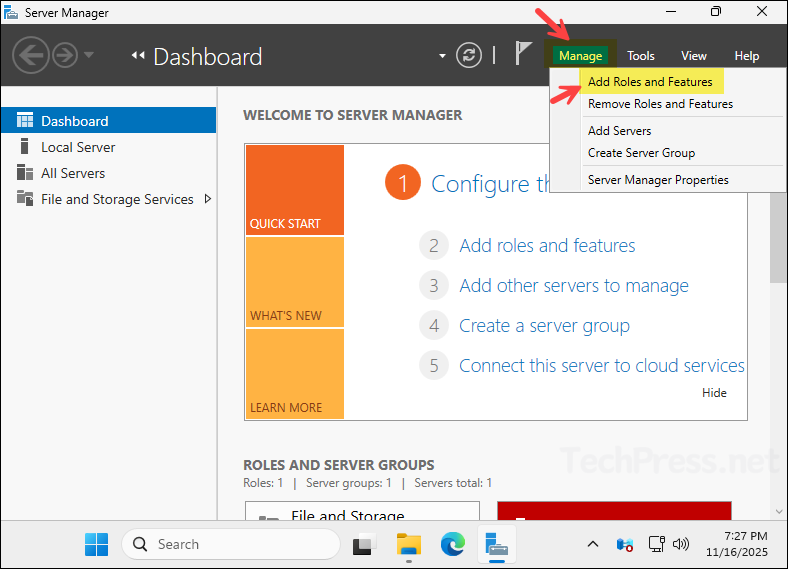
- Open the Server manager > Manage > Add Roles and Features.
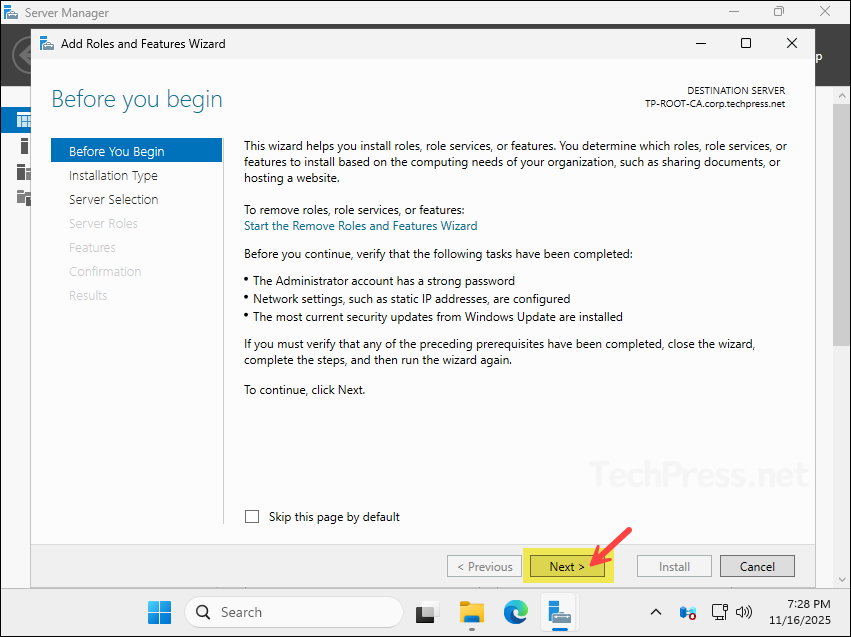
- Click Next.
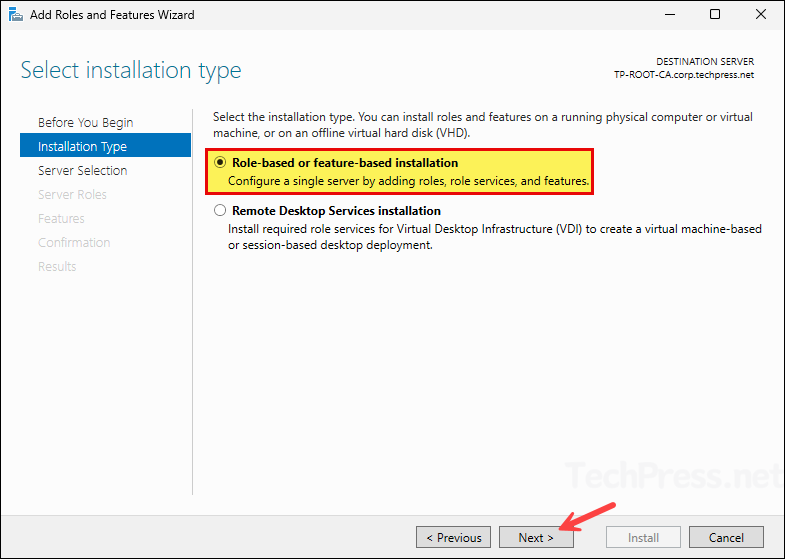
- Select Role-based or feature-based installation and click Next.
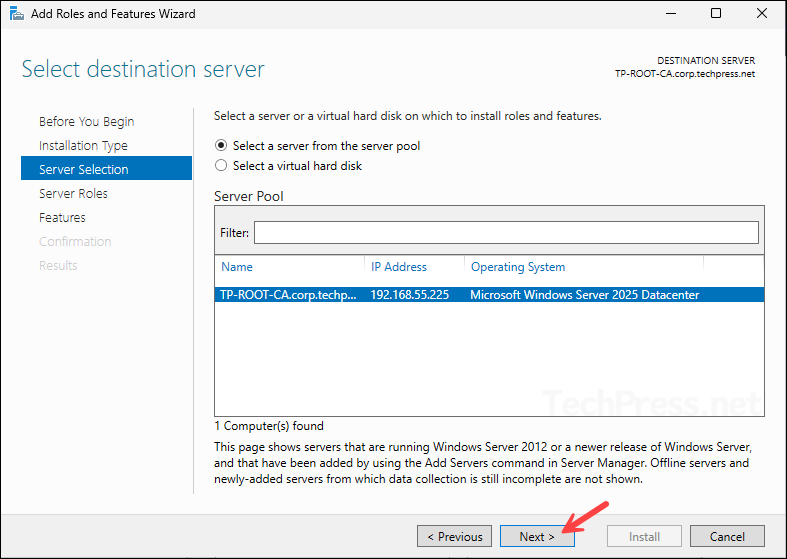
- On Server Selection screen, Click Next.
- On the Server roles screen, select Active Directory Certificate Services and click Next.
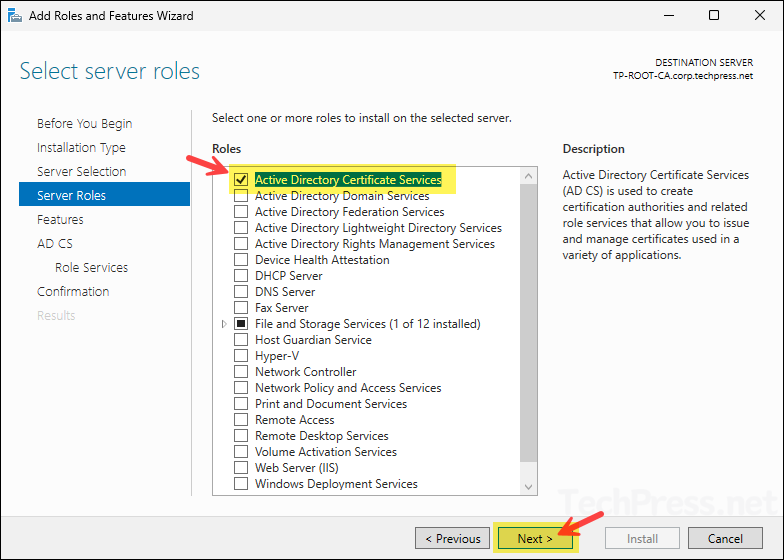
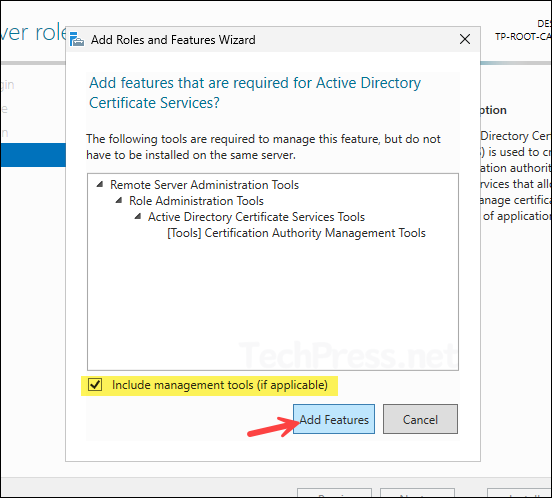
- You will need the necessary management tools to administer Active Directory Certificate Services, therefore click Add Features and continue to the next step.
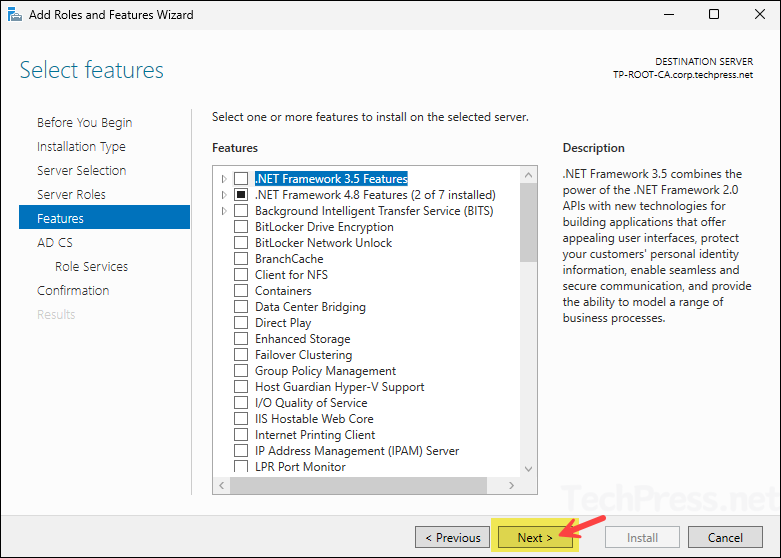
- On the Features screen, do not select anything, Click Next.
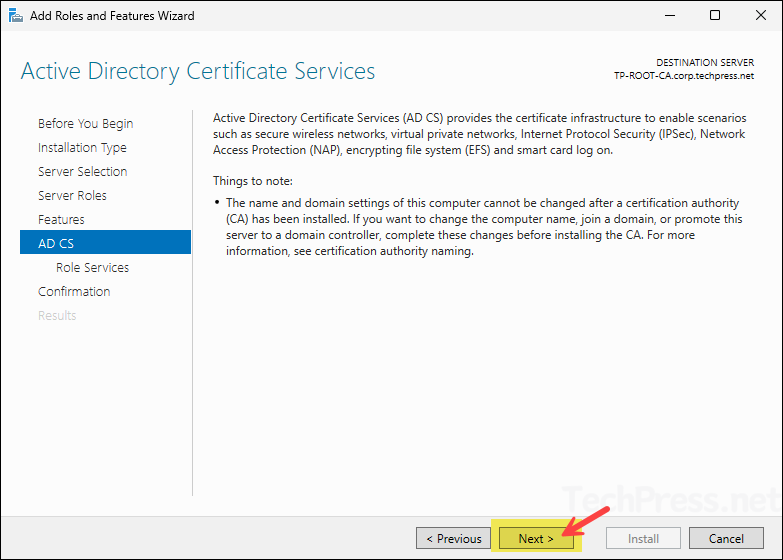
- On AD CS screen, click Next.
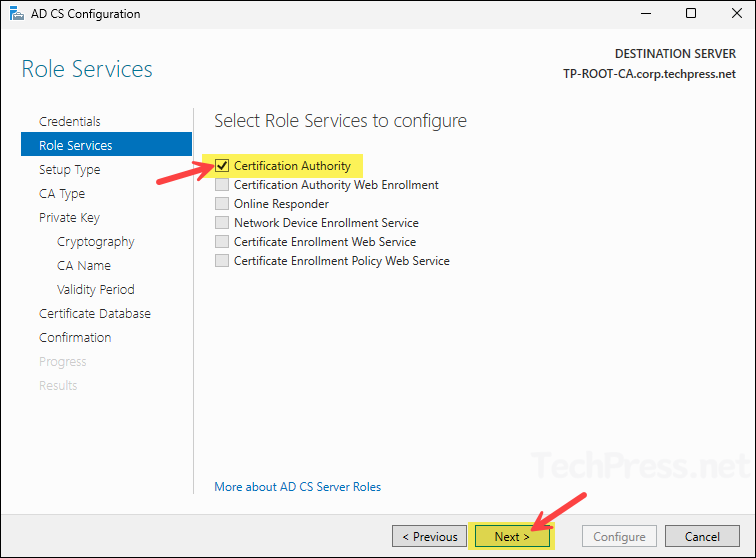
- On Role Services screen, select Certification Authority and click Next.

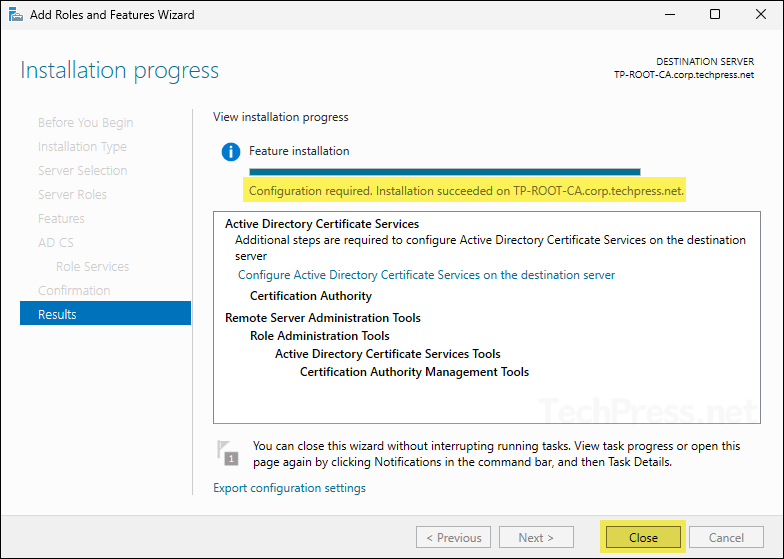
- Click Install. You can optionally select Restart the destination server automatically if required checkbox. I selected this option, but the server did not restart after the installation was completed.
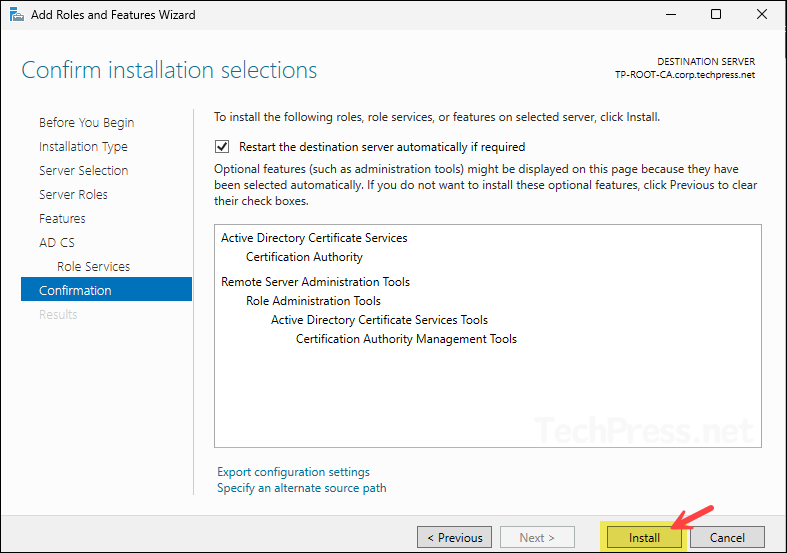
- ADCS installation is completed successfully, click Close.
Configure Active Directory Certificate Services
The next step is to configure Active Directory Certificate Services (ADCS), where you will select and confirm options such as the type of CA, key length, and whether to create a new private key. For configuring the ADCS, follow below steps:
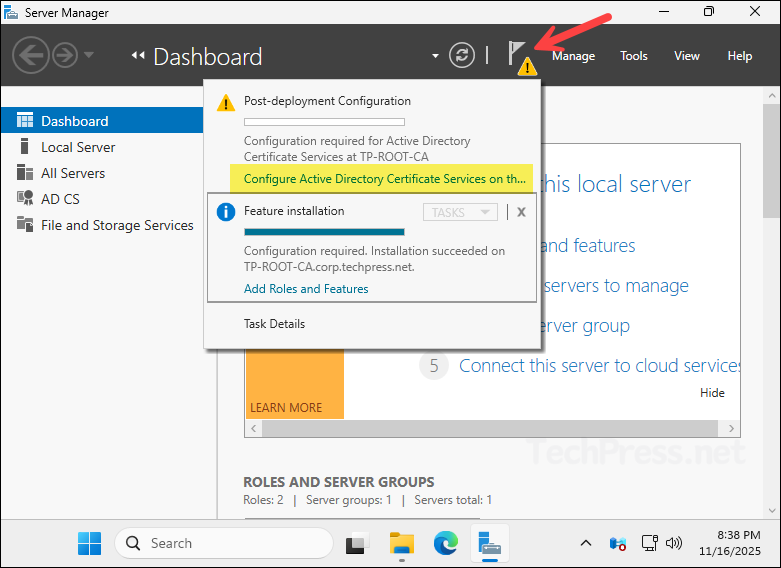
- Open Server Manager, click the warning notification flag, and then select Configure Active Directory Certificate Services on the destination server. You will also see this same link on Results screen when we installed ADCS role in the previous section.
- On Credentials screen, click Next.
- On Role Services screen, select Certification Authority. Click Next.
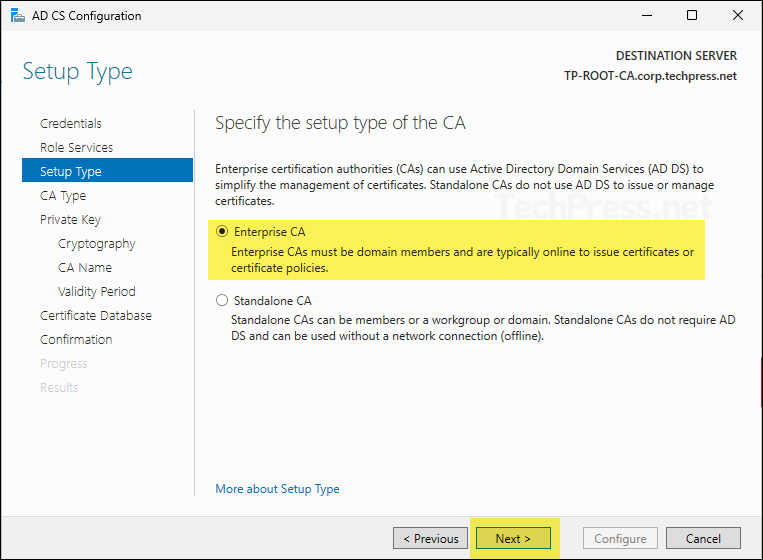
- On Setup Type screen, select Enterprise CA and click Next.
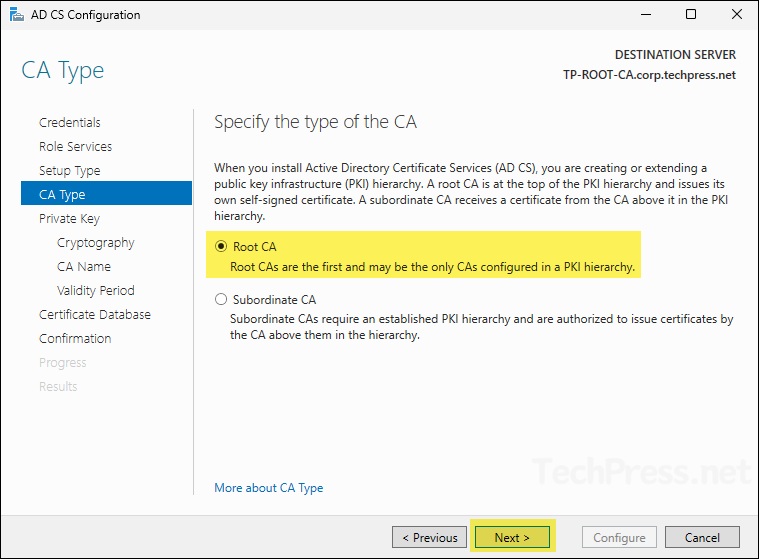
- On CA Type screen, select Root CA and click Next.
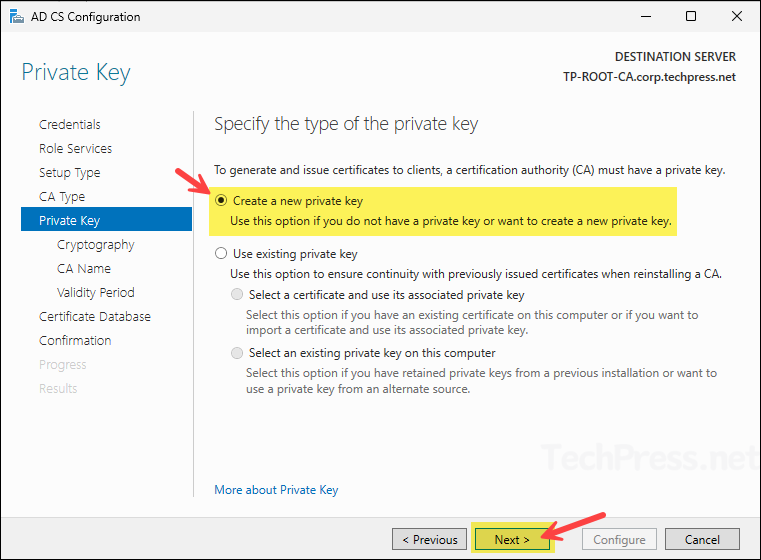
- On Private Key screen, select Create a new private key and click Next.
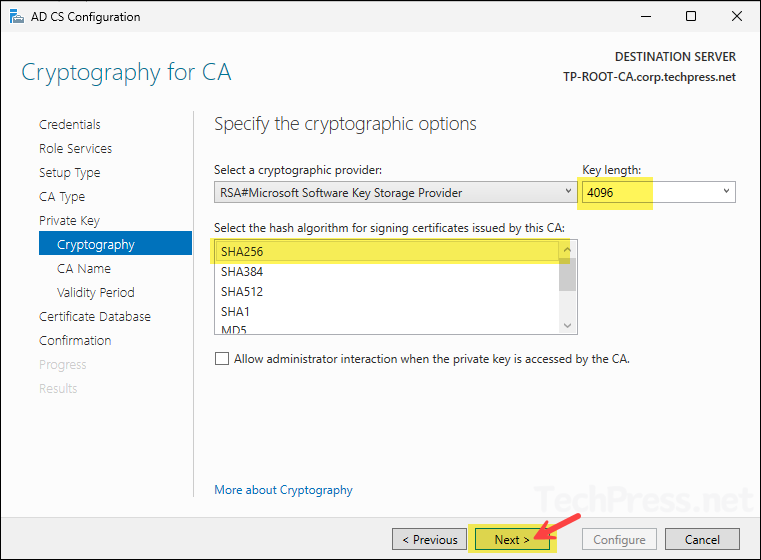
- On Cryptography screen, keep everything default except the key length, update it to 4096 and click Next.
- Verify the information of the CA like common name, Distinguished name etc. and click Next.

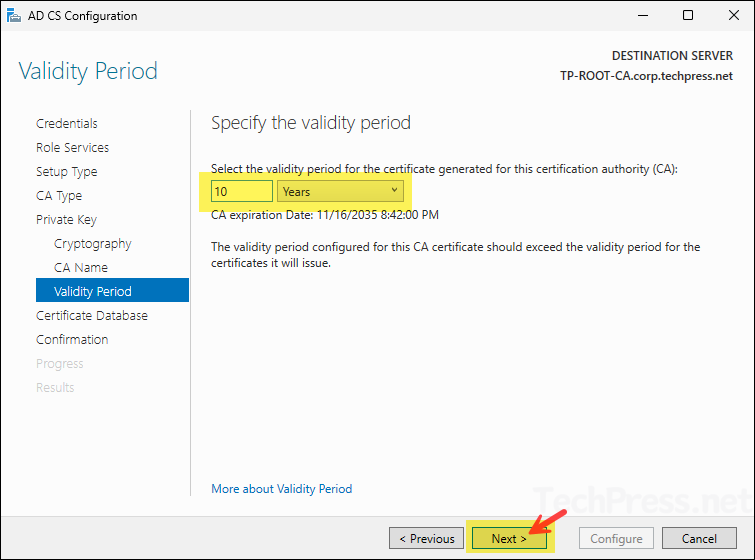
- Set the validity period of the certificate generated for this CA to 10 years and click Next.
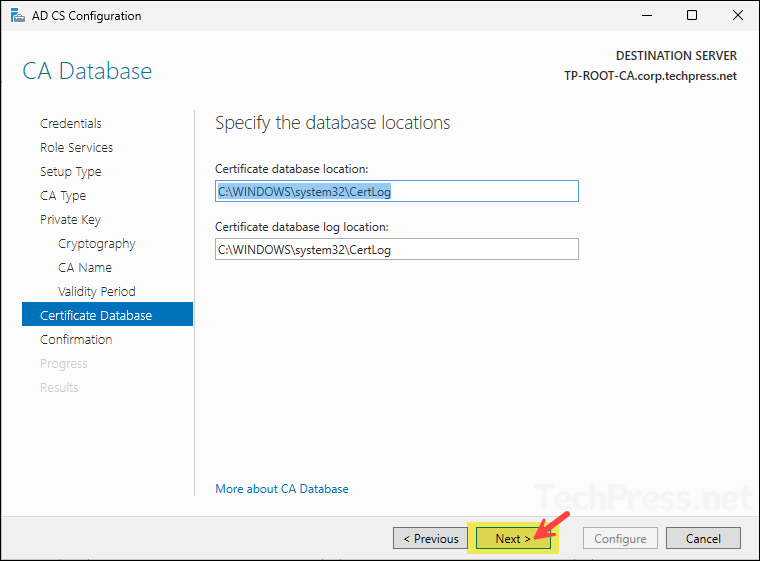
- Keep the default locations for Certificate Database and click Next.
- Review the information you configured for the Enterprise Root CA and click Configure.
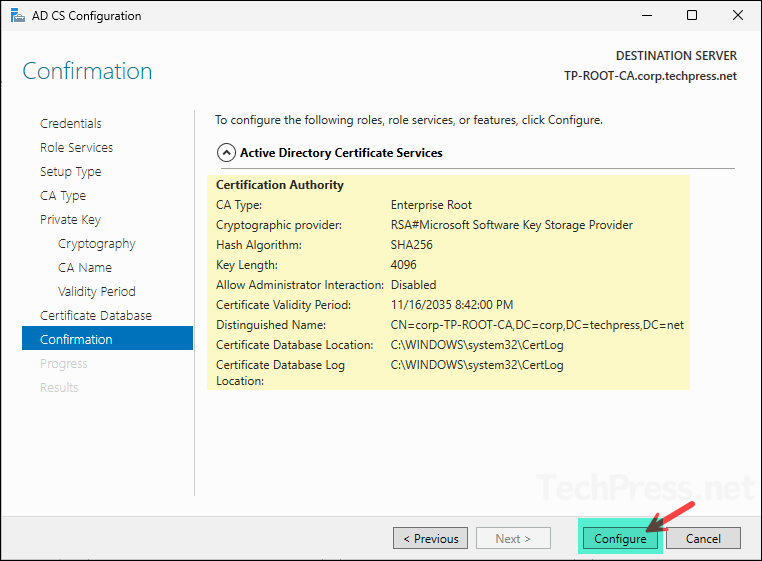
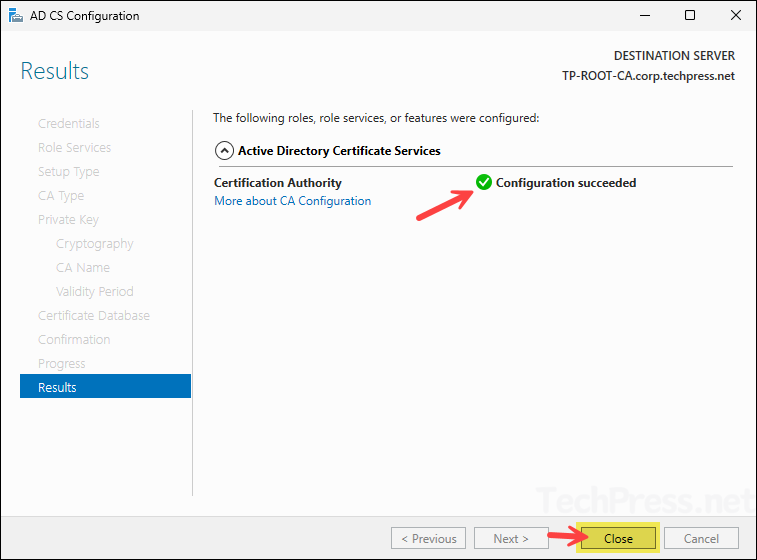
- On the Results screen, it will show Configuration succeeded with a green tick to confirm that Enterprise root CA has been successfully configured on this server.
Root CA CRL Configuration
After you have installed and configured the ROOT CA role on your server, next step is to complete the CRL (certificate revocation list) configuration. We have set some of the CRL configuration values in the CAPolicy.inf file therefore, we would only configure the ones which are required as per best practices.
- Set the default validity for certificates that the CA issues. This tells Windows Default Policy Module to issue new certificates with a default 5 years validity. This mainly will matter when you are creating a subordinate CA certificate on the ROOT CA, if ROOT CA will not act as the issuing CA. So, if your root is 10 years, and you set CA defaults to 5 years, and your SubCA template is 5 years, the subordinate CA certificate will be valid for 5 years.
certutil.exe -setreg CA\ValidityPeriodUnits 5
certutil.exe -setreg CA\ValidityPeriod "Years"- Define CRLOverlapPeriod and CRLOverlapUnits values. These settings provide a grace period during which clients can continue using the old CRL until the new CRL is published and available. By default, this value is set to 0 (unset), so I recommend configuring it. Do not set this value too low, as it will not provide enough time to publish an updated CRL. Likewise, avoid setting it too high, as that would pose a security risk by allowing clients to use an outdated CRL for an extended period.
certutil -setreg CA\CRLOverlapPeriod "Days"
certutil -setreg CA\CRLOverlapUnits 7- Restart ADCS services.
net stop CertSvc
net start CertSvc
Enable Auditing on Root Certificate Authority
It’s highly recommended to enable auditing on your certificate authority server. When enabled, CA activities are written to the Windows Security log, giving you important information about the changes on your CA. Once enable, you can open Event Viewer > Windows Logs > Security, then filter by Task Category = Certification Services or by event IDs in the 4886–4890 range (and related 48xx CA events).
- Run below commands to turn on all CA-specific auditing categories for the Certificate authority. It covers the audit of below events:
- Start and stop AD CS
- Back up and restore the CA database
- Issue and manage certificate requests
- Revoke certificates and publish CRLs
- Change CA configuration
- Change enrollment agent restrictions
- Other CA administrative operations covered by the CA audit classes
certutil -setreg CA\AuditFilter 127
restart-service certsvc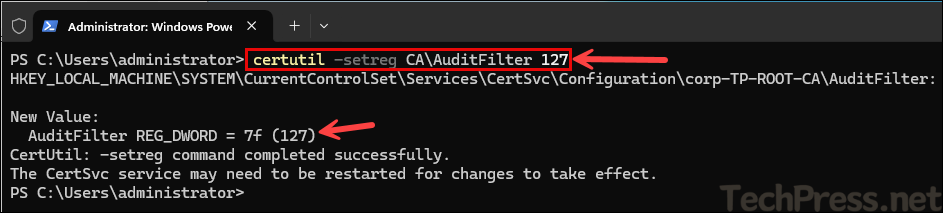
- Launch the Local Security Policy console (
secpol.msc) and configure Local Security Policy > Advanced Audit Policy Configuration > System Audit Policies > Object Access > Audit Certification Services to audit Success and failure.

Create a CNAME record for Subordinate CA (Optional)
This step is optional. Skip this step if you do not plan to create a subordinate CA or If you do not want to create a CNAME, you can use the hostname of the subordinate CA or even the IP address (not recommended). Creating a CNAME for your subordinate CA is helpful because it simplifies the CDP and AIA URL structure and makes future changes easier to manage.
Since I will be using my subordinate CA for the CDP and AIA locations, I am creating a CNAME alias named pki to simplify the naming convention. You can use any CNAME you prefer. Below screenshot shows pki CNAME record pointing to my subordinate CA.

After creating the CNAME record, ping the FQDN of the CNAME to verify that it resolves correctly. In my case, it is pki.corp.techpress.net, which points to my subordinate CA.
ping pki.corp.techpress.net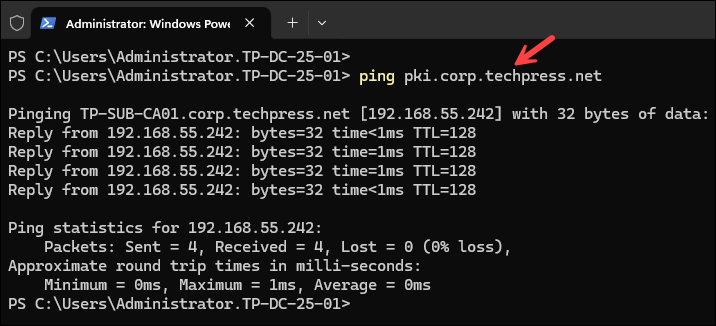
Instead of using pki.corp.techpress.net as the FQDN for your CRL and AIA files, you could also use something like pki.techpress.net. To do this, you would need to configure a website in IIS or use an external website (pki.techpress.net) that contains a folder named pki. Just ensure that the location is accessible from the client devices where you plan to deploy the certificates.
Configure CDP and AIA Extensions on ROOT CA
Configure Certificate Revocation List Distribution Point (CDP) and Authority Information Access (AIA) extension on the Root CA. The configured http:// location must be accessible from clients where you deploy the certificates. You can use the location now (http://pki.corp.techpress.net/pki/) and create it later after the setup is complete. Make sure the locationis created before you start deploying the certificates on users devices.
Configure CDP Extensions
- Launch the Certificate Authority Console (
certsrv.msc) on the Root CA (TP-ROOT-CA). - Right-click on the corp-TP-ROOT-CA and select properties.
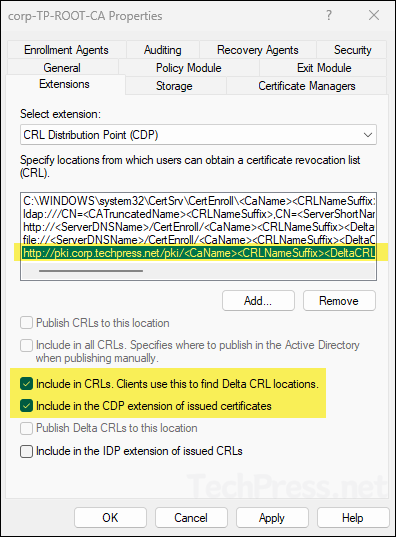
- On the Extensions tab, select CRL Distribution Point (CDP) from the drop-down menu and click Add. Copy and paste below value into the Location textbox, replacing the FQDN with your own domain’s FQDN.
http://pki.corp.techpress.net/pki/<CaName><CRLNameSuffix><DeltaCRLAllowed>.crl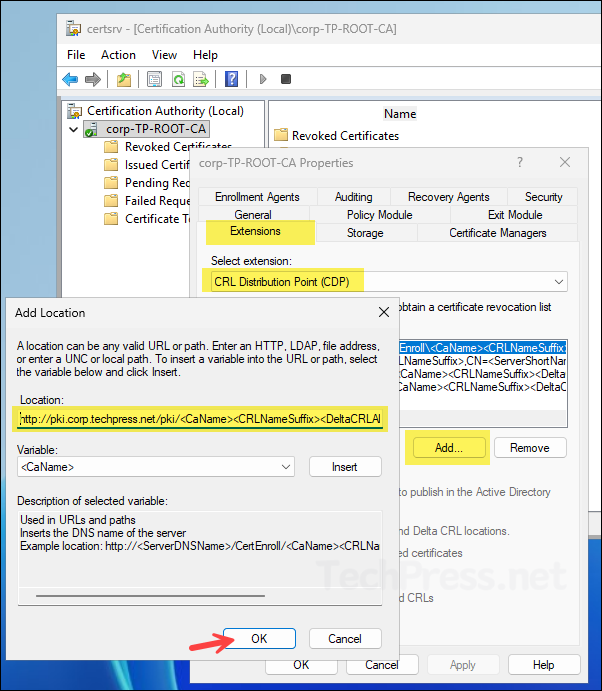
- Select the location you just added and check the boxes for Include in CRLs. Clients use this to find Delta CRL locations. and Include in the CDP extension of issued certificates options. Click OK.
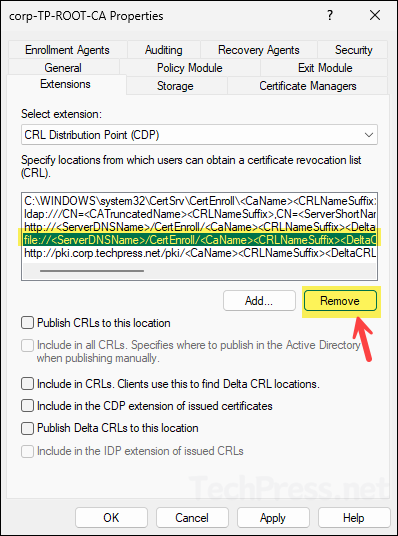
- Select the file://... path and click Remove.
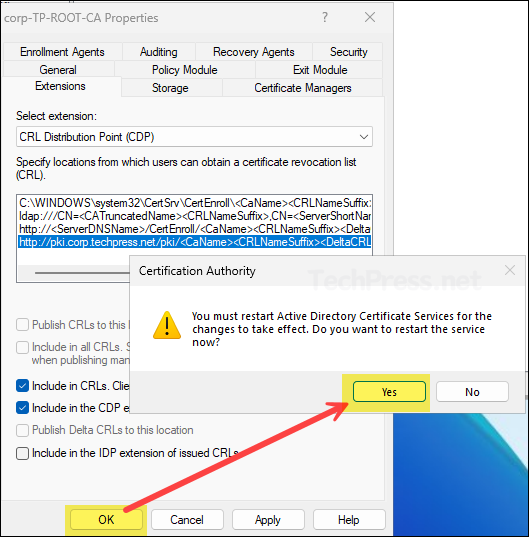
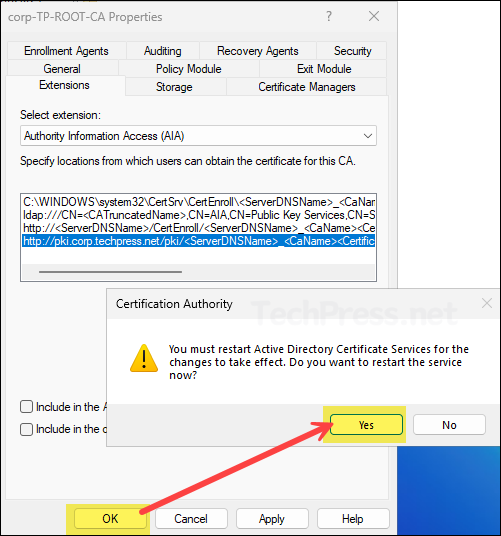
- After you have configured the CDP extensions, click on OK button. It will prompt you to restart the Active directory certificate services, click Yes to proceed.
Configure AIA Extensions
- On the Extensions tab, select Authority Information Access (AIA) from the drop-down menu and click Add. Copy and paste the value below into the Location textbox, replacing the FQDN with your own domain’s FQDN.
http://pki.corp.techpress.net/pki/<ServerDNSName>_<CaName><CertificateName>.crt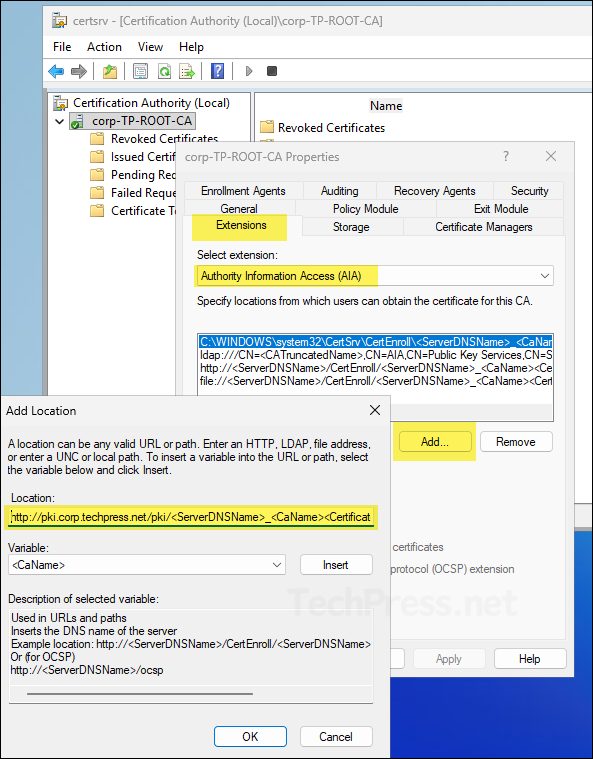
- Select the file://... path and click Remove.
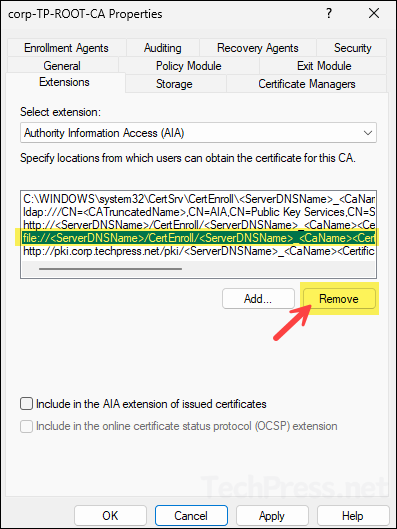
- After you have configured the AIA extensions, click on OK button. It will prompt you to restart the Active directory certificate services, click Yes to proceed.
Use the commands below to verify the CDP and AIA locations you just configured. Ensure that the newly added paths appear in the command output.
Verify CDP and AIA Extensions
certutil.exe -getreg CA\CRLPublicationURLs
certutil.exe -getreg CA\CACertPublicationURLs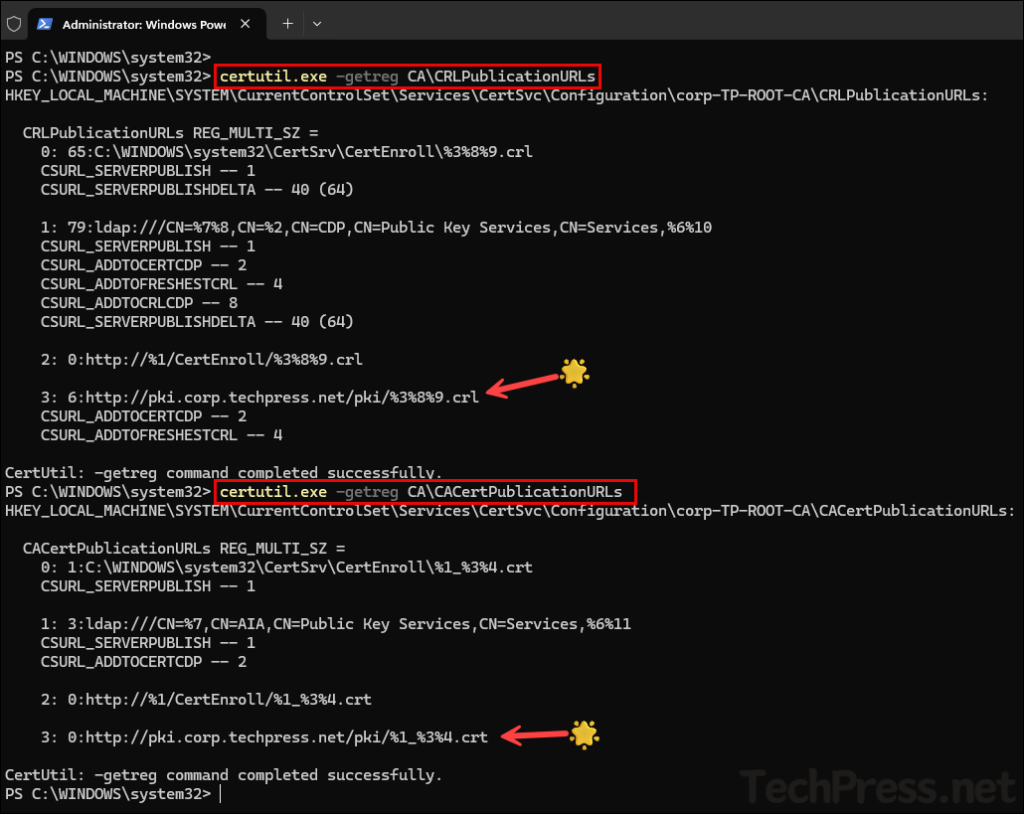
Publish the CRL on Root CA
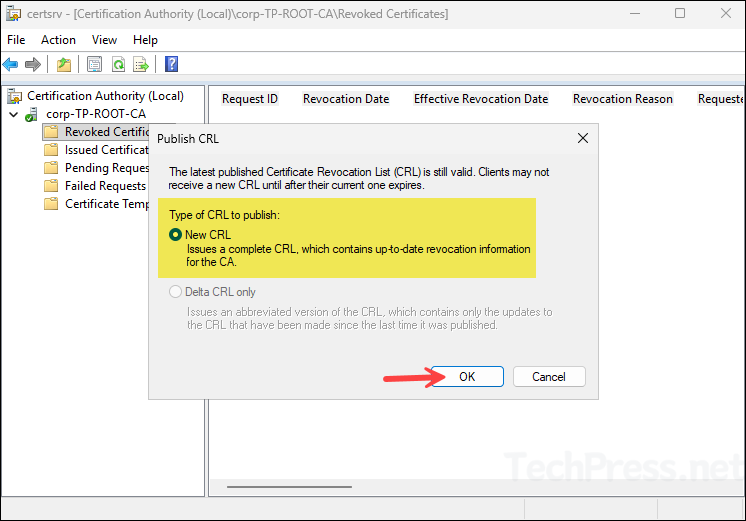
Now that the CDP and AIA extensons are configured on the root CA, publish the CRL on the Root CA by generating a fresh list and placing it where clients can access it. You can publish the CRL through GUI or by running the command certutil -crl.
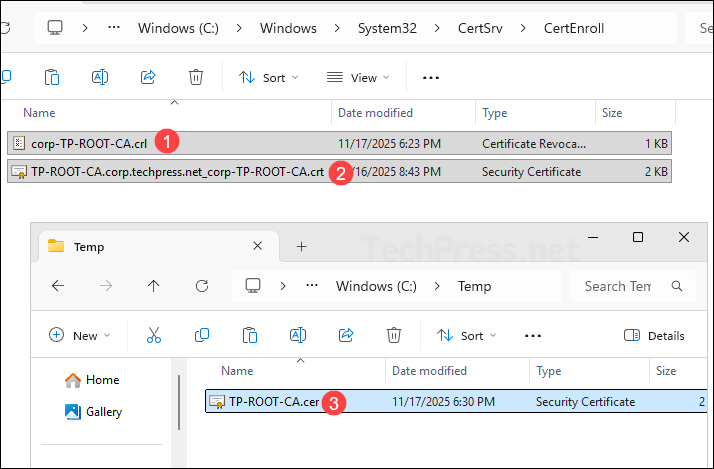
The CRL is published to C:\Windows\System32\CertSrv\CertEnroll\ path along with .crt file. These files must be copied to the HTTP CDP path you configured earlier (http://pki.corp.techpress.net/pki/).
For an Enterprise domain-joined Root CA, you can also publish the root certificate and .crl to Active Directory using certutil -dspublish (explained later).
- To publish the CRL using GUI, Open the Certification Authority > Right-click on Revoked certificates folder > All Tasks > Publish.

- Select the New CRL and click on OK to publish.
You can also Publish the CRL using command line
certutil -crlGo to the location C:\Windows\System32\CertSrv\CertEnroll\ and find the CRL we published, including the AIA crt file for the Root CA.

Export Root Certificate
If you do not publish the Root certificate in Active directory and plan to deploy it via a Group policy or if you need the root certificate for a third party non-domain joined network appliance or similar device. Use below steps to export the root certificate.
- On TP-ROOT-CA server, press Win+R to open the Run dialog box.
- Type
certlm.mscand press Enter to open the Local computer certficate store. - Expand Trusted Root Certification Authorities Store > Certificates. Right-click on the Root certificate > All Tasks > Export.

- In the Certificate Export Wizard, click Next. Select DER encoded binary X.509 (.CER), then click Next. Provide the location where you want to export the Root CA certificate (.cer file), and click Finish.
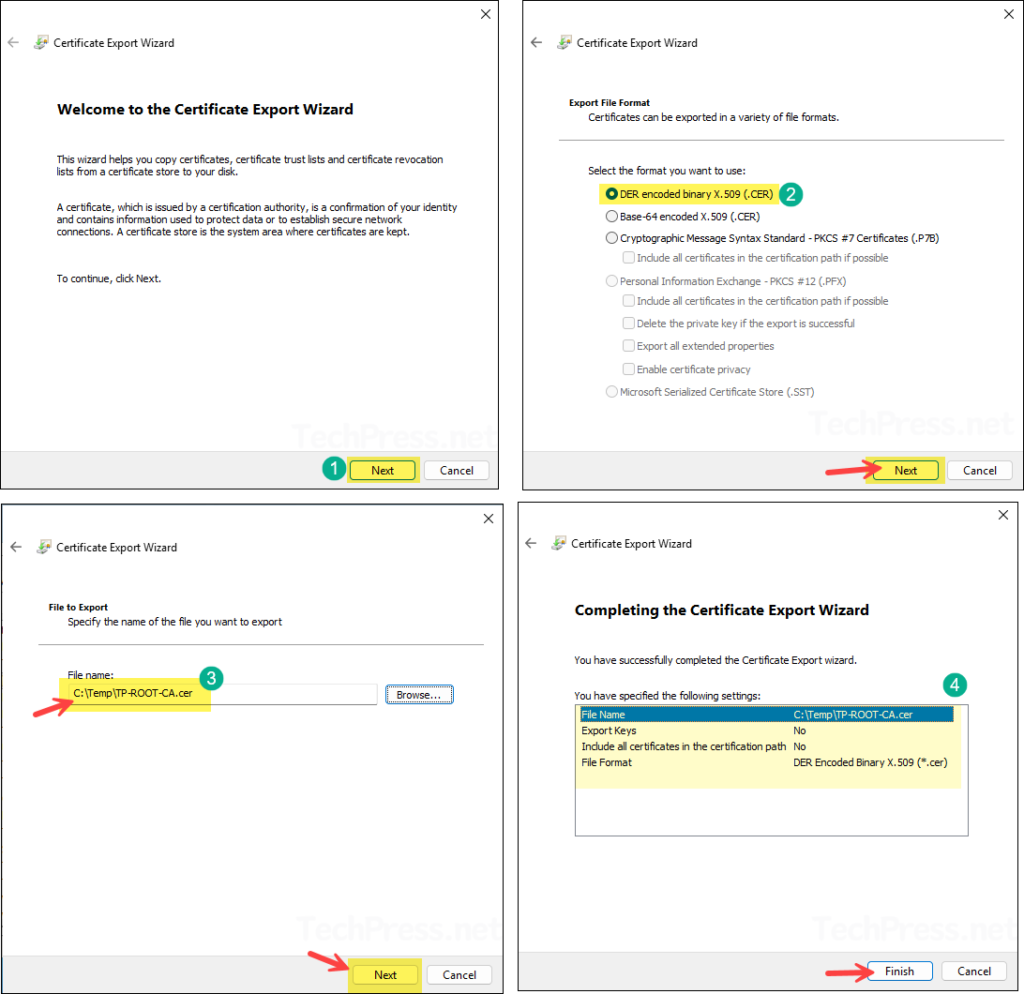
- TP-ROOT-CA.cer file has been exported successfully at the provided location.
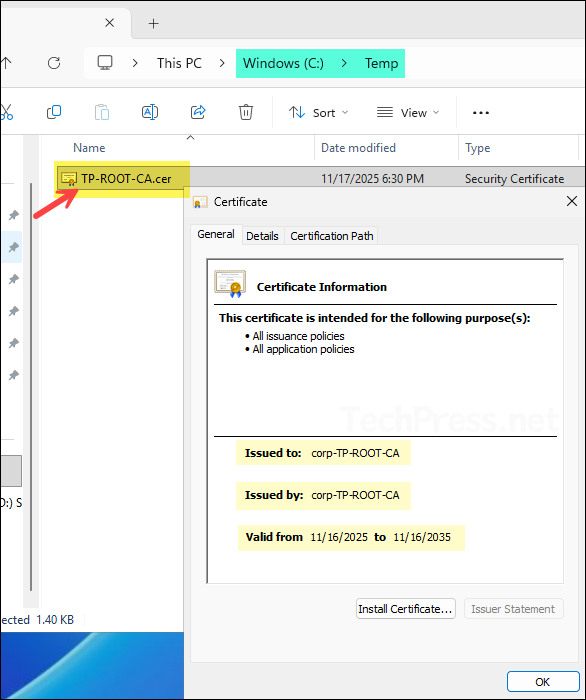
- Copy below files and paste them into the \\pki.corp.techpress.net\pki\ location on the subordinate CA. If the location does not exist, ensure that the pki folder is created and that the share and permissions are properly configured. If you do not plan to create a subordinate CA then you can create this location on the Root CA itself and make sure its accessible.
- corp-TP-ROOT-CA.crl
- TP-ROOT-CA.corp.techpress.net_corp-TP-ROOT-CA.crt
- TP-ROOT-CA.cer
Publish Root Certificate and CRL to Active Directory
As it is an Enterprise Root CA integrated with Active Directory, you can publish the root certificate and CRL to Active Directory. When you do this, all domain-joined client devices will automatically trust the Root CA. After running below command, TP-ROOT-CA.cer will be placed in the local machine Trusted Root Certification Authorities store on all domain-joined computers.
certutil -dspublish -f C:\Temp\TP-ROOT-CA.cer RootCA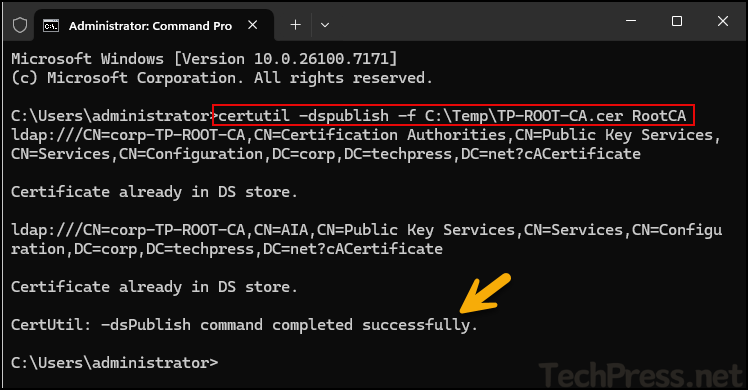
C:\Users\administrator>certutil -dspublish -f C:\Temp\TP-ROOT-CA.cer RootCA
ldap:///CN=corp-TP-ROOT-CA,CN=Certification Authorities,CN=Public Key Services,CN=Services,CN=Configuration,DC=corp,DC=techpress,DC=net?cACertificate

Certificate already in DS store.

ldap:///CN=corp-TP-ROOT-CA,CN=AIA,CN=Public Key Services,CN=Services,CN=Configuration,DC=corp,DC=techpress,DC=net?cACertificate

Certificate already in DS store.

CertUtil: -dsPublish command completed successfully.
Similarly, run below command to publish the CRL to Active Directory. If the CRL already exists in AD, the output will display Base CRL already in DS store.
certutil -dspublish -f "C:\Windows\System32\CertSrv\CertEnroll\corp-TP-ROOT-CA.crl"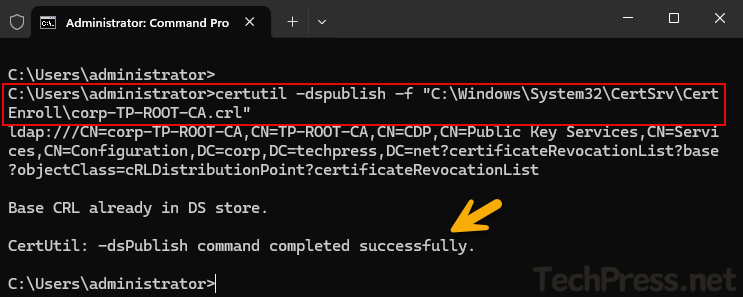
C:\Users\administrator>certutil -dspublish -f "C:\Windows\System32\CertSrv\CertEnroll\corp-TP-ROOT-CA.crl"
ldap:///CN=corp-TP-ROOT-CA,CN=TP-ROOT-CA,CN=CDP,CN=Public Key Services,CN=Services,CN=Configuration,DC=corp,DC=techpress,DC=net?certificateRevocationList?base?objectClass=cRLDistributionPoint?certificateRevocationList

Base CRL already in DS store.

CertUtil: -dsPublish command completed successfully.

C:\Users\administrator>