In this post, I will show you multiple ways to show or hide empty drives in Windows 11. By default, empty drives such as DVD drives, virtual drives, and card readers are not visible to the user. If you are an administrator and need to display all drives to troubleshoot a specific issue, you can use this guide to make the necessary changes in Windows 11.
We will cover several methods, including Settings app, Registry, and command-line options. You can choose the method that best suits your needs and apply it to your devices.
Contents
What counts as an empty drive?
Usually removable devices with no media: optical drives, multi-slot card readers, some docking bays etc. Hard disk partitions are not hidden, even if they are empty and have no files in them.
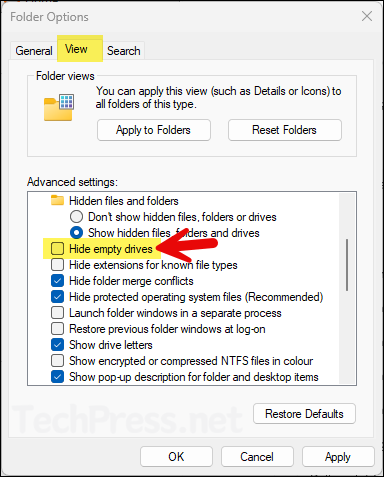
Option 1: Show or Hide Empty Drives using File Explorer
- Open File Explorer > Click the … menu on the toolbar, then choose Options.

- In Folder Options, go to the View tab.
- Under Advanced settings, toggle Hide empty drives.
- Checked = Hide empty drives
- Unchecked = Always show drives
- Click OK. If you don’t see an immediate change, close and reopen File Explorer.
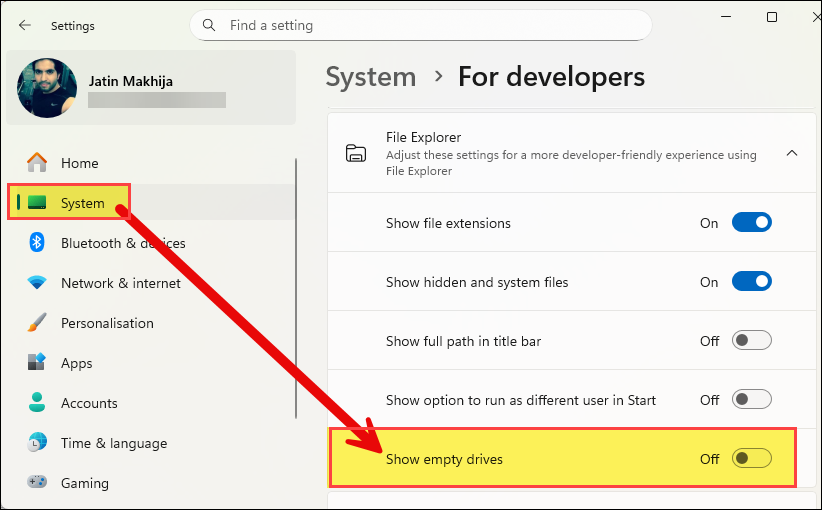
Option 2: Show or Hide Empty Drives using Setting App
To show or hide empty drives using Settings App, Sign in to Windows 11 device > Settings App > System > For developers. Under File Explorer, you will see Show empty drives toggle. Turn it on to show empty drives, keep it off to hide empty drives.
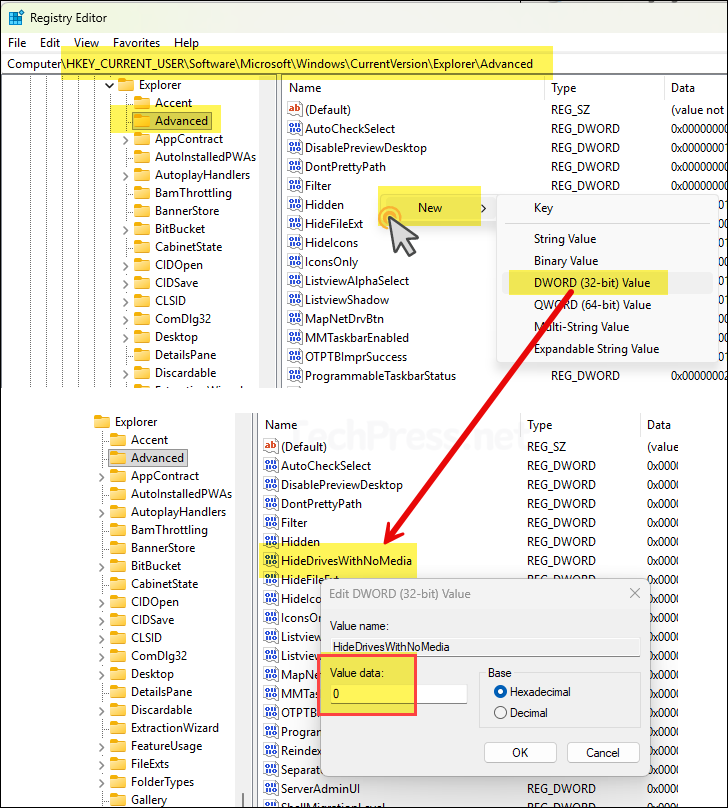
Option 3: Show or Hide Empty Drives using Registry
You can also use registry editor to show or hide empty drives. This solution works on all editions and affects only the current user. You should take a backup of registry data before making any changes.
- Open the registry editor on your system and navigate to below registry path.
- Registry key: HKEY_CURRENT_USER\Software\Microsoft\Windows\CurrentVersion\Explorer\Advanced
- Value: HideDrivesWithNoMedia (DWORD)
1= Hide empty drives0= Show empty drives
Option 4: Show or Hide Empty Drives using PowerShell
Open PowerShell as an administrator and run the following commands to show or hide empty drives. The script will create or update the necessary registry values. Use the -Value switch and set it to either 1 or 0 to hide or show empty drives.
At the end of the script, there is a Stop-Process command that restarts File Explorer. Before running this command, make sure you have saved all your work. Alternatively, you can skip this step and simply sign out and sign back in to Windows for the changes to take effect.
Hide Empty drives [Update -Value switch to 0 to show empty drives]
$Path = 'HKCU:\Software\Microsoft\Windows\CurrentVersion\Explorer\Advanced'
New-Item -Path $Path -Force | Out-Null
Set-ItemProperty -Path $Path -Name HideDrivesWithNoMedia -Type DWord -Value 1   # 1=hide, 0=show
# Restart Explorer to apply immediately:
Stop-Process -Name explorer -Force
Option 5: Show or Hide Empty Drives using Command Prompt
You can show or hide empty drives using command prompt as well. Launch Command prompt as an administrator and execute the command as per your requirements.
:: Hide empty drives
reg add "HKCU\Software\Microsoft\Windows\CurrentVersion\Explorer\Advanced" ^
 /v HideDrivesWithNoMedia /t REG_DWORD /d 1 /f

:: Show empty drives
reg add "HKCU\Software\Microsoft\Windows\CurrentVersion\Explorer\Advanced" ^
 /v HideDrivesWithNoMedia /t REG_DWORD /d 0 /f

:: Restart Explorer (optional, for instant effect)
taskkill /f /im explorer.exe & start explorer.exe