In this blog post, I will demonstrate the steps to enable and configure EPM in Intune. Endpoint Privilege Management (EPM) allows users to continue working as standard users on their devices while still being able to perform tasks that typically require administrative rights. Some common examples of tasks that may require admin rights include: Running Windows diagnostics tools, Installing applications, Updating device drivers etc.
For example:
If a user wants to install Microsoft 365 Apps for enterprise on their device using the OfficeSetup.exe file, they normally wouldn’t be able to do so without admin rights. With EPM, you can create a rule that allows the installation to run with elevated privileges — without granting the user full local administrator access.
I have enabled, configured, and tested Endpoint Privilege Management (EPM) in my tenant from scratch — from purchasing licenses to creating an elevation rule on Intune admin center. In the following sections of this post, you’ll find everything you need to get started with Endpoint Privilege Management (EPM).
- Which license is required to Enable EPM ?
- How to Enable EPM ?
- What happens on the device after you enable EPM ?
- Creating an elevation rules policy.
- EPM Reporting.
Related blog post: Troubleshooting Intune Endpoint Privilege Management.
Contents
Prerequisites
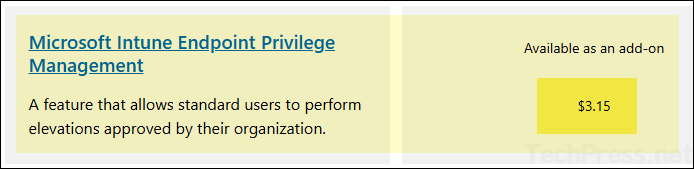
- A standalone EPM add-on license or Microsoft Intune suite license is required. A standalone Microsoft Intune Endpoint Privilege Management license costs $3.15/user/month. Microsoft Intune Suite license costs $10.00/user/month. For more details, refer to the link: Microsoft Intune pricing.
- Microsoft Entra joined or Microsoft Entra hybrid joined devices.
- Intune enrolled Windows 10/11 or co-managed devices.
- Supported OS versions are:
- Windows 11, version 24H2
- Windows 11, version 23H2 (22631.2506 or later) with KB5031455.
- Windows 11, version 22H2 (22621.2215 or later) with KB5029351.
- Windows 11, version 21H2 (22000.2713 or later) with KB5034121.
- Windows 10, version 22H2 (19045.3393 or later) with KB5030211.
- Windows 10, version 21H2 (19044.3393 or later) with KB5030211.
Please note that the Azure Virtual Desktop (AVD) and Workplace-join devices are not supported by EPM.
Steps to Enable Endpoint Privilege Management (EPM)
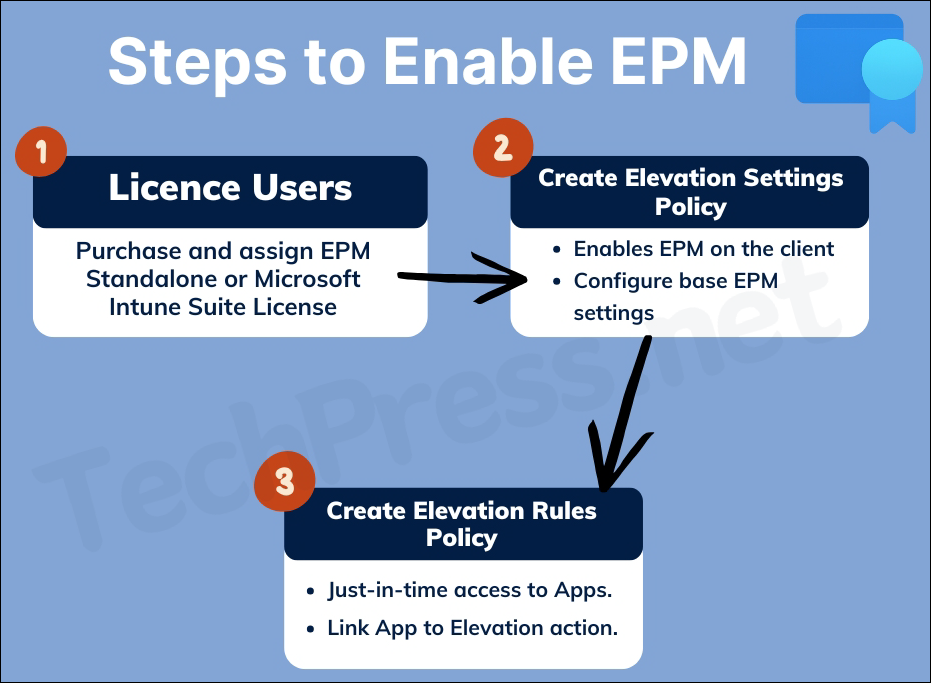
To enable and configure EPM, you will need to complete below three tasks:
- Purchase and assign either standalone EPM licenses or Microsoft Intune suite licenses for end users in your Intune tenant.
- Create an Elevation settings policy: This policy is for enablement of EPM on the client device and also configures the base settings like default elevation response, Reporting scope and whether you want to send elevation data for reporting.
- Create an Elevation rules policy: This policy is required to confugure file information and elevation response. According to the rules defined in the policy, the target application will get elevated rights.
Please note that currently EPM only supports files with .exe, .msi or .ps1 extension.
1. Assign Microsoft Intune EPM License to Users
The first and most important step is to ensure that users are assigned a Microsoft Intune Endpoint Privilege Management license. This license is an add-on to Microsoft Intune Plan 1 or Plan 2.
As of now, only Microsoft Intune Suite includes the Endpoint Privilege Management license. If you are using Intune Plan 1 or Plan 2, you must buy standalone EPM licenses and assign to users in your tenant.
To assign the license, use Microsoft 365 admin center. Starting September 1, 2024, Entra admin center no longer supports license assignment through its user interface. Also, I recommend to use group based license assignment to make the management of licenses easier.
2. Create an Elevation Settings Policy
An Elevation Settings policy is required to enable Endpoint Privilege Management (EPM) on client devices. This policy also allows you to configure the default behavior for elevation requests for any files not managed by an Elevation Rules policy.
For example: If you download software from the internet and try to install it on your device without administrator rights, the installation will fail — even if you right-click the app and select Run with elevated access. Since there is no elevation rules policy exists for this software, the default elevation response (as configured in the Elevation Settings policy) will apply.
Please note that some files downloaded directly from internet are prevented by Windows until they are validated. You need to manually unblock the file from the file properties pane. Unblocking a file should only be done when you trust the file.
A managed file is the one that is explicitly defined in an Elevation Rules policy. All other files on the user’s device are considered unmanaged by EPM and will follow the default elevation response as specified in the Elevation Settings policy.
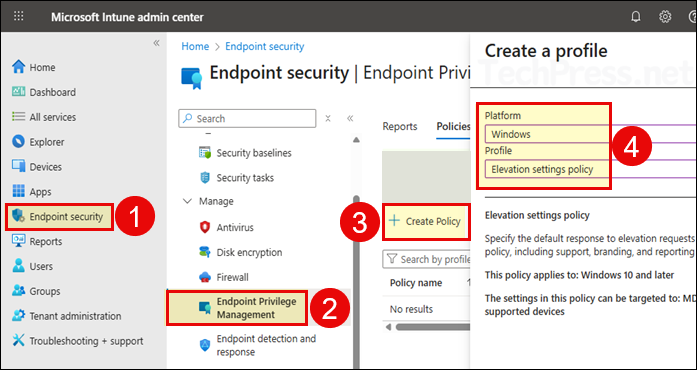
To create an Elevation Settings Policy, follow below steps:
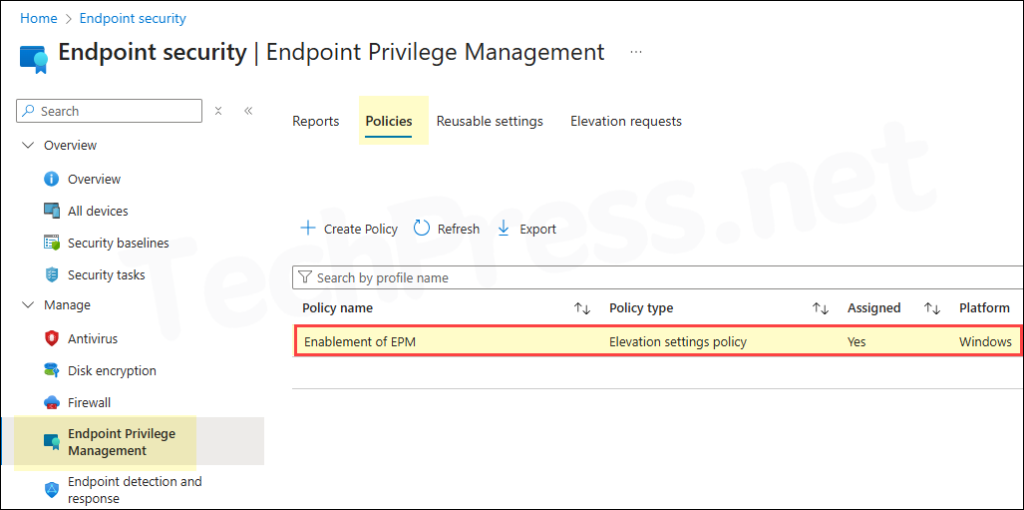
- Sign in to the Intune admin center > Endpoint security > Endpoint Privilege Management > Create.
- Platform: Windows.
- Profile: Elevation settings policy.
- Basics tab: Provide a name and description of the EPM Settings policy. Click Next.
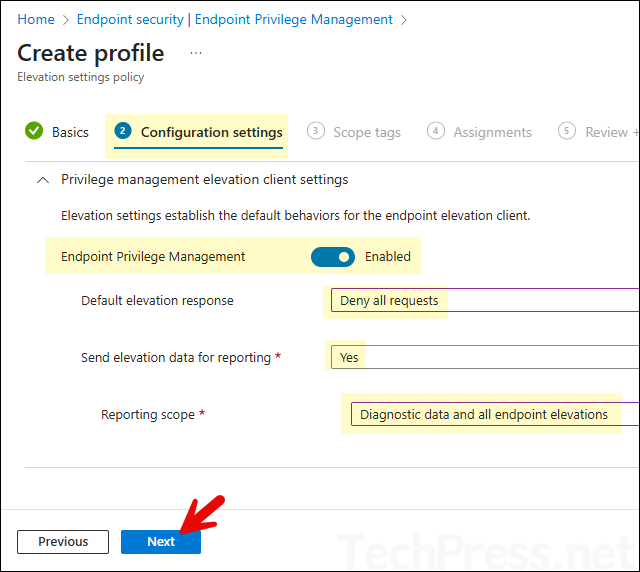
- Configuration settings: Configure below recommended configuration settings.
- Endpoint Privilege Management: Enabled
- Default elevation response: Deny all requests
- Send elevation data for reporting: Yes
- Reporting scope: Diagnostic data and all endpoint elevations
Default elevation response: For default elevation response, you can also select any of the below options. I will recommend keeping Deny all requests as the default response. This default response will be invoked when a user tries to elevate using Run with elevated access and there is no matching elevation rule found for that file.
– Deny all requests: Deny’s user’s elevation request for unmanaged files.
– Require user confirmation: A prompt is shown to the user to confirm if they want to run the application. You can also request user to provide a business justification and/or Windows authentication before the app is executed in administrator context.
– Required support approval: User can submit the elevation request to the administrator after providing a business justification. Admin can approve or reject the request from Intune admin center. If the request is approved, user will get a notification pop-up on their device. If the administrator rejects the application request, no notification is sent to the user. Administrators need to manually communicate the users by other means like email.
– Not configured: This option is same as deny all requests.
- Scope tags: Click Next.
- Assignments: Assign Elevation settings policy to an Entra security group containing users or devices.
- Review + create: Click Create.
If you create multiple Elevation settings policies and assign it to the same device. A conflict can occur in the policies. EPM will apply below default actions until the policy conflict is resolved:
- If there are two conflicting elevation settings policy applied on the device. One Enables EPM and other one disables EPM. The resulting action would be to Enable EPM on the device until the conflict is cleared.
Note
What Happens on a Client Device After Elevation Settings Policy is Applied
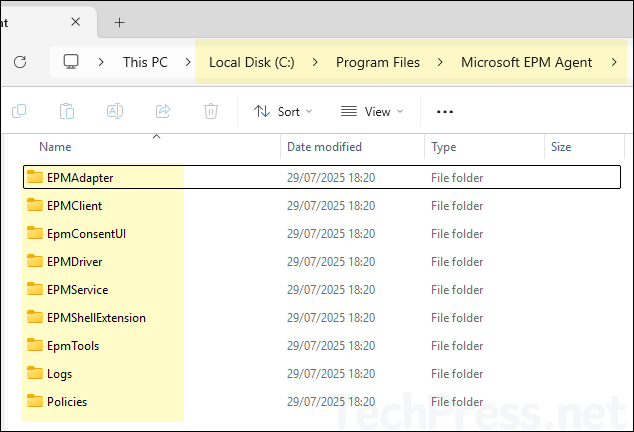
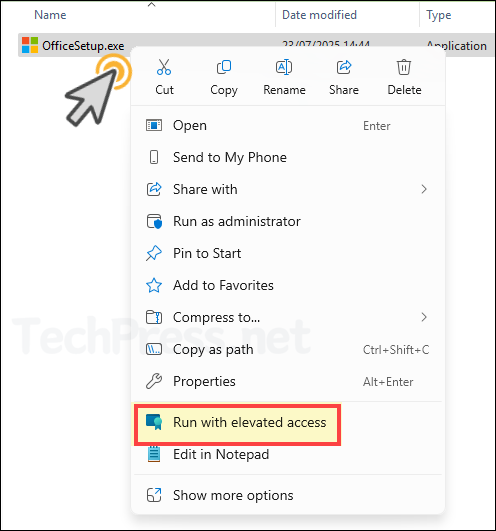
After you create and deploy Elevation Settings Policy, EPM will be enabled on the device. You will find C:\Program Files\Microsoft EPM Agent folder is added to the device along with the EPM Microsoft Agent, which is responsible for processing the EPM policies. The right-click context menu will be updated and will include an option Run with elevated access.
Below screenshot is from a device where Elevation settings policy is applied and Microsoft EPM Agent is installed successfully.
When you right-click on any .exe, .msi, or .ps1 file, you’ll see a new option: Run with elevated access. Selecting this option triggers Endpoint Privilege Management (EPM), which then checks for any configured elevation rules for this file and takes the appropriate action based on the policy settings.
To view the EPM Agent version information and its uninstall command, navigate to the following registry path:
HKEY_LOCAL_MACHINE\SOFTWARE\Microsoft\Windows\CurrentVersion\Uninstall
Under this key, locate the entry for Microsoft EPM Agent, and check the DisplayName and DisplayVersion values to get the installed version details and UninstallString.
Instead of opening Registry Editor and manually navigating to the relevant path, you can simply open a PowerShell console and run the following command to retrieve information about the Microsoft EPM Agent.
Use PowerShell to check EPM Agent version
Get-ChildItem 'HKLM:\SOFTWARE\Microsoft\Windows\CurrentVersion\Uninstall',
              'HKLM:\SOFTWARE\WOW6432Node\Microsoft\Windows\CurrentVersion\Uninstall' |
  Get-ItemProperty |
  Where-Object { $_.DisplayName -match 'Endpoint Privilege Management|EPM Agent' } |
  Select-Object DisplayName, DisplayVersion, Publisher, InstallDate, UninstallString, QuietUninstallString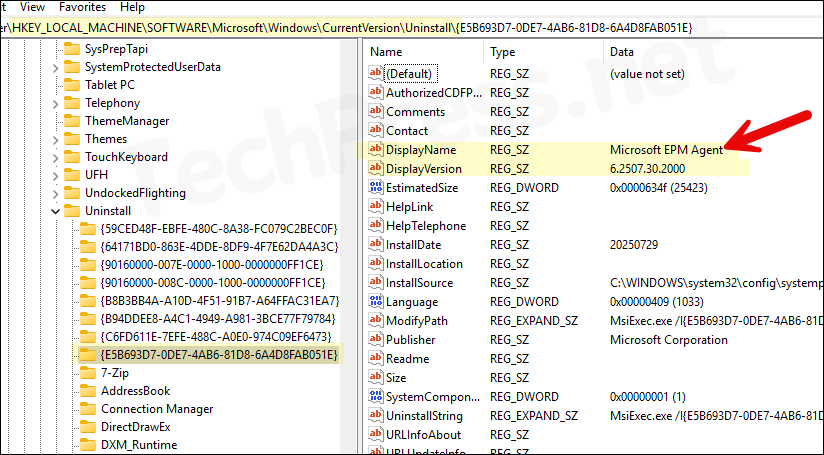
For more Information on the changes on the client device and troubleshooting EPM Issues, refer to the blog: Troubleshooting Intune Endpoint Privilege Management.
Before Configuring Elevation Rules Policy
Before we proceed with configuring an Elevation Rules policy, I’d like to highlight a few important points and complete some prerequisite steps that will help us in the creation of the elevation rules policy.
Key Concepts of an Elevation Rules Policy
An Elevation Rules policy consists of two parts: detection and elevation action. To ensure the rule applies only to the intended file, we provide as much identifying information as possible to detect the file. This may include:
- File attributes
- File hash
- File version
- Publisher or CA certificate
- Product name
- Minimum version details
It is highly recommended to include the file hash when detecting the file, as it uniquely identifies the specific version of the executable. Export the application’s publisher certificate and use it along with the file hash for accurate detection. Also include other file properties like file name, product name, file version etc.
Real-World Example
One of the users in my organization requested to install Microsoft 365 Apps for enterprise. They downloaded the setup file directly from the Microsoft website. The file name is OfficeSetup.exe. Since the user does not have administrator rights, they are unable to install the application on their device.
User submitted a request to IT requesting for just-in-time elevation — specifically to install this application.
As an IT administrator, we need to ensure the following:
- The user is assigned an EPM license.
- An Elevation Settings policy is applied to the user or their device.
- An Elevation Rules policy is created for OfficeSetup.exe file.
To accurately detect the application on the user’s device, we need to gather identifying information from the setup file, such as:
- File hash
- Publisher certificate
- File name
- File path (location)
Retrieve File Hash and Certificate
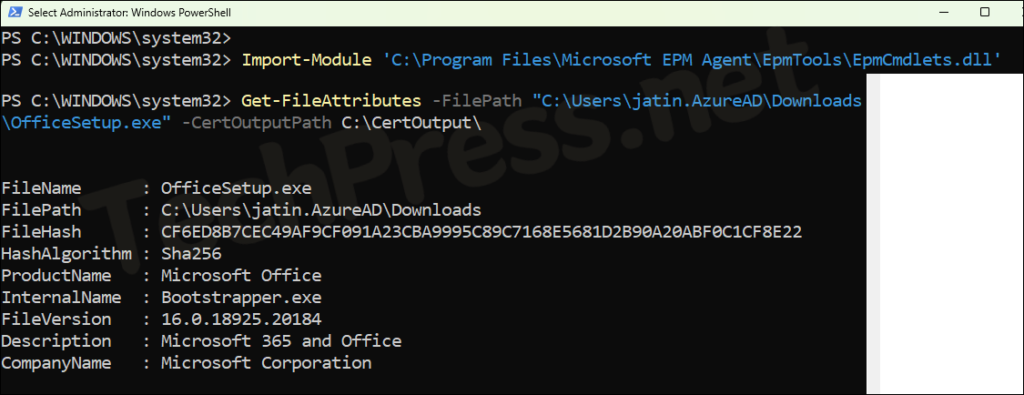
You can use the Get-FileAttributes cmdlet from the EpmTools PowerShell module to retrieve file hash information and export certificates. This module is automatically installed on EPM enabled devices. Sign in to an EPM-enabled device where the file also exists and run the following PowerShell commands:
Update the -FilePath and -CertOutputPath values according to your requirement. As an example, I have OfficeSetup.exe file stored in my downloads folder and I am exporting the certificate in C:\CertOutput\ folder.
Import-Module 'C:\Program Files\Microsoft EPM Agent\EpmTools\EpmCmdlets.dll'

Get-FileAttributes -FilePath "C:\Users\jatin.AzureAD\Downloads\OfficeSetup.exe" -CertOutputPath C:\CertOutput\
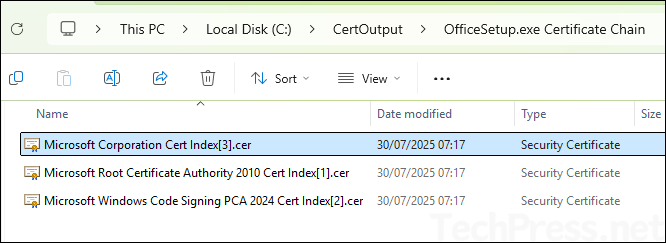
As shown in below screenshot, FileHash information, along with other file attributes, is displayed in the PowerShell console. Copy this information to a Notepad file — you’ll need it later when creating the Elevation Rules policy. Additionally, the certificate is exported to the C:\CertOutput\ folder as specified in the command.
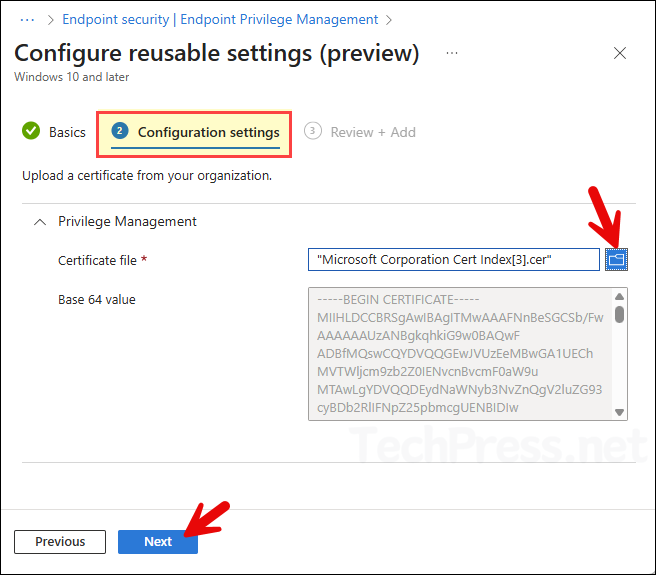
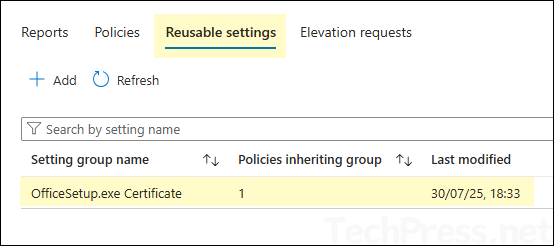
Add the Certificate to Reusable Settings Group
Instead of uploading a certificate to the elevation rule policy directly, you can create a reusable settings group and add the certificate there. Then you can link it to the elevation rule policy. This way certificate files are easy to manage from one place. To create a reusable settings group:
- Sign in to the Intune admin center > Endpoint security > Endpoint Privilege Management > Reusable settings > Click Add.
- Basics tab: Provide a name and description for the reusable settings. For example: OfficeSetup.exe Certificate.
- Configuration settings: Select the publisher certificate file and click on Next.
- Review + Add: Click on Add.
- Certificate will be added and listed under the Reusable settings tab.
3. Create an Elevation Rules Policy
To elevate specific .exe, .msi, or .ps1 files and run them in the administrator context, you must create an Elevation Rules policy. Without this policy, the default elevation response of Deny all requests (as configured in the Elevation Settings policy) will be applied.
To create an Elevation Rules Policy, follow below steps:
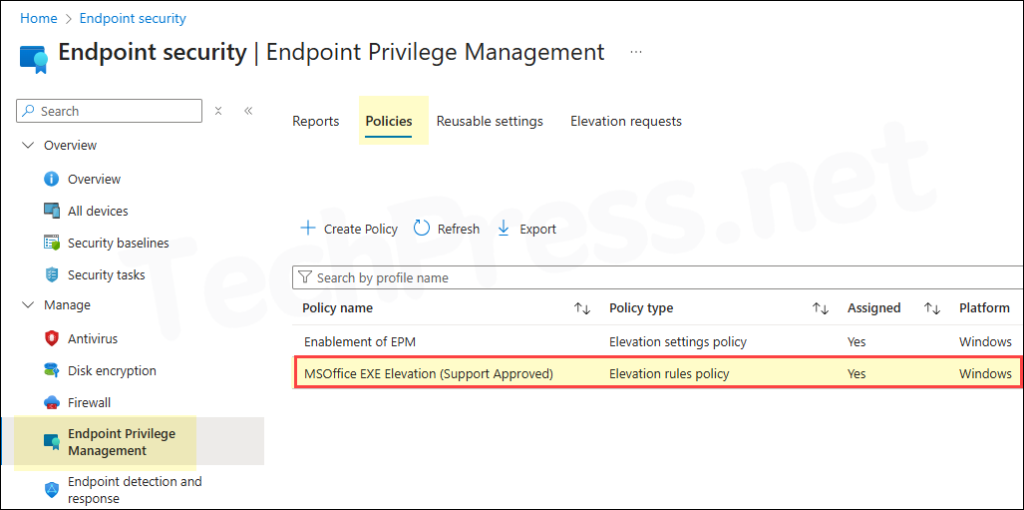
- Sign in to the Intune admin center > Endpoint security > Endpoint Privilege Management > Create.
- Platform: Windows.
- Profile: Elevation rules policy.

- Basics tab: Provide a name and description of the EPM Settings policy. For example: I have provided MSOffice EXE Elevation (Support Approved) name. Click Next.
Configuration settings
Click on Edit instance link to configure the rule settings.
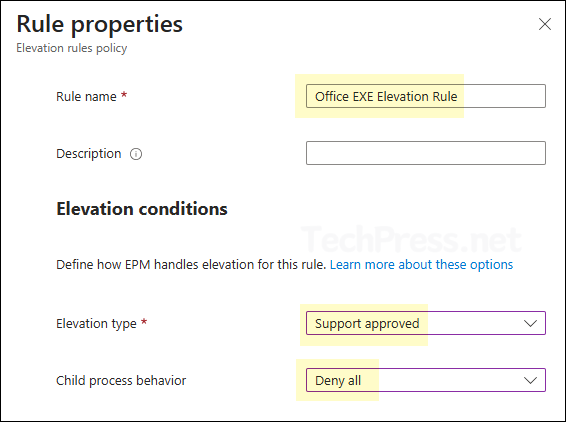
- Rule properties:
- Rule name: Provide a name of the elevation rule.
- Description: Provide a description of the rule.
- Elevation conditions:
- Elevation type: The available options are User confirmed, Automatic, Deny, Support approved and a newly added option Elevate as current user. These are the same options we encountered earlier while configuring the default elevation response setting in the Elevation Settings Policy. Therefore, I won’t go into further detail about them here. I will recommened you to select either Support approved or User confirmed as per the requirement.
- Child process behaviour: The main file may spawn child processes that require admin rights. If installation issues occur, you can either create a specific rule to elevate the child process or select allow all child processes to run elevated. I’ll select Deny all, as it suits my installation needs. By default, the setting is Require rule to elevate.
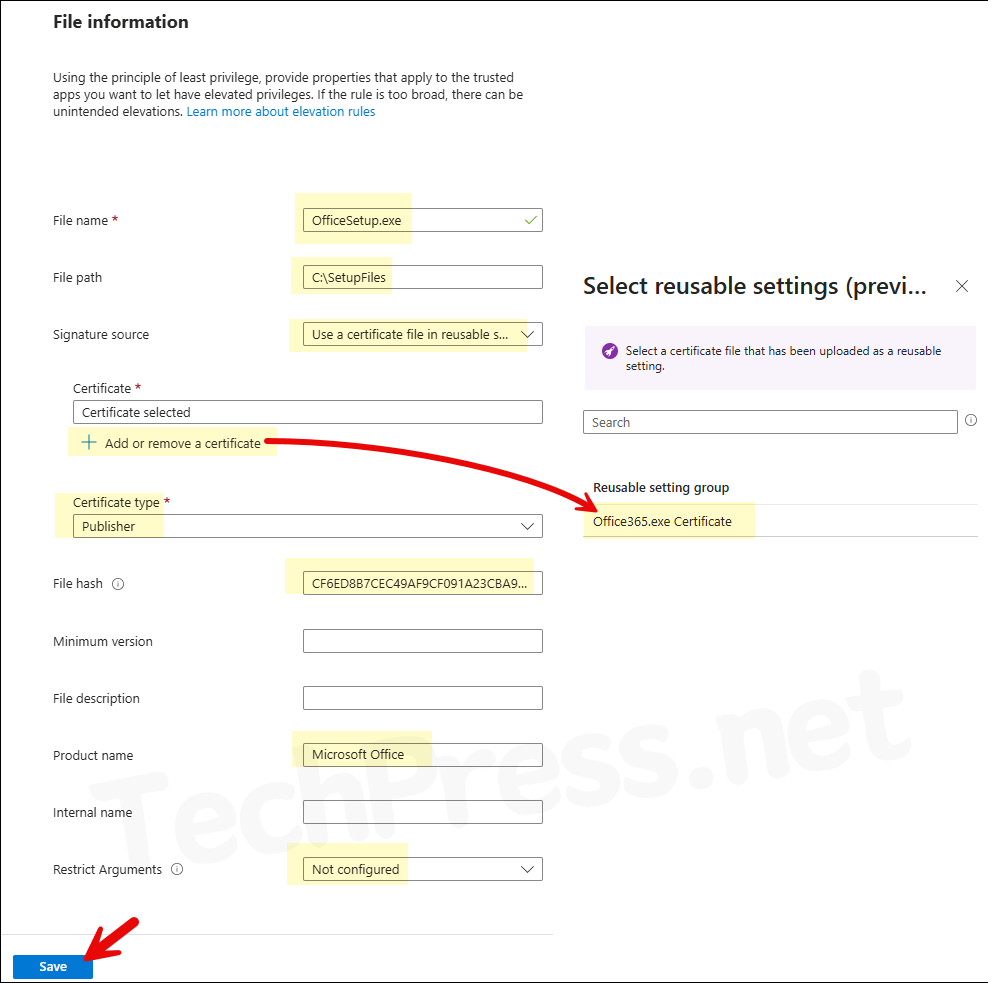
- File Information:
- File name: OfficeSetup.exe
- File path: C:\SetupFiles (I have moved OfficeSetup.exe into C:\SetupFiles folder)
- Signature source: Use a certificate file in reusable settings
- Certificate: Click on Add or remove a certificate and select the certificate.
- Certificate type: Publisher
- File hash: Provide the file hash we copied earlier into a notepad
- Minimum version: Provide minimum version or keep it blank.
- File description: Provide a file description or keep it blank.
- Product name: Microsoft Office
- Internal name: Provide Internal name or keep it blank.
- Restrict Arguments: Not configured
Click on Save to save the rule settings and click on Next.
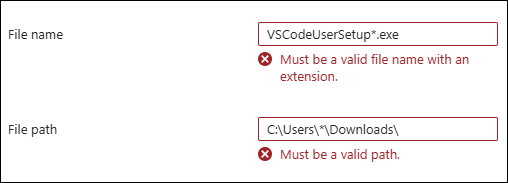
As of the July 21, 2025 Intune service release (2507), you can use wildcards in the file name and file path when creating an Elevation Rules policy. For example, file paths like C:\Users\*\Downloads\ and file names such as VSCodeUserSetup*.exe, VSCodeUserSetup-arm64-*.exe, or VSCodeUserSetup-?????-1.??.?.exe are supported. However, even though I was on Intune service release 2507, wildcards were not being accepted for the file name and file path for some reason. It could be that this update has not yet been fully rolled out to all tenants.
- Scope tags: Click Next.
- Assignments: Assign Elevation rules policy to an Entra security group containing users or devices.
- Review + create: Click Create.
Sync Intune Policies
EPM rules will be applied when your device will check-in with Intune next time. The device check-in process might not begin immediately. If you’re testing this policy on a test device, you can manually kickstart Intune sync from the device itself or remotely through the Intune admin center.
Alternatively, you can use PowerShell to force the Intune sync on Windows devices. Restarting the device is another way to trigger the Intune device check-in process.
End User Experience
After EPM elevation rules policy has been applied on the target user or device. User can right-click on the application and click on Run with elevated access.
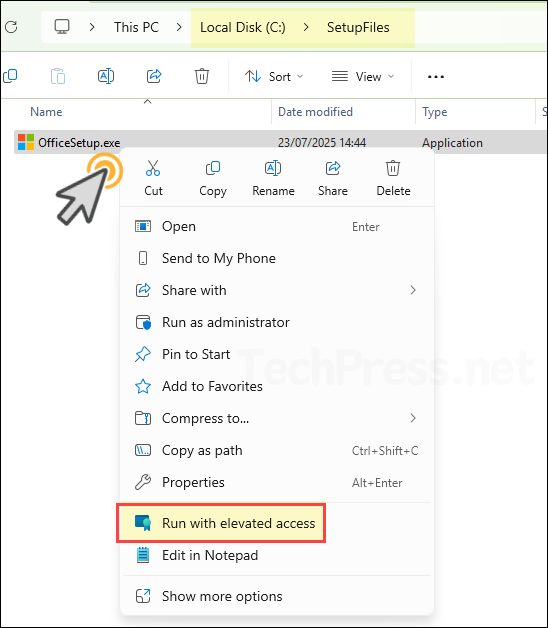
- Provide a business justification and click on Send.
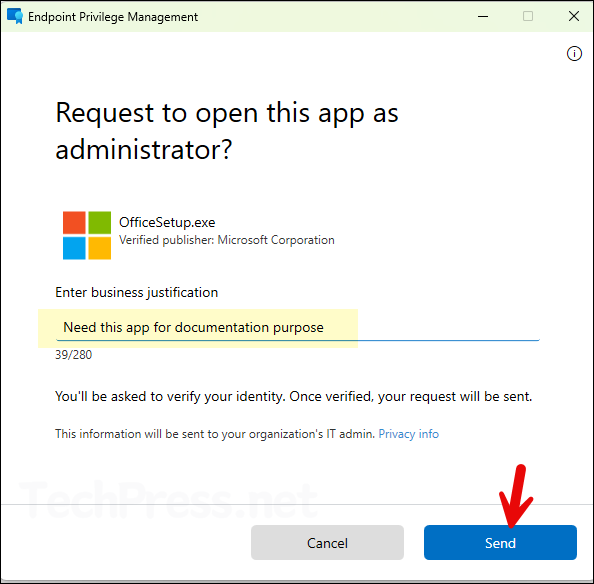
- Your request has been sent to the administrator. You’ll be notified on your device once it’s approved.

Elevation Requests Approval
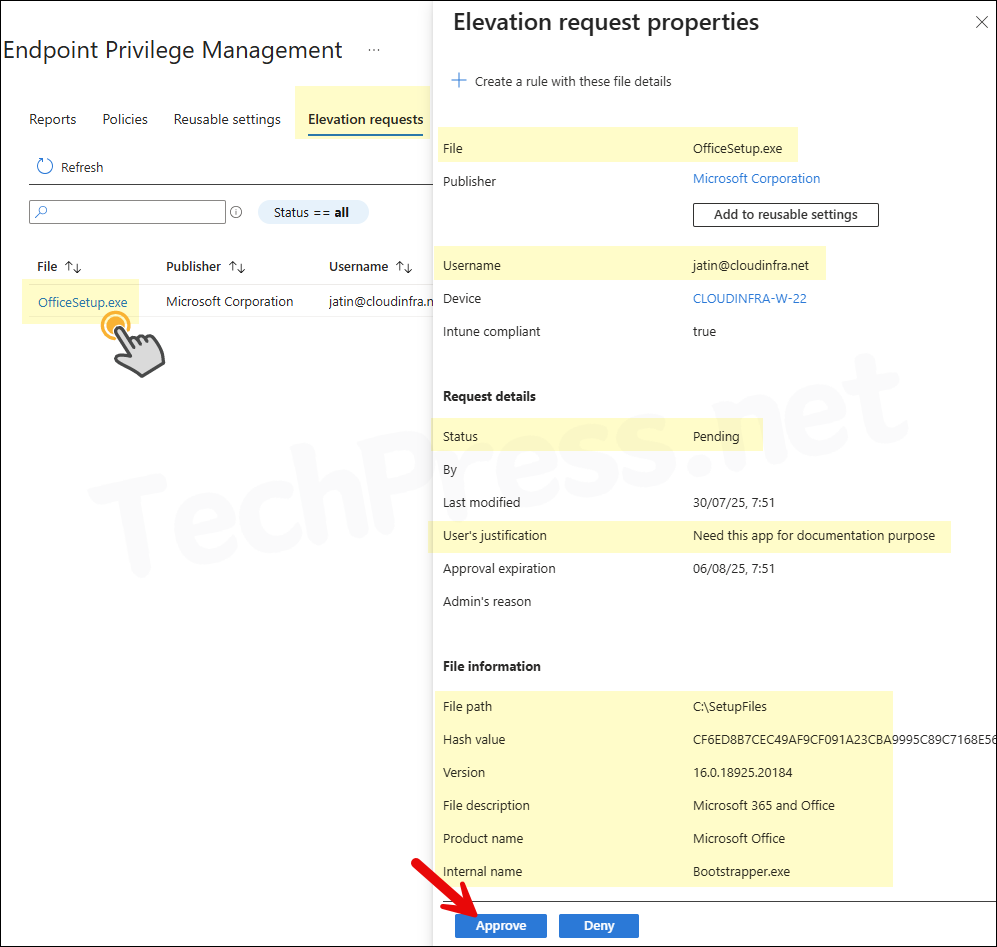
IT administrators with Endpoint Privilege Management Elevation Requests RBAC permission can sign in to the Intune admin center to approve elevation requests. At present, there is no option to receive email notifications for these requests, so administrators need to regularly monitor the Elevation Requests tab to check for any pending approvals.
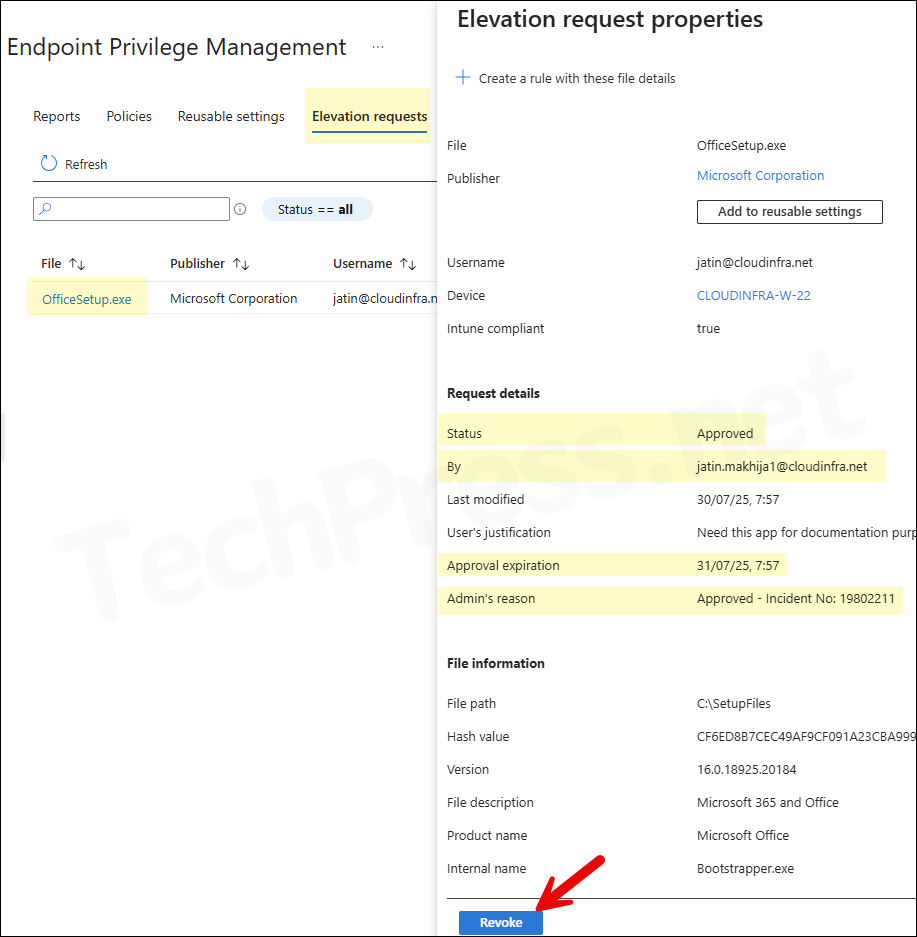
Go to the Elevation Requests tab and locate any pending requests. Click on the file link to view its details. Elevation request properties provide key information to help you decide whether to approve or deny access. Verify that the publisher is trusted and the file name, file hash, and other attributes are legitimate. If Security Copilot is enabled, you can also analyze the file directly from this pane.
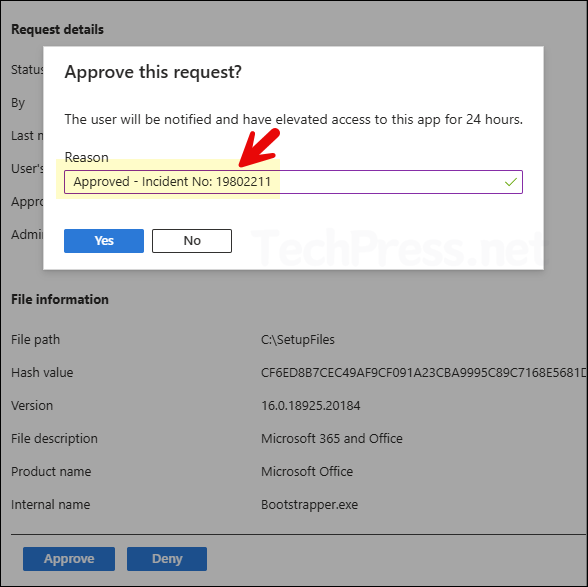
- Provide a Reason for approval. This information will not be sent to the user. Its only for Audit and reporting purpose. Click on Yes. Once the request is approved, user gets 24 hours to run the file as elevated.
- Under the Elevation requests tab you will find all the elevation requests along with their status.
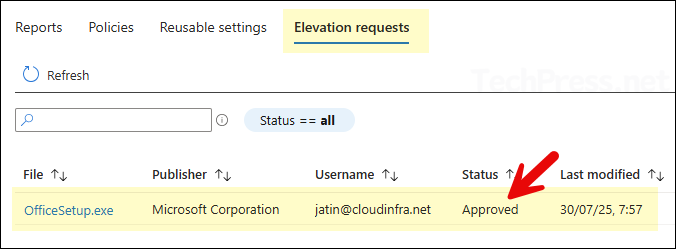
- Click on any Elevation request to open its properties page. It will provide all the Information about an Approved/denied or revoked elevation request.
Back to the Client Device
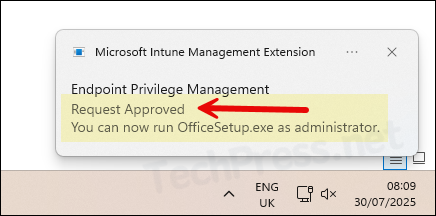
Now, returning to the client device, when an administrator approves the elevation request, user receives a pop-up notification confirming the approval. The notification indicates that the EPM request has been approved and the user can now run OfficeSetup.exe with administrator privileges.
I’ll right-click OfficeSetup.exe file located in C:\SetupFiles and select Run with elevated access. A pop-up message appears asking, Open this app as administrator? and confirming that I’ll have administrator access to this application. Click Continue to proceed.
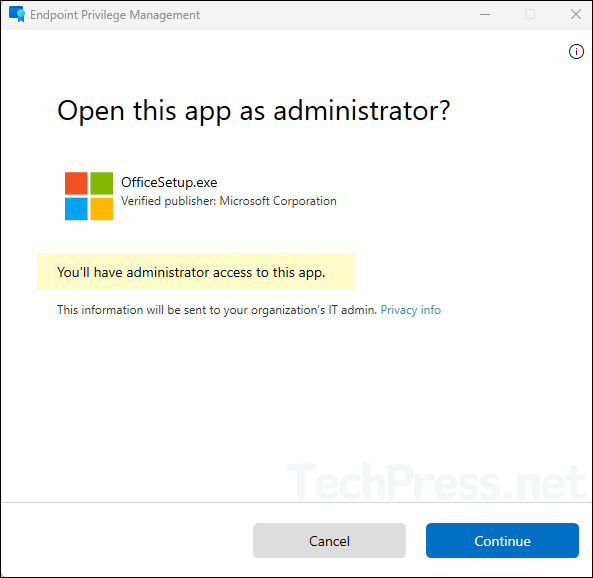
As per the requirement, User is now able to launch Office setup successfully and Install the application on theri device.

Endpoint Privilege Management Reporting
The data available in reporting depends on the Reporting scope configured in the Elevation Settings Policy. Since we previously set this to Diagnostic data and all endpoint elevations, we can expect the report to include comprehensive information, including unmanaged elevations.
EPM reporting data is processed every 24 hours. If you have recently processed an elevation request for a user and don’t see it in the reports, it may not have been processed yet, and you’ll need to wait for the next reporting cycle.
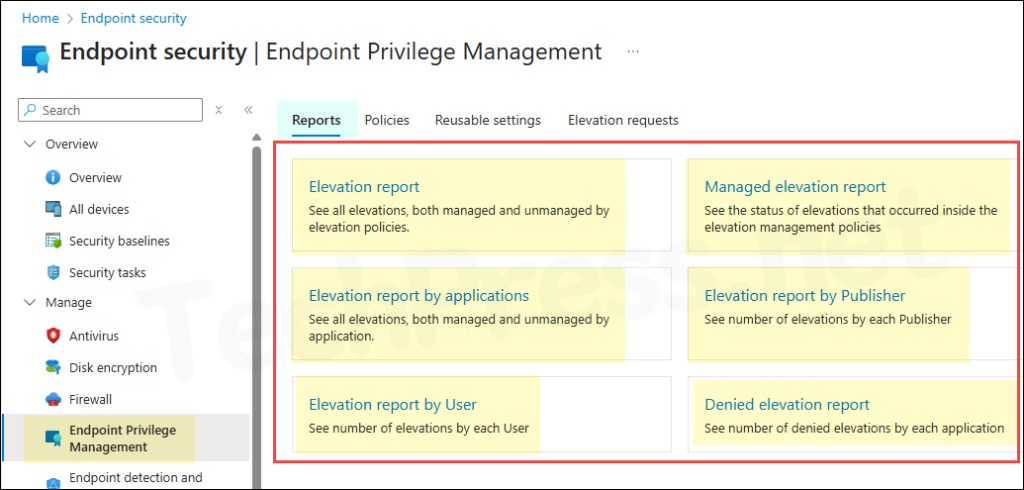
To view all available reports in the Intune admin center under Endpoint Privilege Management, follow these steps:
- Sign in to the Intune admin center > Endpoint security > Endpoint Privilege Management > Reports.
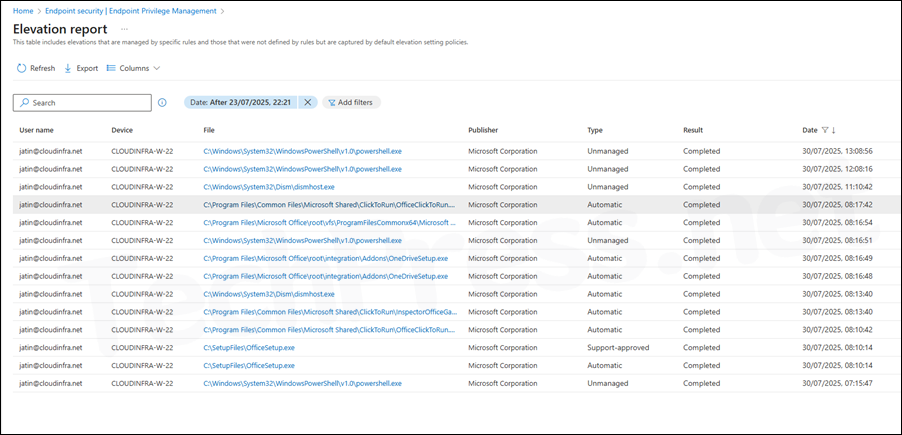
- I clicked on Elevation Report to review all managed and unmanaged elevation activities. The report provides details for each elevation type (such as Automatic or Support-approved) along with the associated User name, Device, File, Publisher, Result, and Date.
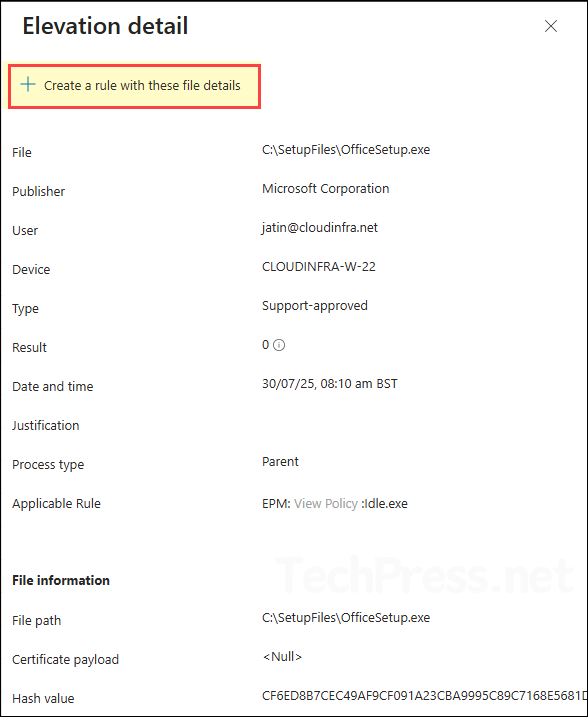
- If you find an application in the list that a user has requested for elevation, you can create an elevation rule directly from there. Simply click Create a rule with these file details to proceed.
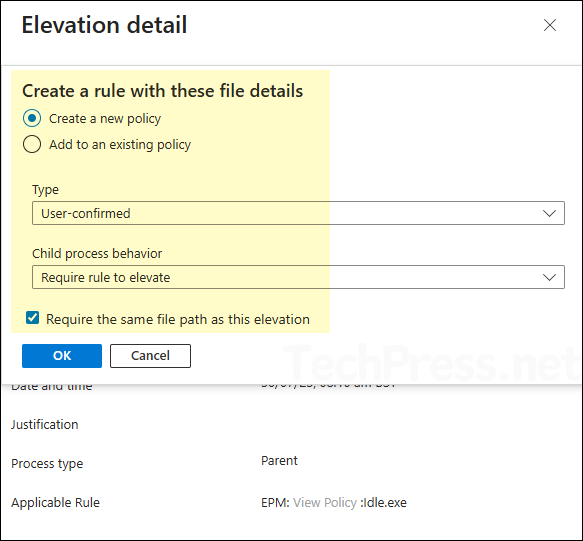
- If you proceed with rule creation directly from the reporting section, you’ll be prompted to either create a new policy or add the rule to an existing one. You’ll also need to confirm the policy type and define the child process behavior.
There are other EPM reports available for you to explore and gather the data related to a specific elevation request:
- Elevation report
- Managed elevations report
- Elevation report by applications
- Elevation report by publisher
- Elevation report by user
Endpoint Privilege Management Troubleshooting
To troubleshoot issues related to Endpoint Privilege Management, refer to my EPM troubleshooting guide: Troubleshooting Intune Endpoint Privilege Management.
Great post. Thank you.
Have you ever created a PowerShell script (ps1 file)?
The ps1 script allows you to modify the IP configuration in admin mode.
I’d like to authorize it with EPM only.