This post is about showing you how to disable driver signature enforcement in Windows 11. Windows 11 blocks unsigned and improperly signed kernel-mode drivers to protect the system from malicious or unstable code. In most cases, this is exactly what you want.
There are, however, legitimate scenarios where you might need to bypass signature checks temporarily, such as testing a custom driver you are developing, installing a legacy device that no longer receives signed updates, or working with lab equipment that ships with unsigned kernel components.
The options below show safe, controlled ways to disable driver signature enforcement temporarily or enable a developer testing mode. Use the lightest method that meets your goal, then re-enable protection as soon as you finish.
Contents
Important Points
- To disable driver signature enforcement, administrator rights are required.
- Back up important data or take a restore point.
- In managed environments, your organization’s security baseline or Device Guard/HVCI policies may prevent these changes.
- Some options require Secure Boot to be disabled in UEFI firmware. Re-enable it afterwards.
What happens when you disable Driver Signature Enforcement?
Disabling Driver Signature Enforcement lets Windows load kernel-mode drivers that are unsigned or test-signed, which can be useful for development, legacy hardware, or niche lab equipment that are not fully signed.
The trade-offs are reduced security and potentially lower stability. Unsigned drivers can hide malware or trigger crashes, and features like Secure Boot or Memory integrity may need to be turned off to make them load, further weakening protection. Core protections such as SmartScreen, Defender, and enterprise policies like WDAC still apply, but you should treat the change as temporary and re-enable enforcement as soon as the driver is installed and verified.
Method 1: Disable Driver Signature Enforcement: One-Time Disablement for the Next Boot (Quickest and Safest)
Use this when you only need to install or load an unsigned driver once.
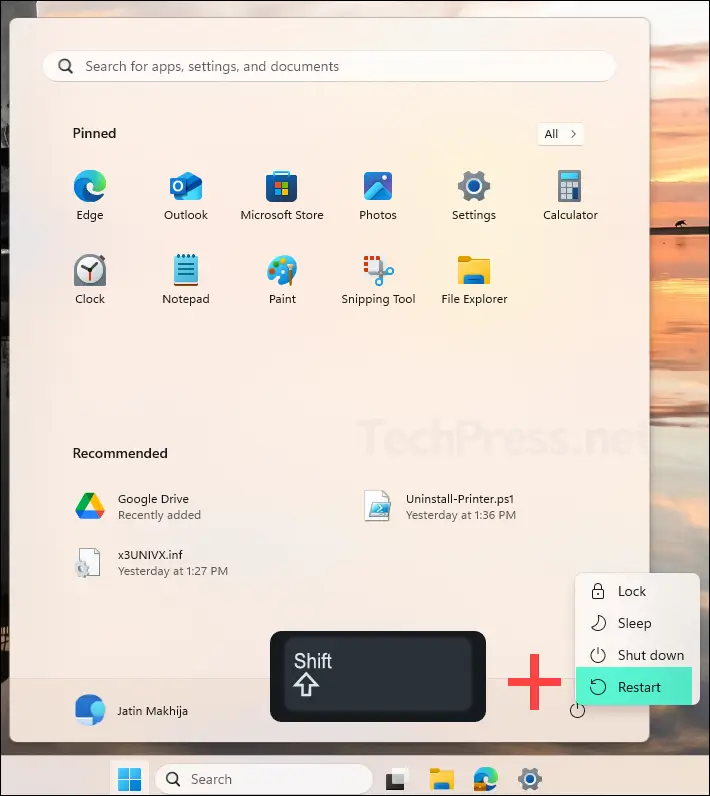
- Save your work and Hold Shift key and click Restart.
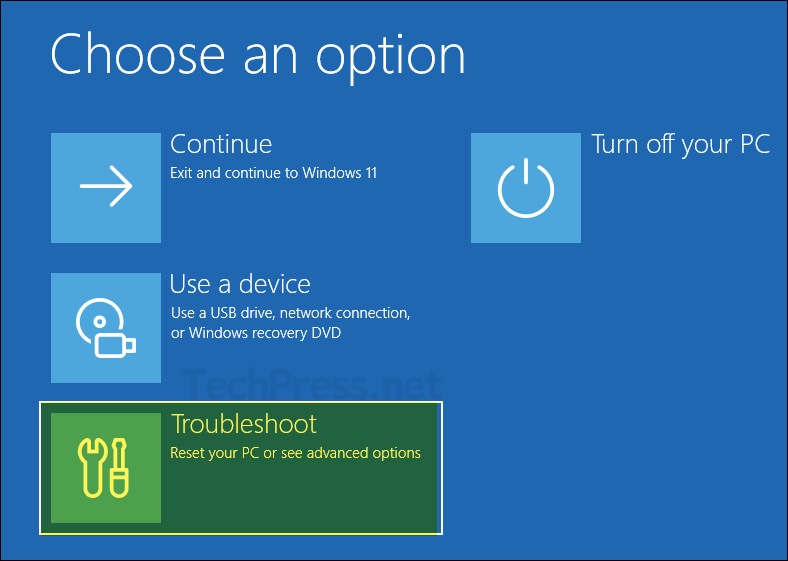
- System will boot into the recovery mode, where you will see below screen. Click on Troubleshoot.
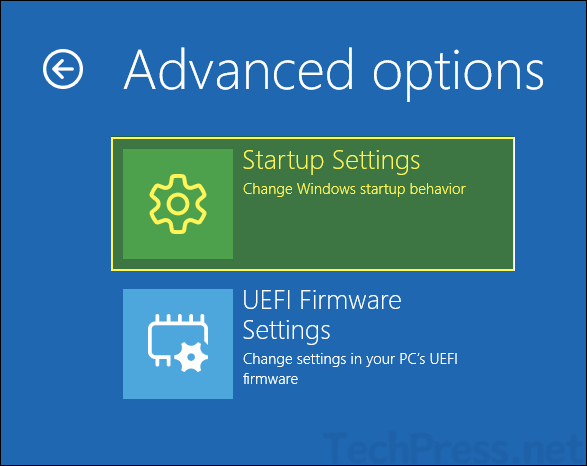
- On Advanced options screen, select Startup Settings.
- Click Restart.
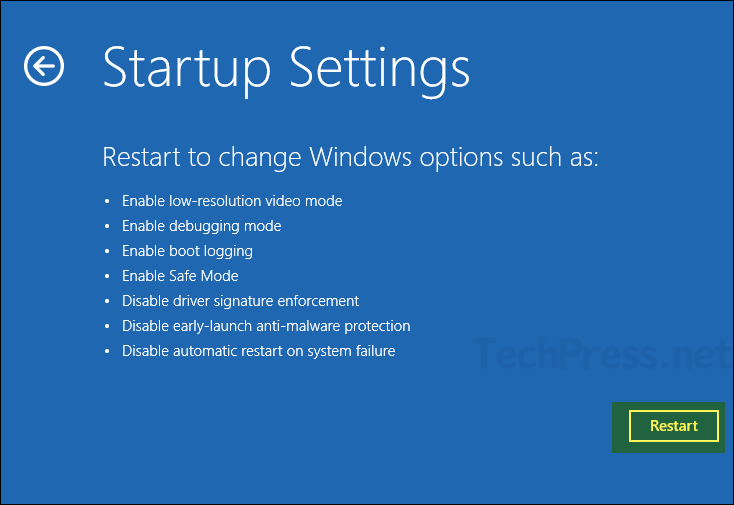
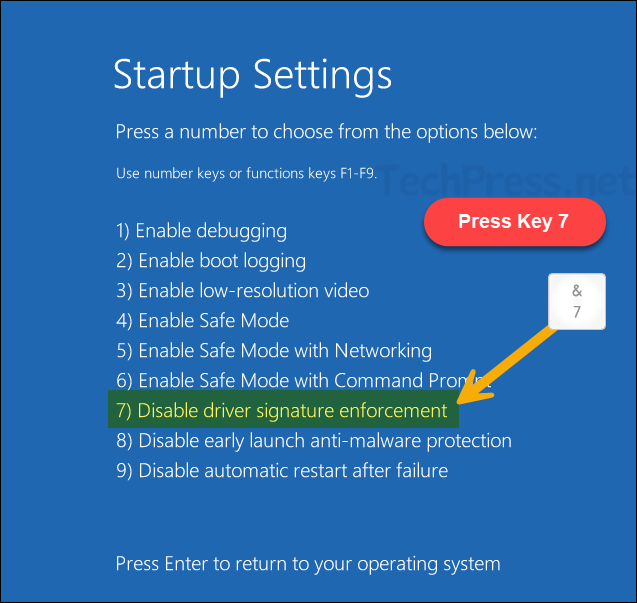
- After the restart, the option to configure the Startup Settings will be available. To disable driver signature enforcement, Press Key 7 on the keyboard. Your system will automatically restart.
Method 2: Disable Driver Signature Enforcement using BCDEdit
Windows has a boot flag to disable kernel integrity checks entirely. This is bit risky as it does not disable driver signature enforcement just one time. It will disable it permanently. Therefore you should only be using this for short period of time only on test devices. Permanently disabling driver signature enforcement is not recommended on Production devices.
- Open command prompt as administrator.
- Run below command:
Disable Driver Signature Enforcement
bcdedit /set nointegritychecks on- After you run the above command, verify if it has been disabled by running bcdedit command. In the output, find the option nointegritychecks and confirm if its set to Yes.
Verify Disable Driver Signature Enforcement
bcdedit Revert it back after Driver Installation
bcdedit /set nointegritychecks off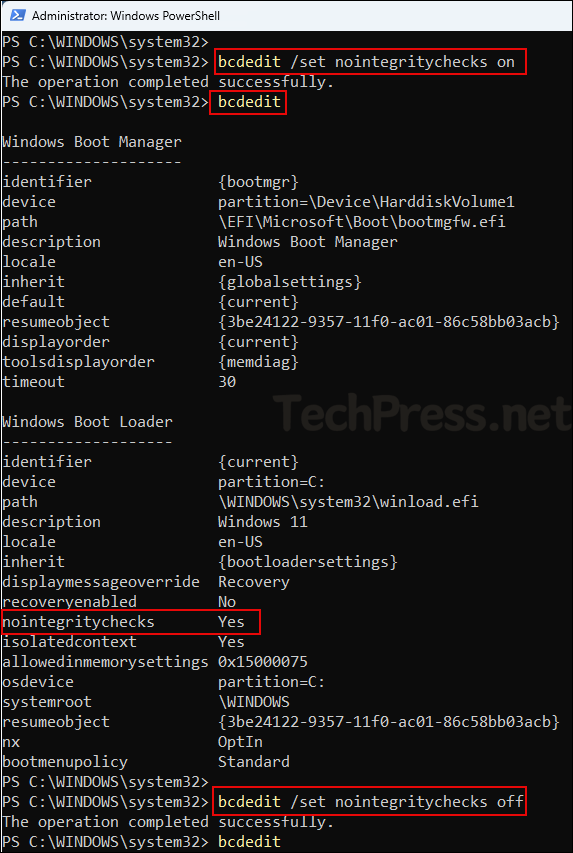
Method 3: BCDEdit in Test Mode
Use this when you are developing or repeatedly testing drivers. Windows will accept test-signed drivers.
- Open command prompt as administrator.
- Run below command:
Disable Driver Signature Enforcement
bcdedit /set testsigning on- If your PC uses Secure Boot, enter UEFI firmware settings and temporarily disable Secure Boot. Test Mode will not activate on many systems while Secure Boot is on.
- Restart the PC. You should see a small Test Mode watermark on the desktop.
- Install and use your test-signed driver.
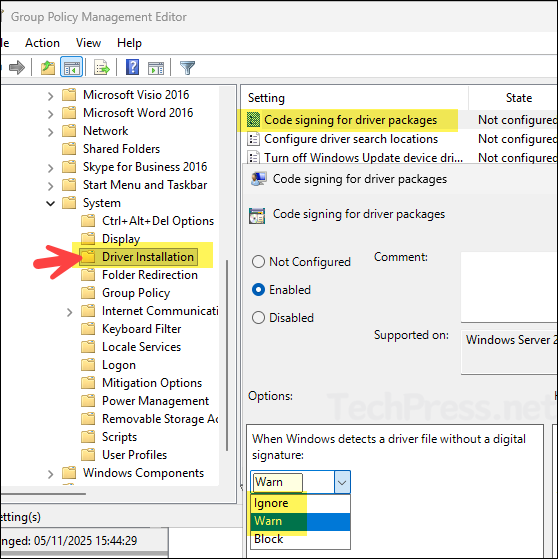
Method 4: Disable Driver Signature Enforcement using Group Policy (GPO)
You can also disable driver signature enforcement by using a Group policy for your active directory domain joined client PCs. The group policy setting is Code signing for device drivers, which lets you enable or disable the driver signature enforcement. There are three options for this setting, Ignore, Warn and block.
- Ignore: Allow installing unsigned drivers without prompting.
- Warn: Prompt before installing unsigned drivers.
- Block: Prevent installing unsigned drivers (default behavior).
Create a GPO to Disable Driver Signature Enforcement
- Login to a domain controller and open Group policy management console (gpmc.msc). Right-click on Group Policy Objects > Select New and provide a name of the New GPO, For example: Disable Driver Signature Enforcement.
You can also remotely manage the group policies by installing RSAT tools on Windows 11.
- Right-click on the newly created GPO and click on Edit. Navigate to User Configuration > Policies > Administrative Templates > System > Driver Installation.
- O the right-hand side, double-click on the setting Code signing for driver packages and then set it to Enabled. For the setting What happens when windows detects a driver file without a digital signature, select either Warn or Ignore to disable driver signature enforcement.
- Once the GPO is created, it will only take effect after you link it to an OU. Because this GPO contains settings under User Configuration node, it’s best to apply it to an OU that contains users.
On 64-bit Windows 11, this policy does not let an unsigned kernel-mode driver load. It only affects the installation staging prompt behavior. Kernel-mode code integrity still blocks unsigned drivers at load time. If your goal is to actually run an unsigned kernel driver, use one of the methods we covered earlier.