This blog will cover the step on how to disable ELAM in Windows 11. Early Launch Anti-Malware (ELAM) is a Windows security feature that ensures only trusted drivers load on your device. In most cases, you do not need to make any changes to ELAM. Keeping it enabled (default state) provides protection against malicious drivers loading on the system. However, in special cases like troubleshooting or third-party Antivirus conflicts, you can temporarily disable this feature.
ELAM is a Windows security feature that makes sure an antimalware driver loads at the very start of the boot process, before any third-party drivers. This gives security software, such as antivirus solutions, the first chance to run in kernel mode and evaluate other drivers as they load. If a malicious driver attempts to enter the kernel, the ELAM driver can detect it early and prevent it from being initialized.
About ELAM
Disabling ELAM on a Windows device removes the early boot protection that blocks malicious or unknown drivers before the operating system loads, increasing the risk of rootkits and bootkits. It should only be done temporarily for troubleshooting or debugging.
Contents
Important Points
- ELAM loads a driver (e.g., Microsoft Defender’s
WdBoot.sys) before other boot-start drivers and let Windows decides whether to load known bad or unknown drivers based on the ELAM policy specified in this registry key: HKEY_LOCAL_MACHINE\SYSTEM\CurrentControlSet\Control\EarlyLaunch\DriverLoadPolicy.
- If you’re using a non-Microsoft AV, Microsoft requires Microsoft Defender Antivirus ELAM driver to be enabled, so Defender for Endpoint can start correctly. If you see device onboarding errors like 577/1058, then enable ELAM driver to fix it.
- By default, ELAM policy will initialize known good and unknown drivers, but will not initialize known bad drivers. This is configurable using Group policy or Intune (one of the methods shown in this post)
Method 1: Disable ELAM Temporarily via Advanced Startup
You can temporarily disable ELAM using the Advanced Startup options. This is the easiest and safest way to turn it off. The change applies only for a single boot, and ELAM will be enabled again automatically after the next restart. Let’s go through the steps:
- Sign in to the Windows 11 device.
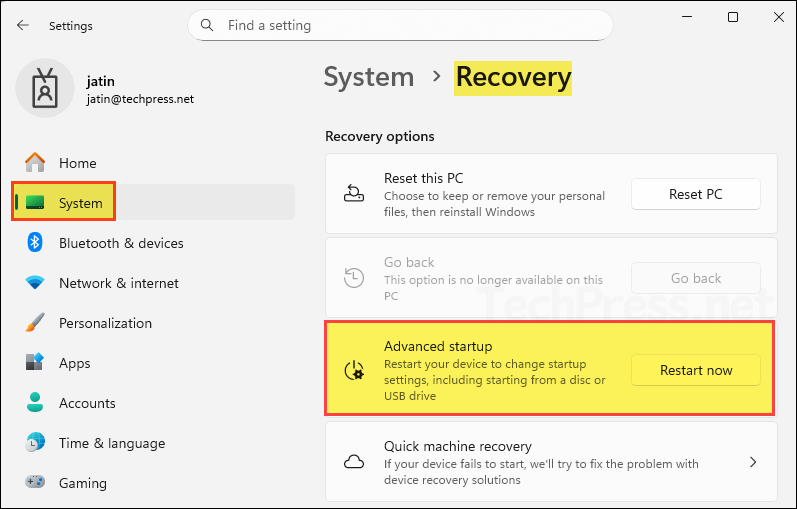
- Open the Settings App > System > Recovery > Advanced startup > click Restart now.
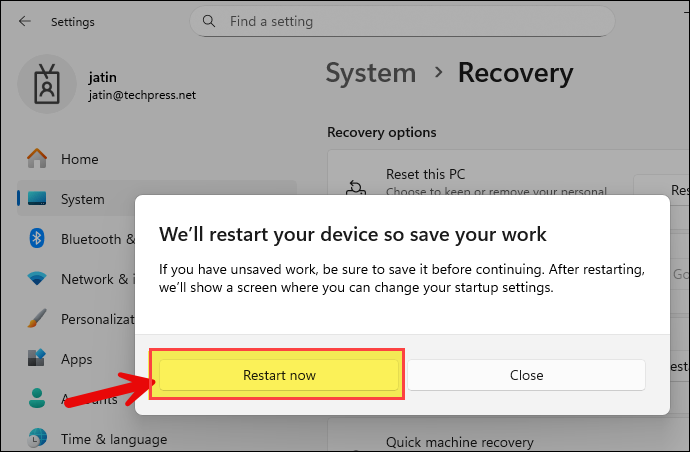
- Ensure that you have saved your work, and then click on the Restart now button to restart your device.
- Windows will now boot directly into the recovery mode. Click on Troubleshoot > Advanced options.
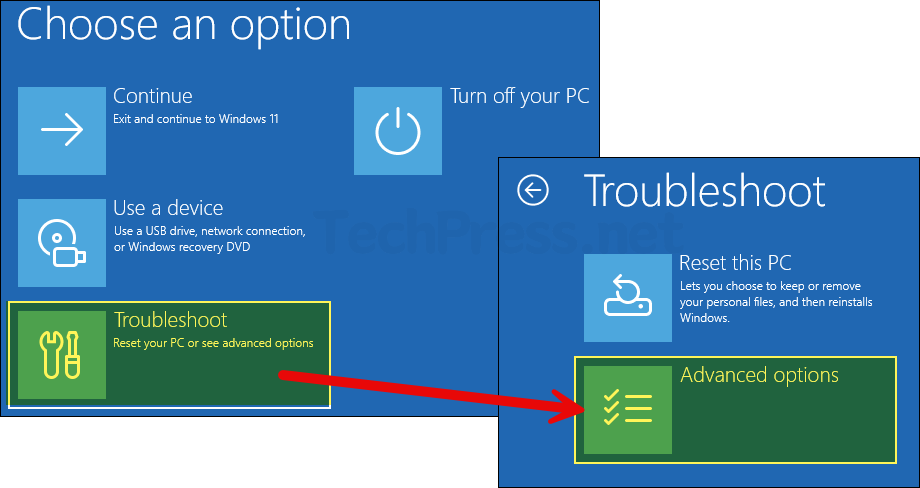
- Click on Startup Settings.
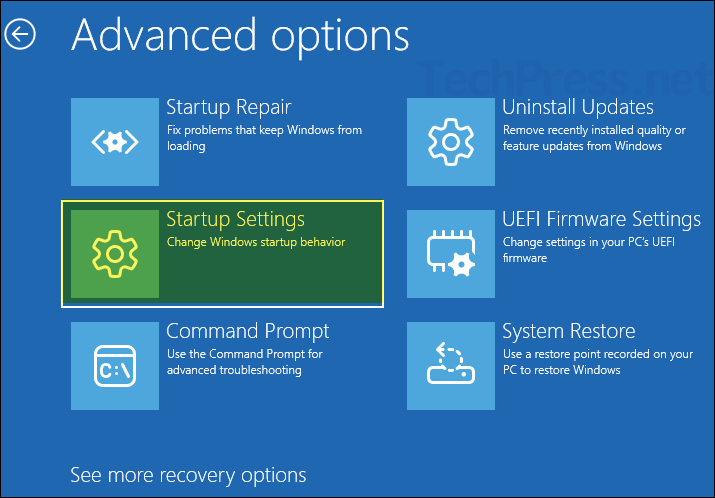
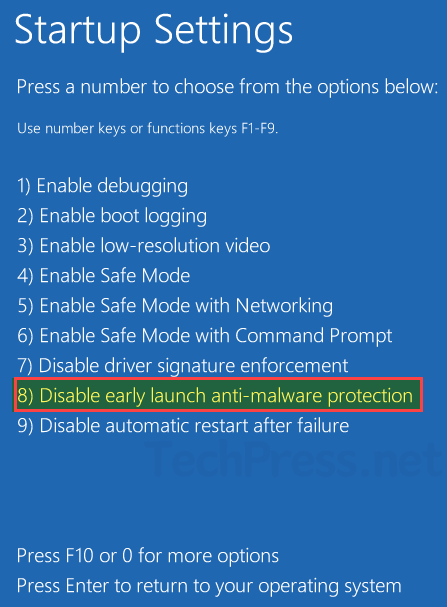
- Click the Restart button to reboot your device. After the restart, you will see a screen that lets you configure or modify these options.

- In the Startup Settings list, 8th option is Disable early launch anti-malware protection. Press 8 or F8 on your keyboard to select it and reboot your device. This will temporarily disable ELAM.
Method 2: Hard Disable ELAM via Boot Configuration
Another option is a hard disable or permanently disable ELAM on Windows 11 device. For this, we will use a built-in Windows command-line tool called bcdedit to modify the boot configuration data (BCD) store. Even if you reboot your Windows computer multiple times, ELAM will stay disabled. You can use the same command again to re-enable it. In the next sections, I have provided the commands to disable and re-enable ELAM.
Disable ELAM using bcdedit
- Sign in to the Windows device on which you want to disable ELAM.
- Right-click the command prompt and select Run as administrator.
- Execute below command to disable ELAM.
Disable ELAM
bcdedit /set {current} disableelamdrivers yes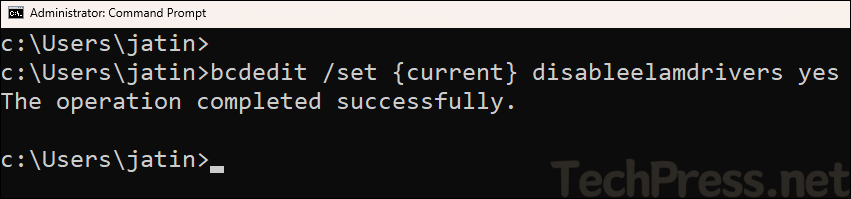
- Restart your computer. That’s it! ELAM is disabled.
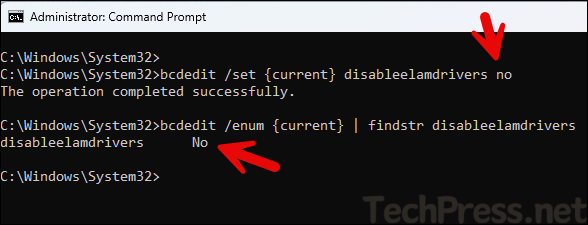
Verify if ELAM is disabled
To verify if ELAM is disabled, you can open a command prompt and run below command. disableelamdrivers value should be Yes.
Verify ELAM is disabled
bcdedit /enum {current} | findstr disableelamdrivers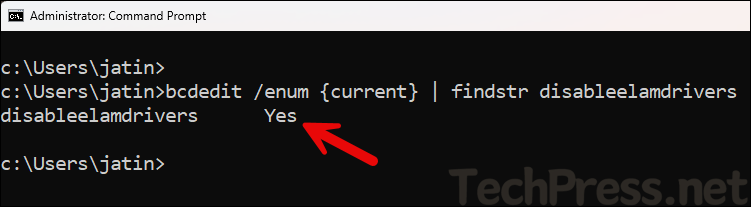
Re-Enable ELAM
If you have finished troubleshooting and want to re-enable ELAM, open an elevated Command Prompt and run one of the following commands, then restart your device:
Enable ELAM (Use any command)
bcdedit /deletevalue {current} disableelamdrivers

Or

bcdedit /set {current} disableelamdrivers no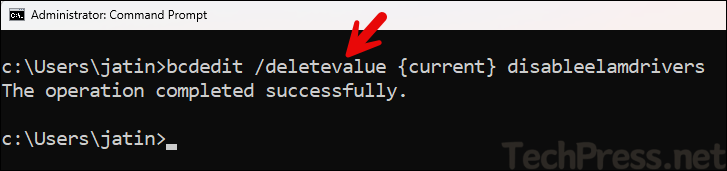
Running bcdedit /set {current} disableelamdrivers no also re-enables ELAM. Instead of removing the disableelamdrivers flag, this command keeps the flag in place but sets its value to No. Restart your computer to apply the change. Use one of the above commands, you don’t need to use both the commands to enable ELAM.
To verify if ELAM driver for defender is existing on the disk, execute below command on PowerShell console. If it returns true, then, ELAM driver is existing. You can also manually go to the given path and check if WdBoot.sys file exists.
(Test-Path 'C:\Windows\System32\drivers\wd\WdBoot.sys'), (Test-Path 'C:\Windows\ELAMBKUP\WdBoot.sys')Method 3: Disable ELAM using Group Policy
Another option to disable ELAM is by creating a Group policy. To create a GPO, use Group Policy Management Console (gpmc.msc). This console is already installed on an Active Directory domain controller, and you can also install it on a Windows 11 PC by adding the RSAT: Group Policy Management Tools optional feature from the Settings app.
- Open Group policy management console (gpmc.msc).
- Go to Computer Configuration > Policies > Administrative Templates > System > Early Launch Antimalware > Boot-Start Driver Initialization Policy. Set this to Enabled and for the option choose the boot-start drivers that can be initialized, select All.
This policy setting controls which boot-start drivers are initialized, based on classifications returned by the Early Launch Antimalware (ELAM) driver. Each driver is evaluated at startup and assigned one of the following classifications:
- Good: The driver is signed and has not been tampered with.
- Bad: The driver is identified as malware. It is strongly recommended not to allow these drivers to load.
- Bad but required for boot: The driver is identified as malware, but Windows cannot boot successfully without it.
- Unknown: The driver has not been attested by the antimalware solution and cannot be classified by the ELAM driver.
If you enable this policy setting, you can specify which types of drivers should be initialized during the next system startup.
If you disable or do not configure this policy setting, Windows will initialize drivers classified as Good, Unknown, or Bad but required for boot, and will block those classified as Bad.If no ELAM driver is available (for example, your antimalware product does not include one, or it has been disabled), this policy setting has no effect and all boot-start drivers are initialized by default.
About Boot-Start Driver Initialization Policy GPO setting
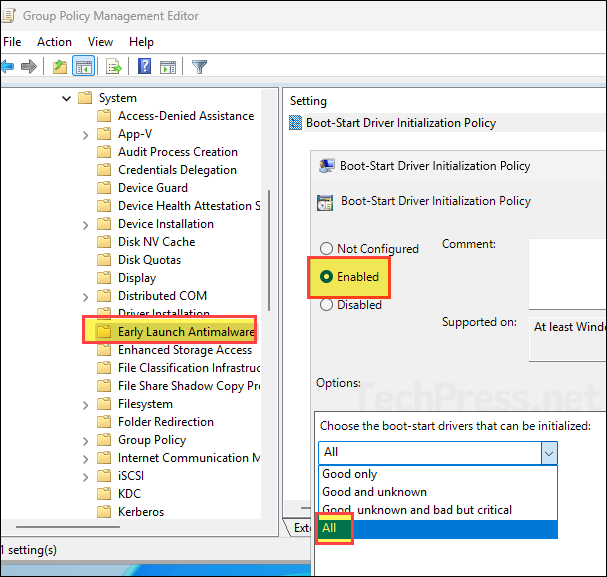
- Once the GPO is created, make sure to link it to an OU that contains the computers you want to target. On target computers, you can either wait for the standard policy refresh cycle (up to 90 minutes) or open Command Prompt and run
gpupdate /forceto apply the policy immediately.
Method 4: Disable ELAM using Intune
You can also disable ELAM using Intune by creating a device configuration profile as shown below.
- Sign in to Intune admin center > Devices > Windows > Configuration > Create > New Policy.
- Platform: Windows 10 and later
- Profile type: Settings catalog
- Click Create.
- Basics: Provide a name and description of the profile.
- On Configuration settings tab, click on + Add settings and use the Settings picker to search using boot-start and select Administrative Templates\System\Early Launch Antimalware category. Select Boot-Start Driver Initialization Policy.
- Boot-Start Driver Initialization Policy: Enabled
- Choose the boot-start drivers that can be initialized: All
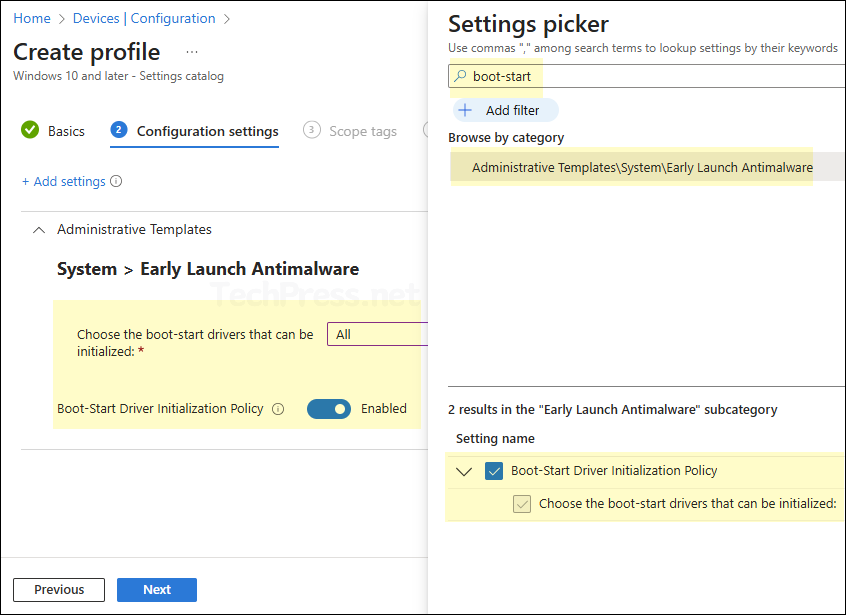
- Scope tags (optional): A scope tag in Intune is an RBAC label you add to resources (policies, apps, devices) to limit which admins can see and manage them. For more Information, read: How to use Scope tags in Intune.
- Assignments: Assign the policy to Entra security groups that contain the target users or devices. As a best practice, pilot with a small set first; once validated, roll it out more broadly. For guidance on assignment strategy, see Intune assignments: User groups vs. Device groups.
- Review + create: Review the deployment summary and click Create.
Method 5: Disable ELAM using Local Group Policy Editor
You can also use the Local Group Policy Editor on a Windows 11 device to disable ELAM. The policy location and setting to configure are the same as when creating a Group Policy Object on a domain controller. The only difference is that the Local Group Policy Editor applies the policy only to the individual device, not across the domain.
- Sign in to the Windows 11 device on which you want to disable ELAM.
- Press Win + R to open the Run dialog box.
- Type gpedit.msc and press Enter to open the Local group policy editor.
- Go to Computer Configuration > Policies > Administrative Templates > System > Early Launch Antimalware > Boot-Start Driver Initialization Policy. Set this to Enabled and for the option choose the boot-start drivers that can be initialized, select All.
Troubleshooting
In case of any issues, here are a few tips to help you troubleshoot and apply the changes correctly.
- Ensure you are running Command prompt as Administrator, otherwise the commands will fail.
- After applying changes, always restart the device for the new settings to take effect.
- Verify ELAM status by checking the BCD configuration and the
DriverLoadPolicyregistry value. - If the system fails to boot, use Advanced Startup > Startup Settings and select Disable early launch anti-malware protection to get back into Windows and reconfigure.
- If
bcdeditcommand is not recognized, then check if you are executing the command in PowerShell console and switch to command prompt.
Conclusion
In this post, we learned about ELAM on Windows and how to enable or disable it. In most cases, there is no need to turn off ELAM, and doing so will leave your system exposed at the earliest stage of startup. Disabling ELAM means that all drivers, including potentially malicious ones, will be allowed to load during boot, increasing the risk of rootkits and other low-level threats. Disable it only temporarily if you are in a troubleshooting scenario.