In this blog post, I will demonstrate the steps to configure Platform SSO for macOS using Intune. Platform SSO is Apple’s built-in way for Mac devices to enable single sign-on (SSO) using passwordless authentication, Microsoft Entra ID or smart card based authentication.
Platform SSO lets users sign in to macOS with their Microsoft Entra ID and then get seamless SSO in apps and browsers. You can deploy a single Settings catalog policy that will configure Microsoft’s Enterprise SSO plug-in and Platform SSO both. There is no requirement of separate SSO app extension profile.
When you deploy Platform SSO on a Mac, the device registers with Microsoft Entra ID and receives a workplace-join (WPJ) certificate. That certificate is hardware-bound and only Microsoft Enterprise SSO plug-in can access it; apps and browsers use it (via the plug-in) to satisfy Conditional Access and provide seamless SSO. If you choose the Secure Enclave method, macOS also provisions a hardware-backed platform credential for passwordless sign-in, without changing the local Mac password.
Contents
Key Features of Platform SSO
- True Single Sign-On (SSO): Users sign in once and get SSO in Edge, Safari, and Chrome (v135 onwards, previous chrome versions require Microsoft SSO extension) browsers.
- Passwordless options, including a Secure Enclave key and smart cards: For phish-resistant, Use Secure Enclave (Touch ID backed keys) or use smart cards; password sync is also supported if you select the Password method.
- Fewer prompts and fewer passwords to manage: If you select Secure Enclave, the experience is similar to Windows Hello for Business: minimal re-auth and fewer credentials for users to remember.
- Simpler policy model in Intune: Platform SSO includes the SSO app extension. No separate SSO app extension profile is required once Platform SSO is in place.
- Microsoft Entra join on macOS: Devices receive a hardware-bound workplace-join (WPJ) certificate so apps and browsers can satisfy Conditional Access.
- Just-in-time local account creation, role mapping, and shared device options: You can create accounts at login, map IdP groups to local admin/standard or specific rights, use network authorization for accounts without a local user, and enable Authenticated Guest Mode for shared Macs (requires shared device keys).
- Token lifecycle handled by the platform: Platform SSO refreshes tokens automatically and, by default, forces a full sign-in roughly every 18 hours; you can tune refresh behavior.
- Licensing: Included with all Intune plans, no extra SKU.
Prerequisites
- macOS: 13+ (Sonoma 14+ recommended).
- App: Intune Company Portal 5.2404.0+ (includes Platform SSO).
- Browsers: Edge; Safari; Chrome (v135 onwards).
- Intune RBAC role: Device configuration, Read, Create, Update and Assign permissions required. For more Information, refer to the link: How to Create Custom RBAC role in Intune.
Before we begin
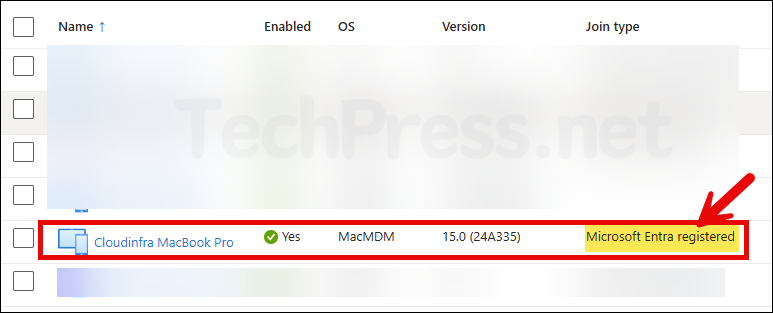
Before we start the configuration steps, I want to show the current state of my Mac. It’s already enrolled in Intune and registered with Microsoft Entra. You don’t need to enroll the device before applying the Platform SSO policy, you can create an Intune Settings Catalog policy first and enroll the device afterward. Once the device receives the policy, it will be Microsoft Entra joined.
Step 1: Authentication Method
You need to specify the authentication method while creating Platform SSO policy on Intune. Users will sign in to their Mac devices with the authentication method you configure in this policy. Select from any of the below options.
- Secure Enclave (recommended): This is a Microsoft recommended option, which is similar to Windows hello for business. In this method, SSO plug-in will use hardware-bound cryptographic keys and not the Entra credentials for SSO to apps and browsers. It’s passwordless and phishing-resistant.
- Smart card: This option is also passwordless and phishing resistant. Users can use smart card certificate and associated PIN to sign in.
- Password: Use this to sign in to the macOS device using Entra ID username and password instead of local account password. Entra ID will replace local account password with its password and ensures that both are in sync. Local account username stays the same.
Step 2: Create Platform SSO Policy
Let’s create Platform SSO policy in the Intune admin center. Before you begin, prepare a Microsoft Entra security group with your target macOS users or devices for assignment. Start with a small test group, validate results, then expand to more devices.
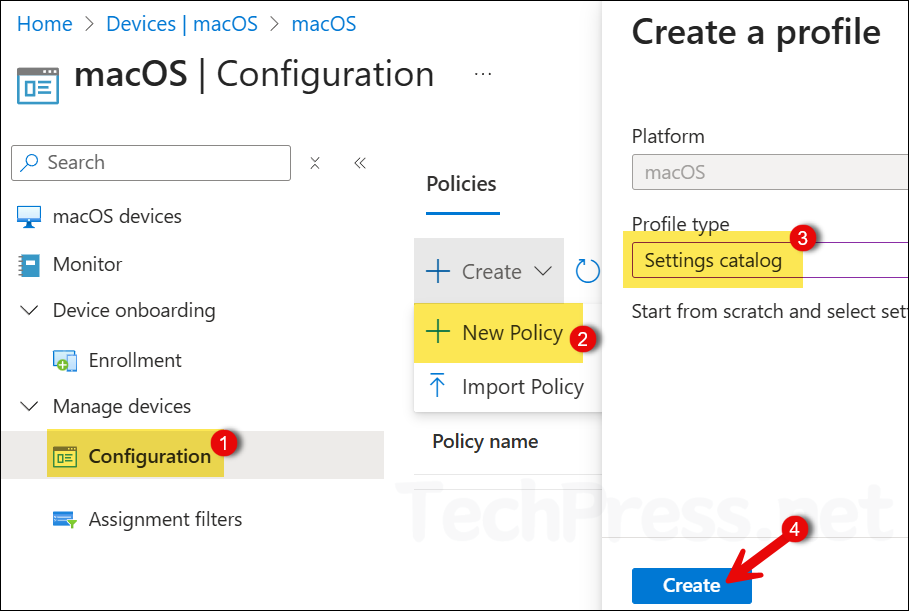
- Sign in to the Intune admin center > Devices > macOS > Configuration > Create > New Policy.
- Click on the Profile type drop-down and select Settings Catalog. Click Create.
- Basics tab: Provide a Name and Description of the policy. For example: Platform SSO for macOS.
Configuration tab
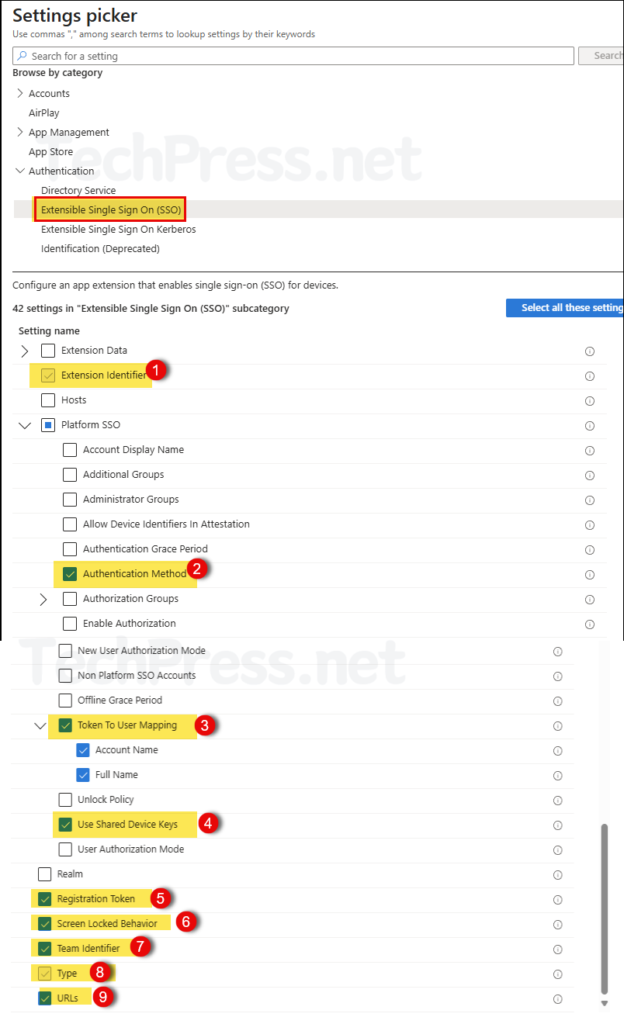
Click on + Add settings and use the Settings picker to select Extensible Single Sign On (SSO) under Authentication. I would be selecting below settings to configure Platform SSO on macOS v14+ devices (macOS Sequoia).
- Extension Identifier
- Expand Platform SSO:
- Select Authentication Method
- Select Token To User Mapping
- Select Use Shared Device Keys
- Registration Token
- Screen Locked Behavior
- Team Identifier
- Type
- URLs
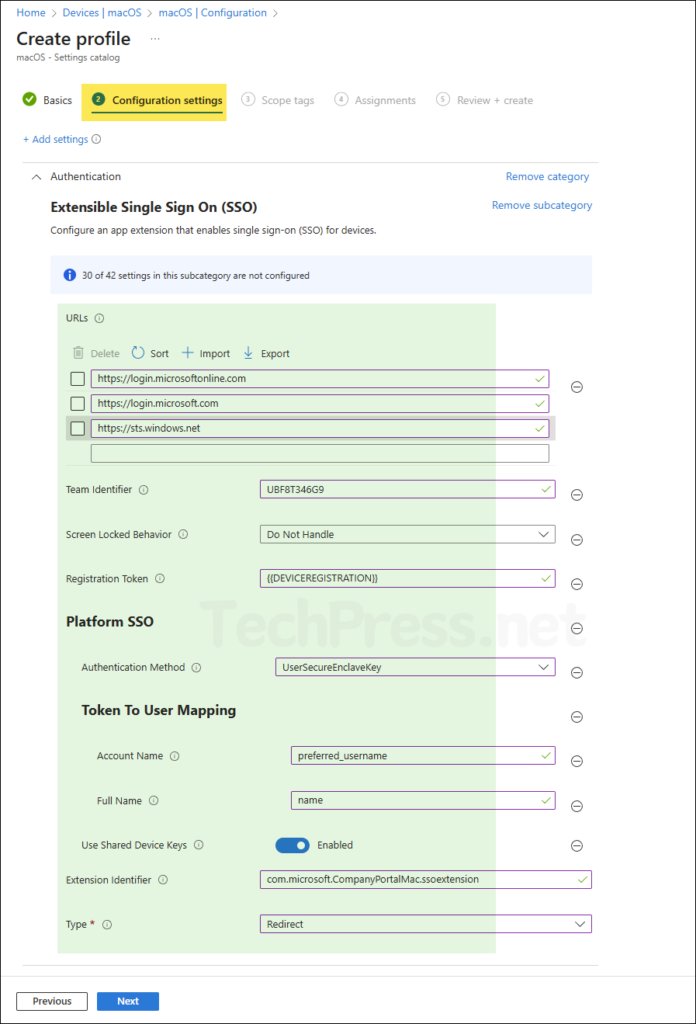
Configure the values for the selected settings as per below table. Copy and paste them exactly as shown. I’m using the SecureEnclaveKey authentication method; you can change this to Smart Card or Password as per your requirements.
| Sr. No. | Setting | Value |
|---|---|---|
| 1 | Extension Identifier | com.microsoft.CompanyPortalMac.ssoextension |
| 2 | Platform SSO > Authentication Method | UserSecureEnclaveKey |
| 3 | Token To User Mapping > Account Name | preferred_username |
| 4 | Token To User Mapping > Full Name | name |
| 5 | Platform SSO > Use Shared Device Keys | Enabled |
| 6 | Registration Token | {{DEVICEREGISTRATION}} |
| 7 | Screen Locked Behavior | Do Not Handle |
| 8 | Team Identifier | UBF8T346G9 |
| 9 | Type | Redirect |
| 10 | URLs | https://login.microsoftonline.com https://login.microsoft.com https://sts.windows.net |
- Scope tags (optional): This is an optional configuration, skip it by clicking on Next. A scope tag in Intune is an RBAC label you add to resources (policies, apps, devices) to limit which admins can see and manage them.
- Assignments: Assign this policy to an entra security group containing macOS devices or users. It’s a best practice to test the policy on a few users/devices first. If it’s working fine, then extend it further.
- Review + create: Review the policy settings and click on Create.
Sync Intune Policies
The device check-in process might not begin immediately. If you’re testing this policy on a test device, you can manually kickstart Intune sync from the device itself or remotely through the Intune admin center.
Alternatively, you can use PowerShell to force the Intune sync on Windows devices. Restarting the device is another way to trigger the Intune device check-in process.
Monitor Microsoft SSO Extension Installation Progress
- Go to Devices > macOS > Configuration. Select the profile you want to monitor.
- Check under Device and user check-in status to confirm the success of the profile deployment.
- For additional details, click Device Assignment Status and Per Setting Status.
End User Experience
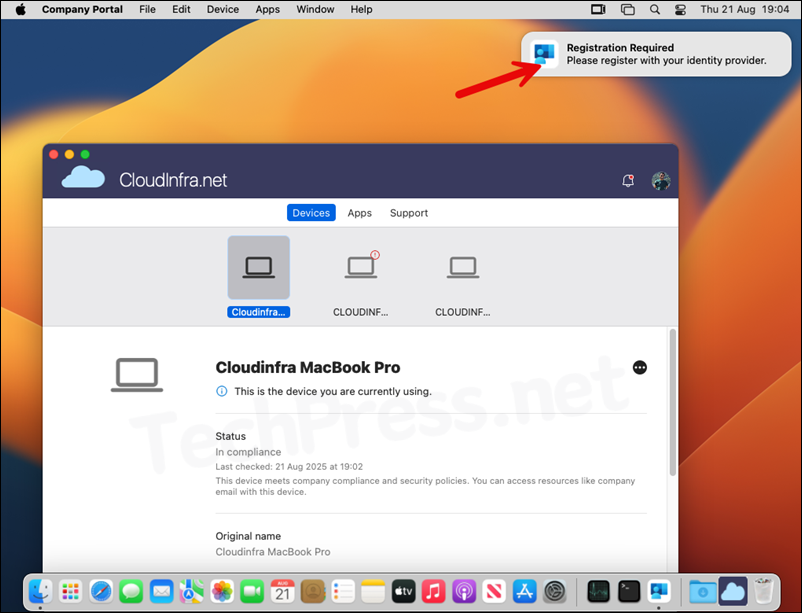
After the Intune device check-in process is completed, users will get a pop-up at the top right-hand side corner of the screen which reads Registration Required, Please register with your identity provider. Click on the pop-up to start the registration process.
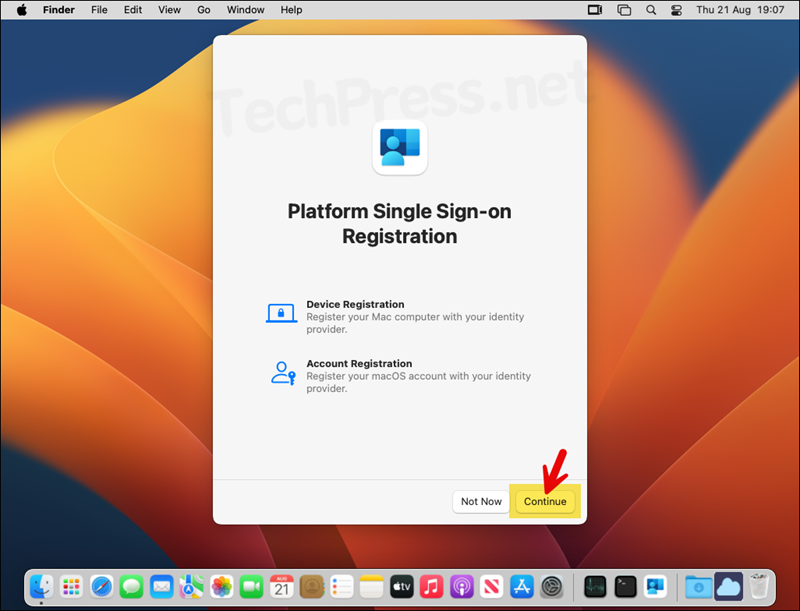
- On Platform Single Sign-on Registration screen, click Continue.
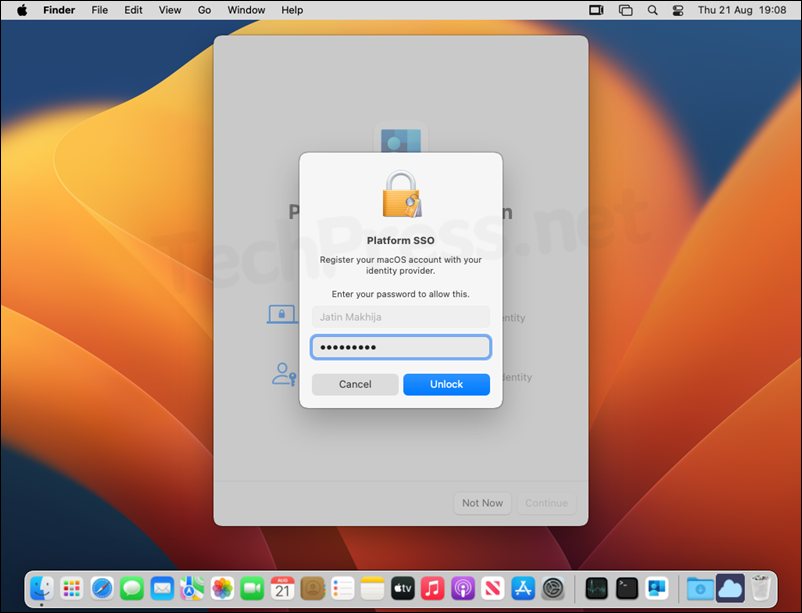
- Provide your local account credentials and click Unlock.
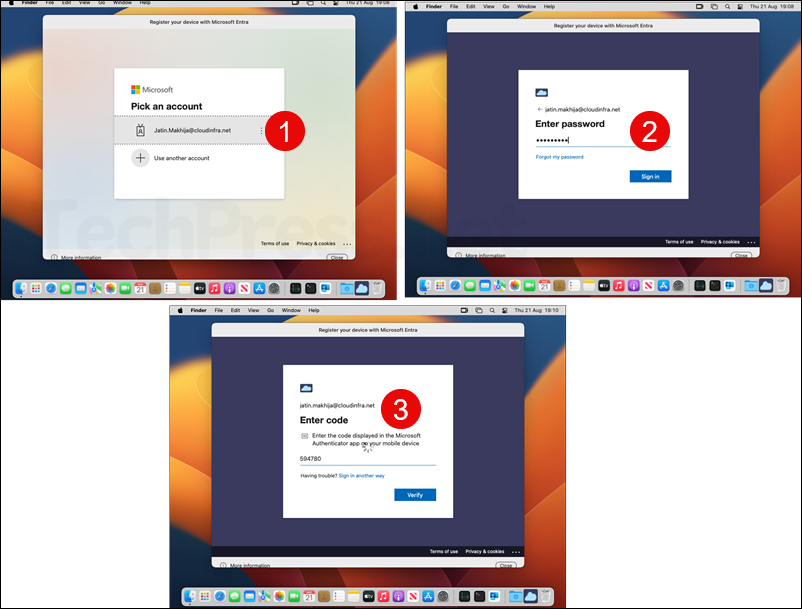
- Next screen will be to authentication with Entra ID, provide your Entra ID credentials and complete the MFA process.
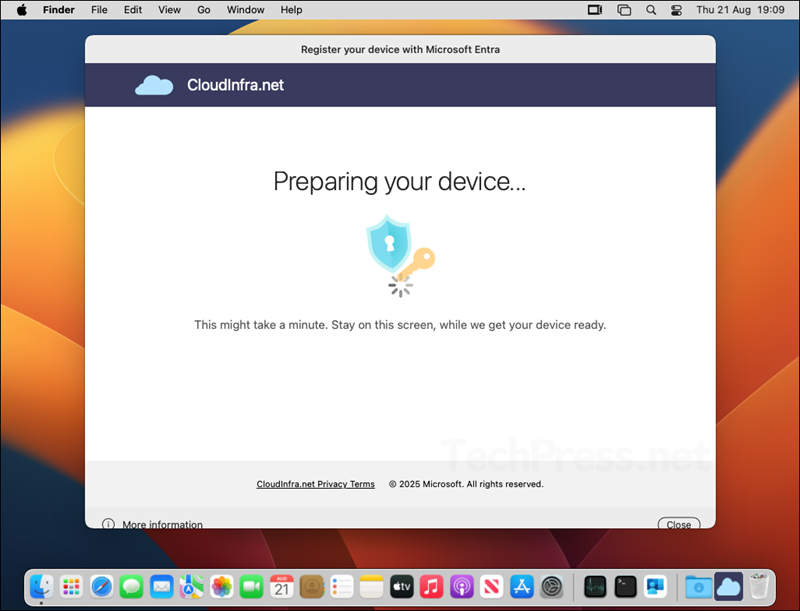
- The process will now start the registration process / Microsoft Entra Join process
- After that, you will get a pop-up to enable your Entra ID passkey. Click on Open System Settings.
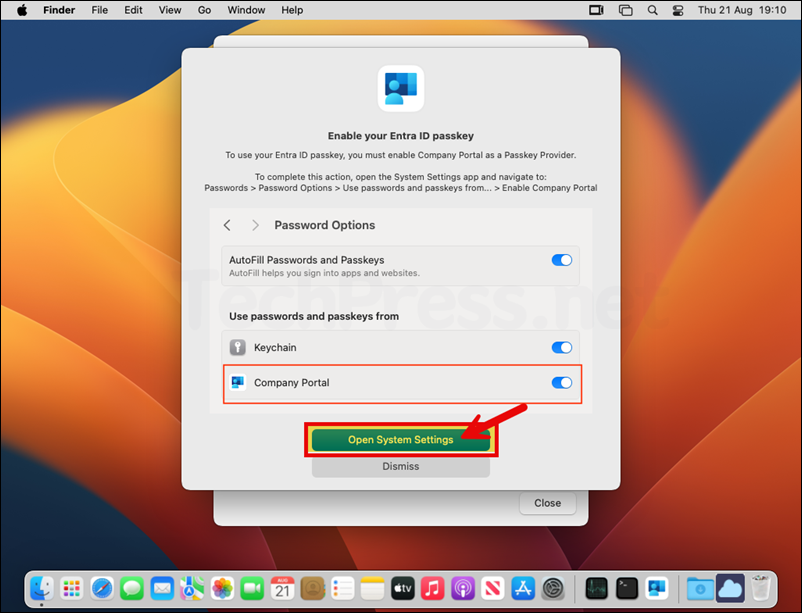
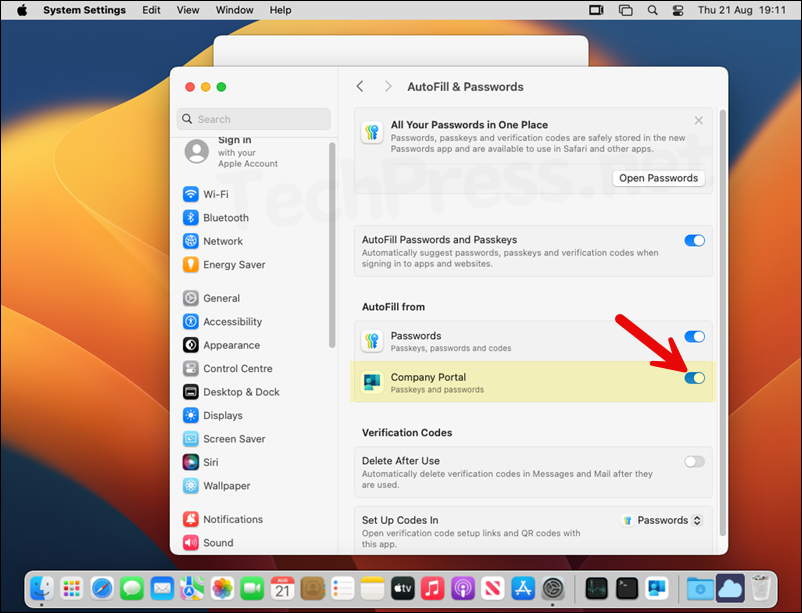
- It may take you directly to the AutoFill & Passwords screen. If not then from System settings > click AutoFill & Passwords and use the toggle switch to enable Company Portal.
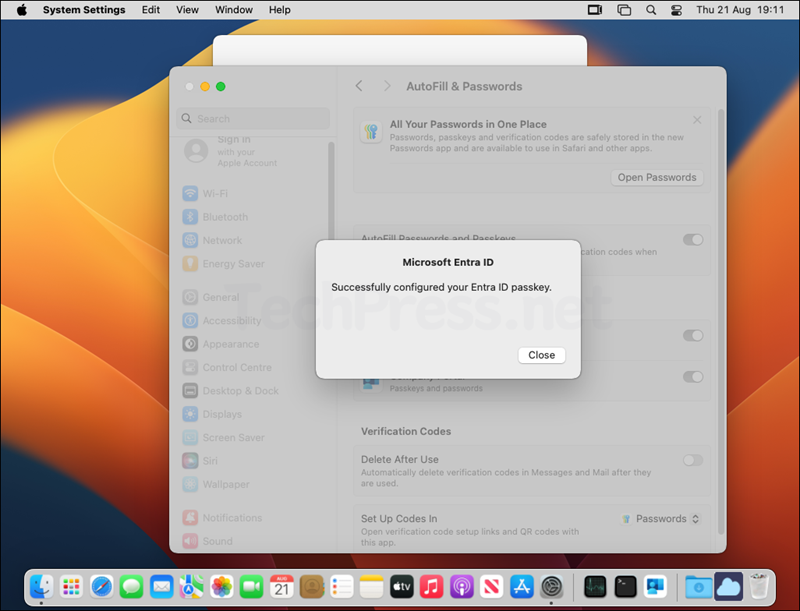
- You will get a message Successfully configured your Entra ID passkey. Click Close.
- Platform Single Sign-on Registration is complete. Click Close. In the next step, we will verify the configuration.

Confirm Platform SSO Settings on the Device
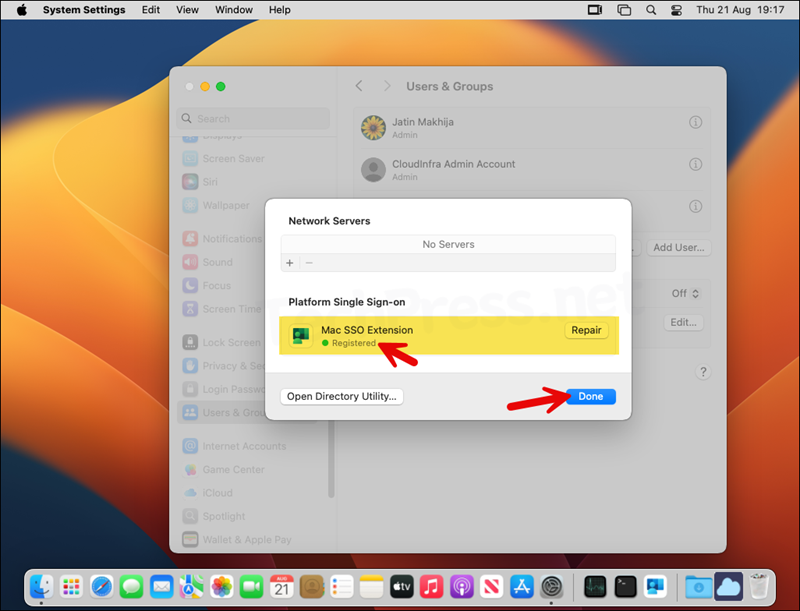
- Open System settings > Users & Groups. On the right-hand side, click on Edit next to Network account server.
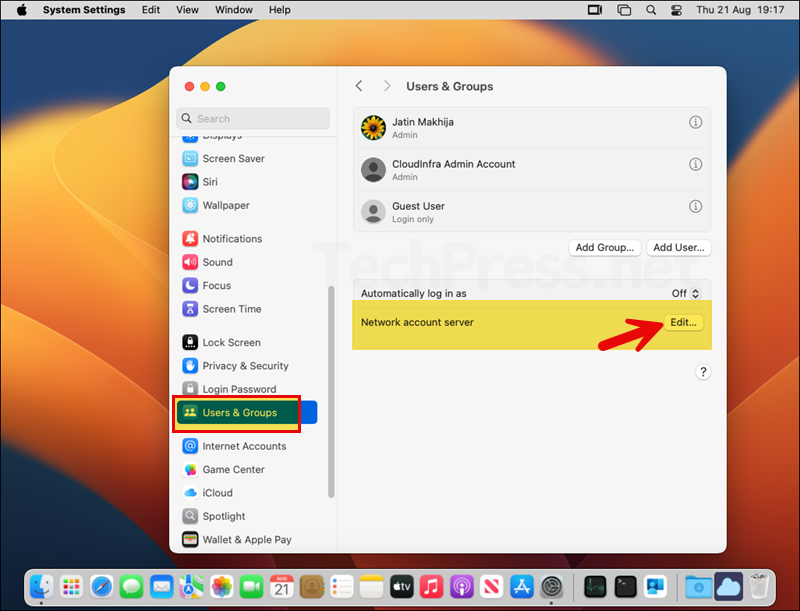
- Verify Mac SSO Extension status is showing as Registered. Click on Done.
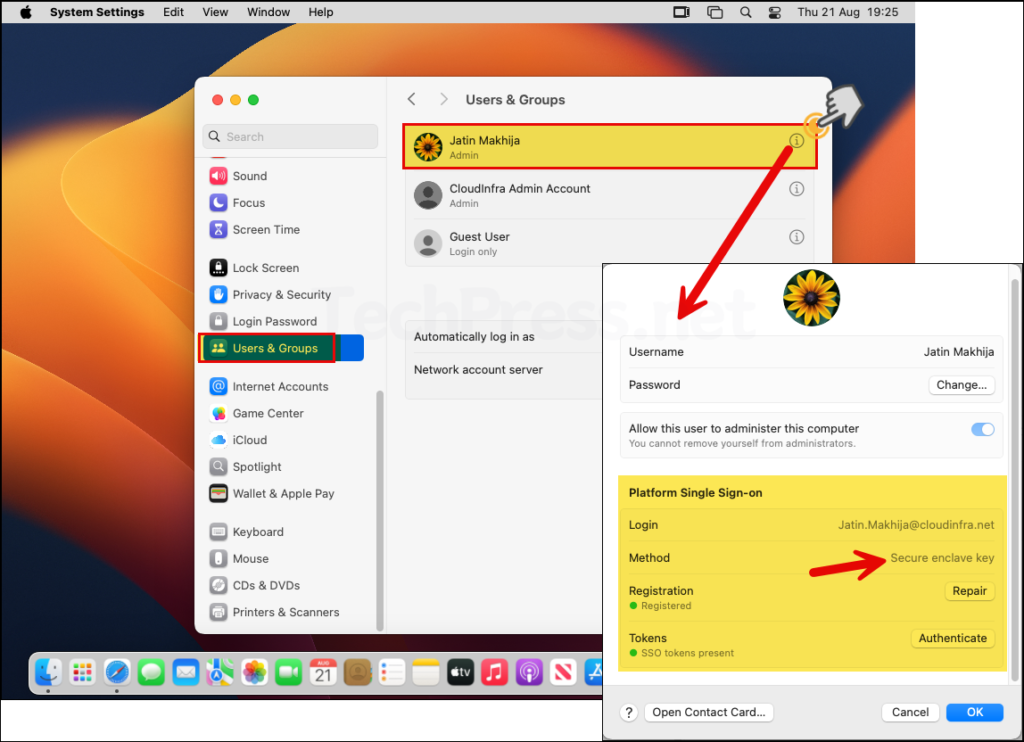
- Go to System settings > Users & Groups. Click on Information icon (i) next to the user account, it will show Platform Single Sign-on settings like Login, Authentication method, Registered state, Token information etc.
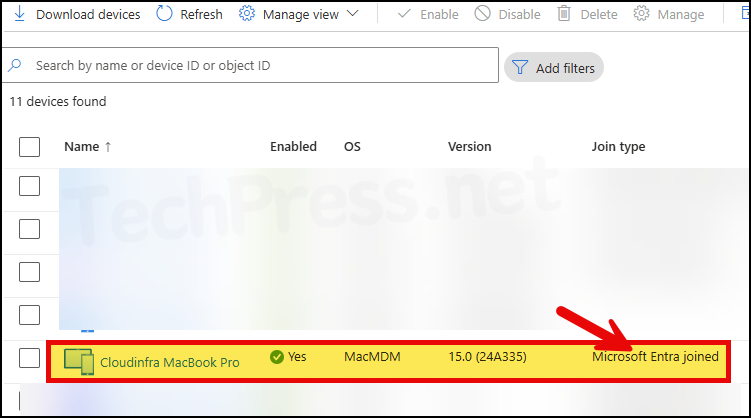
- Now, let’s check the status of our Entra registered device in Entra ID. The device status has been changed from Microsoft Entra registered to Microsoft Entra joined.
Thats it! Now Sign out or restart your Mac and after that use Touch ID or Entra ID credentials to Sign in.
Verify and Test Platform SSO on Mac: Checklist
- Open any of the browsers you use on your device like Google chrome, Edge or Safari and browse to https://portal.office.com or any other Microsoft 365 application. Confirm that the Single sign on is working. (It should not prompt you for credentials).
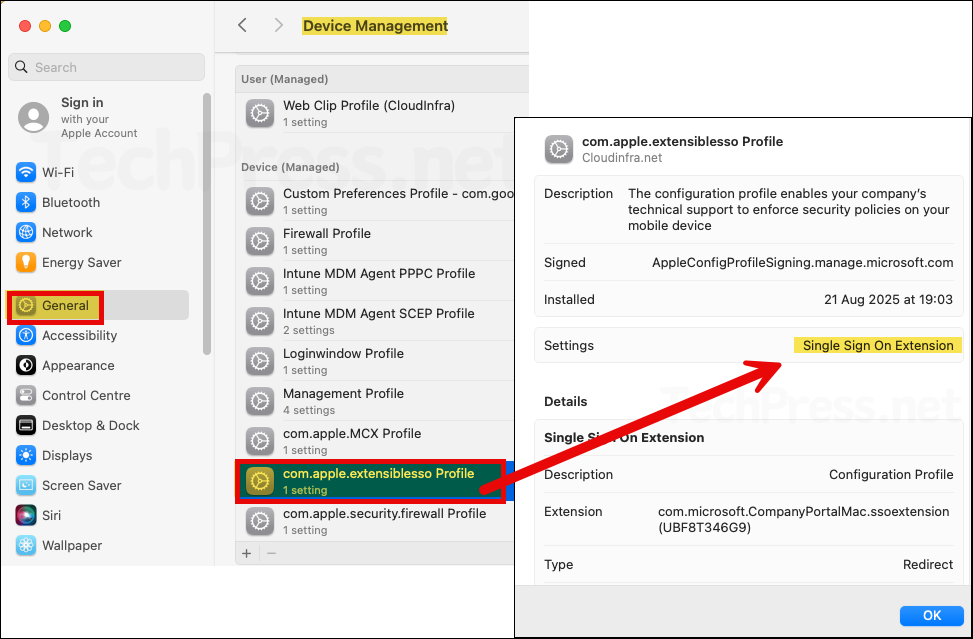
- Go to System Settings > General > Device Management. You will find com.apple.extensiblesso Platform SSO profile. Double-click on it and scroll down to view the deployed SSO configuration.
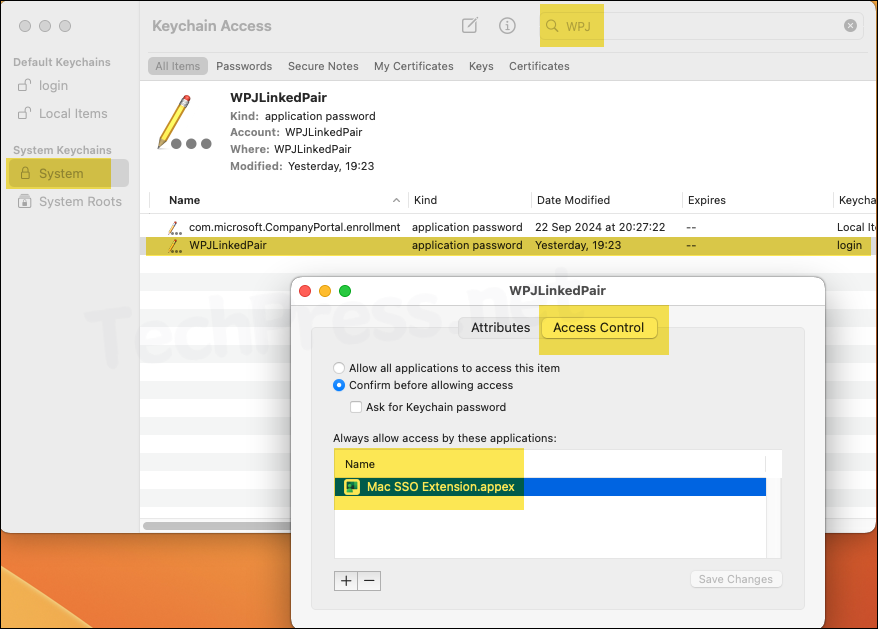
- Open Keychain Access > System keychain > search for the Workplace join (WPJ) certificate.
- Launch Outlook, Microsoft Teams or OneDrive on your device and it should also sign in without any authentication prompt.
- Confirm that the Touch ID is working. Touch ID unlocks sessions and you stay signed in across apps/browsers.
Troubleshooting
Refer to IntuneMDMDaemon*.log and IntuneMDMAgent*.log files, which could provide useful information for troubleshooting and finding out the root cause of the issue. For more information about how to locate these files on a macOS device, see my other blog post, How To Collect Intune Logs From macOS Device.
- If you run into issues, recheck the Platform SSO configuration policy in Intune and ensure all values are filled in correctly.
- If you don’t receive a registration prompt after deploying the Platform SSO policy, there may be multiple SSO extension payloads applied to the device. Only one Settings Catalog SSO extension profile can target a device. Remove any other SSO policies targeting the device and test again.
- Open the Platform SSO deployment on Intune admin center and check if there are any Errors or Conflicts. Check the error message which can help you in troubleshooting the issue.
Zero-Touch macOS onboarding: Hello, I am testing enrollment and onboarding of a corporate macOS with intune, the onboarding and enrollment process completes fine. Two things: 1. Why the local admin account password I am creating via LAPS, the password does not sync. When I log in, it prompts me to reset the password and create a new one. 2. In the deployment profile, if i configure it to create a local account, it will create a non-admin local account matching the username in Entra but it prompts to create a password, therefore the user will have two passwords, the local one and entra one. Thoughts? Thanks for your help.