In this blog post, I’ll walk you through configuring Google Chrome SSO with Entra ID using Intune. Single sign-on in Chrome browser is used to streamline authentication and enable seamless access to enterprise applications without repeated logins. Integrating Chrome with Entra ID enhances security, improves user experience, and ensures compliance across managed devices.
After you enable single sign-on (SSO) for Chrome on Windows devices, you no longer have to enter username and password when a website requires authentication with Entra ID. It will automatically sign you in, which will significantly improve user experience.
Starting with Google Chrome version 111, you can configure automatic user sign-in for accounts backed by a Microsoft cloud identity provider such as Entra ID. When you enable or allow automatic sign-in to Microsoft cloud identity providers, user’s logged on device credentials are automatically transmitted to the user’s cloud IDP (Identity provider) each time the user tries to authenticate with Entra ID.
Before you can enable this configuration in Chrome browser, you will need to download and import chrome ADMX templates in Intune and use the settings in the template to configure SSO. To configure Platform SSO on macOS, refer to this guide: Configure Platform SSO for macOS using Intune.
Firefox SSO with Entra ID using Intune.
Related Blog Post
Contents
Download and Import Chrome ADMX templates
To download and import Google Chrome ADMX templates, download Chrome Enterprise bundle, which contains the admx files we need to upload to Intune. Let’s go through the steps, I have also explained the whole process in my other blog post as well: Imported Administrative templates.
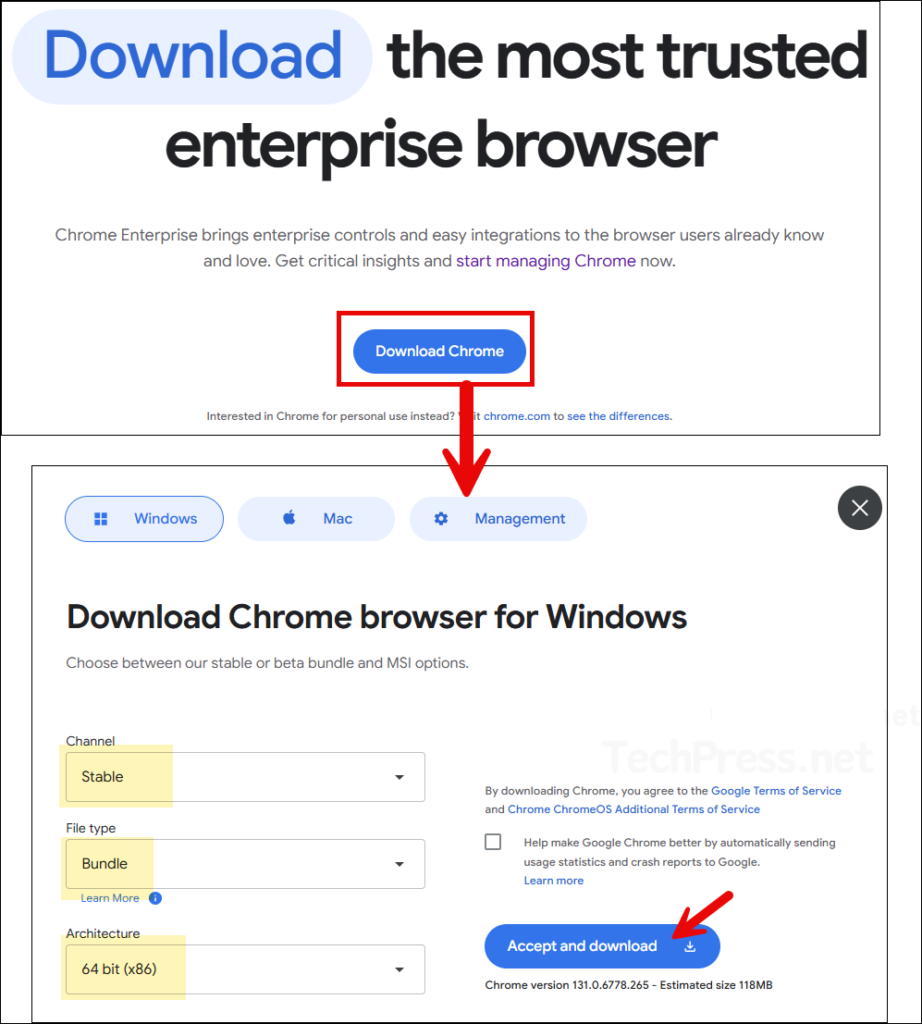
- Go to the URL: Chrome ADMX templates.
- Click on Download Chrome and then provide Channel, Filetype and Architecture information. Then click on Accept and download.
- Extract the zip file and go to the location \…\GoogleChromeEnterpriseBundle64\Configuration\admx where you will find chrome.admx, google.admx and GoogleUpdate.admx.
- Go to the location \…\GoogleChromeEnterpriseBundle64\Configuration\admx\en-US where you will find its corresponding language files chrome.adml, google.adml and GoogleUpdate.adml. You will require both .admx and .adml file to complete the template upload process.
- For windows.admx and windows.adml template files, you will need to download template files for Windows. I will use the template files for latest windows client OS which is Windows 11 24H2. Download it from link: Download Windows 11 24H2 ADMX. Install it and go to the location C:\Windows\PolicyDefinitions and C:\Windows\PolicyDefinitions\en-US where you will find windows.admx and windows.adml files.
- Upload all template files in Intune by going to Intune Admin Center > Devices > Configuration > Click on Import ADMX > Click on +Import.
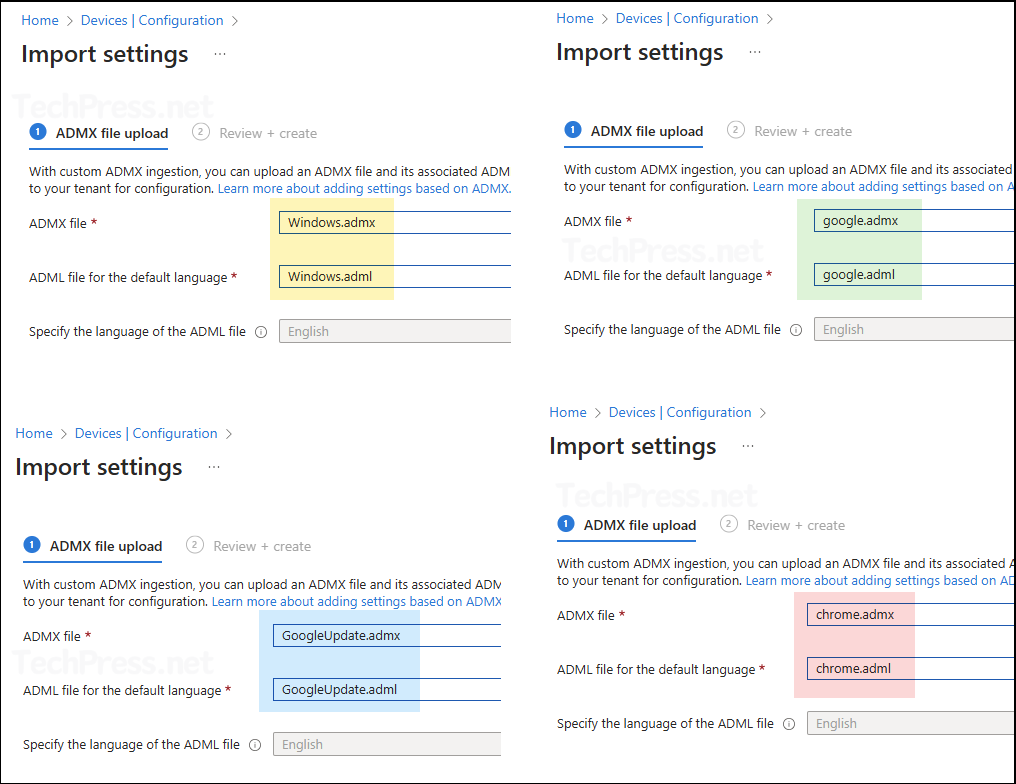
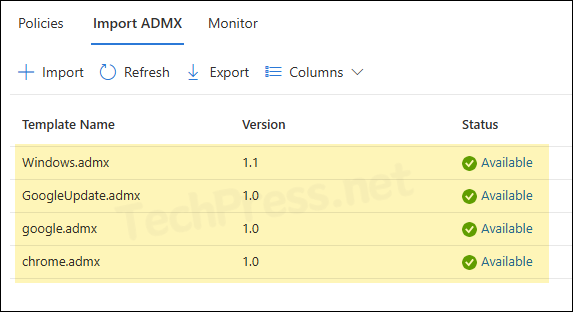
- Windows.admx, GoogleUpdate.admx, google.admx and chrome.admx files are now uploaded to Intune and their status is showing as Available.
Enable Chrome SSO with Entra ID Intune Policy
Once you have imported all the required .admx template files in Intune, you can create a device configuration policy as shown below:
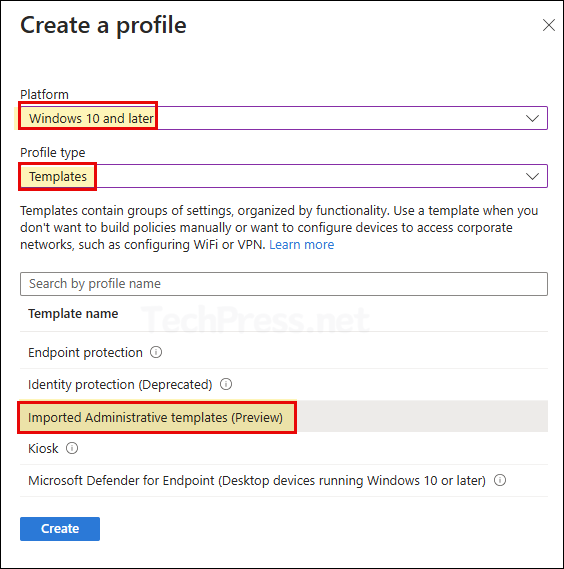
- Sign in to Intune admin center > Devices > Windows > Configuration > Create > New Policy.
- Platform: Windows 10 and later
- Profile type: Templates.
- Template Name: Imported Administrative templates
- Click Create.
- On the Basics tab, provide a Name and Description of the policy and click Next.
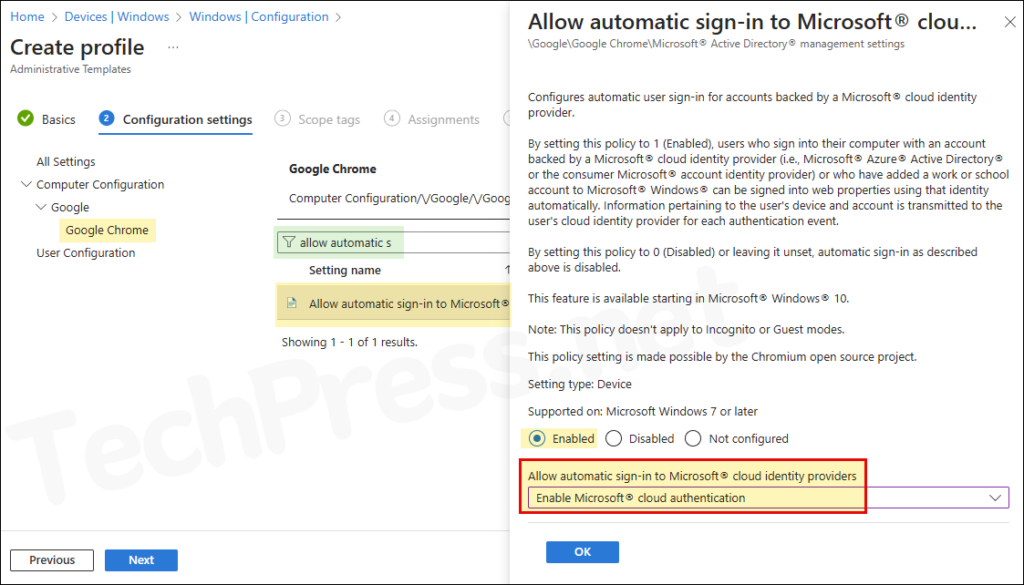
- On Configuration settings tab, navigate to Google\Google Chrome and search using keyword allow automatic sign-in. Enable Allow automatic sign-in to Microsoft® cloud identity providers policy and set it to Enable Microsoft cloud authentication.
Configures automatic user sign-in for accounts backed by a Microsoft® cloud identity provider. By setting this policy to 1 (Enabled), users who sign into their computer with an account backed by a Microsoft® cloud identity provider (i.e., Microsoft® Azure® Active Directory® or the consumer Microsoft® account identity provider) or who have added a work or school account to Microsoft® Windows® can be signed into web properties using that identity automatically.
Information pertaining to the user’s device and account is transmitted to the user’s cloud identity provider for each authentication event. By setting this policy to 0 (Disabled) or leaving it unset, automatic sign-in as described above is disabled.
This feature is available starting in Microsoft® Windows® 10. Note: This policy doesn’t apply to Incognito or Guest modes.
Official definition of the Policy setting Allow automatic sign-in to Microsoft® cloud identity providers
- Scope tags: Click Next
- Assignments: Assign this policy to an entra security group containing users or devices. It’s a best practice to test the policy on a few devices first. If it’s working fine, then extend it to other devices.
- Review + create: Review the policy settings and click on Create.
Monitoring Chrome SSO Intune Policy
- Sign in to the Intune admin center > Devices > Configuration.
- Select the Device Configuration profile you want to work with, and at the top of the page, you’ll see a quick view of the Success, Failure, Conflict, Not Applicable, and In Progress status.
- Click on View report to access more detailed information.
Sync Intune Policies
The device check-in process might not begin immediately. If you’re testing this policy on a test device, you can manually kickstart Intune sync from the device itself or remotely through the Intune admin center.
Alternatively, you can use PowerShell to force the Intune sync on Windows devices. Restarting the device is another way to trigger the Intune device check-in process.
End User Experience
After the deployment is successfully completed, launch a website in the Google Chrome browser that requires authentication with Entra ID. You will be automatically signed in without the need to enter a username and password. The credentials you used to sign in to the Windows device will be passed through for automatic sign-in to the web app, which requires Microsoft cloud authentication.
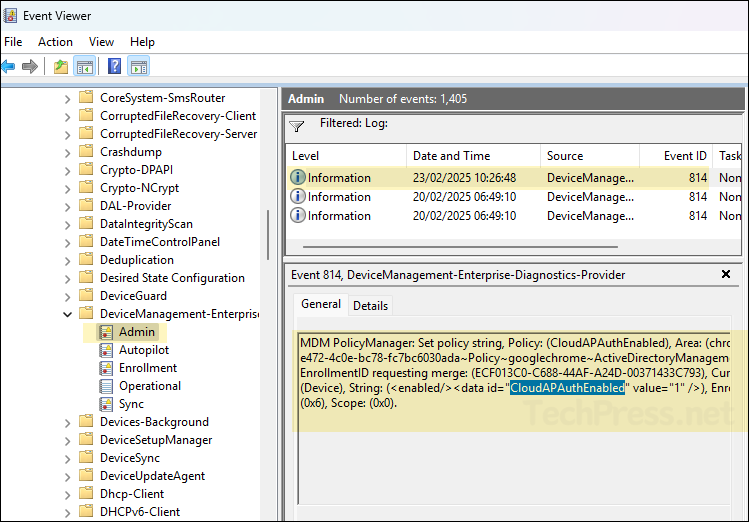
To find logs related to your SSO configuration deployment, open Event viewer> application and services logs> Microsoft > Windows > device management-enterprise-diagnostics-provider> Admin. Right-click on Admin folder > Filter Current log. Filter it using Event ID 814.
MDM PolicyManager: Set policy string, Policy: (CloudAPAuthEnabled), Area: (chrome0e05e6f3-e472-4c0e-bc78-fc7bc6030ada~Policy~googlechrome~ActiveDirectoryManagement), EnrollmentID requesting merge: (ECF013C0-C688-44AF-A24D-00371433C793), Current User: (Device), String: (), Enrollment Type: (0x6), Scope: (0x0).
CloudAPAuthEnabled