In this blog post, we will explore the configuration of B2B direct connect and examine the end-user experience within the Microsoft Teams application.
Shared channels in Microsoft Teams are specifically designed for collaboration with individuals both within and outside the organization. It allows you to invite people who are not part of the team. Access to the shared channel is limited to users with the roles of owners or members.
While guests (individuals with Entra ID guest accounts in your organization) cannot be added to a shared channel, you can invite external individuals to participate in a shared channel through Entra ID B2B direct connect.
This feature is currently exclusive to Microsoft Teams shared channels. Through B2B direct connect, users from both organizations can collaborate seamlessly using their home credentials within a shared channel in Teams, eliminating the need to be added as guests to each other’s organizations.
Table of Contents
How to Configure B2B Direct Connect
To invite users to shared channels from outside your organization, you’ll need to configure B2B direct connect in yours and also in your partner’s Azure organization. Entra B2B Direct Connect is a feature of External Identities that enables you to establish a mutual trust relationship with another Entra ID organization for seamless collaboration.
| About B2B direct Connect |
|---|
| B2B Direct Connect enables your users and groups to access apps and resources hosted by an external organization. To establish a connection, an administrator from the external organization must also enable B2B Direct Connect. When you enable outbound access to an external organization, limited data about your users is shared with the external organization, allowing them to perform actions such as searching for your users. Additional data about your users may be shared with an organization if they consent to that organization’s privacy policies. |
Please follow the steps below to configure B2B Direct Connect.
- Log in to the Entra Admin Center.
- Navigate to Identities > External Identities > Cross-tenant access settings.
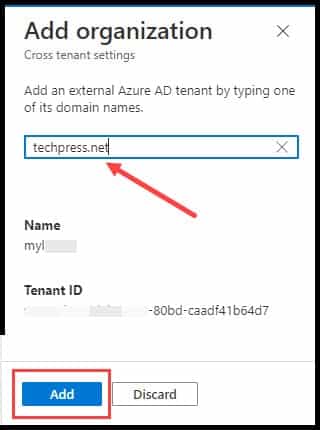
- Click on Organizational Settings, then click + Add Organization.
- Add domain name or Tenant ID of External organization.
- After adding the organization, proceed to configure both Inbound access settings and Outbound access settings.
- Inbound access settings determine whether users from external organizations can access resources in your organization. You can restrict access to your organization’s resources by specifying users, groups, or applications from the external organization that are allowed to access resources within your organization.
- For example, suppose there is a web app named FinanceApp created in your organization, myOrg. The Finance department of the Extorg organization desires access to this app. To facilitate this, you can create an Entra security group in Extorg for the Finance department. Add this group while configuring B2B Direct Connect Inbound settings in myOrg.
- Outbound access settings govern whether your users can access resources in an external organization. You can customize these settings for a specific user, or group, or allow access for the entire organization.
Configure B2B Inbound Access Settings
We will now explore how to configure B2B Direct Connect Inbound access settings. This configuration is required for both your Entra ID organization and the external Entra ID organization.
To configure inbound access settings, please follow the steps below:
- Log in to the Entra Admin Center.
- Navigate to Identities > External Identities > Cross-tenant access settings.
- Click on Organizational Settings.
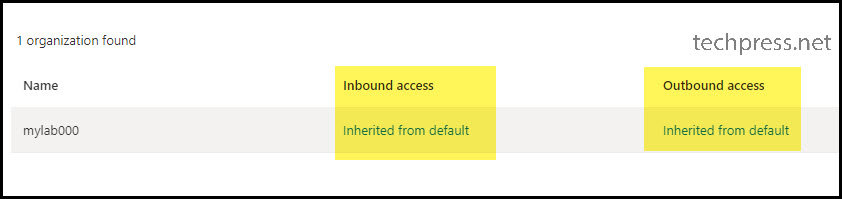
- The “Inbound access” column shows “Inherited from default,” indicating that this setting is currently being controlled by the default settings.
- Click on “Cross-tenant access settings” and then navigate to “Default settings” to review the default settings for B2B Direct Connect.
- To configure Inbound access settings, click on the “Inherited from default” link under the Inbound Access column.
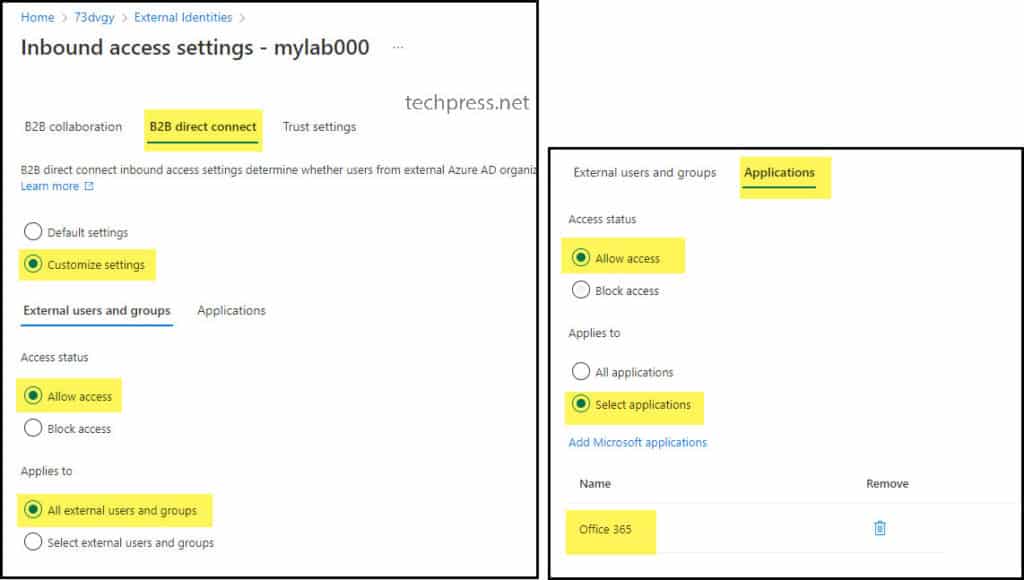
- Click on the “B2B Direct Connect” tab, and then choose “Customize settings“.
- In the “External users and groups” tab, select “Access status” as “Allow access” and choose “Applies to” as “All external users and groups”.
- In the “Applications” tab, set “Access status” to “Allow access” and choose “Applies to” as either “All Applications” or select specific applications, such as Office 365.
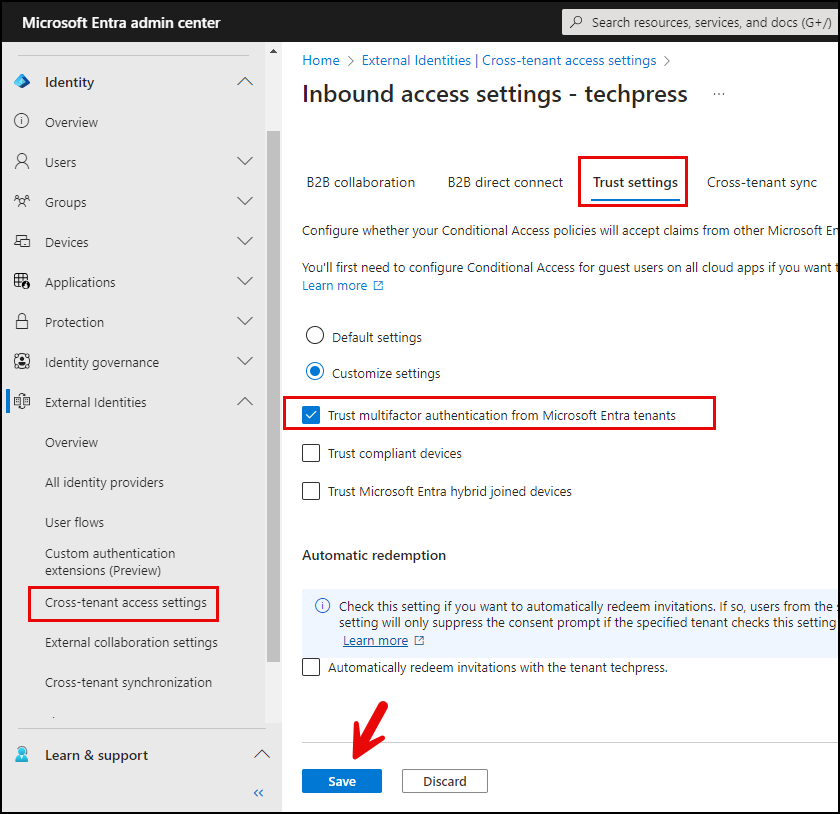
Configure Trust Settings
The next tab is for Trust Settings, where you can configure trust settings related to external Entra ID organizations. Select “Customize settings” and then choose the specified checkboxes.
- Trust multi-factor authentication from Microsoft Entra tenants – If you trust the Multi-Factor Authentication claim of external Entra ID organizations, you can select the checkbox “Trust multi-factor authentication from Entra ID tenants.” Enabling this option will reduce the MFA prompts, as users will only need to go through MFA once instead of twice.
- Trust compliant devices – If you trust the claim of compliant devices by external Entra ID organizations, you can check “Trust compliant devices“. If your conditional access policy applies to compliant devices, then this claim should satisfy the requirements for a compliant device, allowing access to the applications.
- Trust Microsoft Entra Hybrid Joined devices – If you trust hybrid Entra Joined devices from external Entra ID organizations, Enable this option.
Configure B2B Outbound Access Settings
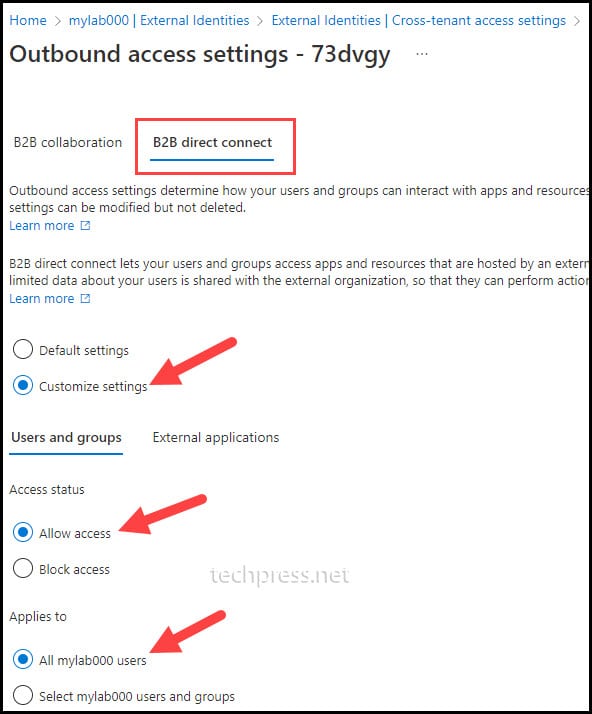
Outbound access settings control whether users in your organization can access resources outside the organization. You can also specify which users, groups, or apps are allowed to access external resources. Let’s explore how to configure B2B Outbound access settings.
To configure outbound access settings, please follow the steps below:
- Log in to the Entra Admin Center.
- Navigate to Identities > External Identities > Cross-tenant access settings.
- Click on Organizational Settings.
- The “Outbound access” column will display as “Inherited from default“, indicating that this setting is currently being controlled by the default settings.
- Click on “Cross-tenant access settings” and then navigate to “Default settings” to review the default settings for B2B Direct Connect.
- To configure Outbound access settings, click on the “Inherited from default” link under the outbound access column.
- Click on the “B2B Direct Connect” tab, and then choose “Customize settings“.
- In the “Users and groups” tab, select “Access status” as “Allow access” and set “Applies to” to “All <your org> users.” This configuration will permit all users of your organization to access resources in the configured external organization.
- In the “External Applications” tab, choose “Access status” as “Allow access” and set “Applies to” to “All Applications.” This setting will grant access to all applications in the configured external organization. Alternatively, you can select specific applications that your organization’s users are allowed to access.
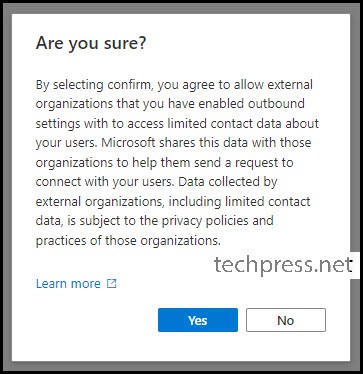
- When you attempt to save the Outbound access settings, a pop-up related to the privacy policy will appear. Review the message and click on “Yes” to proceed. You can also click on “Learn more” to obtain additional information about it.
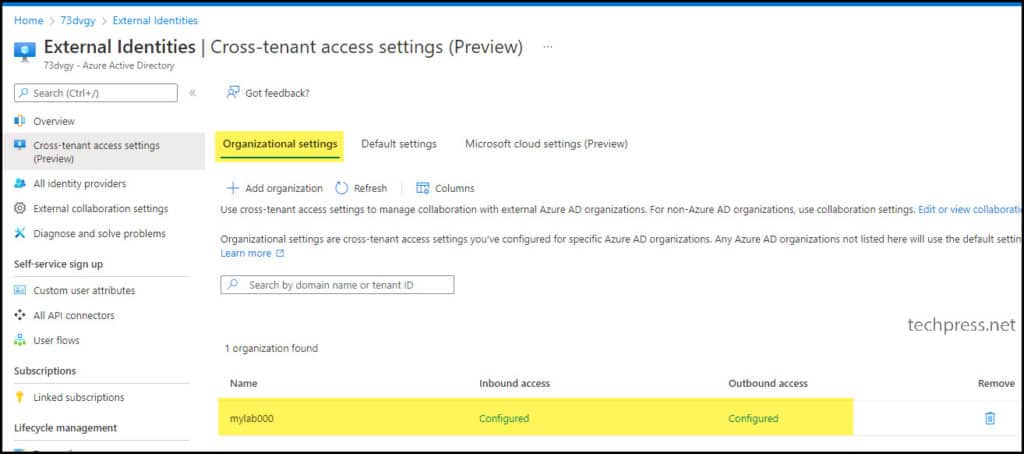
- Inbound and Outbound Access settings are now configured. You can modify these settings later if your organization’s requirements change.
- For example, if you want to stop Inbound access in the future, you can go back to Entra ID > Cross-tenant access settings > Organization Settings > Find the configured organization and reconfigure Inbound or Outbound access settings.
| The Entra ID admin of the external organization needs to add your Entra ID organization info on their side and configure Inbound and Outbound Access policies. Once this configuration is complete, you should be able to invite users from the external Entra ID organization. |
B2B Direct Connect and Microsoft Teams
As we are aware, the B2B Direct Connect feature currently exclusively functions with Microsoft Teams shared channels. Through B2B Direct Connect, users from both organizations can collaborate using their home credentials within a shared channel in Teams, eliminating the need to be added as guests to each other’s organizations.
In Microsoft Teams, shared channels can be created, and only team owners can do so. The team owner who creates the shared channel automatically becomes the channel owner.
1. Create a Teams Shared Channel
- Open Microsoft Teams.
- Locate the team in which you want to create a shared channel.
- Click on the three dots next to the team and select “Add Channel“.
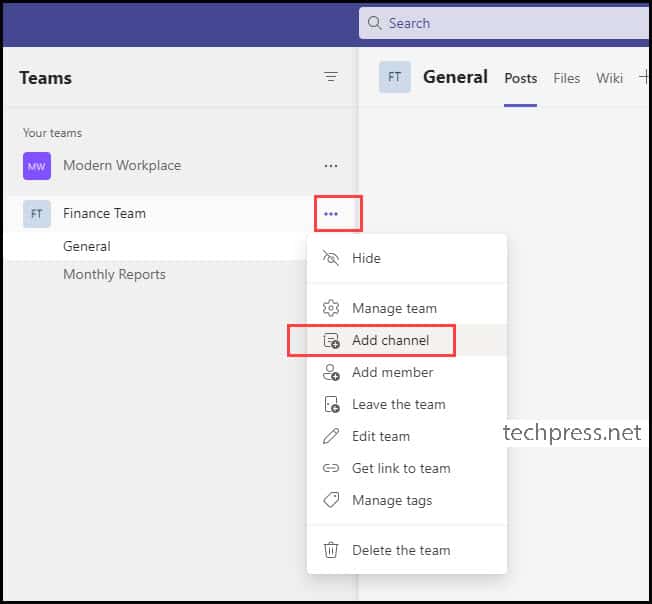
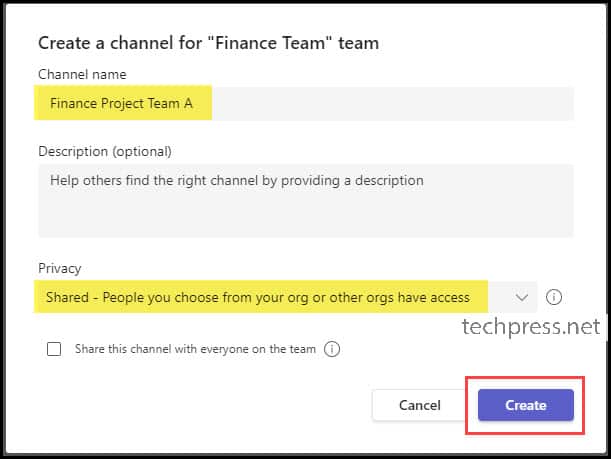
- Provide a name for the channel, for example, “Finance Project Team A”. In the privacy dropdown, select “Shared”. While there are Standard and Private channel options, for a Teams shared channel, choose “Shared” – where people you select from your organization or other organizations have access.
- Click on the “Create” button.
2. Add External Users to the Teams Shared Channel
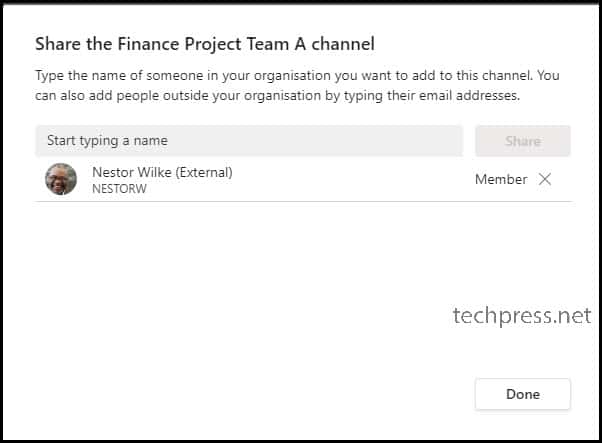
After clicking on the “Create” button while creating a Teams shared channel, you will be prompted to share the channel with other users. On this screen, you can search for and add users, whether internal or external.
Due to the B2B Direct Connect configuration, we can search for users in the external organization. As illustrated in the screenshot, a user, Nestor Wilke (External), is searchable from my organization. You can add this user to the shared channel.
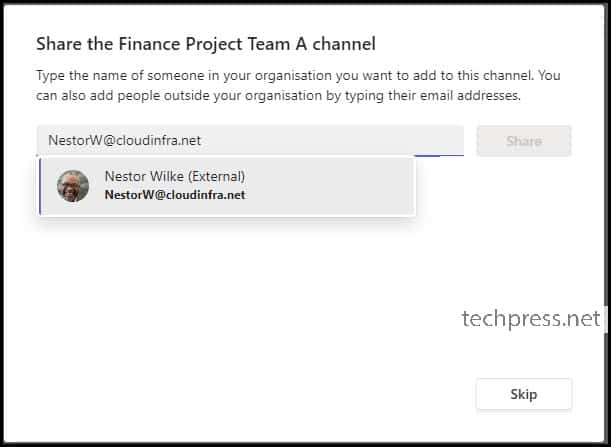
You will also notice that there is an “External” tag next to the name of the user to indicate that this user is from another Entra ID organization. Additionally, you can continue to add more users or teams to this shared channel even after its creation. Click on “Done” to complete the setup.
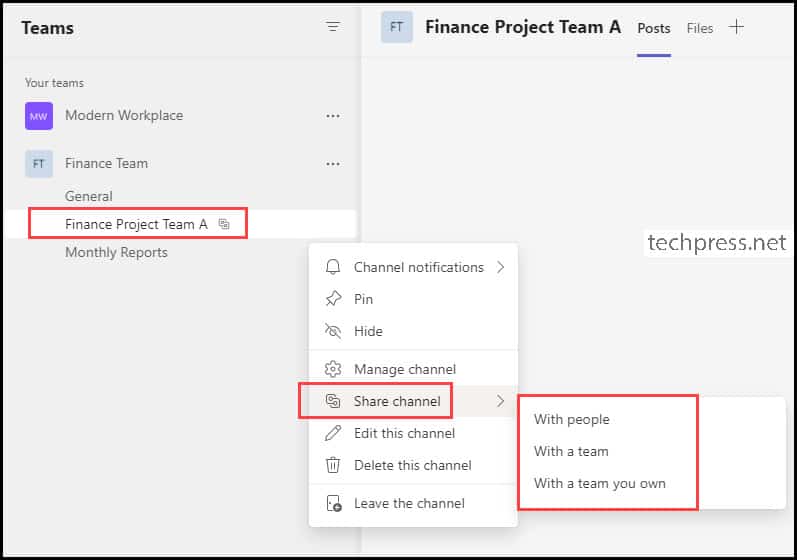
The Teams Shared Channel “Finance Project A” has been created. Observe the icon next to the channel to highlight that this is a shared channel. You can click on the three dots and then select “Share channel“. This action will provide you with different options for sharing the channel with a team or individual users.
Key Points about Shared Channels
- Inviting External Users: Shared channels enable the invitation of people from outside your organization through Entra B2B Direct Connect.
- Default Activation: Shared channels are enabled by default but can be disabled by editing Teams policies via the Microsoft Teams Admin Center.
- Limitation on Guest Accounts: Guest accounts cannot be added to shared channels.
- Conversion Limitation: Shared channels cannot be converted to standard channels.
Conclusion
Teams shared channels provide an excellent solution for collaborating with external organizations without adding external users as guests in your Entra organization. You can configure B2B direct connection before inviting users from an external organization.
When you invite an external user from a shared channel, it verifies the B2B direct connect settings before adding the user. For more information, you can explore and read about shared channels in the Microsoft Documentation.